Author: Stefan Hansen
Texmaker is an editor for the document markup language LaTeX. It lets you concentrate on the content of a document, while the underlying LaTeX engine takes care of the layout. Whether you are experienced with LaTeX or just starting out, Texmaker makes LaTeX easier to tame. It is GPL-licensed, cross-platform (running on Linux, Unix, Windows, and Mac OS X), and extremely stable.
It’s a common misconception that LaTeX is useful only for people who write documents with extensive mathematical formulas. It’s true that LaTeX stands out when it comes to making professional-looking mathematical formulas, but it’s far from the only thing LaTeX is good at. People in the academic world can also benefit from its citation and footnote facilities. Even for people writing non-scientific documents, Texmaker is a great tool. The fact that Texmaker helps you focus on the content without distracting you with typography, is something every writer will benefit from, especially when working with long, highly structured documents such as articles, reports, and books.
If you know LaTeX, you will be able to use Texmaker in a matter of minutes. The difficulty lies in learning LaTeX. People with no experience with LaTeX will probably have to spend a couple of days to get going with Texmaker. If you have experience with HTML, or any other markup language, you can do it in less.
You can install Texmaker from your distribution’s repositories, or download it from the developers’ site. Naturally you need to have LaTeX installed for Texmaker to work; the recommended package is Tex Live. Also, you need a document viewer to view the generated output files, and the Aspell spellchecker.
The first time you launch Texmaker you might have to tell Texmaker where your LaTeX compilers and viewers are located. On Linux they should be located in your bin directory; on Windows you often need to manually locate your PDF viewer within the Programs directory.
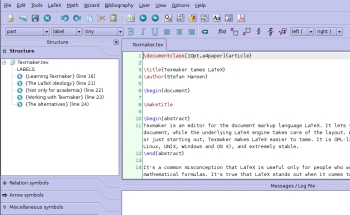
The Texmaker interface consists of an editor window, a structure tree to the left, and a message/log area below that displays information related to the compilation of your document, along with a menu and toolbars.
The structure tree gives an overview of the sections and subsections in your document. By clicking on a section in the tree, you can move the cursor to the corresponding position in the editor window. Every time you save your document, the structure tree is updated. Unfortunately, subsection branches collapse when you save your document, which means you have to open them manually again if you want to revisit a particular spot.
To start working on a new document, choose File -> New from the menu. You can then start typing away, or you can use Menu -> Quick Start to have Texmaker insert code for a letter, an article, a book, or whatever you like. It’s kind of like using a template in a word processor, except that you see the LaTeX markup instead of WYSIWYG.
With the markups you describe the structure of the document in terms of sections, paragraphs, lists, citations, and so on. You can insert automatically generated footnotes and citations or a table of contents with a single tag. When you compile your document, LaTeX formats your document according to the template you have chosen and the layout code you have written.
You can insert markup tags in different ways. You can type them, insert them from the menu or toolbar, or use a keyboard shortcut. You can configure keyboard shortcuts to suit your preferences. For some reason, the most often used tags are not assigned a shortcut by default, so this is one of the first things you should do after installing Texmaker. To do so, go to Options -> Configure Texmaker -> Editor menu. Tags are colored, so they are easy to distinguish from the text itself.
Before you can see how your document looks you need to save and compile it. Compiling a document gives you output in PDF, DVI, or PostScript format. When Texmaker is configured to Quick Build (Options -> Configure Texmaker -> Quick Build), this is a matter of two keystrokes, and you will see your document in a viewer for its format.
If there are errors in your code, Texmaker will tell you in the message/log window. If you click the Next LaTeX Error icon in the toolbar, your cursor will move to where the error is, and there will be an explanation in the message/log area. After correcting any errors you have, you can view your document.
New users will most likely compile and view their documents often — a habit that springs from the use of WYSIWYG word processors. Gradually, you will compile and view your documents less frequently, and you will become more productive.
If you need help you can access the LaTeX reference from the help menu. There is also a user manual, but it is somewhat limited.
The alternatives
Another editor/IDE for LaTeX is KDE’s Kile. Texmaker is a more simple application than Kile, which in many cases is an advantage. However, when it comes to opening and compiling large documents (100 pages or more), Kile is faster than Texmaker.
If you would like a semi-WYSIWYG interface, LyX might be what you are looking for. Texmaker is better for learning LaTeX, since LyX hides the LaTeX code, but for some people this is not important. LyX uses its own file format, whereas both Kile and Texmaker use pure LaTeX. Choosing between Texmaker and LyX is mostly a matter of temperament.
To jump from using a traditional word processor to using a LaTeX-editor like Texmaker is a bold and brave move, since it’s way different from what most people are used to. That said, there is a good reason why people who do jump, mostly stay onboard.
Category:
- Desktop Software


