Author: Ben Martin
While large cheap hard disks allow you to keep your audio collection in a lossless format such as FLAC on your home network, when you are on the move you probably want to squeeze the most out of every gigabyte by using a compressed format. This article takes a look at three tools aimed at making audio conversion for portable music players a painless task.
The KDE desktop offers audiokonverter, while GNOME provides audio-convert and audio-convert-mod. The latter two are separate projects despite their similar names. audiokonverter provides packages for Debian, Ubuntu, openSUSE, and generic RPM distributions on its home page, even though the distribution repositories for Gutsy, Fedora, and the openSUSE Build Service do not offer packages for audiokonverter. Packages for audio-convert are offered for Gutsy as nautilus-script-audio-convert. The Fedora repositories contain audio-convert-mod, but it is not packaged for other distributions. For this article I used the generic RPM for audiokonverter, installed audio-convert from source, and used audio-convert-mod from the Fedora repository.
As the article involves encoding to Ogg and MP3, I’ll put a brief word about encoding settings up front. When encoding audio into Ogg format you get a choice from 1 to 10 for a quality setting. The default is 3, which the Vorbis FAQ claims gives the equivalent decoded audio to an MP3 encoded at 128kbps. Personally, I would use Ogg at a quality setting above 3, perhaps a setting of 6, which the FAQ claims yields near CD quality, and I would encode MP3 at 192kbps if I were forced to use MP3 format. The quality setting is a trade-off; the audio output circuitry on a portable music player, coupled with the earphones used when on the go, will probably modify the audio more than the artifacts introduced by lossy encoding.
audiokonverter
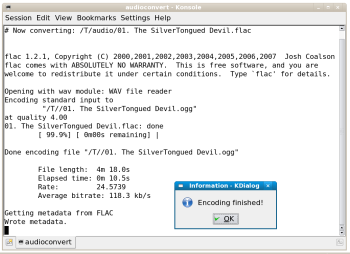
audiokonverter can convert audio files from Ogg, MP3, AAC, M4A, FLAC, WMA, RealAudio, Musepack, Wavpack, WAV, and movies into MP3, Ogg, FLAC, or M4A for iPods. When audiokonverter is converting audio files you see the progress in a terminal window, as shown in the screenshot.
Once you install audiokonverter using one of the packages on its homepage, when you right-click an audio file you will see a new “convert to” submenu in the context menu, from which you can choose which format you would like your files to be converted into. When you select your desired output compression from a submenu you will be asked where the converted audio files should be saved. For Ogg output you must also specify the quality level desired and whether the audio should be left in stereo. For MP3 output you are prompted for the output directory, VBR bitrate, and whether you would like stereo audio to be retained as stereo.
audiokonverter will ask these questions about destination directory, quality level, and stereo retention every time you convert one or more audio files. To get around this, you can edit the desktop metadata file, /usr/share/apps/konqueror/servicemenus/audioconvert.desktop, which contains the options that are used to execute audiokonverter from the context menu. If you want Ogg output type, adding -q 4 will make audiokonverter not ask for the output quality every time. Adding -dontask to any of the shortcuts in the desktop file will make audiokonverter not ask for the directory for output files and use the default quality or VBR level for the output file. Unfortunately, you cannot specify that audiokonverter should use the default output directory and also explicitly give a compression quality setting on the command line.
The below settings in audioconvert.desktop will cause audiokonverter not to ask about the encoding quality setting for Ogg encodes but use quality of 4 automatically.
[Desktop Action ogg]
Name=OGG
Icon=sound
Exec=konsole -e audioconvert -t o -q 4 %F
audio-convert
audio-convert is a bash script that calls Zenity to interact with the user through GTK dialogs. The script is a bit chatty by default, opening up many windows in succession to ask questions. Some of these windows either don’t have default options (like the audio format to encode into) or have defaults which are the opposite of what you probably want. You can address both of these issues fairly easily as shown below.
audio-convert comes with an audio-convert-install script to install itself in your home directory for use from Nautilus. The installation script assumes that you have installed the main bash script into /usr/bin/audio-convert. After installation, I had to restart Nautilus before it would offer the audio-convert script when I right-clicked on an audio file.
When you select an audio file and choose audio-convert, you’ll get a dialog telling you that you must select at least one file — even though you already have done. I looked over the Questions and Answers for Nautilus scripting and created a script to debug the problem. It turns out that the Nautilus version 2.20.0-6.fc8 I was using did not pass the selected file names to the script as command line parameters but only through environment variables. Using the information in the Questions and Answers, I created the script below, which I placed in an executable file in my ~/.gnome2/nautilus-scripts directory, and could then convert audio files from the Nautilus scripts menu as expected.
#!/bin/bash

quoted=$(echo -e "$NAUTILUS_SCRIPT_SELECTED_FILE_PATHS" | awk 'BEGIN {
FS = "n" } { printf ""%s" ", $1 }' | sed -e s#""##)

eval "~/audio-convert-0.3.1/audio-convert $quoted"
audio-convert offers Ogg, MP3, FLAC, and AAC output formats. If you choose Ogg output you will be offered the ability to preserve tags from the audio file and specify the output Ogg quality level. By default the output file is stored in the same directory as the input audio file. By default the preserve tags option is not selected, which seems undesirable, as you would likely want to preserve as much information about your files as possible, especially as the metadata is likely to be tiny relative to the compressed audio.
To change the default to preserve the artist, song title, and other embedded metadata, change the audio-convert script and replace FALSE with TRUE in the ask_to_pass_metatags function as shown below:
ask_to_pass_metatags ()
{
        #zenity --question --text="$ask_to_pass"
        #pass_metatags=$?
        questions=(TRUE "$ask_to_pass")
}
With the above change, the only thing you have to select every time you want to convert files is the format you want to use. To have audio-convert offer a default audio format for conversion, you have to edit a few lines of the audio-convert script as shown below. First, create a new checklistdepformat variable which has all options set to FALSE. On the next line, switch the Ogg option to TRUE, which means that it will be ticked in the dialog when it opens. Then use this new format data to create a two-column dialog with Zenity. The French comments are part of the original program and have been left in abridged form here to help you find the correct location in the program for the changes.
######## .... principale ########

checklistdepformat=$(echo $depformat| sed -r 's/(w+)/FALSE 1/g')
checklistdepformat=$(echo $checklistdepformat|sed 's/FALSE ogg/TRUE ogg/')

while [ ! "$formatout" ] # ....pas fait de choix
do

        # this is the new dialog
        formatout=`zenity --title "$title" --list --checklist --column y --column="Format" $checklistdepformat --text "$choix"`
        # comment out the old dailog
        ###formatout=`zenity --title "$title" --list --column="Format" $depformat --text "$choix"`

        ###### Choix -> Sortie boucle ######
        ...
audio-convert-mod
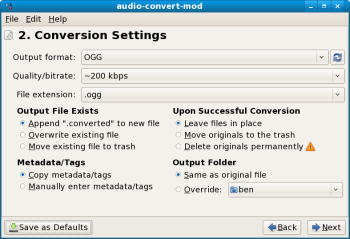
The audio-convert-mod tool presents a wizard that walks you through two phases before the actual conversion takes place. This avoids having multiple different windows appearing before a conversion. All the options relating to the conversion are presented on the second screen of the wizard, and you can save the settings of that screen as your default response. Overall, the audio-convert-mod script was the easiest of these three utilities to configure for slipstream conversion because you could set the default options, and because it comes with a tray icon to indicate when conversion is complete so you don’t get disturbed with a pop-up window at a random point in the future.
audio-convert-mod did not come with Nautilus script integration, so it doesn’t appear in the scripts submenu when you right-click on an audio file. You have to tell Nautilus to use audio-convert-mod the same way you set up any other filetype-application association. To convert an audio file, select it in Nautilus and choose “Open with Other Application…” Enter the path of the audio-convert-mod executable (/usr/bin/audio-convert-mod) in the “Use a custom command” portion of the dialog. The audio-convert-mod site mentions that you may need to log in again after installing audio-convert-mod for it to fully appear to the system. I tried logging in as a different user after installation and audio-convert-mod did not appear in my list of Other Applications. This is a minor problem, as once you have manually entered the path of audio-convert-mod in the Open with Other Application dialog, it will appear in the list of other applications in the future.
When audio-convert-mod starts up it shows you the files and directories that you have chosen to convert in a wizard-style window. Clicking Next takes you to the conversion settings screen, which lets you choose the output format (I had MP3, Ogg, AAC, AC3, WV, WAV, and FLAC available), the bitrate for conversion, where the new files will be stored, how to name the new files, and how to handle embedded metadata. An extremely handy option is the ability to save the current settings as the defaults, so when you run audio-convert-mod in the future you can just click Next at this screen without tinkering.
The next screen of the wizard actually performs the conversion and shows you the progress. A little tray icon will also blink when the conversion is complete, which means you can minimize the audio-convert-mod wizard but still be aware of when the conversion has completed. When the conversion is over, clicking Next allows you to start a new conversion or dismiss audio-convert-mod. I would have liked to see a Dismiss option where the Next button is grayed out in this final window. As it stands, you have to move the mouse from Next up to the Quit button to close audio-convert-mod.
I ran into one serious bug with audio-convert-mod. I elected to preserve my metadata in the output with audio-convert-mod. audio-convert-mod did not complain during conversion, but the output files did not preserve any of my embedded metadata when I created Ogg and MP3 files. I then tried the other option in the GUI of audio-convert-mod, “Manually enter metadata/tags.” With this option, the conversion once again was performed without any errors reported, but I also didn’t get a chance to enter metadata for the new file. I have lodged the metadata preservation bug in the project’s Bugzilla.
Wrap up
Both audiokonverter and audio-convert are very capable audio conversion tools and you can tailor both of them to allow fairly slipstream conversions. That said, I would choose audio-convert-mod for conversions. It offers a nice amount of settings for conversion and allows you to save all your settings as defaults for next time around. The one major blemish for audio-convert-mod was the lack of metadata preservation, which I imagine will not remain an outstanding bug for long.
One other thing to consider is that audio-convert will open two new dialogs for each audio file you convert. While it does close the previous dialog when it opens the next, this dialog chatter can be annoying if you wish to do something else while converting your audio files.
Category:
- Graphics & Multimedia


