
Author: Nathan Willis
HDR stands for high dynamic range, and in reference to this particular look it’s a misnomer — all Flickr photos are standard, low dynamic range JPEGs. Use of the term HDR in this context stems from the fact that the technique generally begins with multiple low dynamic range shots of the same scene taken at different exposures. The shots are stacked together to mimic the effect of an HDR original. The stack of images is then tone-mapped, pulling in shadow detail from the darkest exposure and highlight detail from the brightest. It’s that tone-mapping step that gives these images their distinctive appearance.
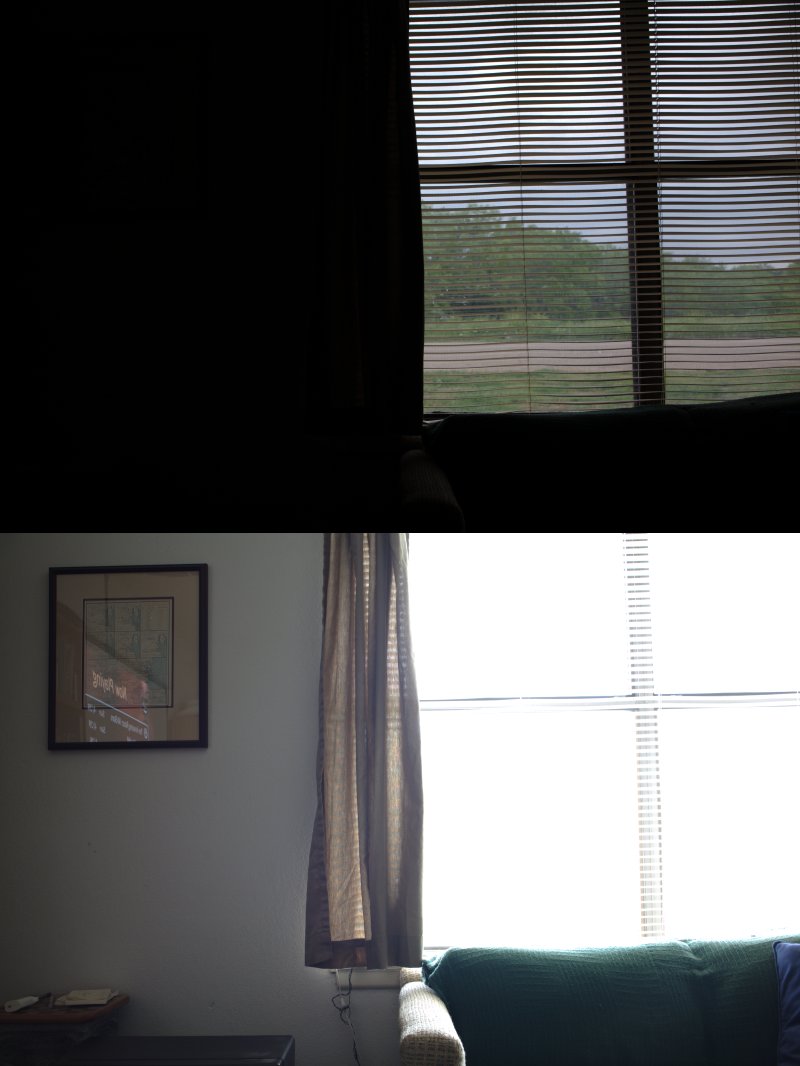
| Figure 1: the scene. Click to enlarge. |
When the original scene has too much dynamic range to be properly exposed, bracketing and tone-mapping is a straightforward way to save it. Take the window scene in figure 1, for example. It has a serious technical problem: the sunlight outside the window is so much brighter than the room light inside that no exposure will capture both correctly.
To overcome this hurdle, you take one shot exposed for the outside sunlight, and one shot exposed for the interior. You could open both as layers in an image editor like Krita or the GIMP and manually blend them, but Qtpfsgui will combine them into one automatically.
Fire it up
You can download Qtpfsgui from its project page as source code, or follow the links there to third-party binary packages for openSUSE, Fedora, and Ubuntu. The current version is 1.8.5, and requires Qt4, libtiff, libexiv, libjpeg, and libopenexr to function.
After launching Qtpfsgui, click on the New Hdr toolbar button to start a new project. In the first step, you select the images that you wish to combine. The program can load JPEG, TIFF, and RAW files. In step two, you can tweak the settings Qtpfsgui uses to merge the images; the dialog box encourages you to stick with the default configuration. Once it is done, step three loads the resulting combined image for you to preview.
| Figure 2: the GUI. Click to enlarge. |
In the preview window, you can adjust the gamma of the image, or zoom in and out to examine the details. The histogram above the preview shows you the range of brightness captured in the image. At this point, it is a good idea to save your work — the “Save Hdr as…” menu item will write the merged image to an OpenEXR-formatted file.
Tone-mapping the merged image is where the real action is. Clicking on “Tonemap the Hdr” opens a new window in which you can preview and tweak your choice of tone-mapping algorithms. Qtpfsgui 1.8.5 offers seven: Ashikhmin, Drago, Durand, Fattal, Pattanaik, Reinhard ’02, and Reinhard ’04. The names of these algorithms come from academic papers in which they were described. Qtpfsgui uses implementations from the pfstools command-line package; to learn more you can consult the pfstools page linking to each paper.
You can also read through the practical comparison on Qtpfsgui’s wiki, although the information there is inconsistent from algorithm to algorithm, and much of it is subjective. The only real way to determine which algorithm produces the best results is to try them all. Qtpfsgui lets you generate previews for as many tests as you care to look at, at a number of sizes. On a slower system, it is a good idea to run a few samples at thumbnail size before you try to export any full-resolution output. You can save your output in JPEG, PNG, PBM, or BMP format.
Figure 3 features several tone-mapped samples using different algorithms (all at their default settings). As you can see, they vary considerably in effect and how natural they appear. Even on some of the most natural-looking, though, you can find odd-looking artifacts such as the halo effect around the curtains, and the black highlights on the arm and back of the sofa.
| Figure 3: the output. Click to enlarge. |
It is also worth noting that because of the strong, sunlit backlight, neither exposure captured any detail in the window frame. The tone-mapping operations decided to make it white, which it isn’t. Certain picture elements — strong direct backlight, translucent materials, and thin objects like blinds or branches — are always going to prove problematic.
Go nuts
I chose a plain example to illustrate tone-mapping’s original purpose: to fix otherwise impossible-to-expose scenes. The fancy and surreal tone-mapped stuff that you see on Flickr is often the result of pushing the process way past correction. If that is what you want to do, Qtpfsgui is the easiest way to go on a Linux system.
With seven algorithms to choose from, fine-grained control over each algorithm’s parameters, and rapid-fire generation of thumbnails, there is almost no look you can’t achieve. The documentation recommends the Fattal algorithm for producing the most outlandish effects — those that reduce the overall image contrast the most, making the sky and the foreground alike almost flat.
You can even use Qtpfsgui to produce unnatural tone-mapped images from a single frame, although you are better off starting with multiple, bracketed exposures. That is because underexposed shadow areas have a lot of sensor “noise” that is not noticeable when black, but sticks out as ugly, multi-color grain when brightened and saturated.
But if you like experimenting with the weird look, try it even on normal, single-exposure shots. With modern digital camera sensors, it really does take a large difference between highlights and shadow areas to produce a scene that can’t be captured with detail in camera RAW format.
Qtpfsgui is not an editor
Qtpfsgui does not provide any mechanism to align the images that it merges; any misalignment will result in ghostly artifacts likely to be exaggerated by tone-mapping. Since Qtpfsgui does not provide any image editing tools, it is best to shoot all input frames on a tripod, and to minimize camera shake with the longer exposures. That way you can import RAW originals directly.
Alternatively, you could edit your RAW originals in a 16-bit-per-channel editor like Krita or CinePaint and save the result to an HDR format. You need to make sure you save the EXIF tags with the image, though. When Qtpfsgui merges input frames, it sorts the images based on the exposure data embedded in each file’s EXIF tags. If it cannot find the exposure data, Qtpfsgui will prompt you to enter it manually for each frame — a hassle it is best to avoid.
Considering how useful and interesting the task that Qtpfsgui performs is, it is almost a shame that it is a standalone tool and not integrated into other photo apps. Integrating it into a workflow now means either processing and correcting the RAW files in a separate app first, then exporting them to TIFF for Qtpfsgui, or tone-mapping the RAW files in Qtpfsgui first, and touching up the output in another app second. Here’s hoping we see Qtpfsgui’s functionality make it to plugins for Krita, the GIMP, your favorite editor, and some RAW converters.
But what a minor nit-pick that really is. Qtpfsgui enables Linux users to do some fancy stuff — both useful stuff like automating the correction of hard-to-fix images and wild and crazy stuff like generating those bizarre, artsy images that are such a craze on Flickr.


