
Author: Dmitri Popov
The following description guides you through the process of transcoding a DVD film into a single MPEG-1, which offers several advantages:
- You can play MPEG files on an older machine without a DVD drive.
- Instead of using original DVDs, you can burn a low-resolution backup copy on a CD.
- When you’re on the move, you can copy the films you want onto your laptop instead of lugging DVDs. This will not only make your luggage lighter, but also improve the laptop’s battery life (the hard disk consumes much less power than the DVD drive).
- If you have a server in your household, you can move your films to it and stream them using VLC around the house (more about that later).
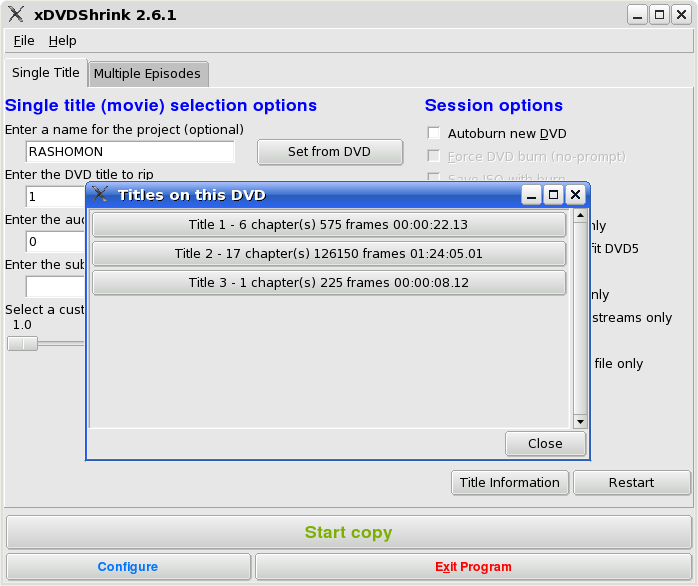
To transcode a DVD, insert it into the DVD drive and launch VLC. Choose File -> Open disk and select the DVD option in the Disk type section. Next, you have to select the DVD title and the desired subtitle language. Most DVDs contain multiple titles, and it’s not always obvious which one contains the film. The same is true for subtitles — there is no way of telling what channel number corresponds to which language. You have two options here: you can either try different combinations and preview the result in VLC, or you can ‘cheat’ the system by using a tool like DVDShrink on Linux or DVDx on Windows. The latter option is more straightforward and less time-consuming. If you are using Linux, use the DVDShrink script to quickly learn the right title and subtitle channel. Launch DVDShrink and press the “Set from DVD” button next to the “Enter the DVD title to rip” field. This opens the “Titles on this DVD” windows, which contain the list of the available titles. Note the title with the longest playtime (in the figure, it’s Title 2). Repeat this for the subtitles channel.
| You can use DVDShrink to quickly locate the film title and the subtitles channel — Click to enlarge |
With this information in hand, return to VLC and enter the proper values in the appropriate fields.
The next step is to configure the streaming options. Tick the “Stream output” check box and press the Settings button. If you want to see the film during transcoding, tick the “Play locally” check box. Tick the File check box, and specify the file and its path in the Filename field using the Browse button. You need to enter the file name and its extension manually; for example, Rashomon.mpeg. Set Encapsulation Method to MPEG 1, then tick the “Video codec” check box and select mp1v. This enables the Bitrate list, and the default bitrate there is 1024Kbps, which offers a good balance between file size and video quality. For example, using this bitrate, VLC converts Akira Kurosawa’s 1 hour and 24 minutes black and white film Rashomon into a 700MB MPEG file, which fits nicely onto a standard CD-ROM. Reducing the bitrate results in a smaller file with lower video quality. Next, tick the “Audio codec” check box and select mp3 from the list. As with the video codec, you can also select different audio bitrates. The default is 192Kbps, but you can set it to 128Kbps without any noticeable loss in quality. To add subtitles, tick the “Subtitles overlay” check box.
Press OK twice to close the windows, and VLC starts transcoding. If you ticked the “Play locally” check box, you can also see the film while waiting for the transcoding to finish.
Tip: VLC is also available as a portable application for Windows. Copy your transcoded films and Portable VLC onto a mobile hard disk and you can watch your favourite films on any computer that’s running Windows.
| VLC’s Web interface allows you to control the player via the browser– Click to enlarge |
VLC also allows you to stream the transcoded films on the local network, so you can move the transcoded films onto the server and watch them on any computer in the house. Choose File -> Open File, press the Browse button to select the file you want to stream, then press Open. Tick the “Stream output” check box and press the Settings button. Tick the UDP check box and type in the IP address of the computer you want to stream the film to. Leave the Port field at the default value 1234. Press OK twice, and VLC starts to play the film.
If you want to be able to control VLC via the browser, enable its Web interface by choosing Settings -> Add Interface -> Web Interface. To view the film on the target machine, launch VLC, choose File -> Open Network Stream, make sure the UDP option is selected, and press OK. To control VLC remotely, point your browser to http://vlcserver:8080 and use VLC’s Web interface to manage the player.
Dmitri Popov is a freelance writer whose articles have appeared in Russian, British, and Danish computer magazines.


