
Author: Manolis Tzanidakis
Noteworthy features of DD-WRT are powerful quality of service control, which allows bandwidth optimization for specific programs or hosts; Wireless Distribution System (WDS) with support for WPA encryption; and RADIUS authentication for more secure wireless connections. Check the project’s wiki for a complete features list.
To make the best use of the limited storage space on most routers, DD-WRT is available in four different versions — Micro, Mini, Standard, VoIP, and VPN. I installed the latest version (23SP2) of the VPN flavor — which includes OpenVPN — on my router, an ASUS WL-500G deluxe.
| Figure 1 – click to enlarge |
Installation can be done using either the router’s default Web interface or with TFTP. I was able to install the firmware successfully with both methods, but the developers suggest sticking with the Web GUI method if it works. Either way, you should avoid installing the firmware over a wireless connection, because a wireless network tends to be unstable and you might destroy your router.
If you previously installed another third-party firmware, such as OpenWrt, on your router, you should re-flash it with the manufacturer’s default firmware, restore the default settings, and then install DD-WRT with the stock Web GUI upgrade method in order to avoid any setup conflicts between the two firmwares.
You configure DD-WRT using an attractive, multi-language Web-based GUI, which can be optionally accessed over HTTPS for more security. The default username is root and the password is admin, but you can (and should) change both of these options in the Administration area. DD-WRT starts a Telnet daemon by default, which listens for connections from the local network, but since Telnet is unencrypted and thus insecure, you should disable it and enable the SSH daemon (dropbear) instead for shell access to your router. Both these options can be set in the Administration area.
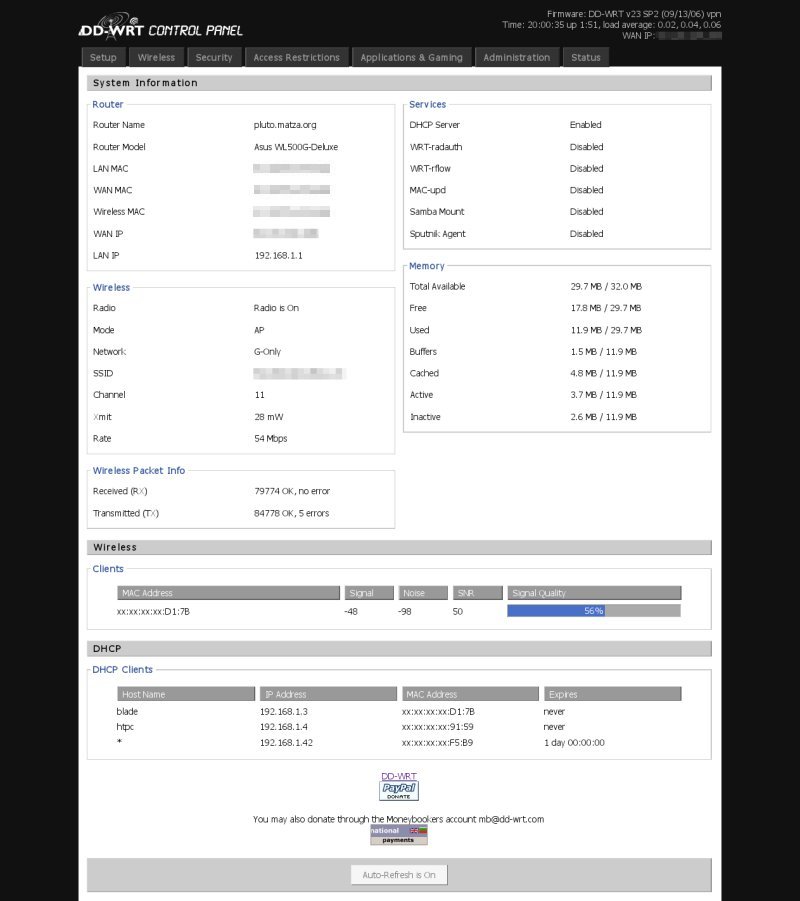
The Web interface offers nearly limitless configuration options — you can even overclock your router from it — and it would take a dozen articles to discuss each one of them in detail. All configuration screens include help sections with comprehensible explanations for each option. Figure 1 shows a screenshot of the initial screen with the device status, and on this page you can see a simulation of DD-WRT’s interface.
| Figure 2 – click to enlarge |
| Financial support |
|---|
| The DD-WRT project accepts donations and also operates a small shop that you can visit to support it. |
DD-WRT’s root file system is the compressed Squashfs, mounted read-only, which means that you cannot add or change any files on it; all configuration options are stored in non-volatile RAM (NVRAM). Nevertheless, you can customize your setup beyond the available options on the Web GUI, for example to add custom firewall rules or run commands on startup. Just add the commands you want the router to run on boot to the Administration -> Commands screen and select either Save Startup or Save Firewall; see figure 2 for an example. If you want to install additional packages you can either use a Samba share on a remote host or enable JFFS2. You can find detailed instructions on how to do that, along with a complete list of documentation, on the HOWTOs section of the project’s wiki.
Overall I had a nice experience with DD-WRT. Configuration is a joy, and in a short time you can create advanced setups without any prior Linux or network administration knowledge.


