
Author: Joe Barr
Please note that this is not a review of GnuCash 2.0, nor a discussion of what’s changed in this release, but simply an introduction and explanation of GnuCash based on the 2.0 release, for those who don’t already grok dual-entry accounting, to encourage them to try it for themselves.
Getting over the barrier
Start by reading the section called “The Basics” in the GnuCash Tutorial and Concepts Guide that you can find under Help. You really need to understand what double-entry accounting is all about before you can ever be comfortable using GnuCash, even to balance your checkbook.
|
GnuCash splash screen – click to view |
In The Basics, the Guide explains not only the five basic types of accounts, but why it takes a minimum of two entries — thus the name “double-entry” — to keep the accounts in balance. It takes you just far enough past the fundamental “Assets – Liabilities = Equity” equation to show how Income and Expenses, the last two of the five account types, fit into the equation. It’s easy, really.
Assets include things like the money in your checking account. Liabilities are the things that you owe, like rent or car payments. Equity is nothing more than the difference between the two. Told you it wasn’t hard. Now, speaking of checking accounts, let’s set up GnuCash to track one.
A simple checkbook
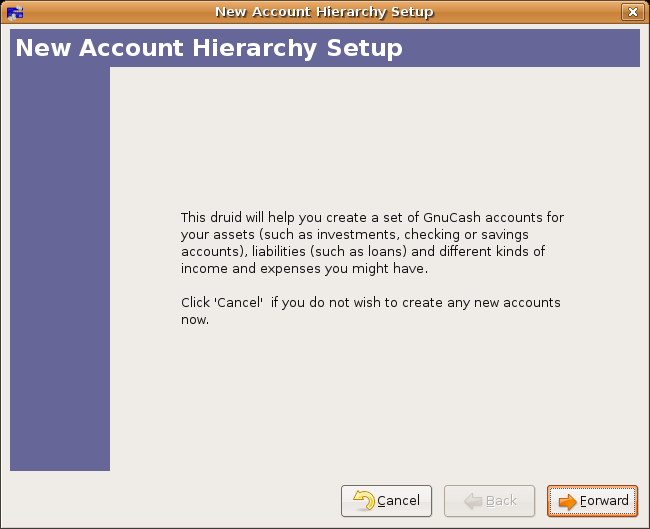
Now that you understand the basics of double-entry accounting, you’re ready to use GnuCash. To keep the process as simple as possible, we’ll use GnuCash’s New Accounts druid to handle the process of account creation. Click on File -> New, then select New File. Read the information in the first window, then click Forward and choose your currency from the list provided. Odds are that you’ll find yours listed, no matter where you live. After selecting the currency, click Forward again.
Now we’re ready to create accounts. As you can see in the druid, the default account selection is something called Common Accounts. We don’t want that right now, so uncheck it. Use the slider to find A Simple Checkbook and check it instead.
The next screen gives you an opportunity to enter a starting balance for the checking account. Click once on Checking account to highlight that account, then click again in the Opening Balance column. Enter $1,500 — 1500 actually, since the dollar sign and comma are not required — in the entry box that appears.
Click Apply in the next window. At this point, GnuCash has created a file which will contain the chart of accounts and the opening balance of $1,500 in the checking account you just created in the wizard. This is a good time to save what you’ve done so far. Click Save and enter sample-checkbook as the file name. As you can see, the GnuCash UI now shows “sample-checkbook – Accounts” as the title, and lists Assets, Equity, Expenses, and Income for accounts.
| Simplifying imports |
|---|
|
I took advantage of GnuCash’s 2.0 ability to import QIF files — OFX and HBCI formats can also be imported — and downloaded my year-to-date transaction data from my bank’s online site. The next step took a little effort. Each transaction in the QIF download has to be assigned to an account. You can create as many accounts as you like to categorize your transactions. Regardless of how many or how few accounts you choose to use, each transaction has to be assigned to an account or left as “Unspecified.” This can be a little frustrating when you have 50 or 100 identical transactions. Here’s a tip on how to cut down on the amount of elbow-grease needed to accomplish this. My QIF download contained all the transactions for the year. I split it up into two files, one for the first month of the year and the second for all the rest, then imported the first month and assigned accounts as needed. When I imported the rest of the year, all those transactions identical to the ones in the first month were automatically assigned accounts, saving me considerable time and effort. |
Adding accounts
Before you start writing checks, add a few additional expense accounts instead of tracking all of them in one big Expense account. Click Expenses, then right-click it, select New Account, and a New Account – Expenses window opens. Enter “Housing” as the account name. Note that the currency selection defaults to the currency you originally set in the wizard. Also note the Account Type is preset to Expense and the Account Parent is Expenses. For our purposes, you can leave the other options, and the Opening Balance for the account, blank — just click OK.
Use the Housing expense account to track all housing-related expenses: rent, utilities, phone, cable, and so forth. Of course, you could keep everything in Expenses, or you could add individual expense accounts for every type of housing-related expense. For the purposes of our exercise here, we want to keep it simple.
Now you’re back at Accounts, where you can add expense accounts for Auto, Entertainment, Groceries, and Miscellaneous. Once those have been added, add an Income account for Salary. Then click Save. Now that the chart of accounts is ready, you’re ready to enter a few transactions.
Start by depositing a paycheck, and then paying the rent, electricity, and phone bills. Expand Assets and then Current Assets, to reveal the Checking account, and double-click on it to display the Checking account register. The green line, representing a transaction that has already been entered, shows our opening balance. The yellow line is the one you are entering now. By default, the current date is displayed, but you got paid and deposited the check last week, so you need to change the date. Do that by clicking on the date, then on the expansion icon to the right of it. Double-click on the day of the month when you deposited the check. The date has been changed. Press Tab twice to bypass the Num column and enter “Paycheck” as the Description. In the next column, click on the expansion icon to list the accounts you have to choose from. Obviously, this one belongs to Income: Salary, so select it from the list.
Now tab to the Deposit column and enter 2500. When you press Enter, GnuCash recomputes the balance shown at the end of the transaction line, turns that line green, and opens a new yellow line for the next transaction.
Now it’s time to pay some bills out of this swollen check account.
The first check is number 111, and it is for $500. To enter it, start with the date, then the check number, use Rent as the description, select Housing expense from the transfer column, then tab to the Withdrawal column and enter 500. Just as it did with the paycheck deposit, GnuCash recomputes the balance and positions you on the next line. Write check 112, for electricity, for the amount of $124.90, also transferred to Housing. Ditto for the phone bill of $58.20, which is check number 113.
Save the file at this point and let’s take stock of where we are. After saving, click the big red X (Close) on the Checking Account register.
So far, so good, but what about the double-entry accounting bugaboo? We haven’t been doing that, have we? Actually, yes — we did it all from the Checkbook account register. When you selected the “Transfer” account for each transaction, GnuCash properly placed the offsetting entry in it. Let’s double-check that, just to make sure. From the Accounts window, expand Expenses, then double-click on Housing. A Housing account window opens, similar to the Checking Account window. And there they are, all three checks we wrote for our housing expenses, present and accounted for.
We’ve been using dual-entry accounting all along, without ever a thought about debits and credits and with nothing more than the click-and-point actions required to create accounts and use them. GnuCash does almost all of it for you. The reason you should know about dual-entry accounting is not so much so that you’ll be able to use GnuCash, but rather in order for you to understand what GnuCash is doing for you.
Reconciliation
Now let’s say the bank statement has come in the mail. It’s time to reconcile our books with theirs. From the Accounts window, locate the Checking account and click on it. On the menu bar across the top of the window, select Actions -> Reconcile. That opens a Reconciliation window for the Checking account. Enter the statement state and the closing balance from the statement, and click OK.
The reconciliation window now changes its form and lists all the movements of cash to and from the checking account. The left side the windows lists funds in, the right side funds out. Begin the reconciliation process by going through the bank statement, starting with the previous balance, and selecting the equivalent transaction from either the left or the right side of the reconciliation window. A check mark appears on each item in those panels after you have selected them.
In our example, we run out of entries in the Reconciliation window before we do on the bank statement, and we still have a difference between the two of $7.55. It turns out the missing entry is a bank service charge for $7.55 that is on the bank statement, but not yet in GnuCash. Entering it is a snap.
Right-click on the Funds Out panel and select New. That opens our Checking account register, where we can enter the bank service charge just as we would any other transaction. We’ll use Miscellaneous as the transfer account, and put the $7.55 in the Withdrawal column.
With that entry in our records, the difference between our GnuCash checking account and the bank is zero. We have reconciled the account. Click on Finish in the Reconcile window menu bar. The reconciliation windows closes, and the appropriate transactions in our Checking account register will now display a y instead of an n in the R(econciled) column.
Conclusion
Using GnuCash to balance your checkbook is perfectly legitimate. It’s easy and it’s accurate. You don’t need a commercial product to do the same thing. GnuCash 2.0, however, can take you well beyond a simple checkbook: you can track your credit cards, savings accounts, and investment accounts, or you can keep a full set of books for a small business. But you’ll never discover all of its treasures if you don’t give it a try. Now you have no excuse not to do so.


