
Author: Dave Fancella
Recording with Ecasound can be complex, but we’ll do it simply, because we’ll be importing the recordings into Audacity.
Before recording, test the setup. Open your mixer and make sure that you have selected the appropriate sound capture input (in aumix and Kmix you will see a red button in place of the
normal green button to indicate the device currently used for sound capture). Make sure your instrument is plugged in and ready to record, and type the following command in a terminal session:
ecasound -i:/dev/dsp -o:test.wav
Play your instrument for a little bit, and then press Ctrl-C to stop the recording. Play back the file you just created by typing:
ecasound test.wav
If you hear what you just played, then you’re fine and can move on. If not, make sure the correct sound capture device is selected, make sure that sound works, and so on. Diagnosing a problem can be difficult, but the rule is, “If you have sound with other programs, you should have sound with Ecasound.” If you had to build Ecasound, go through the configuration logs and see if there were any flagged problems that would indicate Ecasound can’t record.
Now it’s time to adjust your input levels. Ecasound comes with a program to do that, sort of. Open your mixer program and get it set in a place where you can look at the mixer and the
terminal window at the same time, then type ecasignalview and play for a while. You want to play as loud as you ever play and as soft as you ever play. Adjust the volume setting on the sound capture device in your mixer application until you have no distortion, which is defined as any max-peak value great than 1 in the ecasignalview program. When you’ve finished this adjustment, stop ecasignalview by pressing Ctrl-C.
Now we’ll record a track. Type:
ecasound -a:1 -i:/dev/dsp -o:firsttrack.wav
This command looks pretty easy to decipher, but let’s go through it piece by piece.
ecasound— the name of the program-a:1— Here you set up what’s called a “chain” in ecaspeak — an input connected to an output, with any effects processing in the middle.-i:/dev/dsp— Here you declare the input, the /dev/dsp device. We use devices for simplicity and clarity. You could invoke ALSA, ARTs, or Jack if you’d like.-o:firsttrack.wav— Here we declare the output, completing the audio chain. It’s a WAV file. You can write to a different format if you’d like, and you can even further customize the output format. By default Ecasound outputs to 16-bit int 44.1kHz WAV format. We’ll import this file into Audacity later where you can resample it if you’d like. Audacity will do its manipulations with 32-bit float so there will be no loss of sound in the mastering steps.
Now that you’ve recorded one track, add another. For this we want to playback the first track while recording the second track, so we’ll need some additional command line magic:
ecasound -a:1 -i:firsttrack.wav -a:2 -i:/dev/dsp -o:secondtrack.wav

-a:1 -o:/dev/dsp
It’s a little more convoluted than we need now, but it’ll make more sense when we record the third track. Here you see that we have two chain setups, each numbered. In fact every audio chain you create will be numbered. Number 1 starts with just an input, and it’s the first track we recorded. Then, without declaring an output for Number 1, we declare Number 2 with both an input (the sound capture device) and an output (a file). After doing all this, we go back and give Number 1 an output, the sound playback device.
For now, let’s play back the second track by itself by typing ecasound secondtrack.wav. Do you hear the second track by itself, or do you hear the second track mixed with the first track? If you hear the second track by itself, then you can move on. If you hear both tracks mixed together, then you need to go back to your mixer application and make sure you’ve set the sound capture device correctly. It’s a common pitfall to have your sound capture
device set as “master” instead of “mic” or “line-in,” but that will cause each track to be layered onto the previous tracks in the output file, when we want each track to be separated into its own file. Always double-check the second track to make sure it recorded on its own properly, even if
you’re absolutely certain you’ve got the settings right. You’ll save yourself hours of frustration by taking 10 seconds to verify your setup when you’ve recorded the second track. I’ve been burned by my own absent-mindedness many times.
We’ll record a third track, and then move on. For the third track, type:
ecasound -a:1 -i:firsttrack.wav -a:2 -i:secondtrack.wav -a:3

-i:/dev/dsp -o:thirdtrack.wav -a:1,2 -o:/dev/dsp
This command should be pretty easy to decipher. We set up inputs for chain Numbers 1 and 2, and then we set up input and output for Number 3. And — whoa! look at that! — we set up outputs for Numbers 1 and 2 at the same time. Now the convoluted syntax makes sense. You can see how when you’ve got six or eight or 20 tracks, using this command line convention will make your job easier.
Now let’s talk about options. You’ll probably need to do some basic mixing while recording each subsequent track, especially when you start dealing with multiple instruments. You can give the -ea flag to a chain setup to set a volume level like so:
-a:1 -i:file.wav -ea:120
This will amplify the track by 120%. By default Ecasound uses noise-shaping dithering to deal with distortion in the final output, so you’re generally safe to mix without worrying about hurting the sound in any way. While recording, our sole purpose is to get all the tracks onto disk to import into Audacity for mastering, so you have to worry only about the integrity of the recorded tracks, not Ecasound’s monitoring output.
You can also pan a track like this:
-a:1 -i:file.wav -epp:20
The value given to -epp is a percentage from 0 to 100, where 0 is extreme left and 100 is extreme right. This option is useful when you have two guitars for rhythm tracks and you want to pan them to extremes while recording leads, as is common in rock and metal recordings.
Type man ecasound for a long list of all the wonderful things Ecasound can do for you.
The last thing we need to do is make sure to grab the last set of command line options used in the project. Inevitably you’ll want to go back and re-record tracks at some point, and it’s best to have the last set of command-line options to start with. So open your text editor, highlight everything after the word “ecasound,” and save it to a file. In the future you’ll want to do all of your hard work with Ecasound from this file, and you’ll invoke Ecasound like so:
ecasound -s:yourfile
Give it a useful and arbitrary extension if you like so you can see what it is in a directory listing. I do my first run of tracks from the command line as we have done so far, and all future work I do using a chain setup file in a text editor, making sure to press “save” between changes to the file.
Importing and cleaning up in Audacity
Next we’ll import all our tracks into Audacity. Choose Project->Import Audio from the Audacity menu. Navigate to the directory in which you’ve stored all of your tracks and select “WAV files” from the file type selection box. You should see all of your tracks in the file selection dialog. Select all the files by clicking on the first one, pressing and holding the Shift key, and selecting the last file in the listing. Press OK and watch while Audacity imports all of your tracks.
One minor caution: if you compiled Audacity yourself, or you somehow acquired a binary that was linked against GTK2, make sure you save often. Audacity depends on wxWidgets, which in turn depends on GTK, but is not yet entirely stable with GTK2. The wxWidgets team is hard at work porting to GTK2; meanwhile, those of us using distributions such as Mandrake that have phased out
GTK in favor of GTK2 already will have to deal with it. Alternatively, you can install GTK and build wxWidgets yourself, linked against GTK, and then build Audacity.
Ecasound, by default, records stereo tracks. This is the behavior we want, for the most part, but you might want to eliminate all of the stereo tracks and turn some of them into mono tracks. To do that, first select the title bar of the track you wish to turn into a mono track. From the resulting popup menu select “Split stereo track.” This gives you two mono tracks instead of one stereo track. Close one of the mono tracks by clicking the “X” button at the top left-hand corner of the track. Change the existing track to mono by clicking the track title bar and selecting “mono.”
Overview of Audacity
Audacity has many features in common with other multi-track editors, but it is not a rip of any of them. The rule of thumb when you’re using Audacity is to do what feels the most natural to you, and you’ll probably find what you’re looking for.
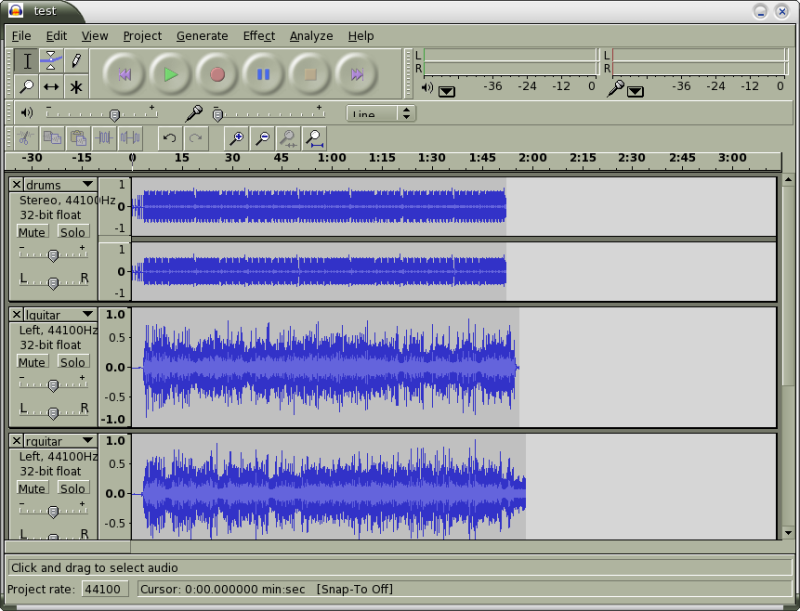
| Click to enlarge |
We’ll start with a look at a screenshot of the project. I’ve already cleaned up my stereo tracks using the procedure outlined above, and I cheated; I created a drum track with Hydrogen and used that as my first track.
Probably the first thing you’ll notice are the huge play buttons. To the left of them are the cursor tools, each of which changes the cursor, and therefore the action that happens when you move the cursor over one of the wave forms and click. To the right of the play buttons are the VU meters. Underneath these two bars is the mixer toolbar, which adjusts hardware levels on the sound card and doesn’t edit any tracks or the exported volume level. Under the mixer toolbar you’ll see a variety of your standard edit, undo, and zooming operations.
The Audacity window has a fairly standard assortment of menus. The Project menu, which we’ve already used once to import files, contains all global project operations, some of which you can perform on a single track, selection of tracks, or all tracks. The next three menus contain effects. Effects in Audacity come in three varieties:
- Native Audacity effects
- Nyquist plug-in effects
- LADSPA plug-in effects
Native Audacity effects are integrated into the program and are typically my first choice when I want to use an effect. Nyquist plug-ins are also well-integrated and are almost impossible to distinguish from native Audacity effects. If you take the time to learn about the powerful Nyquist scripting language (a LISP derivative), you can write excellent effect plug-ins for Audacity without having to deal with a more complex programming language such as C++ (with which the native effects are written) or C (most LADSPA plug-ins). LADSPA stands for Linux audio developer’s simple
plug-in API, and exists to provide a plug-in interface developers can use to extend audio applications. While most if not all Linux audio applications (including Ecasound) support LADSPA in one form or other, Audacity is the first, and so far as I know only, program to run on Windows and Mac OS X and support LADSPA plug-ins on all the platforms on which it runs. You’ll need to find and probably build a few LADSPA effects, and the best place to start looking is LADSPA’s Web site. Steve Harris also has an excellent series of plug-ins available from his Web site, including the set that I personally have installed.
All of Audacity’s effects are organized as one of three kinds — Generate, Effect, and Analyze — and the menus are predictably labeled according to what you want to do.
The track view
Next we come to the Track View, where you’ll do most of your work. Each track exists in its own self-contained box, and Audacity’s view of a track provides a lot of useful information and tools. The window is split into two parts, a panel containing information and tools, and the actual wave form view. When a track is longer than the viewable area in the Track View, you will see the toolbox, and the wave form will scroll with the bottom scrollbar on the window.
The title bar of the toolbox contains a drop-down menu of various actions you can perform on the track. Underneath the title bar are two text labels that tell you the sampling rate (given in hertz), whether the track is stereo or mono, and the frame size (32-bit float, mostly, but you can change that if you need to).
The track toolbox also has a mute/solo button combination, stereo panning control, and a volume control.
For my recording, I recorded an exported drum track from Hydrogen plus two rhythm guitar tracks and a lead guitar track. Now I want to pan each rhythm guitar track to extreme, one left and one right, and I want the lead guitar track to be just slightly offset from center. Using the track toolbar, I pan the track marked “lguitar” to 100% left and the track marked rguitar to 100% right, and the track marked “solo” to 10% right. (“Solo” doesn’t appear in the screenshot, but it’s there.) I click on the play button and listen. I can adjust basic volumes and panning easily during playback, but I want to do more.
I like the sound of a lead guitar with a phaser, and Audacity has my preferred phaser effect. To apply the phaser, I start by selecting the period of the wave form in the track that actually contains the solo. Then I choose Effect->Phaser from the menu bar. Next I see a dialog that wants to know how to apply the phaser. I like a wet phaser, so I move the dry/wet slider all the way to the wet side. More stages are also better, in my opinion, so I set it at four stages. LFO Frequency I set at 1.1, LFO Start Phase I leave alone, and I set Depth at 255. Feedback % is the amount of the processed signal that gets fed back into the track. When set to 0, none of the phasered guitar comes back, so I put that at a modest 50. Now I click on the Preview button and see if I like the resulting sound. Since I do, I click OK, which applies the effect.
Most of the effects have dialogs similar to this, with options specific to the effect. If you’ve never worked with digital effects before, try each effect and research digital effects in general.
Audacity typically stores each track in a series of smaller files. When you perform any edit operation, Audacity reads only the blocks on disk that are affected, applies the effects, and then writes new blocks. By doing this, Audacity allows you to roll back changes if you decide you don’t like them. This block file approach also means that as you apply more and more edits to tracks, Audacity’s total performance, especially during playback, doesn’t change, while in other audio editors you might find performance getting steadily worse with each operation.
After applying an effect, you frequently need to adjust the volume on a track. Since the area I just modified is still selected after applying the phaser, I can click Play and make my volume adjustment immediately before moving on.
As solos go, this one turned out OK, but dynamically it’s suffering quite a bit — in other words, I’m not happy about how the differences in volume sound. To make sure each note will be the loudest, most annoying I can make it, I can click the toolbar icon for the envelope editor, which is a fancy way of writing crescendoes and decrescendoes over a track, and is more visually representative of what goes on under the hood. Conceptually, a volume envelope is the same thing as those dynamic marks you find under the staff on a musical score and signal changes in volume.
Two blue lines now grace each track, one on the top and one on the bottom. I can go through my solo track moving these lines around, making sure the solo screams when it’s supposed to, backs down when it’s supposed to, and ultimately fades into oblivion. While Audacity provides a fade-out effect, I prefer to use an envelope at this time, since the envelope doesn’t require editing any actual samples and gets calculated in real-time during playback.
| Click to enlarge |
During this process, I’ll also be clicking the “solo” button on the track labeled “solo” and playing it back, over and over, and over again, making sure that each note sounds perfect in relation to each other note. Then I’ll untoggle solo mode and listen to the whole song so I can adjust the volume on the solo track again.
Now I’d like to really offset one of my rhythm guitar tracks. For this purpose I’ll use the timeshift tool, located on the same toolbar, with an icon that looks like a double-sided arrow. With this tool I can click on any waveform and move it left or right to adjust when the track will play in relation to the other tracks. Track playback always starts at 0, so any parts of the track that wind up before that point won’t be played.
Next, I want to clean up the solo track a bit, because it contains a fair amount of recorded silence before the solo starts. Since that silence was recorded, there is actually some noise in there from normal electronic interference. For a small project like this, it’s pretty irrelevant, but when I start layering on three or four different vocal lines and three or four different solo lines, all the recorded silence will add up to pure noise in the final mix, so I’ll remove it while I’m thinking about it.
I select the area that is recorded silence and choose Edit->Silence to convert this to digital silence. My drum track contains a count-off as well, to make sure that I started playing both rhythm tracks at the same time. I’ll silence that as well, since I don’t want it in the final mix. Both of my rhythm guitar tracks include normal distorted electric guitar noise at the beginning, but I’ll leave that to be fixed in the final mix, when all the tracks are together.
Final mixdown
To complete the final mixdown, you export the project to a WAV file, then open that file as a new project and do your last editing there. In the final mixdown phase you can apply an equalizer to the whole mix, do your last trimming around the beginning and ending of the song, and do the fade-out on the whole track.
I export as WAV because I keep my masters in two forms: the Audacity project and all of its associated files, and the mixed-down Audacity project. I later burn both forms onto data CDs for archival purposes.
Initiate the process by going to File->Export As WAV. If you export your WAV file using
Audacity’s default settings you will export a CD-quality WAV file. If you intend to apply equalizers or any other effects to the final output, however, you will want to export a 32-bit float WAV file instead of the default 16-bit. The export dialog doesn’t let you choose this setting on the fly; you have to set your default setting in the application preferences dialog found at File->Preferences, and then click the File Formats tab. Mind this decision, however, because many external applications don’t understand 32-bit float WAV files. If you want to export to a WAV file again, for example if you plan to burn to a regular CD, you’ll need to change the settings again.
Since I’m only doing trimming and fade-out for this project, I’ll leave it alone and use the default settings. By default, the new filename is the name of your project plus the extension
for the chosen type of file. I’ll keep the test.wav filename, but I’ll need to make sure to label the mixdown project properly.
To make my new project, I open test.wav and select the beginning silence in the track, adding at least a couple of milliseconds to give my CD burning program some room to work with, and select Edit->Delete. I’m satisfied with the way the beginning sounds now, but if I weren’t, I could use the fade-in effect, a volume envelope, or making sure the track starts on a zero crossing (recall that a sample represents a number from -1 to 1? Zero crossing is any point where the waveform crosses 0 on its way from one end to the other).
I’ll use a fade-out on the end of the song. I start by deleting all the fluff at the end by highlighting the section of the track I don’t want anymore and choose Edit->Delete. I select the last five seconds of the song, using the ruler at the top, and choose Effect->FadeOut.
The recording is completed, and now I’ll go ahead and export it one more time and give it a useful name, such as Jam4OSTG.wav. I won’t put spaces in the name because I intend to further manipulate the file from the command line.
Preparing a recording for distribution
If you intend to distribute your music, you have many options available. I recommend exporting from Audacity to a CD-quality WAV file (16-bit 44100Hz) because that gives you the most options. You can also export to an Ogg Vorbis-encoded file, though some users have experienced problems exporting to Ogg Vorbis from Audacity. (If you do have a problem, you can use oggenc from the command line.) If you want to make an MP3, you need to install LAME and deal with the stupid patent issues surrounding MP3.
I am fairly discriminating about CD music quality, so I use my exported CD-quality WAV files when I burn to a CD. Since I have a lot of hard drive space available, I’ll also copy the uncompressed WAV file to my song directories and add it to my XMMS playlist. If I wanted, I could use Ecasound to convert it to FLAC and save some hard drive space without sacrificing the quality of the recording. Ecasound can convert your exported file to almost any format imaginable.
Expanding your recording studio
Once you’ve successfully made one recording, I suggest you take some time and learn the ins and outs of your system before worrying about expanding your studio. While its true that starting with a basic computer isn’t the best sound quality you can get, when you first start recording your skill level is going to be the first bottleneck to good sound.
With that said, many factors can influence the sound of an instrument played in an arbitrary location. When you record, the problem is exacerbated by all the electronics in the room. Get well-shielded cables for every connection. Invest in a set of high-quality headphones for mastering and recording. Pay special attention to your microphones. I use microphones only for vocals, and I use digital effects within Audacity to deal with making my vocals sound better and correcting for the room. Since it’s such a small part of my own recordings, that’s acceptable. If you’re using microphones for a significant part of your recording process, consider the room acoustics too.
To expand your computer’s capabilities as a recording device, move to multi-track recording. Get a digital mixer and a sound card with ADAT plugs, and connect them via an ADAT cable to eliminate most electronic interference on the input lines. Good shielded cables will fix the rest. You can then record one-off songs onto multiple tracks and then master them as a separate stage. Recording into a regular sound card doesn’t give you that ability, as you have to have all the volume levels set perfectly and you have to apply any effects during the recording. You can get a decent setup, even with new parts, for $300 to $800, and it’s well worth the investment if you’re planning to do a lot of recording and you want the best possible quality. This is one of the places where you’ll have to make a serious decision to either go USB or commit yourself to PCI cards. If you have a band, or intend to record many instruments at once (common in a midi-driven studio), then PCI is the best way to go for multi-track recording. If your tracks are still going to be recorded one at a time, then you might find a USB sound device to better fit your needs.
In a multi-track setup, you’re more likely to run into hard drive and memory speed limits before you hit processor speed limits. Audacity does not support effect processing in real-time, so don’t be in a hurry to get a new CPU until you find yourself spending too much time looking at progress bars during effects processing.
Conclusion
Open source software has been available for multi-track recording for some time, but only in recent months has it finally matured to a point where it can handle both entry-level and production-level tasks. In the past you had to spend thousands of dollars to be able to record, which put recording demo tapes, extended play records, and long play records well beyond the budget of a hobbyist or struggling band. Nowadays we have good quality open source software for recording and the Internet as a distribution mechanism. The cost to record is literally the same as the price of your computer and the time spent recording. The cost of hosted Web space to distribute is very cheap. You can and should also distribute your music on peer-to-peer networks. Today, you have the ability to create recordings on your computer using stock OEM hardware that rival the recordings available at your local music store and distribute your music to millions.


