In Part 1, we worked through the process of setting up a video shoot, shot clips, reviewed them using the Totem movie viewer, and saved them on the hard disk.  The job was carried out using Linux tools on an Asus X83-VM notebook.
Now that we have usable footage, it’s time to do a little editing and add elements that give the video a professional look.¬† In this article we’ll discuss basic video editing using¬†kdenlive, transitions between scene elements, adding text and audio, ending up with rendering the finished video and uploading to¬†YouTube.¬† My intention is to introduce readers to the tools, while pointing out important parts of the editing process.¬† You can use your own motivation and interest to push your video production beyond the basics and on to higher levels.
Editing Prep
Make sure that you have kdenlive installed on your Linux system.  You can either use the Synaptic Package Manager or apt, on the command line, to get it on your system.
    rreilly> sudo apt-get install kdenlive
On the XFCE desktop, which I use, you can start kdenlive from Applications -> Multimedia or from the command line with:
    rreilly> kdenlive
Kdenlive is comprehensive and has a lot of powerful features.¬† For the purposes of getting a video on YouTube, we’ll just use a handful of operations.¬†¬†Normal things like copying, pasting, and saving files should be intuitive and follow normal gui traditions.

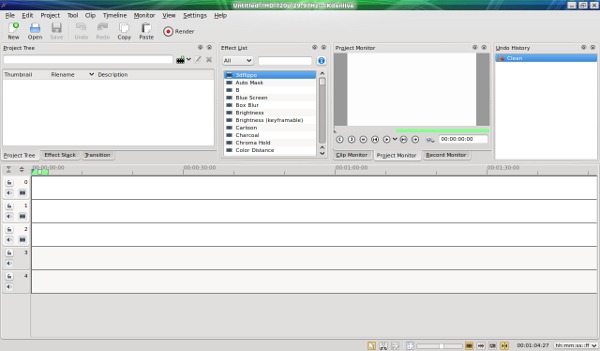
The program will start with a number of different screen sections.  Figure 1 shows the main kdenlive screen.
Across the top is the standard-model tool bar containing various drop-down menus, like file, edit, tool, clip, and so on.
To the left, below the tool bar is the¬†pane for the Project Tree, Effects, and Transitions.¬† You can click through the tabs across the bottom of the pane.¬† The Project Tree queues up all the video clips, title pages, slide-show clips (images), and audio that will be used in the finished video.¬† You can pull in .AVIs, .MPEGs, MP3s, and many others.¬† Likewise, the Effect and Transition tabs organize those types of operations.¬† We’ll address those shortly.
The center pane houses the Effect List and allows easy selection of video, audio, and custom effects, such as fading to black, adding room reverb, or applying a sepia look to a clip.
Moving to the right, is the integrated Monitor pane.¬† It acts like a little media player and has controls for playing a clip, fast forward, reverse, and pause.¬† This pane also contains the Project and Recording monitors.¬† The Project monitor lets you review the whole project, while the Recording one helps you capture clips from your fire-wire cameras, notebook’s webcam, and the notebook screen.
On the far right, you’ll find the Undo History pane.¬† Use this to go backwards in your steps to fix mistakes and rethink decisions.
The lower half of the screen is dedicated to time-line management.  You can drag clips down to this area and place them in your chosen sequence.  Clips can be moved around, copied, pasted, and deleted.  You can also do on-the-fly clip cropping and expansion.
Editing With kdenlive
The first thing we need is a video.  
On the main kdenlive toolbar, click the Project drop-down then the Add Clip menu item to bring up the file list window.  Double-click a file to bring the clip into the Project Tree viewer.  Choose the best clip from the shoot in Part 1. 
Think of the Project Tree viewer as a queue for all the clips used in your project.¬† You can also bring in audio, images, and title pages.¬† They are considered “clips” and are all treated the same way on the timeline.
Left click and drag a clip from the Project Tree viewer to the desired spot on the number 0 timeline.  I like to separate video and audio clips on different time lines because it is then easy to move them around independently.

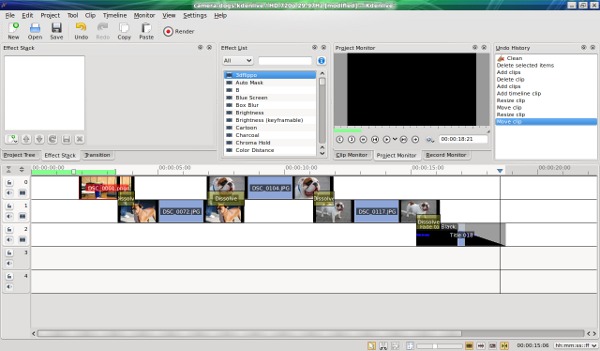
Figure 2 shows example clips and their relationships on the timeline.
To crop a clip (either at the beginning or the end), just left click the clip on the timeline, then move to either end to highlight the arrow handle.  Grab the arrow and drag it to crop the clip.  You can then drag the timeline position marker around to see the effects of your handiwork.  Place the timeline position marker in a spot then click play in the project monitor to view the video from that position.
Adding Text And Audio
Text is useful for titles, splash screens, and credits.
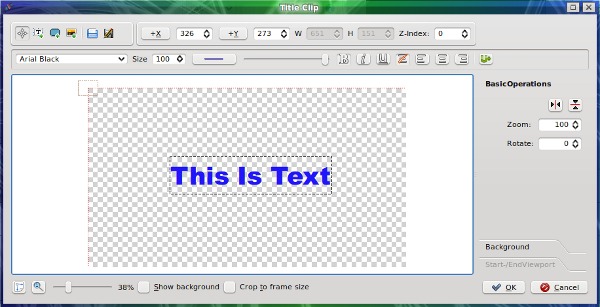
Click on the Project tab and select the Add Title Clip menu item.  This will bring up the Title Clip editor window.  Adding text is accomplished by selecting the Text radio button, in the upper left corner, then clicking where you want the text on the screen.  Type in your text, then hit return to complete the operation.  Click OK to post the Title Clip to the Project Tree.

Figure 3 shows the Title Clip editor window.  All the regular text options are available including font selection, sizing, color, and so on.  You can also rotate the text and change its position with the X and Y input boxes, at the top.  You can even add a background color and image, along with the text.
Best of all, this is a vector-based editor, so you if something doesn’t look quite right, you can always go back and move objects (text, images, etc.) around as needed.¬† Edit the title clip by double-clicking on it in the Project Tree, then make your changes.¬† Finish up with an OK.¬†¬†
Audio clips can be placed on the time-line, just like video.¬† Start by selecting an .mp3 file from your audio collection.¬† It could be music, voice, sound effects, or whatever.¬† Make sure you have the appropriate permission to use the clip.¬† You don’t want to run into troubles with copyrights or get sued.¬†
Once the clip is in the Project Tree queue, you can then drag it down and place it on the timeline.  If the clip it too big, grab the right side handle and drag it back to the left to shorten the clip.  
Using Video Transitions And Effects
A transition is used to smoothly move from scene to scene (clip to clip) and an effect is used to change the clip’s characteristics.
Adding a transition requires that the two tracks have a small amount of overlap.  Right click on the starting clip and follow the arrow to the right to select a transition type.  Dissolves and wipes give a simple and traditional way to move between clips.  The little rectangle will appear between the two clips at the overlap intersection.  You can click on the transition and then edit things in the Transition pane, at screen left.
Effects change the characteristics of the whole clip and are applied to each one individually.
Select a clip, then either double-click an effect from the Effect list (center screen) or right-click to bring up the effect menu.  If you are editing an audio clip, audio effects work in a similar fashion.  Some interesting video effects include fade to/from black, technicolor, and wave.  Interesting audio effects include normalization, fade in/out, and reverb.  Once an effect is selected it can be edited by double-clicking a new effect and deleting the old one.  Use the red X in the Effect stack pane.
You can also select the clip, on the timeline and apply an effect, such as a fade-out.  I like to fade-out the audio at the end of the video.  Grab the effect handle and drag it either way to shorten or lengthen the effect.  Effect lengths can also be varied using a little duration box in the Effect stack pane.
Feel free to use transitions and effects in combination for cool effects.
Make sure to also periodically save your kdenlive project file, so you don’t have to recreate the video selection, transitions, effects and so on, if something bad happens.¬† Use File -> Save As and give it a name.¬† It is good to do this occasionally, throughout your video editing sessions.
Render And Upload The Video
Once the video is completed, it will need to be rendered into a file.  
Click on the Render radio button (center left on the tool bar) to bring up the render menu.¬† Click on the Render Project tab to show available options.¬† Some options include High Definition video, MPEG4, and Flash.¬† Here’s a¬†basic video format tutorial, in case you need a refresher.
Once you’ve selected a format, fill in the output filename and select the Render to File button, at the bottom of the window.¬†¬†
Depending on the length of the video, the video format, and your notebook’s horsepower, it will take a few minutes to render.¬† An average two minute video using a high-definition format usually took about four or five minutes to render on my Asus X83-VM high-performance notebook.¬† File size equaled about 100 MB per minute of video, again for high-def formats.
Uploading to¬†YouTube¬†is fairly straightforward.¬† Obviously,¬†you’ll need an account name and password.¬† They have a¬†nifty little tutorial¬†on how to upload that will help you with the job.¬† Select any of the topics on the left hand side of the page, for more detailed instructions.
File size and video formats have a dramatic effect on upload speed.  For example, the first video I uploaded was about 150 MB in size and took two hours to upload.  That was way too long and after working experimenting with different file formats, I was able to get the file size down to about 15 MB, with hardly any loss in video quality.
Next Steps
We’ve covered the basics of editing video clips, adding text and audio, and using different effects.¬† There are a lot of moving parts in putting together a video.¬† Allow for learning time, experiment with the different elements, and have fun.
The kdenlive application helps you to turn out great quality video, including high-definition, with moderate demands on skills and time.  Of course, the finished video is only as good as what you feed it.  Great quality in will yield great quality out.
The last part of the series will expand on using voice-over audio and introduce screen capture with¬†xvidcap.¬† We’ll conclude with a little discussion on rolling everything up into a video tutorial.
Rob Reilly is a technology consultant, writer, and portable computing expert. Early adopter tech trends, seminars, and media projects are his stock-in-trade. His mission is to deliver exceptional value to his clients. Links to many of his articles appear on his Web site at http://home.earthlink.net/~robreilly


