We’ve covered the basics of editing video clips, adding text and audio, and using different effects in Part 1 and Part 2. Although there are a lot of moving parts in putting together a video, learning and experimenting with different elements can be profitable and fun.
In Part 3 of the series we will cover using voice-over audio and introduce screen capture with xvidcap. We’ll end up talking about rolling it all up, perhaps into a video tutorial.
Voice-Over Audio
Quality audio is just as important as quality video. A scratchy or noisy audio track is difficult to follow and detracts greatly from the overall quality of the piece.
You’ll remember in Part 1, that our audio was captured from the video camera’s on-board microphone. While it worked fairly well, improved audio quality can be easily had by making a separate audio recording and then pasting it into the video, replacing the original audio track, within the editing program.
A good program you can use to record your voice is Audacity. This mainstream audio editor is bundled into most Linux distributions.
Attach a good quality microphone to the mic input on your notebook, start the program, then click the record button. Click the stop button when you are finished shooting a take. Make sure to save the file before recording another audio and video clip.
Use a small notebook to make note of your takes, along with the corresponding video and audio file names. It might make sense to use a traditional clapperboard or syncboard, at the beginning of each take to make syncing of the audio and video easier.
Not only can you use Audacity to record audio, during the shooting of the video, you can also use it to add commentary to a video of slides or screen capture session, as we’ll see shortly.
Pasting the audio into the video is fairly straightforward.
Start kdenlive and place a video on the timeline. Turn on the audio clip display by going to Settings -> Configure Kdenlive -> Display and make sure the Audio box is checked. Click Apply to save the setting.
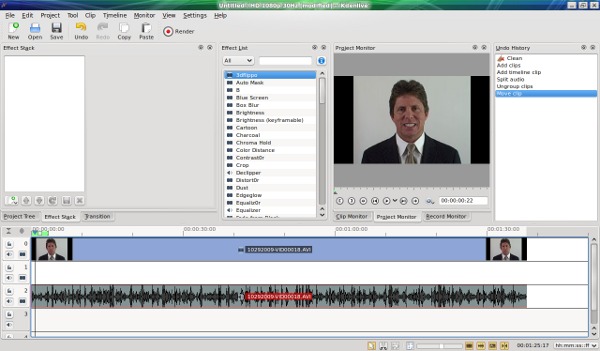
 Since we are replacing the audio, with the voice-over track we need to separate the original audio from the video. Highlight the video clip on the time line then right-click and choose the Split Audio menu item. Follow that up by right-clicking again along with the Ungroup Clips button. There will now be an audio and a video clip. You can click the little speaker icon, on the extreme left side of the time line, to enable or mute the audio. You can also highlight the audio clip and click delete. See Figure 1 for a kdenlive graphic of the video and audio clips right after ungrouping.
Next, pull in your replacement voice-over audio file and place it on the time line, below the video. You’ll have to move the audio clip horizontally, to sync it with the video. Grab the right or left sizing handle to crop unwanted sounds from the beginning or end.
That’s pretty much all there is to adding a voice-over. You can add effects like fading the audio-in at the beginning. You can also modify the voice-over with lots of interesting effects in Audacity, before marrying it up to the video in kdenlive.
Capture With xvidcap
We’ve covered shooting a video, editing it with kdenlive, and replacing low-quality audio, with a voice-over.
The final step in our series is to learn about video screen captures. These little gems let the videographer (or “how-to” video designer) show the viewer a process as it is played out on the notebook screen. You might want to capture the screen movements when demonstrating how to use Firefox or edit a text file with OpenOffice.org.
xvidcap gives you the ability to capture screen movements and save it as a video file, suitable for pulling into kdenlive.
Load xvidcap using apt-get or the Synaptic package manager.
sudo apt-get install xvidcap
You will find xvidcap under the Applications -> Multimedia menu item, if you are using Xubuntu.
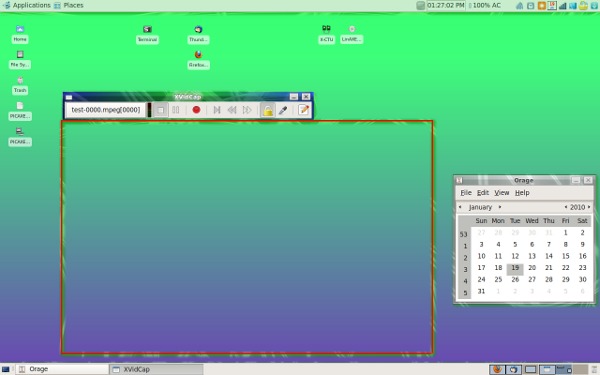
 Figure 2 shows xvidcap ready to capture on my desktop. Controls are straightforward. The red button starts the capture, while the square box (to the left) stops the recording. The double vertical bar button pauses during recording.
Grab the upper left corner of the red outline box and drag it into position around the area of the screen, that you wish to capture. You can do the same with the lower right corner.
Push the red button and go through your process, just as you would normally. So, if you are showing someone how to open a file in OpenOffice.org, click the OpenOffice.org item on the tool bar, then click the File and New drop down items. Your movements, mouse clicks, and screen changes will be recorded to the xvidcap video in real time. When finished with your process go back to the xvidcap bar and click the Stop (square box) button.
The default filename for xvidcap videos start as test-0000.mpeg and move up numerically. It also has several menus of options. Right click on the filename box to bring up the preference screens.
There are a few things you should keep in mind when using xvidcap.
Pay attention to the length of your screen demo session. About 10 seconds of screen video capture, on my Asus notebook, resulted in a file size of almost 3 MB.
I’d suggest scripting out your process into manageable pieces, say into one to two minute segments. This technique lets you add commentary and static screen shots between clips, as you build the video in kdenlive.
Also, I had problems with capturing audio commentary during the xvidcap session, probably because of some odd configuration with my sound system. I’m using ALSA and just get an occasional short burst of noise, when recording audio in xvidcap. It’s a small inconvenience, that is fixed with either minimal commentary or a voice-over capture using Audacity.
Pulling the completed video screen capture into kdenlive is just like doing it with any other clip. Use the Project -> Add Clip menu items, drag the video down to the timeline, separate video and audio, then slice and dice as needed.
Lastly, we’ll talk about putting everything together as a tutorial.
Parting Integration Thoughts
We’ve seen the various aspects of shooting the video, editing with kdenlive, adding voice-overs and audio, and used xvidcap to capture screen activities. Use your creativity to make some great video tutorials.
By all means do one or two videos, trying out the various elements, before creating a “production” video.
It also makes sense to think through your entire video, before shooting any footage. Pros use storyboards. You might use something as simple as a regular old outline. A plan will help you foresee bottlenecks and scheduling conflicts, thus avoiding wasted effort and misunderstandings.
Likewise, you’ll need to work out a system of managing all the files and versions of the various elements. For one project, you may end up with 20 video takes of the talent, five or six voice-over comments, and a handful of titles or graphics files. Don’t forget to respect copyrights when using other people’s audio and video content. Putting everything in one directory, is what I do. There are certainly other methods that you can develop.
Above all, have fun. This series only scratched the surface. Now, making it all interesting, is up to you.
The Future Of Videos
There are many examples of videos and video tutorials on YouTube. Go there and punch in “kdenlive” with “titles” or “effects” to get an extensive selection of interesting video.
I think that the advent of good-quality, moderately-priced video cameras, powerful notebooks, and good editing software, makes the future looks bright for video tutorials and how-tos.
Do-it-yourself videos and tutorials…better get on ’em before you miss the next big technology wave.
This e-mail address is being protected from spambots. You need JavaScript enabled to view it
is a technology consultant, writer, and portable computing expert. Early adopter tech trends, seminars, and media projects are his stock-in-trade. His mission is to deliver exceptional value to his clients. Links to many of his articles appear on his Web site at http://home.earthlink.net/~


