
Author: Joe Barr
I made arrangements to have the door repaired — this time with a large metal plate to make it a little tougher to kick in — and thought about what else might be added to make her home more secure. I finally decided that there wasn’t really any way to keep someone out if they wanted in badly enough.
So I started thinking in terms of security cameras. If only there had been one in place and aimed at the front door when they came in, it would be a big aid in finding the bad guys. Or one aimed at the driveway, to get pictures of the car and the license plate. If the bad guys saw the camera and realized they were being recorded on video, they would just rip out the cameras and whatever they were attached to — VCR, computer, whatever. Unless, of course, the video was being streamed over the Internet and recorded elsewhere. That’s the approach I decided to take.
The hardware
| Click to enlarge |
I found a pair of D-Link 1000W (the W is for wireless) cameras on eBay for just under $150 each. These VGA-quality digital cameras come with 2.4GHz wireless capabilities and allow remote setup via a built-in Web server. I found a matching wireless router, also from D-Link: the 802.11g/2.4GHz DI-524. D-Link does not support Linux on either product, but both the cameras and the router work just fine with Linux. Still to come are one or more UPS devices to ensure the system stays connected to the Internet even if power at the house goes out.
Because I needed to run ZoneMinder at a remote location across the Internet, I had a little extra configuration work to do. If you’re knowledgeable about home LANs, firewalls, NAT, and port mapping, you can skip ahead. If not, I’ll walk you through the basics and explain how I set up the LAN at Susan’s house.
Next: A security LAN
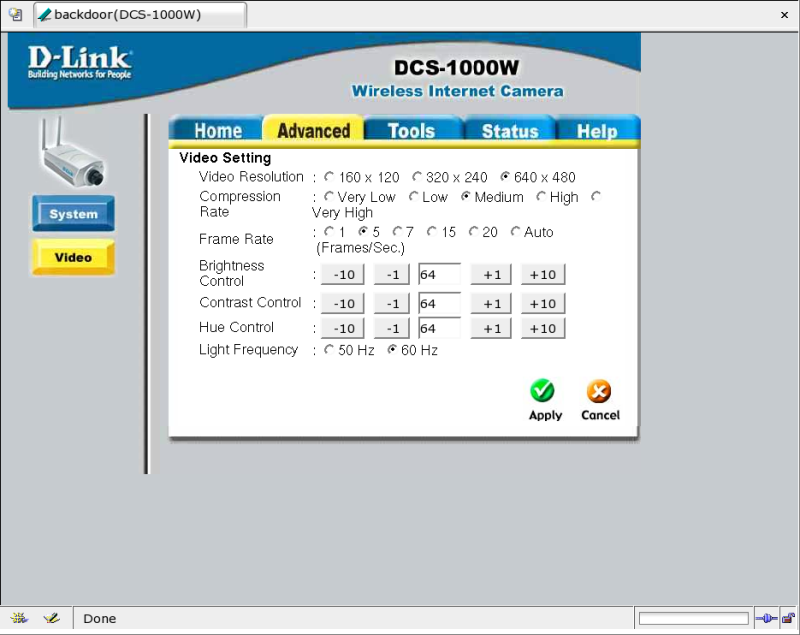
The DCS-1000W has a Web server accessible on port 80. It also uses a second port — the default is 8481– to send images. These port assignments can be changed using the built-in, Web-based setup shown below. When you have multiple cameras being accessed over the Internet, for example, you need to assign different ports to each camera.
| Click to enlarge |
There is a switch in the back of the DCS1000Ws to indicate which interface to use, LAN or WAN. I did the initial setup of the cameras over the LAN, meaning I ran a cable from the camera to the router and made sure the switch on the camera was in the LAN position. I needed to update the firmware on both cameras to make sure they both had the latest version.
The cameras come with a default IP address of 192.168.0.20. D-Link recommends that you use that address for the last camera, so I set up the first camera to use 192.168.0.19. Then I configured the second camera to listen on port 81 and to use 8482 for streaming. If I add a third camera — and there is a good likelihood of that happening — it will listen on 82 and send data on 8483.
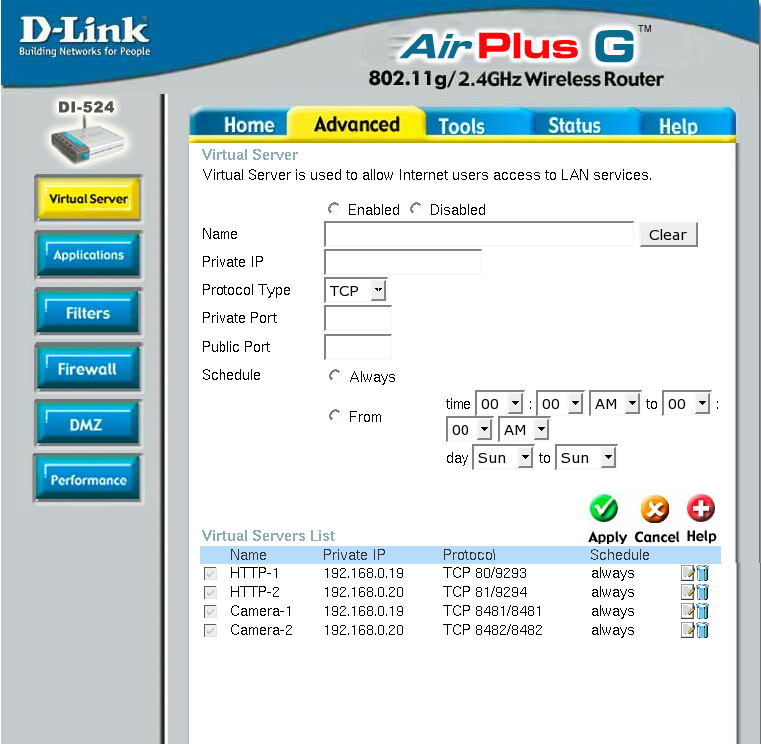
Next, I used the router’s built-in, Web-based setup shown below to do port mapping with its virtual server feature. In order to configure the cameras to be accessible on the Internet using the same IP address, I needed two more ports. I used 9293 to identify the first camera (192.168.0.19 in the chart below) and 9294 (192.168.0.20) for the second. Both cameras and the router were set to use the WEP security protocol to prevent the video signals from being exposed to wardriving geeks.
The cameras were now Internet ready, so I set the switch on the back of each to the WAN rather than LAN interface. If the IP address for Susan’s cable modem — see the chart below — was XXX.145.100.156, the first camera would be addressed as XXX.145.100.156:9293 and the second as XXX.145.100.156:9294. The port mapping on the DI-524 router ensures the traffic gets to the correct device.
                                      DCS-1000W - Camera 1
                                         (192.168.0.19)
                                            /
                                           /
               Susan's                    /
 Internet ===== Cable ============ D-Link DI-524 (192.168.0.1)
                Modem


                                      DCS-1000W - Camera 2
                                         (192.168.0.20)
The next step was the positioning and the focal adjustment on each camera. When I was happy with that, it was time to tackle the ZoneMinder installation.
ZoneMinder
ZoneMinder is a collection of Perl, PHP, and C++ modules which work together to deliver a highly functional video security package. It can handle multiple cameras, either locally attached, like a USB Webcam, or remote Internet cameras. Also required are MySQL and an HTTP server like Apache. That can mean a lot of installation time, and perhaps a few frustrations along the way, but it’s worth it.
Excluding the problems I had correctly configuring Apache, PHP, and MySQL, the ZoneMinder installation and configuration was pretty straightforward. Unfortunately, it took me quite a while to figure out what I had screwed up in the other applications. SUSE 9.1 installs Apache to run as user/group “wwwrun/www.” I suggest you not muck with the Apache directory permissions as they are set when installed. I could have saved myself considerable time and frustration if I had taken that advice. Here’s how I installed it ZoneMinder on my system to work with the Internet cameras at Susan’s, once my other problems were resolved.
After decompressing the tarball into its own directory, I entered the directory and ran the configure script like this:
./configure --with-mysql=/usr/bin --with-webdir=/srv/www/htdocs --with-cgidir=/srv/www/cgi-bin --with-webuser=wwwrun --with-webgroup=www
Next, I ran ZoneMinder’s own config script by entering:
perl zmconfig.pl
I answered only the first four questions of the configure dialog, selecting the defaults for the machine and database names by simply pressing Enter, then entering wwwrun as the fully privileged DB user and www for the less privileged DB user. I told the dialog to plug in defaults for everything else. It’s normal to see errors about not being able to access the database at this point, since it hasn’t yet been created.
Next — as root — I started MySQL, created the ZoneMinder database, and granted rights on it to wwwrun and www by entering the following commands:
. db/zmschema.sql

...

grant all on zm.* to wwwrun@localhost identified by password;

grant select on zm.* to www@localhost identified by password;

quit;
Then I exited su mode and reran the ZoneMinder config script to add the database information to the configuration that wasn’t available earlier. I ran zmconfig.pl a second time, this time adding an argument of -noi to the command line. To finish the build process, I ran make and make install, the latter as root, of course.
To stream or not to stream
ZoneMinder can use streaming to provide real-time and replay viewing of live camera data or recorded events. It’s definitely a nice-to-have feature, but you can live without it if you choose. If you’re not using Netscape — or another browser that supports streaming natively — you can use a Java applet called Cambozola. That’s what I did.
After downloading the latest version of Cambozola, I created a new directory called dist in my Apache root (that’s /srv/www/htdocs on my SUSE 9.1 box) and copied cambozola.jar and cambozola-server.jar from the dist subdirectory where I built Cambozola to the new dist directory. Remember to change the permissions on the new directory so that they match the user/owner of Apache: wwwrun and www in my case.
At this point, everything was ready to start ZoneMinder and begin configuring the application to work with the camera setup. Here’s how I configured mine for the two remote cameras installed at Susan’s house.
I started ZoneMinder by pointing my browser at http://localhost/zm.php. If you get an error message when you do this, make sure you have your HTTP server and MySQL running, then try again. When you start ZoneMinder, the first thing you see is the ZM Console. The console acts as the “home page” for ZM, and from it you can click to a link on any of the other ZM screens you need.
Click on Options at the far right of the second line. If your eyes are as weak as mine, you’ll also want to increase the size of the browser window and its contents. The ZM Options screen shows 14 tabs across the top, giving plenty of opportunity for tweaking. Here are the options I needed to set to work with my installation.
- Network – Check ZM_OPT_REMOTE_CAMERAS
- Video – Select jpeg for ZM_VIDEO_STREAM_METHOD
- Tools – Select No for ZM_CAN_STREAM, Check ZM_OPT_CAMBOZOLA, and enter “dist/cambozola.jar” for ZM_PATH_CAMBOZOLA
Click Save in the bottom right corner of the screen, then close the options screen.
Creating monitors
The next task is to create monitors. A monitor is a camera. I’ve seen comments in the ZoneMinder forum about having more than one monitor per camera, but I think the relationship is almost always one-to-one. To create a monitor, click the Add New Monitor button on the ZM Console.
The ZM Monitor New screen shows five tabs across the top. Here are the changes to the default values that I made. Just as with the options, your mileage will vary depending on the particulars of your installation.
- Monitor – Enter monitor name (Front Door) and select Remote for the Source Type Note: Selection of Source Type drives what options are shown on other tabs
- Source – Enter Remote Host Name (userid:password@XXX.145.100.156) Note: the userid and password are those configured in the camera, not in Apache or MySQL
- Source – Enter Remote Host Port (9293)
- Source – Enter image.jpg for Remote Host Path
- Source – Select 24-bit color for Remote Image Colors
- Source – Enter 640/480 for the Capture Width and Height
- Buffers – Enter 25 for Image Buffer Size
| Click to enlarge |
That last setting was necessary for me because I ran out of shared memory space with the default setting of 100. You may not need to adjust your own buffer size at all. Originally, I wrote that you might need to change to a new Shared Memory Key (ZM_SHM_KEY) in the System tab of ZM Options.
but Coombes has advised me that is not necessary unless you have two complete Zoneminder installations on the same machine. He said “Ordinarily you would change your system config to allow more shared memory to be allocated (either in total or per request)”. Update: I wrote a column about how to do this on Linux.com. You can find it here.
I then repeated the Add New Monitor process to configure the second remote camera. The only difference in the two configurations was the name (TheDriveway) and the Remote Host Port (9294).
Monitor types
Back on the ZM Console, I could now see the two monitors (FrontDoor and TheDriveway) listed. Both showed their Function as Monitor. To change that to another mode, click on mode shown for the monitor (FrontDoor or TheDriveway) that you want to change. A pop-up menu appears to allow you to choose from None, Monitor, Modect, Record, or Mocord.
Monitor is the default mode when adding new monitors. It means that you can view the images (still or streaming) from the camera, but they won’t be examined to trigger events and they won’t be saved. Modect means that the zone or zones associated with the monitor are analyzed by ZM and an alarm event triggered when changes occur. Record means the images are saved, but not analyzed. And finally, Mocord does both motion detection and recording of the images.
I use Modect on both cameras because that’s the whole purpose of this security setup: to record evidence in the event of another break-in.
The Source column identifies the camera. In my case, since only the IP address is shown, they both appear to be the same. Only the port number (9293/9294) differentiates them on the outside.
The next several columns all have to do with Events. Events are alarms that have been triggered by ZM’s motion detection analysis, or forced manually by you. The images associated with each Event are kept in a unique directory for easy retrieval. Each column is clickable for each monitor, allowing you to open a window showing only the Events for a given period. The Events, Hour, Day, Week, Month, and Archive columns show the count of events for each category for the monitor.
The Zone column warrants special attention. After all, the application is called ZoneMinder.
The image from each monitor is defined by default as being encompassed by a single zone, but that default can be tweaked not only to add additional zones, but to change the type of zone(s). Each zone is defined as to type: Active, Inclusive, Exclusive, Preclusive, or Inactive. Active and Inactive indicate whether or not they will be used (analyzed) to trigger an alert event. An Inclusive zone only triggers an alert if another Active zone has already triggered and alert. An Exclusive zone is one that will trigger an alert only if no other alerts have been triggered. The Preclusive zone type is new. Its purpose is to block all alerts for a particular zone. So if it is triggered, say by a sudden change in sunlight, no alerts will be triggered based on any zone for that image frame.
Next: Guarding the house
| Click to enlarge |
With the system fully set up, I’m free to monitor the cameras or not, as I choose. ZM is running and doing its thing whether I have the ZM Console loaded in a browser or not. At present I leave both cameras running in Modect mode during daylight hours. I can watch a live stream — even a live stream from both cameras at once as shown in the Montage below — or simply browse through event images previously written to disk. I can do that browsing by doing a replay of the stream or one shot at a time.
I’ll be tweaking the zones in the driveway monitor to cut down on sun and shadow alerts, but for now I’m satisfied knowing that every vehicle that enters will be filmed, and that anyone who comes through the front door — or moves anywhere in that adjacent living area regardless of the point of entry — will leave evidence of their visit.
Total cost and conclusion
I spent less than $500 total on the project, which includes the cost of two Internet cameras, wireless router, a UPS, and a PayPal donation to Phillip Coombes, ZoneMinder’s creator. That’s a lot of money to me, but I can’t imagine spending it for a better cause.
Coombes stays active in the ZoneMinder forums, offering help for new users and listening to feature requests. The online documentation and tutorials on the ZoneMinder site are much more detailed and cover areas of this very powerful and sophisticated application that I haven’t even mentioned here.
The bottom line is that if you’ve been looking for a GPLed security camera application for Linux, you can stop. ZoneMinder is here, and it’s a dandy. If you’re apprehensive about the installations required — MySQL, Apache, and PHP all playing together nicely — then you can grab a LiveCD version of the latest release from the ZoneMinder download page. Ross Melin is responsible for the LiveCD version, and Coombes says he also “helps out answering any questions about it on the forums.”
Category:
- Security


