While there’s many exciting features to Linux 3.13, there’s still some features that you won’t find in this next major Linux kernel update…
Training College Students to Contribute to the Linux Kernel

Following my recent post on the initiatives now in place to rebalance the demographics of the Linux Kernel community, I would like to share a set of specific training activities to get beginners, specifically college students, involved in the kernel.
These were created by an enthusiastic group at Red Hat, including Matthew Whitehead and Priti Kumar, and unfolded on campus at Rensselaer Polytechnic Institute, Rensselaer Center for Open Source (RCOS), and State University of New York at Albany.
A Week With Korora 19.1 KDE
I made a joke recently on social media — not a good joke, I’ll be the first to admit — that I had used Korora way back when it had two A’s at the end.
In an indirect way, Korora — minus the second A of the past, but inheriting the long-vowel line over the last A — crossed the proverbial radar again recently and, as it would happen, it got another one-week test drive from yours truly, this time in the driver’s seat of Korora 19.1 KDE “Bruce.”
In a word, “Wow.”
For those of you keeping score at home, Korora is a Fedora remix that “aims to make Linux easier for new users, while still being useful for experts.” It’s a noble effort, to say the least: Fedora, which as I’ve said on a million occasions, does everything right, especially building and maintaining the distro’s software, as well as building or maintaining the community supporting it. The principles driving Fedora are excellent ones to emulate, and to provide an option of a Fedora respin in which everything works right out of the box (*cough* Flash *cough*) is indeed a noble task.
So in taking that route, it bears mentioning that the Korora lead developer, Chris Smart, is a man who lives up to his name.
As many of you know, I’m not stranger to Fedora, yet I threw caution to the wind and opted for KDE, given Korora’s choice of KDE, GNOME, Cinnamon and MATE. Here’s why: First, I haven’t used KDE in quite awhile and I wanted to see what’s new, and secondly, my friend Ken Starks at REGLUE is using it in the OpenSUSE machines he’s building for kids down in Austin, Texas.
On a Dell Latitude D610 with the touchpad turned off in the BIOS (due to the wandering cursor thing that Dell refuses to fix — which is why someone gave this hardware to me, I think), the install went flawlessly and any worry that the 1.5GB of RAM would labor under the weight of KDE was put to rest early. For the week I used the D610 on a daily basis, the only hiccup was in updating which, eventually, was traced back to the flaky wireless where I was rather than to the distro and/or desktop environment.
Other hurdles aside — “Why doesn’t apt-get work on this . . . oh wait.” — getting used to KDE was not as hard as I thought. Much of the habits in using a window-manager based distro like CrunchBang took some unlearning. KDE and I have always had a love-hate relationship, but casting aside any prejudices I had about the desktop environment, I found that the same things that bothered me still do (KDE Wallet – seriously?), but the other facets of KDE Plasma were very workable and spending an entire week tweaking it was both educational and fun. Plus, I think there have been many improvements to much of the KDE software lineup: Using Kmail and Konversation much of the time, they performed flawlessly during the course of the week.
On the whole, I like this distro a lot and I think Korora has a bright future. There is a clear comparison that can be made between Korora and Fedora that mirrors the relationship between Linux Mint and Ubuntu. Just as Linux Mint improves the user experience on that particular Ubuntu-based distro, so then can Korora enhance the user experience on this Fedora-based distro.
Trivial, I know: The naming convention is based on characters in “Finding Nemo” in the same way that Debian’s project names are based on “Toy Story” (or CrunchBang’s is based on “The Muppet Show”). It’s always a source of interest to me how projects are named, and you just have to bear with me on that. But a tip of the hat to Nemo!
So a word of warning, Kororans: I’ve signed up on your site and I’m going to keep Korora on the Dell for the forseeable future. See you around.
I promised last week to look at VSIDO and we’ll have to take that up next week. Apologies to those who were expecting that today.
This blog, and all other blogs by Larry the Free Software Guy, Larry the CrunchBang Guy and Larry Cafiero, are licensed under the Creative Commons Attribution-NonCommercial-NoDerivs CC BY-NC-ND license. In short, this license allows others to download this work and share it with others as long as they credit me as the author, but others can’t change it in any way or use it commercially.
(Larry Cafiero is one of the founders of the Lindependence Project and develops business software at Redwood Digital Research, a consultancy that provides FOSS solutions in the small business and home office environment.)

![]()
Lightworks Linux Build Now Offers DVD, YouTube Export Options
The updated version also offers AC3 audio decode support (cross platform) which no longer requires a separate audio filter.
The post Lightworks Linux Build now offers DVD, YouTube export options appeared first on Muktware.
openSUSE Summit Was Geeko Awesome
Our openSUSE Summit 2013 has just finished here in Orlando. We were hosted in a Mexican themed hotel in the area of Disney World, with our own special area setup nicely for our presentations and workshops. The location was a nice new touch for the geeko friends to reconnect and collaborate, if only because there was a large number of lizards all around here!
Weather wasn’t very loving down here in Florida, USA but being in such a family-like get together, it didn’t really matter.
Building a Compute Cluster with the BeagleBone Black
As a developer, I’ve always been interested in learning about and developing for new technologies. Distributed and parallel computing are two topics I’m especially interested in, leading to my interest in creating a home cluster. Home clusters are of course nothing new and can easily be done using old desktops running Linux. Constantly running desktops (and laptops) consume space, use up a decent amount of power, cost money to set up and can emit a fair amount of heat. Thankfully, there has been a recent explosion of enthusiast interest in cheap arm based computers, the most popular of which is the Raspberry Pi. With a small size, extremely low power consumption and great Linux support, arm based boards are great for developer home projects. While the Raspberry Pi is a great little package and enjoys good community support, I decided to go with an alternative, the BeagleBone Black.
Launched in 2008, the original BeagleBoard was developed by Texas Instruments as an open source computer. It featured a 720 MHz Cortex A8 arm chip and 256MB of memory. The BeagleBoard-xm and BeagleBone were released in subsequent years leading to the BeagleBone Black as the most recent release. Though its $45 price tag is a little higher than a Raspberry Pi, it has a faster 1GHz Cortex 8 chip, 512 MB of RAM and extra USB connections. In addition to 2GB of onboard memory that comes with a pre-installed Linux distribution, there is a micro SD card slot allowing you to load additional versions of Linux and boot to them instead. Thanks to existing support for multiple Linux distributions such as Debian and Ubuntu, BeagleBone Black looked to me like a great inexpensive starting point for creating my very own home server cluster.
Setting up the Cluster
For my personal cluster I decided to start small and try it out with just three machines. The list of equipment that I bought is as follows:
1x 8 port gigabit switch
3x beaglebone blacks
3x ethernet cables
3x 5V 2 amp power supplys
3x 4 GB microSD cards
To keep it simple, I decided to build a command line cluster that I would control through my laptop or desktop. The BeagleBone Black supports HDMI output so you can use them as standalone computers but I figured that would not be necessary for my needs. The simplest way to get the BeagleBone Black running is to use the supplied USB cable to hook it up to an existing computer and SSH to the pre-installed OS. For my project though I chose to use the SD card slot and start with a fresh install. To accomplish this, I had to first load a version of Linux on to each of the thre SD cards. I used my existing Ubuntu Linux machine with a USB SD card reader to accomplish this task.
Initial searches for BeagleBone compatible distributions reveals there are a few places to download them. I decided to go with Ubuntu and found a nice pre-created image from http://rcn-ee.net/deb/rootfs/raring/. At the time I searched and downloaded, the most recent image was from August but there are now more recent builds. Once you have un-tared the file, you will see a lot of files and directories inside the newly created folder. Included is a nice utility for loading the OS on to an SD card called setup_sdcard.sh. If you aren’t sure what device Linux is reading your SD card as, you can use the following to show you your devices:
sudo ./setup_sdcard.sh --probe-mmc
On my machine the SD card was listed as /dev/sdb with its main partition showing as /dev/sdb1. If you see the partition listed as I did, you need to unmount it before you can install the image on it. Once the card was ready, I ran the following:
sudo ./setup_sdcard.sh --mmc /dev/sdb --uboot bone
This command took care of the full install of the OS on to the SD card. Once it was finished I repeated I for the other two SD cards. The default user name for the installed distribution is ubuntu with password temppwd. I inserted the SD cards in to the BeagleBones and them connected them to the ethernet switch.
The last step was to power them up and boot them using the micro SD cards. Doing this required holding down the user boot button while connecting the 5V power connector. The button is located on a little raised section near the usb port and tells the device to read from the SD card. Once you see the lights flashing repeatedly you can release the button. Since each instance will have the same default hostname when initially booting, it is advisable to power them on one at a time and follow the steps below to set the IP and hostname before powering up the next one.
Configuring the BeagleBones
Once the hardware is set up and a machine is connected to the network, Putty or any other SSH client can be used to connect to the machines. The default hostname to connect to using the above image is ubuntu-armhf. My first task was to change the hostname. I chose to name mine beaglebone1, beaglebone2 and beaglebone3. First I used the hostname command:
sudo hostname beaglebone1
Next I edited /etc/hostname and placed the new hostname in the file. The next step was to hard code the IP address for so I could probably map it in the hosts file. I did this by editing /etc/network/interfaces to tell it to use static IPs. In my case I have a local network with a router at 192.168.1.1. I decided to start the IP addresses at 192.168.1.51 so the file on the first node looked like this:
iface eth0 inet static
address 192.168.1.51
netmask 255.255.255.0
network 192.168.1.0
broadcast 192.168.1.255
gateway 192.168.1.1
It is usually a good idea to pick something outside the range of IPs that your router might assign if you are going to have a lot of devices. Usually you can configure this range on your router. With this done, the final step to perform was to edit /etc/hosts and list the name and IP address of each node that would be in the cluster. My file ended up looking like this on each of them:
127.0.0.1 localhost 192.168.1.51 beaglebone1 192.168.1.52 beaglebone2 192.168.1.53 beaglebone3
Creating a Compute Cluster With MPI
After setting up all 3 BeagleBones, I was ready to tackle my first compute project. I figured a good starting point for this was to set up MPI. MPI is a standardized system for passing messages between machines on a network. It is powerful in that it distributes programs across nodes so each instance has access to the local memory of its machine and is supported by several languages such as C, Python and Java. There are many versions of MPI available so I chose MPICH which I was already familiar with. Installation was simple, consisting of the following three steps:
sudo apt-get update sudo apt-get install gcc sudo apt-get install libcr-dev mpich2 mpich2-doc
MPI works by using SSH to communicate between nodes and using a shared folder to share data. The first step to allowing this was to install NFS. I picked beaglebone1 to act as the master node in the MPI cluster and installed NFS server on it:
sudo apt-get install nfs-client
With this done, I installed the client version on the other two nodes:
sudo apt-get install nfs-server
Next I created a user and folder on each node that would be used by MPI. I decided to call mine hpcuser and started with its folder:
sudo mkdir /hpcuser
Once it was created on all the nodes, I synced up the folders by issuing this on the master node:
echo "/hpcuser *(rw,sync)" | sudo tee -a /etc/exports
Then I mounted the master’s node on each slave so they can see any files that are added to the master node:
sudo mount beaglebone1:/hpcuser /hpcuser
To make sure this is mounted on reboots I edited /etc/fstab and added the following:
beaglebone1:/hpcuser /hpcuser nfs
Finally I created the hpcuser and assigned it the shared folder:
sudo useradd -d /hpcuser hpcuser
With network sharing set up across the machines, I installed SSH on all of them so that MPI could communicate with each:
sudo apt-get install openssh-server
The next step was to generate a key to use for the SSH communication. First I switched to the hpcuser and then used ssh-keygen to create the key.
su - hpcuser sshkeygen -t rsa
When performing this step, for simplicity you can keep the passphrase blank. When asked for a location, you can keep the default. If you want to use a passphrase, you will need to take extra steps to prevent SSH from prompting you to enter the phrase. You can use ssh-agent to store the key and prevent this. Once the key is generated, you simply store it in our authorized keys collection:
cd .ssh cat id_rsa.pub >> authorized_keys
I then verified that the connections worked using ssh:
ssh hpcuser@beaglebone2
Testing MPI
Once the machines were able to successfully connect to each other, I wrote a simple program on the master node to try out. While logged in as hpcuser, I created a simple program in its root directory /hpcuser called mpi1.c. MPI needs the program to exist in the shared folder so it can run on each machine. The program below simply displays the index number of the current process, the total number of processes running and the name of the host of the current process. Finally, the main node receives a sum of all the process indexes from the other nodes and displays it:
#include <mpi.h>
#include <stdio.h>
int main(int argc, char* argv[])
{
int rank, size, total;
char hostname[1024];
gethostname(hostname, 1023);
MPI_Init(&argc, &argv);
MPI_Comm_rank (MPI_COMM_WORLD, &rank);
MPI_Comm_size (MPI_COMM_WORLD, &size);
MPI_Reduce(&rank, &total, 1, MPI_INT, MPI_SUM, 0, MPI_COMM_WORLD);
printf("Testing MPI index %d of %d on hostname %sn", rank, size, hostname);
if (rank==0)
{
printf("Process sum is %dn", total);
}
MPI_Finalize();
return 0;
}
Next I created a file called machines.txt in the same directory and placed the names of the nodes in the cluster inside, one per line. This file tells MPI where it should run:
beaglebone1 beaglebone2 beaglebone3
With both files created, I finally compiled the program using mpicc and ran the test:
mpicc mpi1.c -o mpiprogram mpiexec -n 8 -f machines.txt ./mpiprogram
This resulted in the following output demonstrating it ran on all 3 nodes:
Testing MPI index 4 of 8 on hostname beaglebone2 Testing MPI index 7 of 8 on hostname beaglebone2 Testing MPI index 5 of 8 on hostname beaglebone3 Testing MPI index 6 of 8 on hostname beaglebone1 Testing MPI index 1 of 8 on hostname beaglebone2 Testing MPI index 3 of 8 on hostname beaglebone1 Testing MPI index 2 of 8 on hostname beaglebone3 Testing MPI index 0 of 8 on hostname beaglebone1 Process sum is 28
Additional Projects
While MPI is a fairly straightforward starting point, a lot of people are more familiar with Hadoop. To test out Hadoop compatibility, I downloaded version 1.2 of Hadoop (hadoop-1.2.1.tar.gz) from the Hadoop downloads at http://www.apache.org/dyn/closer.cgi/hadoop/common. After following the basic set up steps I was able to get it running simple jobs on all nodes. Hadoop, however, shows a major limitation of the BeagleBone which is the speed of SD cards. As a result, using HDFS for jobs is especially slow so you may have mixed luck running anything this is disk IO heavy.
Another great use of the BeagleBones are as web servers and code repositories. It is very easy to install Git and Apache or Node.js the same as you would on other Ubuntu servers. Additionally you can install Jenkins or Hudson to create your own personal build server. Finally, you can utilize all the hookups of the BeagleBone and install xbmc to turn a BeagleBone in to a full media server.
The Future
In addition to single core boards such as the BeagleBones or Raspberry Pi, there are dual core boards starting to appear such as Pandaboard and Cubieboard with likely more on the way. The latter is priced only a little higher than the BeagleBone, supports connecting a 2.5 inch SATA hard disk and features a dual core chip in its latest version. Similar steps to those performed here can be used to set them up, giving hobbyists like me some really good options for home server building. I encourage anyone with the time to try them out and see what you can create.
Linux Shell Script To Monitor Space Usage and Send Email
Linux shell script to check /var logs space and send email if used space reach 80%. Also print space usage of each directory inside /var. Useful to find out which folder use most of space under /var. This script really helps system administrator to monitor their servers space usage. Based on the requirement , administrators can change the directoires they want to monitor.
#!/bin/bash
LIMIT=’80’
#Here we declare variable LIMIT with max of used spave
DIR=’/var’
#Here we declare variable DIR with name of directory
MAILTO=’
This e-mail address is being protected from spambots. You need JavaScript enabled to view it
‘
#Here we declare variable MAILTO with email address
SUBJECT=”$DIR disk usage”
#Here we declare variable SUBJECT with subject of email
MAILX=’mailx’
#Here we declare variable MAILX with mailx command that will send email
which $MAILX > /dev/null 2>&1
#Here we check if mailx command exist
if ! [ $? -eq 0 ]
#We check exit status of previous command if exit status not 0 this mean that mailx is not installed on system
then
echo “Please install $MAILX”
#Here we warn user that mailx not installed
exit 1
#Here we will exit from script
fi
cd $DIR
#To check real used size, we need to navigate to folder
USED=`df . | awk ‘{print $5}’ | sed -ne 2p | cut -d”%” -f1`
#This line will get used space of partition where we currently, this will use df command, and get used space in %, and after cut % from value.
if [ $USED -gt $LIMIT ]
#If used space is bigger than LIMIT
then
du -sh ${DIR}/* | $MAILX -s “$SUBJECT” “$MAILTO”
#This will print space usage by each directory inside directory $DIR, and after MAILX will send email with SUBJECT to MAILTO
fi
Sample Output
./check_var.sh
37M /var/cache
32K /var/db
8.0K /var/empty
4.0K /var/games
70M /var/lib
4.0K /var/local
8.0K /var/lock
38M /var/log
0 /var/mail
4.0K /var/nis
4.0K /var/opt
4.0K /var/preserve
88K /var/run
220K /var/spool
37M /var/tmp
24M /var/www
4.0K /var/yp
Read more linux shell scripts
New and simple desktop for Linux
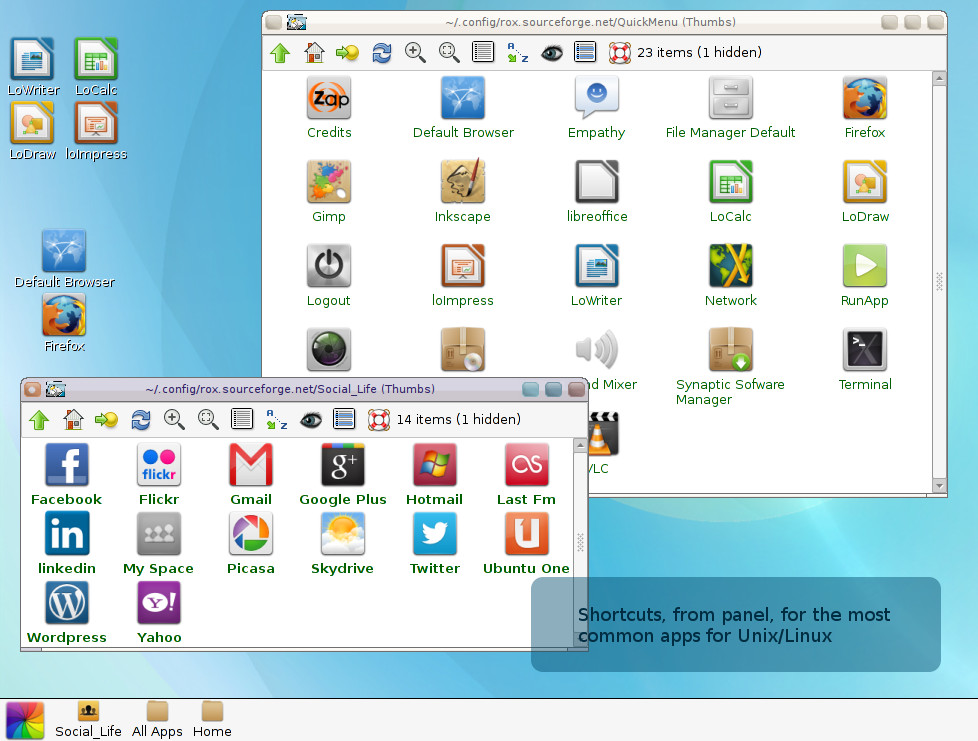
Based on ancient Rox and Window Manager fluxbox . Zappwm is a desktop that consumes only 39MB and offers an environment with drag’n drop very simple and practical .
Currently in version 4.2 , includes the addition of 10 wallpapers, screen corners rounded , links to cloud computing and three main inputs for applications that resemble the interfaces for smartphones :
Social Life – Shortcuts to social networks and cloud computing .
All Apps- shortcuts for all graphics applications .
Home- Personal Folder .
The desktop configuration is very simple , though limited to wallpaper . Just click with the right mouse button and choose Backdrop > Show. Then drag your wallpaper it will be assigned .
This is just a feature of ROX : Drag shortcuts to the panel , desktop and between windows . It is also possible to use ” composite ” application with xcompmgr , but this sacrifices the environment and lightness .
The system requirements are: rox-filer , fluxbox , pcmanfm and xdg – utils . For those who download the application on Debian format ( compatible with ubuntu 12.x, Debian, Mint etc. ) You can install via gdebi , or with the command in terminal mode, with root, “dpkg -i zappwm” followed by ” apt -get – f install” to correct dependencies.

Eztables: simple yet powerful firewall configuration for Linux
Anyone who ever has a need to setup a firewall on Linux may be interested in Eztables.
It doesn’t matter if you need to protect a laptop, server or want to setup a network firewall. Eztables supports it all.
If you’re not afraid to touch the command line and edit a text file, you may be quite pleased with Eztables.
Some features:
- Basic input / output filtering
- Network address translation (NAT)
- Port address translation (PAT)
- Support for VLANs
- Working with Groups / Objects to aggregate hosts and services
- Logging to syslog
- Support for plugins
- Automatically detects all network interfaces
Live From SUSECon: OpenSUSE’s openQA Distro Tester is the Coolest, Plus OpenSUSE 13.1
Computer conferences are glorious and I love going to them, even though it means making eye contact with other humans and sharing air, and sometimes I even have to adjust my stride to avoid trampling people. Because they’re full of nerds and the latest tech, and what could be more fun than playing with someone else’s cool tech toys, and playing stump the chump with sales engineers? Nothing I tell you, nothing!
It’s a bit of hyperbole to call openSUSE’s openQA the coolest tech in the show, but it is mighty ingenious and useful, and it literally stopped me in my tracks as I was cruising the vendor floor. openQA is an automated build tester that records the entire distro build process in a series of screenshots, and then it creates an ogg/theora video out of the screenshots. Don’t take my word for it– go look at example. Just click the little movie clapboard on any item on the results page.
openQA finds and reports errors, and it’s not just an OpenSUSE tool because it also works for RHEL, CentOS, and Fedora. OpenQA is the pretty front-end to OS-autoinst which was created and is maintained by Bernhard M. Wiedemann. OS-autoinst is distro-independent and should work with any Linux distribution. openQA and OS-autoinst can test everything from the bootloader and kernel to applications.
openQA and OS-autoinst still need work, so if you’re looking to make your mark as a FOSS contributor consider lending a hand to these excellent projects. Learn more about openQA at openQA in openSUSE
New Release Next Week
openSUSE 13.1 is officially released next week on Nov. 18. Fun fact: openSUSE has a new release every eight months, and there are only three per version: .1, .2 and .3. So a .1 release comes out every other November. openSUSE 13.1 promises greater stability (not that it’s ever been unstable), Amazon S3 integration, Samba 4.1, 32-bit ARM support, a a special Raspberry Pi build, and lots more.


