

![]()
Read more at LinuxInsider
![]()
Alan Baghumian has announced the availability of an updated build of Parsix GNU/Linux 4.0, a desktop distribution and live DVD based on Debian’s “testing” branch: “To celebrate our 8th anniversary, we decided to release an updated version of Parsix GNU/Linux 4.0 code name ‘Gloria’.
Editor’s Note: This article, part two in a series by Eric Brown, includes a buying guide for open source and Linux-friendly 3D printers. For more background on open source printers see part one: Open Source Pushes 3D Printers to Success.
3D printers run on simple microcontrollers – many of them based on the open Arduino hacker platform — and are controlled by desktop PCs like any other printer. Almost all the open source printers — and almost none of the proprietary designs – support Linux desktops, in addition to Windows and Mac.
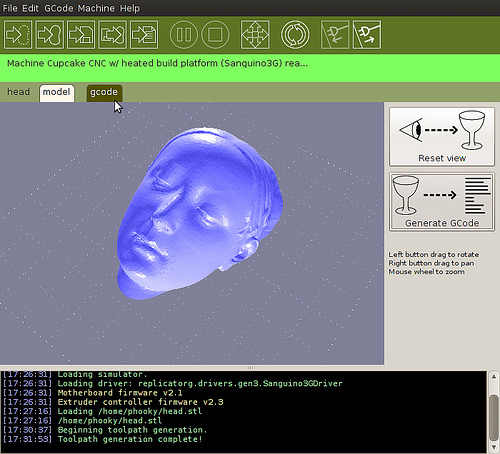
With MakerBot and RepRap printers, users can draft their own designs using any CAD software, including open source programs like TinkerCAD and 123D Design, or download a CAD-generated .stl file from an open repository like Thingiverse or GrabCAD. The designs are run through a slicing program, such as the open source Slic3r, which converts the designs into layer data. This data is processed by a printer program that translates the sliced CAD drawings into machine code. More and more printer programs like Printrun or Repeteir-Host bundle a slicing program.
One of the most popular programs continues to be ReplicatorG, which supports RepRap and MakerBot machines. (For more on 3D printing with Linux, see Kyle Rankin’s recent guide in LinuxJournal.)
There’s considerable overlap between 3D printer hackers and open hardware developers using embedded Linux. For example, O’Reilly’s Make Magazine, the leading 3D printer resource, also regularly covers open Linux projects like Raspberry Pi. At Make, and the related Maker Faire, 3D printing is just one part of the wider, FOSS-oriented “Maker” movement, which spans everything from Arduino- and Linux-based gadgets to digitally-designed crafts. Last week O’Reilly spun off the Maker division as a company called Make Media.
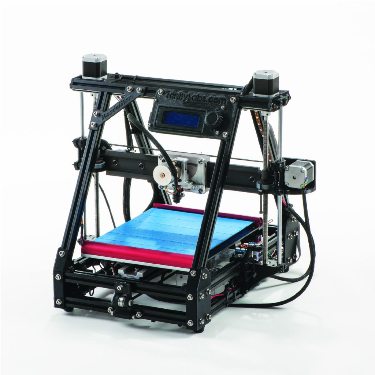
Ten of the 15 desktop models on Make’s 3D printer review page are open source. In addition to the previously mentioned Printrbot, Solidoodle, Type A, and Ultimaker “original” systems, other open models listed include the low-cost RepRap Huxley derivative SeeMeCNC, as well as other RepRap-based printers that range from $1,300 to $1,700, including Trinity Labs’ MendelMaxPro, Deezmaker’s Bukobot 8, MakerGear’s M2, and Aleph Object’s Lulzbot AO-100.
Castle Island’s The Worldwide Guide to Rapid Prototyping offers another recent 3D printing guide, which also lists open source models like PP3DP’s Up! printers, Bits from Bytes’ RapMan, and the Fab&Home project’s printer kit design. The latter, which emerged from Cornell University, uses a different syringe-based additive fabrication technology that is less precise than thermoplastic extruders, but supports a a variety of liquid materials, including silicone, cement, stainless steel, and even chocolate and cheese. The craft market is literally eating it up.
Most of the open source desktop models support both biodegradable PLA and stronger, non-degradable ABS plastics, and some can extrude water-soluble PVA plastic to form plastic supports for the object during fabrication. Some offer dual extruders for making PVA supports and applying multiple colors.
Other feature criteria include speed, resolution, chassis type, axis extendability, heating platform temperature, accessories, and the presence of an SD slot, which enables printing without an attached PC. Print volume generally ranges from four- to 10-inch cubes.
According a survey conducted last year by Statistical Studies of Peer Production, wish-list items include lower printer and materials prices, as well as high-end features like faster speed, better quality, and metal printing. In particular, Jarkko Moilanen, founder of the P2P Foundation funded research group, expects metal to come to more desktop 3D printers, which would greatly expand the range of end products. Already, a RepRap spinoff called MetalicaRap is developing an electron beam 3D printer that supports metal and can also be used to fabricate solar cells.
At CES, Kickstarter darling Formlabs unveiled its Form 1 stereolithographic desktop printer, which is touted as printing high-precision 3D objects using lasers and plastic resin. It appears to be a proprietary product, however, and it’s being contested by 3D Systems in a patent lawsuit.
Eventually, Moilanen expects even more exotic materials to be supported, including nano materials, which will open up applications such as custom medical devices and tissue engineering. Here, open source has an early champion with the openMaterials project.
As far as we know, there are no embedded Linux 3D printers, which would likely be overkill. Yet, some 2D printers run Linux, and the Raspberry Pi has already been hacked to control 3D printers. Moilanen says he has considered using the Pi in an integrated design.
The need for more powerful processors and embedded firmware may grow, says Moilanen, as the devices grow more complex and start requiring direct web access. “I’m expecting we’ll see web connections arrive on 3D printers, so they can be used just like laser printers are used now,” he says.
One key future direction is cloud-based 3D printing. Already, services like market leader Shapeways, as well as Ponoko and i.Materialise, have found success with designers and engineers who would rather upload CAD files than tinker with hardware. Since their more advanced fabrication devices support multiple plastics, as well as metal and ceramics, some 3D printer owners use the services when their designs outgrow their own machines. As easy-to-use, browser-based CAD programs like TinkerCAD and 3DTin mature, cloud-based 3D printing services could greatly expand their reach to consumers, says Moilanen.
Below are the 10 open source, Linux-compatible models of the 15 products listed on Make Magazine’s reviewed 3D printer page. The other five are all proprietary and except for the newly-proprietary, best-selling Replicator 2, they lack Linux support. Models listed below all support Linux, Mac, and Windows PCs. Unless otherwise noted, all devices support both PLA and ABS plastics, and prices are for assembled models:
Bukobot 8 (Deezmaker)– RepRap-based design, extendable in any axis, supports PVA – $1,385
Lulzbot AO-100 (Aleph Object)– basic RepRap MendalMax design with good accessories – $1,735
M2 (MakerGear)– RepRap Mendel/Pruse design with steel frame, big print volume – $1,499
MendelMaxPro (Trinity Labs)– RepRap Mendel-based with fast-heating 200W glass platform, supports PVA – $1,295
Printrbot LC (Printrbot)– Kickstarter newcomer, extendable in any axis – $799
Printrbot Jr. (Printrbot)– Cheapest, smallest 3D printer around, limited to 4-inch cube, PLA only – $399
Replicator 2 (Makerbot)– Latest version of best seller, higher end, Linux but (newly) not open source, PLA only – $2,199
SeeMeCNC H1.1 (SeeMeCNC)– DIY oriented RepRap Huxley spinoff with injected molded parts, supports PVA – $189 to $594 kit only
Solidoodle 2 (Solidoodle)– Affordable, fully-enclosed original design – $499 – $699
Type A Series 1 (Type A Machines)– Big 9-cubic-inch volume, high accuracy, supports PVA – $1,400
Ultimaker (Ultimaker) – Fast, 150mm/sec. speed, 8.3-cubic-inch volume – ($1,661 kit, incl. controller)
In the first part of this tutorial, we showed how to use Vagrant to automate and manage local virtual machines for a software development environment. We defined a simple Vagrantfile to specify certain attributes for a VM to run a simple web app, and got it running using Vagrant’s command line tools. In this part of the tutorial, we’ll be using Puppet to define and automate the configuration details for our VM. This way, whenever we start up the dev environment with vagrant up, it will be set up to run our web application without any additional manual configuration.
Puppet is an extremely powerful tool for configuring systems, and has its own language for specifying configuration. This language works in a way that’s subtly different from many other computer languages: it’s declarative. This means that, rather than specifying a list of actions that you want the computer to take (as in a shell script), you are describing a set of resources that you want to exist on the system. Resources are the building blocks of your system’s configuration, and they fall into many types that will be familiar to any *nix user: files, packages, users, and so on.
![]()
Let’s examine an example specific to the goal of this tutorial: getting our VM to run a simple web application. In our case, we want the application to be run by Apache, since that’s the service that will be running the application in production. In order for our VM to run an application with Apache, it will need to have the package installed. We can describe the package to Puppet like this:
package { "apache2":
  ensure => present,
}
First, we tell Puppet what type of resource we’re describing: a package. Then we tell it the title of the resource: in this case, apache2, the name of the package we want installed. Then, we define the ensureattribute to be present. This tells Puppet that we want the package to be present on our system. We can also tell Puppet what source it should use to find a package by specifying a provider; so for instance, if we were working on a webapp using Ruby on Rails, we might tell Puppet to install the rails package using the gemprovider, which will cause it to try to load the package from RubyGems:
package { "rails":
  ensure => present,
  provider => gem,
}
Each type has its own set of providers and attributes that can be used to further refine your descriptions. For instance, you could specify version => "3.0.0" if you knew you wanted the 3.0.0 version of a package. There is extensive documentation available on Puppet’s rich type and provider system to help you learn different ways to describe a desired system state with Puppet.
Puppet’s true power is that you can describe resources to it in a generic way (I want this file to exist at that location with these contents, I want this service to be running on that port, etc.), and Puppet will configure your system to match the description regardless of the individual system you are configuring. Wherever you run it, Puppet will examine the current state of the system, compare it to the state you have described, and then do whatever it needs to in order to make the system’s configuration match what you have specified. This means that we could swap out the Vagrant box in our project for a boxfile based on a completely different system, and our Puppet provisioning will still work with only minor changes.
Using what we’ve learned about Puppet’s declarative language, let’s specify some basic setup for our development environment. This code will go into a manifest file. We’ll define ours in sample-dev-env/manifests/default.ppbecause this is the default location Vagrant searches for Puppet manifest files.
$ mkdir manifests
$ vim manifests/default.pp
exec { "apt-get update":
  path => "/usr/bin",
}
package { "apache2":
  ensure  => present,
  require => Exec["apt-get update"],
}
service { "apache2":
  ensure  => "running",
  require => Package["apache2"],
}
file { "/var/www/sample-webapp":
  ensure  => "link",
  target  => "/vagrant/sample-webapp",
  require => Package["apache2"],
  notify  => Service["apache2"],
}
$ git add manifests/default.pp
$ git commit -m "Basic Puppet manifest"
There are a few new concepts in this sample, most notably the require and notify attributes. This allows you to express dependencies between resources so that things happen in the right order. In this example, we’ve specified that the apache2service can’t be run until the apache2package has been installed, and we’ve told Puppet to notify the apache2 service when it’s linked our sample webapp’s directory into the default Apache document root. We’ve also defined an exec resource to run apt-get update before attempting to install Apache—this is just to make sure that apt is updated before it tries to install anything.
Note that the order in which Puppet will take certain steps is not defined by their order in the file, as with shell scripts; we could move these resource definition blocks around, and the result of applying the manifest would remain the same.
Now that we have a simple Puppet configuration defined for provisioning the VM that Vagrant creates and manages, how do we put all the pieces together so that everything works? Fortunately, Vagrant was built from the ground up with configuration management systems like Puppet in mind, so it’s really simple. All we need to do is add this line to the VM config block in our Vagrantfile:
config.vm.provision :puppet
Since we’ve placed our manifest in the default location, Vagrant will automatically detect it and use it for provisioning our VM. This means that now, when we bring up our VM with vagrant up, it will automatically be set up to serve content from the sample-webapp directory in our dev environment. Let’s give it something to serve:
$ pwd ~/sample-dev-env
<h1>Hello, world!</h1>
$ mkdir sample-webapp
$ vi sample-webapp/index.html
Now, if you visit localhost:3000/sample-webapp in a browser on your local machine, thanks to Puppet’s provisioning and Vagrant’s port forwarding, you should see your message displayed. You can continue adding and editing files on your local machine, and the changes will be reflected instantly in what’s served by the Apache instance running on your VM.
The power of this is obvious: Now, any developer on your project can have a local VM serving live-updated code with just these commands:
$ git clone This e-mail address is being protected from spambots. You need JavaScript enabled to view it :your_username/your-dev-env-repo.git $ cd your-dev-env-repo $ git clone This e-mail address is being protected from spambots. You need JavaScript enabled to view it :your_username/your-webapp.git $ vagrant up
That’s it! This workflow can be integrated even more tightly by defining a git submodule within your development environment for the projects it can be used to develop. As your Puppet configuration grows more complex, you may find it useful to organize your specifications into modules and classes, or explore the rich set of Puppet modules available on the Puppet Forge, where you can find powerful building blocks for your Puppet configuration. Puppet has super awesome documentation to help you progress on your journey. Vagrant also has a rich set of documentation available, including in-depth documentation on using Puppet with Vagrant. If building this type of development environment interests you, I’ve taken the simple templates from this tutorial and made them available on Github as a starting point.