Home Blog Page 323

Freespire Linux: A Great Desktop for the Open Source Purist

Quick. Click on your Linux desktop menu and scan through the list of installed software. How much of that software is strictly open source? To make matters a bit more complicated, have you installed closed source media codecs (to play the likes of MP3 files perhaps)? Is everything fully open, or do you have a mixture of open and closed source tools?

If you’re a purist, you probably strive to only use open source tools on your desktop. But how do you know, for certain, that your distribution only includes open source software? Fortunately, a few distributions go out of their way to only include applications that are 100% open. One such distro is Freespire.

Does that name sound familiar? It should, as it is closely related to Linspire. Now we’re talking familiarity. Remember back in the early 2000s, when Walmart sold Linux desktop computers? Those computers were powered by the Linspire operating system. Linspire went above and beyond to create an experience that would be similar to that of Windows—even including the tools to install Windows apps on Linux. That experiment failed, mostly because consumers thought they were getting a Windows desktop machine for a dirt cheap price. After that debacle, Linspire went away for a while. It’s now back, thanks to PC/OpenSystems LLC. Their goal isn’t to recreate the past but to offer two different flavors of Linux:

  • Linspire—a commercial distribution of Linux that includes proprietary software and does have an associated cost ($39.99 USD for a single license).

  • Freespire—a non-commercial distribution of Linux that only includes open source software and is free to download.

We’re here to discuss Freespire and why it is an outstanding addition to the Linux community, especially those who strive to use only free and open source software. This version of Freespire (4.0) was released on August 20, 2018, so it’s fresh and ready to go.

Let’s dig into the operating system and see what makes this a viable candidate for open source fans.

Installation

In keeping with my usual approach, there’s very little reason to even mention the installation of Freespire Linux. There is nothing out of the ordinary here. Download the ISO image, burn it to a USB Drive (or CD/DVD if you’re dealing with older hardware), boot the drive, click the Install icon, answer a few simple questions, and wait for the installation to prompt for a reboot. That’s how far we’ve come with Linux installations… they are simple, and rarely will you have a single issue with the process. In the end, you’ll be presented with a simple (modified) Mate desktop (Figure 1) that makes it easy for any user (of any skill level) to feel right at home.
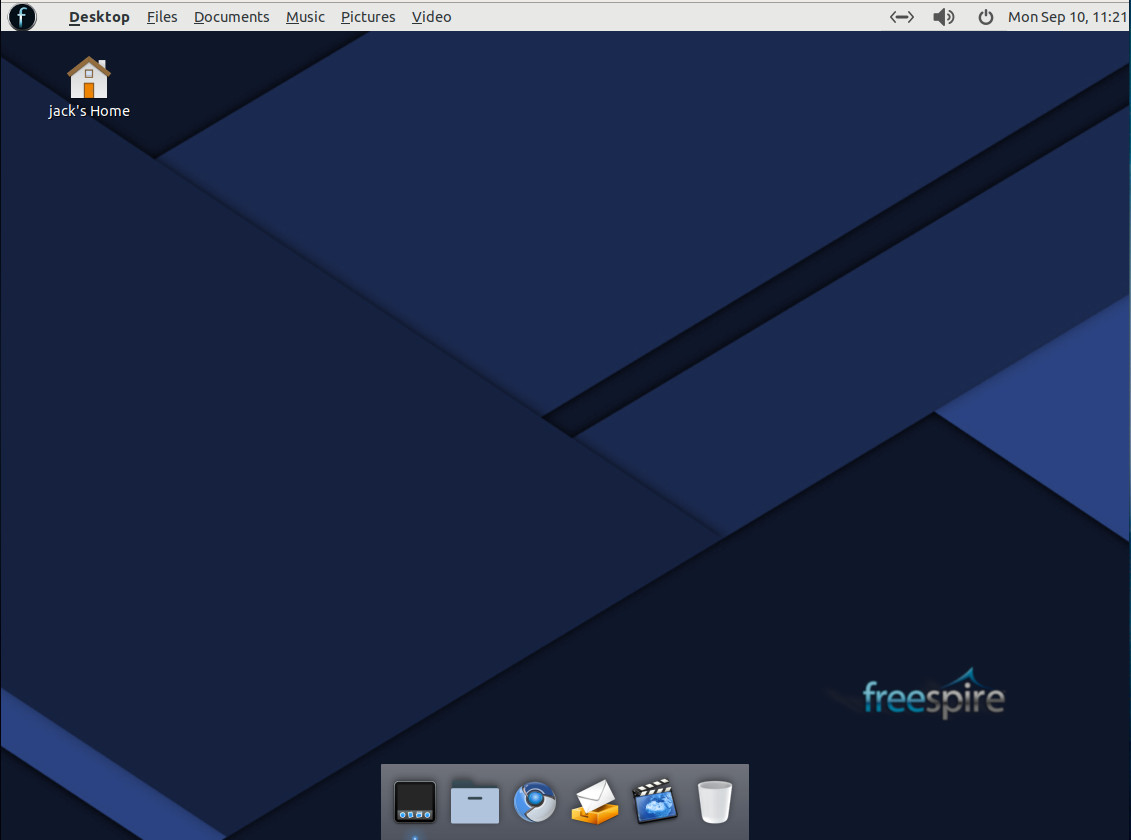
Figure 1: The Freespire desktop.

Software Titles

Once you’ve logged into the desktop, you’ll find a main menu where you can view all of the installed applications. That list of software includes:

  • Geary

  • Chromium Browser

  • Abiword

  • Gnumeric

  • Calendar

  • Audacious

  • Totem Video Player

  • Software Center

  • Synaptic

  • G-Debi

Also rolled into the system is support for both Flatpak and Snap applications, so you shouldn’t miss out on any software you need, which brings me to the part when purists might want to look away.

Just because Freespire is marketed as a purely open source distribution, it doesn’t mean users are locked down to only open source software. In fact, if you open the Software Center, you can do a quick search for Spotify (a closed source application with an available Linux desktop client) and there it is! (Figure 2).
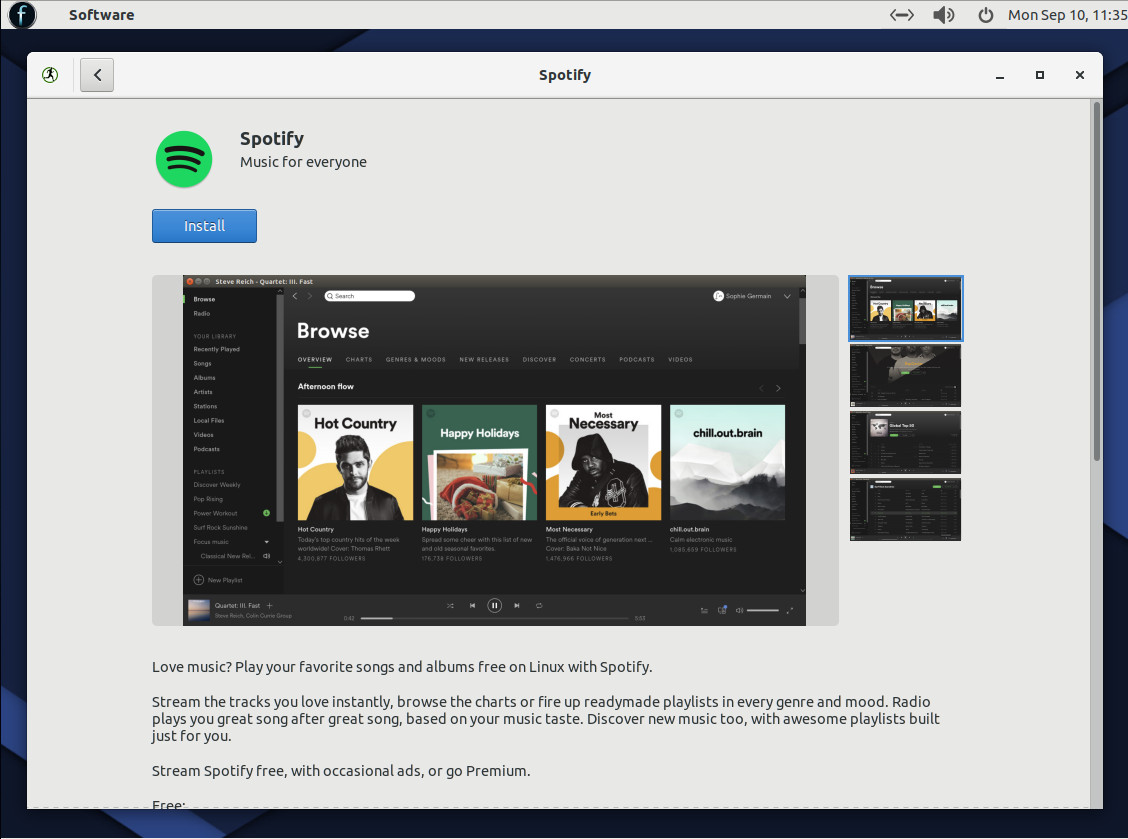
Figure 2: The closed source Spotify client available for installation.

Fortunately, for those productive-minded folks, the likes of LibreOffice (which is not installed by default) is open source and can be installed easily from the Software Center. That doesn’t mean you must install other software, but those who need to do serious business-centric work (such as collaborating on documents), will likely want/need to install a more powerful office suite (as Abiword won’t cut it as a business-level word processor).

For those who tend to work long hours on the Linux desktop and want to protect their eyes from extended strain, Freespire does include a nightlight tool that can adjust the color temperature of the interface. To open this tool, click on the main desktop menu and type night in the Search bar (Figure 3).
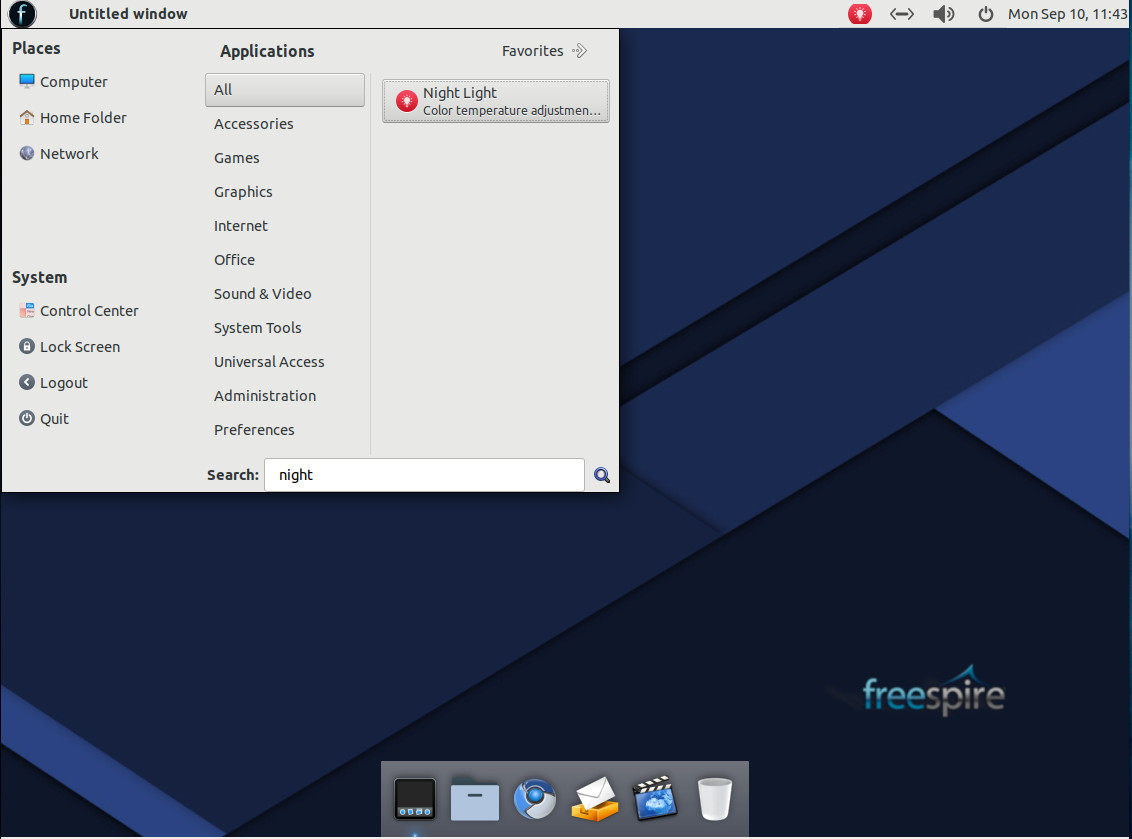
Figure 3: Opening the Night Light tool.

Once opened, Night Light will automatically adjust the color temperature, based on the time of day. From the notification tray, you can click the icon to suspend Night Light, set it to autostart, and close the service (Figure 4).
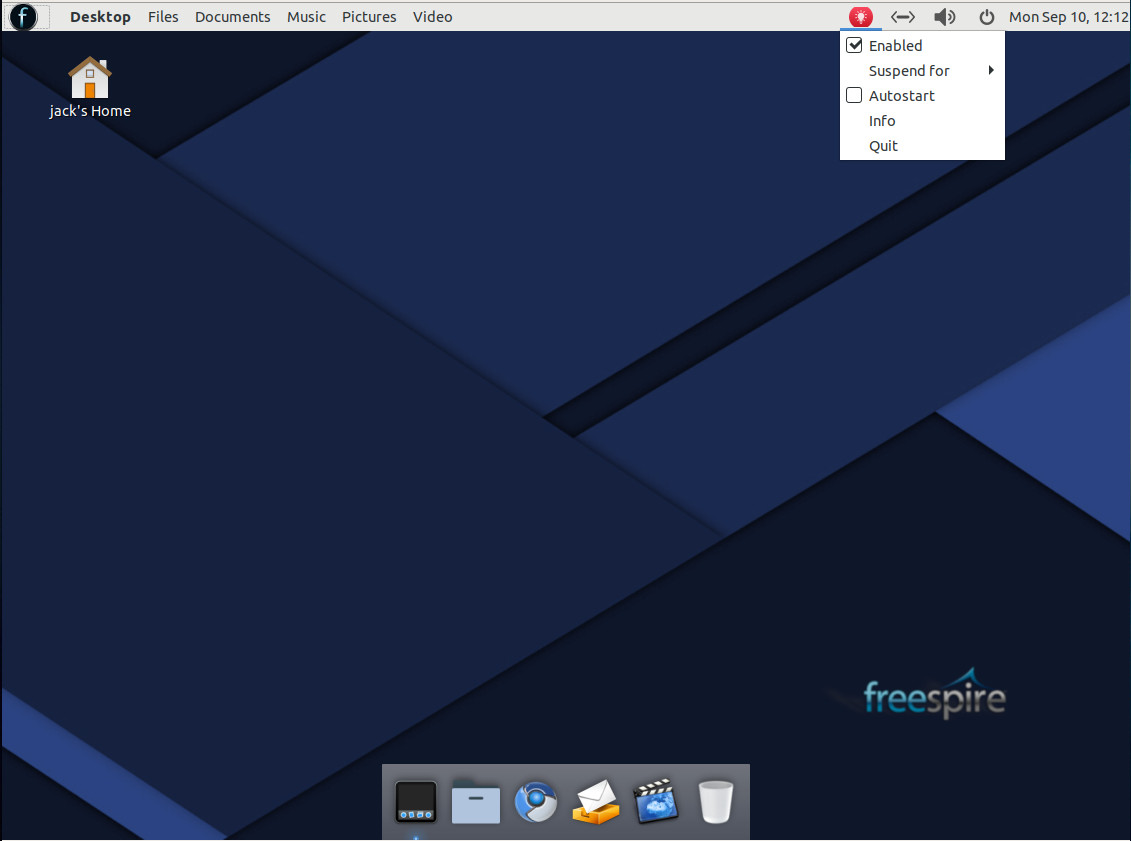
Figure 4: The Night Light controls.

Beyond the Mate Desktop

As is, Mate fans might not exactly recognize the Freespire desktop. The developers have clearly given Mate a significant set of tweaks to make it slightly resemble the Mac OS desktop. It’s not quite as elegant as, say, Elementary OS, but this is certainly an outstanding take on the Linux desktop. Whether you’re a fan of Mate or Mac OS, you should feel immediately at home on the desktop. On the top bar, the developers have included an appmenu that changes, based on what application you have open. Start any app and you’ll find that app’s menu appears in the top bar. This active menu makes the desktop quite efficient.

Are you ready for Freespire?

Every piece of the Freespire puzzle is equally as user-friendly as it is intuitive. The developers of Freespire have gone to great lengths to make this pure open source distribution a treat to use. Even if a 100% open source desktop isn’t your thing, Freespire is still a worthy contender in the world of desktop Linux. It’s clean and stable (as it’s based on Ubuntu 18.04) and able to help you be efficient and productive on the desktop.

Learn more about Linux through the free “Introduction to Linux” course from The Linux Foundation and edX.

How to Install and Configure GitLab on Ubuntu 18.04 LTS

GitLab is an open source GIT repository manager based on Rails and developed by GitLab Inc. It is a web-based GIT repository manager that allows your team to work on code, perform feature requests, track bugs, and test and implement applications. GitLab provides features such as a wiki, issue tracking, code reviews, activity feeds, and merge management. It is able to host multiple projects.

GitLab is available in four editions:

  1. Gitlab CE (Community Edition) – self-hosted, free and support from the Community forum.
  2. Gitlab EE (Enterprise Edition) – self-hosted, paid app, comes with additional features.
  3. GitLab.com – SaaS, free.
  4. GitLab.io – Private GitLab instance managed by GitLab Inc.

In this tutorial, I will show you step-by-step how to install GitLab CE (Community Edition) on your own Ubuntu 18.04 LTS (Bionic Beaver) server. I will be using the ‘omnibus’ package provided by GitLab for easy installation.

Read more at HowToForge

Open Source Networking Days Returning This Fall

As we gear up the for the first ever Open Networking Summit Europe event, Amsterdam, September 25-27, it’s becoming clear to me just how far we’ve come this year since the formation of LF Networking. With new major operators joining, like Deutsche Telekom, and others requiring open source project automation tools in their RFPs, like Orange, it’s inspiring to witness just how much the networking industry is rallying around open source and incorporating it as a key element of their business strategies. 

…For those who can’t make it to Amsterdam this time, I wanted to share the good news that the next three Open Source Networking Days (OSN Days) tours will be coming this fall to China, APAC, and North America. Here are confirmed cities and dates so far. Click on the links to learn more and register. Check back soon to main OSN Days website for updates on the others.

ChinaShanghai: Oct 12 | Nanjing: Oct 15 | Beijing: Oct 17

APACSingapore: Oct 15 | Taiwan: (Hsinchu): Oct 17 | Tokyo: Oct 23

North AmericaOttawa: Oct 30 | Bay Area: Nov 1 | Dallas: Nov 6 | Toronto: Nov 8 | Boston: Nov 19 | Montreal: Nov 29 | Austin: TBD

Read more at The Linux Foundation

Cloud Foundry Survey Finds Top Enterprise Languages

Programmers may love hot newer languages like Kotlin and Rust, but according to a Cloud Foundry Foundation (CFF)recent survey of global enterprise developers and IT decision makers, Java and Javascript are the top dog enterprise languages.

That said, the CFF also found that, “More and more, businesses are employing a polyglot and a multi-platform strategy to meet their exact needs.” The CFF discovered 77 percent of enterprises are using or evaluating Platforms-as-a-Service (PaaS); 72 percent are using or considering containers; and 46 percent are using or thinking about serverless computing. Simultaneously, more than a third (39 percent) are using all three technologies together.

For companies this “flexibility of cloud-native practices enables [companies to move] away from a monolithic approach and towards a world of computing that is flexible, portable and interoperable.” That means, while Java and JavaScript are only growing ever more popular, the larger the company, the more languages are used.

Read more at ZDNet

Why You Need To Understand Your Software Supply Chain

Every company uses software, obviously. There isn’t a technology industry keynote that passes without a besuited evangelist telling us that ‘every business is a technology business’ – and they may even pepper in the old ‘hey Uber has no cars, Amazon has no bookstores’ chestnut if they really want to check all the boxes.

But software these days rarely comes on a CD-ROM or in a box, even when it is a commercial off-the-shelf (COTS) software product. The downloaded, continuously updated nature of software creates what the industry likes to call the ‘software supply chain’. Because an increasing amount of this software is open source, we need to understand what implications this has for the shape of the chain.

Duncan Clark, head of PatSnap Academy points out that open source software can enter customers source code, including their internally developed proprietary code, in many different and often undocumented ways. Managing this process is key to working with open source channels effectively.

Read more at Forbes

Lights, Camera, Open Source: Hollywood Turns to Linux for New Code Sharing Initiative

In looking to code smarter, faster and more efficiently, developers across the globe and industries are turning to open-source components that allow them to add powerful features to their work without having to write everything from scratch themselves. One of the latest groups to embrace the Open Source movement is the entertainment industry.

Similar to many other initiatives that have come together in recent years to support the sharing of code between companies, a number of key players under the umbrella of the Academy of Motion Picture Arts and Sciences (AMPAS) have teamed up with The Linux Foundation to establish the Academy Software Foundation (ASWF). Members include companies like Disney, Google, Dreamworks, Epic Games and Intel, just to name a few….

Looking at the growth of new open-source initiatives over the past few years, it is clear that all industries have recognized that they are making widespread use of open-source components and that there is a need to organize it if they hope to direct it toward their shared goals efficiently.

Read more at Linux Journal

Launch your Ecommerce Business for Free with Open Source Solutions

By Cédric Geffroy

At present, there are a lot of saas ecommerce software used to launch an ecommerce business. Softwares like Shopify, Volusion or BigCommerce are often seen as the best choice because they are easier to use and quicker to deploy. However, these assumptions are wrong, especially when you need custom development for your ecommerce site or when you want to add some advanced functions that will help your business grow. This is because these softwares do not allow you to customize your website just the way you want it.

By using open source solutions you are sure to have unlimited potential building your ecommerce site just the way you want it. It offers you a cost-effective solution that can be deployed within a short time.

For this tutorial I have made use of the worldwide used solution that offers flexibility with large community of users. Here are the suggested options:

Prestashop 1.6: This is currently the most stable and advanced open source ecommerce solution with a community of more than one million members, one thousand contributors and 250 agencies (just in case you need a little help…). The 1.6 version has been replaced by the completely revamped 1.7 version which includes Symfony framework. However, I still recommend using the 1.6 version as the 1.7 will probably need a few more releases to be as stable and as efficient as the 1.6.

Linux LEMP on 16.04 + MariaDB: On distribution, LEMP (Linux, Nginx, Mysql and PHP) is the best option when combined with MariaDb in place of Mysql. I also recommend using a cloud hosting company like Digital Ocean, because they have a strong community with well written tutorials and available support. They offer a one click LEMP installation, just like other hosting companies.

After installing your one-click LEMP, log in to your server and check if all your services are up to date.

  • apt-get update

  • apt-get upgrade

I also recommend installing this useful extract tool which will be able to “Do the Right eXtraction” (DTRX) for any archive.

  • apt-get install dtrx

Uninstall Mysql (to install MariaDB)

  • apt-get purge mysql-server mysql-client mysql-common mysql-server-core-5.7

  • mysql-client-core-5.7

  • rm -rf /etc/mysql /var/lib/mysql

  • apt-get autoremove

  • apt-get autoclean

Install MariaDb

  • apt-get update

  • apt-get install mariadb-server

Launch MariaDB configuration

  • mysql_secure_installation

  • Enter current password for root: No current password so press Enter

  • Set root password : Y

  • Remove anonymous users: Y

  • Disallow root login remotely: Y

  • Remove test database and access to it: Y

  • Reload privilege tables now: Y

Install phpMyAdmin – your database administration tool

  • apt-get install phpmyadmin

  • select apache2

  • Configure database for phpmyadmin with dbconfig-common : YES

  • type a new password

  • ln -s /usr/share/phpmyadmin/ /var/www/html/XXXXXXXXX

Replace XXXXXXXXX by a non-obvious name that will allow you to access your phpMyAdmin web page. http://ip_server/XXXXXXXXXX

  • service nginx restart

Modify privileges of phpMyAdmin user

Connect to mysql

  • mysql -u root -p

Type password chosen during mysql installation.

  • GRANT ALL PRIVILEGES ON *.* TO ‘phpmyadmin’@’localhost’ WITH GRANT OPTION;

  • FLUSH PRIVILEGES;

CTRL+C to exit mysql.

Secure phpMyAdmin

We will add password authentication on the phpMyAdmin page to add a layer of security. Execute next command, type a new password and copy the key returned

  • openssl passwd

Create a directory to store this login and password

  • mkdir /etc/nginx/passwd

Create file to store login and key of password with command

  • nano /etc/nginx/passwd/pma_pass

Your file should contain your login and key like that:

  • login:key_returned

(Use something less obvious than “login”)

Save and close by using CTRL+X and typing “Y” + ENTER

Modify your default vhost to access your phpMyAdmin page

  • nano /etc/nginx/sites-available/digitalocean

After:

  • location / { ……….. }

Add:

  • location /XXXXXXXXXX {

auth_basic “Private”;

auth_basic_user_file /etc/nginx/passwd/pma_pass;

}

Replace XXXXXXXXXX by the name used to access your phpMyAdmin page.

Save and close by using CTRL+X and typing “Y” + ENTER

  • service nginx restart

Create a new vhost for your ecommerce website

  • mkdir -p /var/www/example.com/

  • cd /var/www/example.com/

Download PrestaShop (last 1.6 version) and extract

  • wgethttps://download.prestashop.com/download/releases/prestashop_1.6.1.20.zip

  • dtrx prestashop_1.6.1.20.zip

Remove zip archive and move prestashop main directory

  • rm prestashop_1.6.1.20.zip

  • mv /var/www/example.com/prestashop_1.6.1.20/prestashop/ /var/www/example.com/html

  • rm -r prestashop_1.6.1.20/

Modify group/user of directory

  • chown -R www-data:www-data /var/www/example.com/html

Make sure directories are set to 755 and files to 644

  • find. -type d -print0 | xargs -0 chmod 0755

  • find. -type f -print0 | xargs -0 chmod 0644

Now, we have to create the NGINX vhost for our Prestashop 1.6. You can use this example which has been modified to work on an https PrestaShop website. It might need some tuning depending on your needs.

See attached file

Create your vhost file and paste the vhost example (don’t forget to replace example.com by your domain)

  • nano /etc/nginx/sites-available/example.com

Activate the vhost

  • ln -s /etc/nginx/sites-available/example.com /etc/nginx/sites-enabled/

  • service nginx restart

Tune the PHP configuration

Open the php.ini file and change parameters to match those values

  • nano /etc/php/7.0/fpm/php.ini

  • memory_limit = 256M

  • post_max_size=32M;

  • max_input_vars=10000

max_input_vars is probably commented, remove the “;” at the beginning of the line.

You can use CTRL+W to search in the file.  

Save and close by using CTRL+X and typing “Y” + ENTER

Reload the configuration:

  • service php7.0-fpm reload

Install Postfix

Next, we would love to send emails from our shop, therefore we need to install a mail solution used as a send only tool like Postfix.

  • apt-get install mailutils

  • Choose: Internet Site

  • Type domain: example.com

Next, tune the Postfix configuration:

  • Sudo nano /etc/postfix/main.cf

  • Modify this line:

inet_interfaces = all

  • To this:

inet_interfaces = loopback-only

  • Modify this line:

mydestination = $myhostname, example.com, localhost.com, , localhost

  • To this:

mydestination = $myhostname, localhost.$mydomain, $mydomain

Save and close by using CTRL+X and typing “Y” + ENTER

Restart Postfix

  • systemctl restart postfix

Create a database for your PrestaShop

Access your phpMyAdmin interface with this url http://ip_server/XXXXXXXXXX

XXXXXXXXXX is what you chose previously.

You will be prompted with a popup login form, type your login and password chosen for the extra security layer step earlier. On the phpMyAdmin login page type “phpmyadmin” as login and the password chosen during phpMyAdmin installation process.

To add a new database and its user:

  • Click “New” on the left hand side menu.

  • Type and select in dropdown menu.

  • Click

  • On page loaded click on

  • Click on “Add user account”

  • Username: choose username for your database

  • Host name: localhost

  • Password: choose your password

  • Check the checkbox “Grant all privileges on database “XXXXXX”.”

  • Click OK on bottom of page

  • On next page click OK on bottom of page.

Install Prestashop

Go to your website URL: http://www.example.com

  • Choose language and click Next

  • Accept License Agreements and click Next

  • Fill out form and click Next

  • On Database configuration page:

  • Database server address: localhost

  • Database name: the name you picked

  • Database login: username you picked

  • Database password:password you picked

  • Tables prefix: leave “_ps”

  • Click on “Test your database connection now!”

  • Click on Next

Congrats, “Your installation is finished!”

Click on the back office button on this page and bookmark the URL

Remove the install folder with command:

  • rm -r /var/www/example.com/html/install

Now you should be able to access your store with the url: http://www.example.com

Install the SSL certificate

  • apt-get update

  • apt-get install software-properties-common

  • add-apt-repository ppa:certbot/certbot

  • apt-get update

  • apt-get install python-certbot-nginx

  • certbot –nginx

  • Type your email

  • Agree terms: A

  • Share email or not (it’s up to you)

  • Which names would you like to activate HTTPS for?

Hit enter for both with and without www

  • Redirect HTTP traffic to HTTPS website

Select: 2

Use this command to automatically renew your certificates:

  • certbot renew –dry-run

Configure your PrestaShop to work with https.

  • Login to your PrestaShop backoffice

  • Preferences > General

  • Enable SSL: YES

  • Click Save at the bottom of page

After reloading

  • Enable SSL on all pages: YES

  • Click Save at the bottom of page

BOOM, you can now access your store through HTTPS.

References

This article was written based on my years of experience and other tutorials, articles I found on the web in the last few years of my constant research. Notable among this sites are

Many StackOverflow or AskUbuntu answers:

Top 10 Reasons to Join the Premier European Open Source Event of the Year | Register Now to Save $150

See why you need to be at Open Source Summit Europe and Embedded Linux Conference + OpenIoT Summit Europe next month! Hurry — space is going quickly. Secure your spot and register by September 22 to save $150.

Here are the Top 10 Reasons you’ll want to be at this event:

  1. Timely Cutting-edge Content: 300+ sessions on Linux development, embedded Linux systems, IoT, cloud native development, cloud infrastructure, AI, blockchain and open source program management & community leadership.
  2. Deep Dive Labs & Tutorials: An Introduction to Linux Control Groups (cgroups),  Building Kubernetes Native Apps with the Operator Framework, Resilient and Fast Persistent Container Storage Leveraging Linux’s Storage Functionalities,  and 10 Years of Linux Containers, are just some of the labs and tutorials included in one low registration price.
  3. 12 Co-located Events*: Come for OSS & ELC + OpenIoT Summit and stay for LF Energy Summit, Linux Security Summit, Cloud & Container Embedded Apprentice Linux Engineer tutorials, IoT Apprentice Linux Engineer tutorials, Hyperledger Scotland Meetup, Linux in Safety-Critical Systems Summit, and many more co-located events.  (*Some co-located events may require an additional registration fee.)
  4. Discover New Projects & Technologies: Over 30 sponsors will be showcasing new projects and technologies in the Sponsor Showcase throughout the event, joined by our Technical Showcase at the Onsite Attendee reception showcasing Free and Open Source Software (FOSS) projects from system developers and hardware makers.
  5. Social Activities & Evening Events: Take a break and go on a sightseeing bus tour, join the 5K fun run or morning meditation, and meet with fellow attendees through the networking app. Collaborate with fellow attendees at the attendee reception at the National Museum of Scotland and at the Onsite Attendee Reception & Sponsor + Technical Showcase.
  6. Diversity Empowerment Summit: Explore ways to advance diversity and inclusion in the community and across the technology industry.
  7. Women in Open Source Lunch &  Better Together Diversity Social: Women and non-binary members of the open source community are invited to network with each other at the lunch sponsored by Adobe, while all underrepresented minorities are welcome to attend the at the Better Together Diversity Social.
  8. Developer & Hallway Track Lounge: The highlight for many at this event is the ability to collaborate with the open source community. This dedicated lounge offers a space for developers to hack and collaborate throughout the event as well as plenty of seating for hallway track discussions.
  9. Networking Opportunities: Attend the Speed Networking & Mentoring event, OS Career Mixer, or use the networking appto expand your open source community connections by finding and meeting with attendees with similar interests.
  10. Hear from the Leading Technologists in Open Source: Keynote talks include a Linux Kernel update, a fireside chat with Linus Torvalds & Dirk Hohndel, a look at the future of AI and Deep Learning, a panel discussion on the future of energy with open source, a discussion on diversity & inclusion, a talk on the parallels between open source & video games, and insightful talks on how open source is changing banking, human rights and scientific collaboration

Sign up to receive updates on Open Source Summit Europe: 

VIEW THE FULL SCHEDULE »

REGISTER NOW »

This article originally appeared at The Linux Foundation

Why Python is So Popular with Developers: 3 Reasons the Language Has Exploded

Python is the fastest-growing programming language in the world, as it increasingly becomes used in a wide range of developer job roles and data science positions across industries. But how did it become the go-to coding language for so many tasks?

“Python is very popular because of its set of robust libraries that make it such a dynamic and a fast programming language,” said Kristen Sosulski, clinical associate professor of information, operations, and management sciences in the Leonard N. Stern School of Business at New York University, and author of Data Visualization Made Simple. “It’s object-oriented, and it really allows for everything from creating a website, to app development, to creating different types of data models.”

Python has the best claim to being the fastest-growing major programming language right now, said Stack Overflow data scientist Julia Silge. Developer Stack Overflow visits to Python have grown very quickly, she added: This year, it became the most visited programming language in the world on the site.

Read more at TechRepublic

Examining Partitions on Linux Systems

Linux systems provide many ways to look at disk partitions. Here’s a look at commands you can use to display useful information — each providing a different format and with a different focus.

Linux systems provide many ways to look at disk partitions. In this post, we’ll look at a series of commands, each which shows useful information but in a different format and with a different focus. Maybe one will make your favorites list.

lsblk

One of the most useful commands is the lsblk (list block devices) command that provides a very nicely formatted display of block devices and disk partitions. In the example below, we can see that the system has two disks (sda and sdb) and that sdb has both a very small (500M) partition and a large one (465.3G). Disks and partitions (part) are clearly labeled, and the relationship between the disks and partitions is quite obvious. We also see that the system has a cdrom (sr0).

Read more at NetworkWorld