Google has not had any of its 85,000+ employees successfully phished on their work-related accounts since early 2017, when it began requiring all employees to use physical Security Keys in place of passwords and one-time codes, the company told KrebsOnSecurity.
Security Keys are inexpensive USB-based devices that offer an alternative approach to two-factor authentication (2FA), which requires the user to log in to a Web site using something they know (the password) and something they have (e.g., a mobile device).
A Google spokesperson said Security Keys now form the basis of all account access at Google.
The basic idea behind two-factor authentication is that even if thieves manage to phish or steal your password, they still cannot log in to your account unless they also hack or possess that second factor.
In this video from ISC 2018, John Bent and Jay Lofstead describe how the IO500 benchmark measures storage performance in HPC environments. The second IO500 list was revealed at ISC 2018 in Frankfurt, Germany.
Following the success of the Top500 in collecting and analyzing historical trends in supercomputer technology and evolution, the IO500 was created in 2017 and published its first list at SC17. The need for such an initiative has long been known within High Performance Computing; however, defining appropriate benchmarks had long been challenging. Despite this challenge, the community, after long and spirited discussion, finally reached consensus on a suite of benchmarks and a metric for resolving the scores into a single ranking.
The multi-fold goals of the benchmark suite are as follows:
Maximizing simplicity in running the benchmark suite
Encouraging complexity in tuning for performance
Allowing submitters to highlight their “hero run” performance numbers
Forcing submitters to simultaneously report performance for challenging IO patterns.
When I published the highlights of my journey switching from Windows to Linux on my everyday laptop, I was floored at the engagement it received across all corners of the web. I also voiced an admittedly wrong assumption within the article itself that it wouldn’t attract many eyeballs, and yet it became one of my most viewed pieces this year. From where I’m sitting, that tells me a ton of people are interested — are at least actively curious — about ditching Windows and making the jump to Linux. Read more at Forbes.
Timers add yet another way of starting services, based on… well, time. Although similar to cron jobs, systemd timers are slightly more flexible. Let’s see how they work.
So you will “improve” your Minetest set up by creating a timer that will run the game’s server 1 minute after boot up has finished instead of right away. The reason for this could be that, as you want your service to do other stuff, like send emails to the players telling them the game is available, you will want to make sure other services (like the network) are fully up and running before doing anything fancy.
Jumping in at the deep end, your minetest.timer unit will look like this:
# minetest.timer
[Unit]
Description=Runs the minetest.service 1 minute after boot up

[Timer]
OnBootSec=1 m
Unit=minetest.service

[Install]
WantedBy=basic.target
Not hard at all.
As usual, you have a [Unit] section with a description of what the unit does. Nothing new there. The [Timer] section is new, but it is pretty self-explanatory: it contains information on when the service will be triggered and the service to trigger. In this case, the OnBootSec is the directive you need to tell systemd to run the service after boot has finished.
Other directives you could use are:
OnActiveSec=, which tells systemd how long to wait after the timer itself is activated before starting the service.
OnStartupSec=, on the other hand, tells systemd how long to wait after systemd was started before starting the service.
OnUnitActiveSec= tells systemd how long to wait after the service the timer is activating was last activated.
OnUnitInactiveSec= tells systemd how long to wait after the service the timer is activating was last deactivated.
Continuing down the minetest.timer unit, the basic.target is usually used as a synchronization point for late boot services. This means it makes minetest.timer wait until local mount points and swap devices are mounted, sockets, timers, path units and other basic initialization processes are running before letting minetest.timer start. As we explained in the second article on systemd units, targets are like the old run levels and can be used to put your machine into one state or another, or, like here, to tell your service to wait until a certain state has been reached.
The minetest.service you developed in the first two articles ended up looking like this:
What you are doing is stripping out those hacky pauses in the Bash script. Systemd does the waiting now.
Making it work
To make sure things work, disable minetest.service:
sudo systemctl disable minetest
so it doesn’t get started when the system starts; and, instead, enable minetest.timer:
sudo systemctl enable minetest.timer
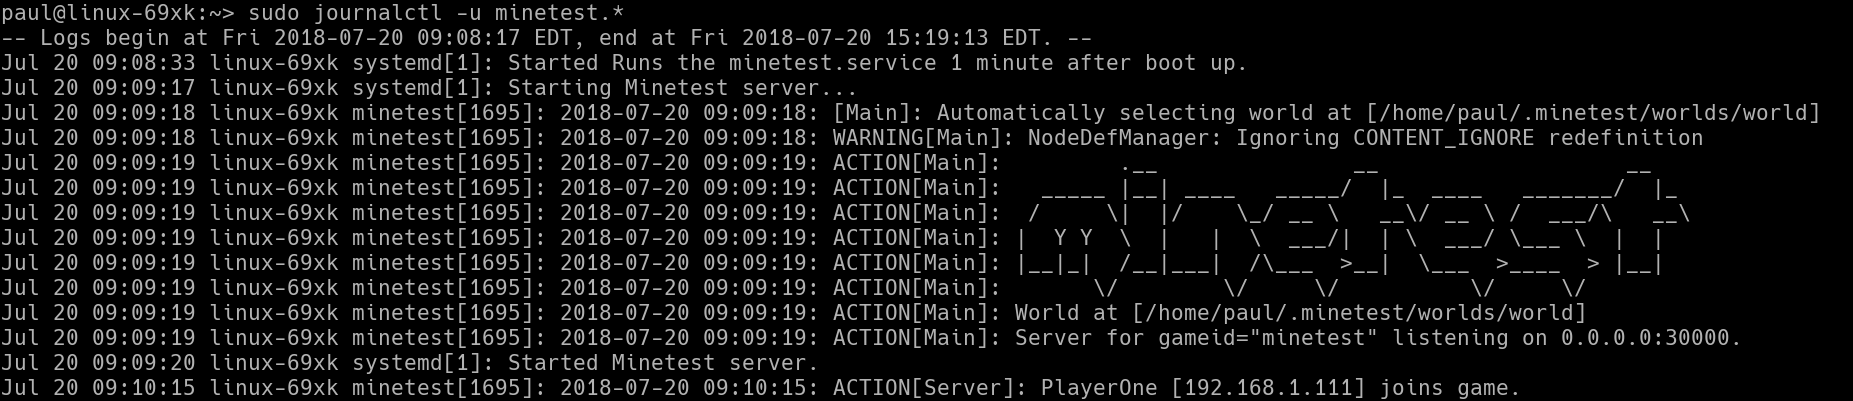
Now you can reboot you server machine and, when you run sudo journalctl -u minetest.* you will see how, first the minetest.timer unit gets executed and then the minetest.service starts up after a minute… more or less.
Figure 1: The minetest.service gets started one minute after the minetest.timer… more or less.
A Matter of Time
A couple of clarifications about why the minetest.timer entry in the systemd’s Journal shows its start time as 09:08:33, while the minetest.service starts at 09:09:18, that is less than a minute later: First, remember we said that the OnBootSec= directive calculates when to start a service from when boot is complete. By the time minetest.timer comes along, boot has finished a few seconds ago.
The other thing is that systemd gives itself a margin of error (by default, 1 minute) to run stuff. This helps distribute the load when several resource-intensive processes are running at the same time: by giving itself a minute, systemd can wait for some processes to power down. This also means that minetest.service will start somewhere between the 1 minute and 2 minute mark after boot is completed, but when exactly within that range is anybody’s guess.
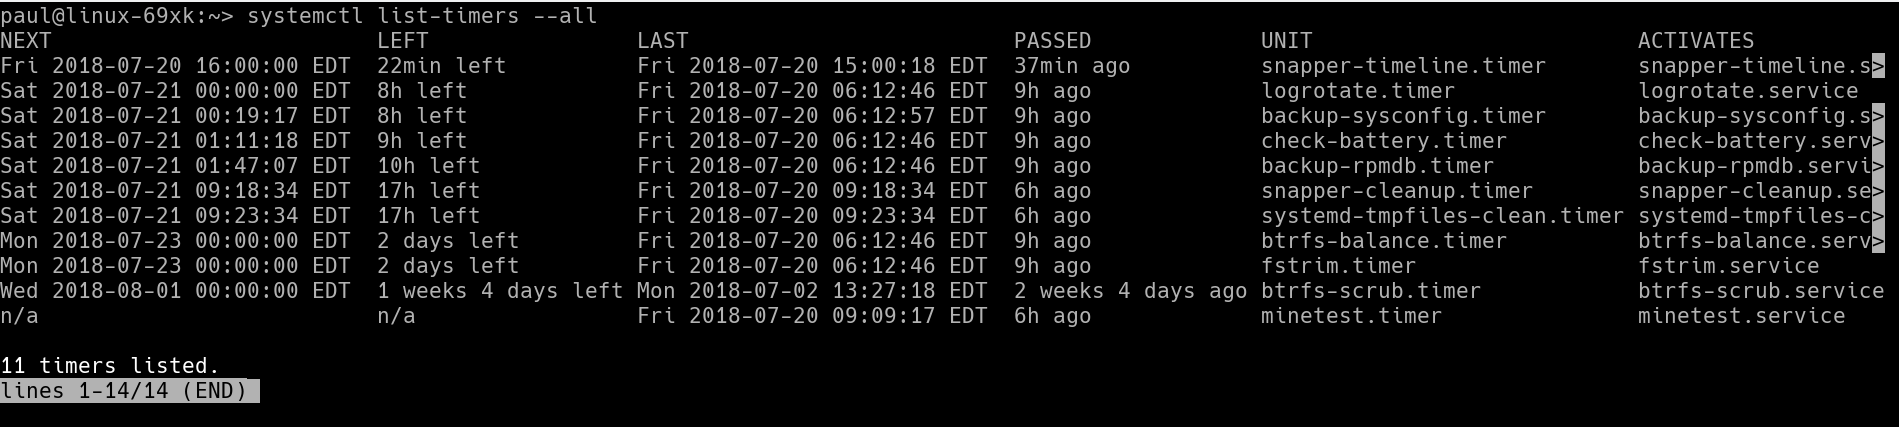
Another thing you can do is check when all the timers on your system are scheduled to run or the last time the ran:
systemctl list-timers --all
Figure 2: Check when your timers are scheduled to fire or when they fired last.
The final thing to take into consideration is the format you should use to express the periods of time. Systemd is very flexible in that respect: 2 h, 2 hours or 2hr will all work to express a 2 hour delay. For seconds, you can use seconds, second, sec, and s, the same way as for minutes you can use minutes, minute, min, and m. You can see a full list of time units systemd understands by checking man systemd.time.
Next Time
You’ll see how to use calendar dates and times to run services at regular intervals and how to combine timers and device units to run services at defined point in time after you plug in some hardware.
See you then!
Learn more about Linux through the free “Introduction to Linux” course from The Linux Foundation and edX.
This month saw the release of a fascinating oral history, in which 76-year-old Brian Kernighan remembers the origins of the Unix command grep.
Kernighan is already a legend in the world of Unix — recognized as the man who coined the term Unix back in 1970. His last initial also became the “k” in awk — and the “K” when people cite the iconic 1978 “K&R book” about C programming. The original Unix Programmer’s Manual calls Kernighan an “expositor par excellence,” and since 2000 he’s been a computer science professor at Princeton University — after 30 years at the historic Computing Science Research Center at Bell Laboratories.
The original Unix Programmer’s Manual calls grep one of “the more memorable mini-revolutions” that Unix experienced, saying it irrevocably ingrained the “tools” outlook into Unix. “Already visible in utilities such as wc, cat, and uniq, the stream-transformation model was deliberately followed in the design of later programs such as tr, m4, sed, and a flurry of language preprocessors.” grep, of course, is used when searching for text patterns — whether that text is coming from input files or from “piped” text (output from another command).
Learn how to write for an international audience in this article from our archives.
Writing in English for an international audience does not necessarily put native English speakers in a better position. On the contrary, they tend to forget that the document’s language might not be the first language of the audience. Let’s have a look at the following simple sentence as an example: “Encrypt the password using the ‘foo bar’ command.”
Grammatically, the sentence is correct. Given that “-ing” forms (gerunds) are frequently used in the English language, most native speakers would probably not hesitate to phrase a sentence like this. However, on closer inspection, the sentence is ambiguous: The word “using” may refer either to the object (“the password”) or to the verb (“encrypt”). Thus, the sentence can be interpreted in two different ways:
Encrypt the password that uses the ‘foo bar’ command.
Encrypt the password by using the ‘foo bar’ command.
As long as you have previous knowledge about the topic (password encryption or the ‘foo bar’ command), you can resolve this ambiguity and correctly decide that the second reading is the intended meaning of this sentence. But what if you lack in-depth knowledge of the topic? What if you are not an expert but a translator with only general knowledge of the subject? Or, what if you are a non-native speaker of English who is unfamiliar with advanced grammatical forms?
Know Your Audience
Even native English speakers may need some training to write clear and straightforward technical documentation. Raising awareness of usability and potential problems is the first step. This article, based on my talk at Open Source Summit EU, offers several useful techniques. Most of them are useful not only for technical documentation but also for everyday written communication, such as writing email or reports.
1. Change perspective. Step into your audience’s shoes. Step one is to know your intended audience. If you are a developer writing for end users, view the product from their perspective. The persona technique can help to focus on the target audience and to provide the right level of detail for your readers.
2. Follow the KISS principle. Keep it short and simple. The principle can be applied to several levels, like grammar, sentences, or words. Here are some examples:
Words: Uncommon and long words slow down reading and might be obstacles for non-native speakers. Use simpler alternatives:
“utilize” → “use”
“indicate” → “show”, “tell”, “say”
“prerequisite” → “requirement”
Grammar: Use the simplest tense that is appropriate. For example, use present tense when mentioning the result of an action: “Click OK. The Printer Options dialog appears.”
Sentences: As a rule of thumb, present one idea in one sentence. However, restricting sentence length to a certain amount of words is not useful in my opinion. Short sentences are not automatically easy to understand (especially if they are a cluster of nouns). Sometimes, trimming down sentences to a certain word count can introduce ambiquities, which can, in turn, make sentences even more difficult to understand.
3. Beware of ambiguities. As authors, we often do not notice ambiguity in a sentence. Having your texts reviewed by others can help identify such problems. If that’s not an option, try to look at each sentence from different perspectives: Does the sentence also work for readers without in-depth knowledge of the topic? Does it work for readers with limited language skills? Is the grammatical relationship between all sentence parts clear? If the sentence does not meet these requirements, rephrase it to resolve the ambiguity.
4. Be consistent. This applies to choice of words, spelling, and punctuation as well as phrases and structure. For lists, use parallel grammatical construction. For example:
Why white space is important:
It focuses attention.
It visually separates sections.
It splits content into chunks.
5. Remove redundant content. Keep only information that is relevant for your target audience. On a sentence level, avoid fillers (basically, easily) and unnecessary modifications:
“already existing” → “existing”
“completely new” → “new”
As you might have guessed by now, writing is rewriting. Good writing requires effort and practice. But even if you write only occasionally, you can significantly improve your texts by focusing on the target audience and by using basic writing techniques. The better the readability of a text, the easier it is to process, even for an audience with varying language skills. When it comes to localization especially, good quality of the source text is important: Garbage in, garbage out. If the original text has deficiencies, it will take longer to translate the text, resulting in higher costs. In the worst case, the flaws will be multiplied during translation and need to be corrected in various languages.
Tanja Roth, Technical Documentation Specialist at SUSE Linux GmbH
Driven by an interest in both language and technology, Tanja has been working as a technical writer in mechanical engineering, medical technology, and IT for many years. She joined SUSE in 2005 and contributes to a wide range of product and project documentation, including High Availability and Cloud topics.
Beyond the hype, it’s necessary to understand what a service mesh is and what concrete problems it solves so you can decide whether you might need one.
A brief introduction to the service mesh
The service mesh is a dedicated infrastructure layer for handling service-to-service communication in order to make it visible, manageable, and controlled. The exact details of its architecture vary between implementations, but generally speaking, every service mesh is implemented as a series (or a “mesh”) of interconnected network proxies designed to better manage service traffic.
This type of solution has gained recent popularity with the rise of microservice-based architectures, which introduce a new breed of communication traffic. Unfortunately, it’s often introduced without much forethought by its adopters. This is sometimes referred to as the difference between the north-south versus east-west traffic pattern. Put simply, north-south traffic is server-to-client traffic, whereas east-west is server-to-server traffic. The naming convention is related to diagrams that “map” network traffic, which typically draw vertical lines for server-client traffic, and horizontal lines for server-to-server traffic. In the world of server-to-server traffic, aside from considerations happening at the network and transport layers (L3/L4), there’s a critical difference happening in the session layer to account for.
Docker guarantees the same environment on all target systems: If the Docker container runs for the author, it also runs for the user and can even be preconfigured accordingly. Although Docker containers seem like a better alternative to the package management of current distributions (i.e., RPM and dpkg), the design assumptions underlying Docker and the containers distributed by Docker differ fundamentally from classic virtualization. One big difference is that a Docker container does not have persistent storage out of the box: If you delete a container, all data contained in it is lost.
Fortunately, Docker offers a solution to this problem: A volume service can provide a container with persistent storage. The volume service is merely an API that uses functions in the loaded Docker plugins. For many types of storage, plugins allow containers to be connected directly to a specific storage technology. In this article, I first explain the basic intent of persistent memory in Docker and why a detour through the volume service is necessary. Then, in two types of environments – OpenStack and VMware – I show how persistent memory can be used in Docker with the appropriate plugins.
Planned Without Storage
The reason persistent storage is not automatically included with the delivery of every Docker container goes back to the time long before Docker itself existed. The cloud is to blame: It made the idea of permanent storage obsolete because storage regularly poses a challenge in classic virtualization setups. If you compare classic virtualization and the cloud, it quickly becomes clear that two worlds collide here. A virtual machine (VM) in a classic environment rightly assumes that it is on persistent storage, so the entire VM can be moved from one host to another. …
When dealing with persistent storage, Docker clearly must solve precisely those problems that have always played an important role in classic virtualization. Without redundancy at the storage level, for example, such a setup cannot operate effectively; otherwise, the failure of a single container node would mean that many customer setups would no longer function properly. The risk that the failure of individual systems precisely hitting the critical points of the customer setups, such as the databases, is clearly too great in this constellation.
The Docker developers have found a smart solution to the problem: The service that takes care of volumes for Docker containers can also commission storage locally and connect it to a container. Here, Docker makes it clear that the volumes are not redundant; that is, Docker did not even tackle the problem of redundant volumes itself. Instead, the project points to external solutions: In fact, various approaches are now on the market that offer persistent storage for clouds and deal with issues such as internal redundancy. One of the best-known representatives is Ceph, and to enable the use of such storage services, the Docker volume service is coupled with the plugin system that already exists, thus providing redundant volumes for Docker containers with the corresponding plugin of an external solution.
If your work involves running tools and scripts on the Linux command line, I am sure there are a lot of commands you would be running each day. Those new to the command line should know there exists a tool – dubbed history – that gives you a list of commands you’ve executed earlier.
In this tutorial, we will discuss the basics of the history command using some easy to understand examples. But before we do that, it’s worth mentioning that all examples here have been tested on an Ubuntu 16.04LTS machine.
Linux history command
If you know how to effectively utilize your command line history, you can save a lot of time on daily basis. Following are some Q&A-styled examples that should give you a good idea on how you can use the history command to your benefit.
If you’re a developer, then you know your way around development tools. You’ve spent years studying one or more programming languages and have perfected your skills. You can develop with GUI tools or from the command line. On your own, nothing can stop you. You code as if your mind and your fingers are one to create elegant, perfectly commented, source for an app you know will take the world by storm.
But what happens when you’re tasked with collaborating on a project? Or what about when that app you’ve developed becomes bigger than just you? What’s the next step? If you want to successfully collaborate with other developers, you’ll want to make use of a distributed version control system. With such a system, collaborating on a project becomes incredibly efficient and reliable. One such system is Git. Along with Git comes a handy repository called GitHub, where you can house your projects, such that a team can check out and check in code.
I will walk you through the very basics of getting Git up and running and using it with GitHub, so the development on your game-changing app can be taken to the next level. I’ll be demonstrating on Ubuntu 18.04, so if your distribution of choice is different, you’ll only need to modify the Git install commands to suit your distribution’s package manager.
Git and GitHub
The first thing to do is create a free GitHub account. Head over to the GitHub signup page and fill out the necessary information. Once you’ve done that, you’re ready to move on to installing Git (you can actually do these two steps in any order).
Installing Git is simple. Open up a terminal window and issue the command:
sudo apt install git-all
This will include a rather large number of dependencies, but you’ll wind up with everything you need to work with Git and GitHub.
On a side note: I use Git quite a bit to download source for application installation. There are times when a piece of software isn’t available via the built-in package manager. Instead of downloading the source files from a third-party location, I’ll often go the project’s Git page and clone the package like so:
git clone ADDRESS
Where ADDRESS is the URL given on the software’s Git page. Doing this most always ensures I am installing the latest release of a package.
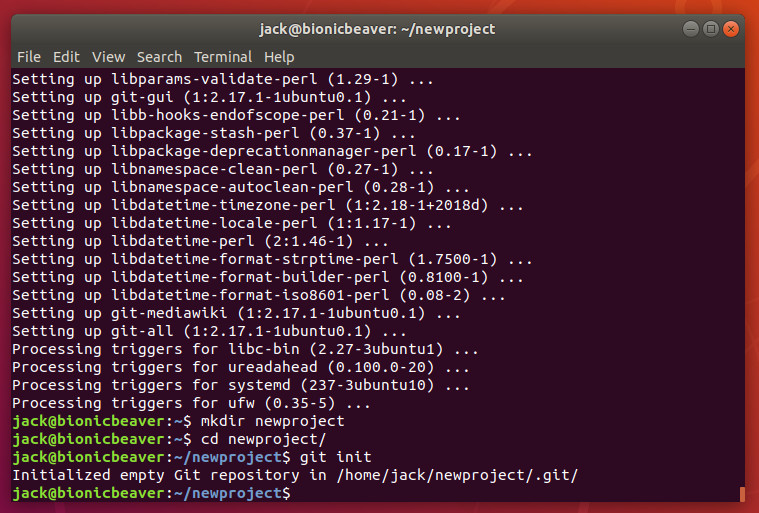
Create a local repository and add a file
The next step is to create a local repository on your system (we’ll call it newprojectand house it in ~/). Open up a terminal window and issue the commands:
cd ~/mkdir newprojectcd newproject
Now we must initialize the repository. In the~/newproject folder, issue the command git init. When the command completes, you should see that the empty Git repository has been created (Figure 1).
Figure 1: Our new repository has been initialized.
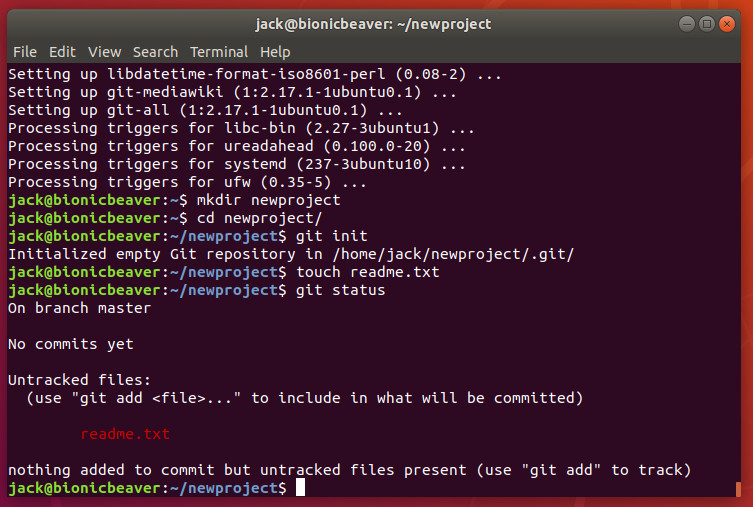
Next we need to add a file to the project. From within the root folder (~/newproject) issue the command:
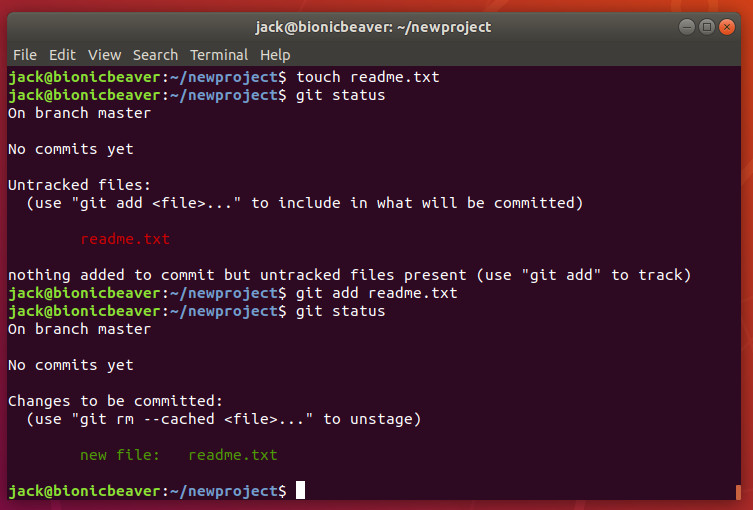
touch readme.txt
You will now have an empty file in your repository. Issue the command git status to verify that Git is aware of the new file (Figure 2).
Figure 2: Git knows about our readme.txt file.
Even though Git is aware of the file, it hasn’t actually been added to the project. To do that, issue the command:
git add readme.txt
Once you’ve done that, issue thegit status command again to see that readme.txt is now considered a new file in the project (Figure 3).
Figure 3: Our file now has now been added to the staging environment.
Your first commit
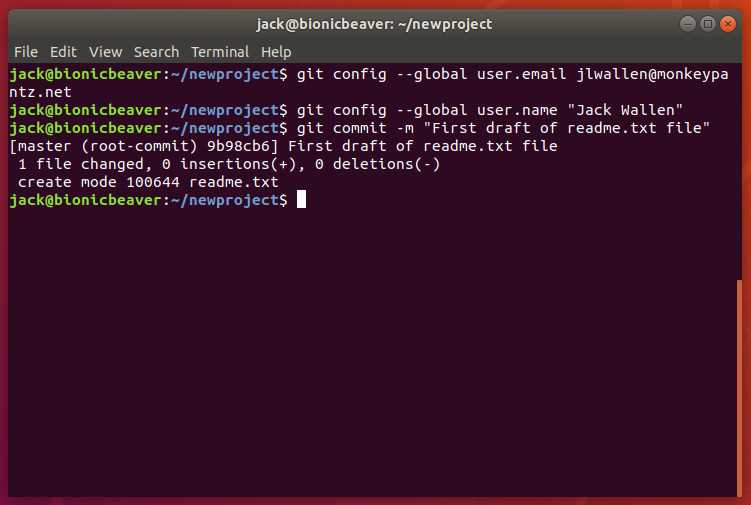
With the new file in the staging environment, you are now ready to create your first commit. What is a commit? Easy: A commit is a record of the files you’ve changed within the project. Creating the commit is actually quite simple. It is important, however, that you include a descriptive message for the commit. By doing this, you are adding notes about what the commit contains (such as what changes you’ve made to the file). Before we do this, however, we have to inform Git who we are. To do this, issue the command:
Where EMAIL is your email address and FULL NAME is your name.
Now we can create the commit by issuing the command:
git commit -m “Descriptive Message”
Where Descriptive Message is your message about the changes within the commit. For example, since this is the first commit for the readme.txt file, the commit could be:
git commit -m “First draft of readme.txt file”
You should see output indicating that 1 file has changed and a new mode was created for readme.txt (Figure 4).
Figure 4: Our commit was successful.
Create a branch and push it to GitHub
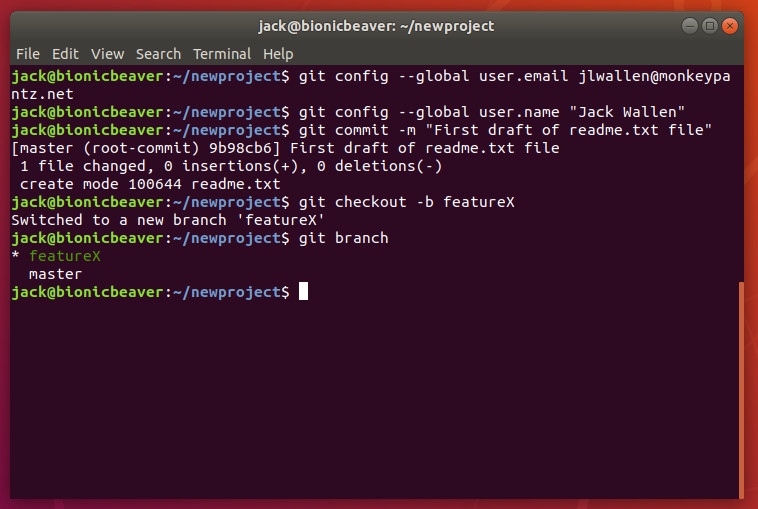
Branches are important, as they allow you to move between project states. Let’s say you want to create a new feature for your game-changing app. To do that, create a new branch. Once you’ve completed work on the feature you can merge this feature from the branch to the master branch. To create the new branch, issue the command:
git checkout -b BRANCH
where BRANCH is the name of the new branch. Once the command completes, issue the command git branch to see that it has been created (Figure 5).
Figure 5: Our new branch, called featureX.
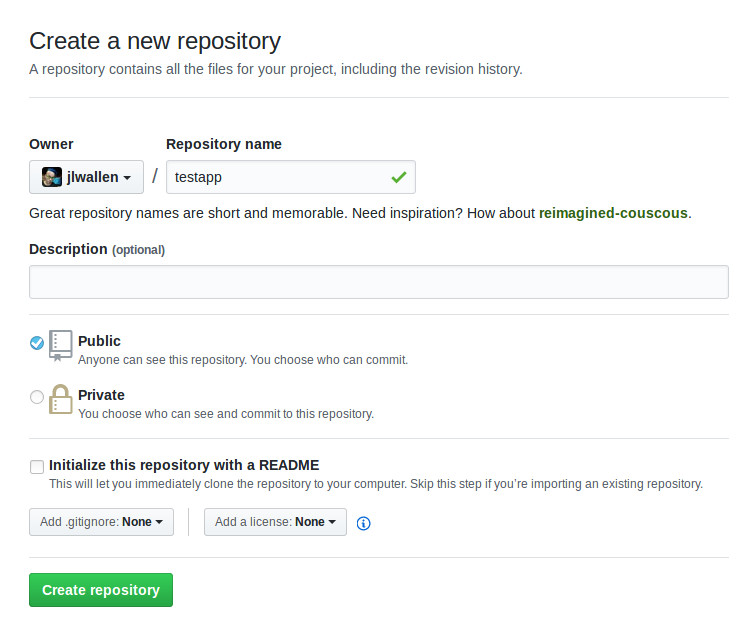
Next we need to create a repository on GitHub. If you log into your GitHub account, click the New Repository button from your account main page. Fill out the necessary information and click Create repository (Figure 6).
Figure 6: Creating the new repository on GitHub.
After creating the repository, you will be presented with a URL to use for pushing our local repository. To do this, go back to the terminal window (still within ~/newproject) and issue the commands:
Where URL is the url for our new GitHub repository.
You will be prompted for your GitHub username and password. Once you successfully authenticate, the project will be pushed to your GitHub repository and you’re ready to go.
Pulling the project
Say your collaborators make changes to the code on the GitHub project and have merged those changes. You will then need to pull the project files to your local machine, so the files you have on your system match those on the remote account. To do this, issue the command (from within ~/newproject):
git pull origin master
The above command will pull down any new or changed files to your local repository.
The very basics
And that is the very basics of using Git from the command line to work with a project stored on GitHub. There is quite a bit more to learn, so I highly recommend you issue the commandsman git, man git-push, and man git-pull to get a more in-depth understanding of what the git command can do.
Happy developing!
Learn more about Linux through the free “Introduction to Linux” course from The Linux Foundation and edX.