Arduino’s support for Linux IoT devices and single-board computers (SBCs) announced at the Embedded Linux Conference+Open IoT Summit NA in March cemented Arduino’s focus on cloud-connected IoT development, extending its reach into edge computing. This move was likely driven by multiple factors — increased complexity of IoT solutions and, secondarily, by more interest in Arduino boards running Linux.
In a “blending” of development communities for the masses — Arduino, Raspberry Pi, and BeagleBone — Arduino’s support for Linux-based boards lowers the barrier of development for IoT devices by combining Arduino’s sensor and actuator nodes with higher processor-powered boards like Raspberry Pi and BeagleBone. Top this with a user-friendly web wizard to connect the Linux boards via the cloud and it simplifies the entire process.
Learn how to kill errant processes in this tutorial from our archives.
Picture this: You’ve launched an application (be it from your favorite desktop menu or from the command line) and you start using that launched app, only to have it lock up on you, stop performing, or unexpectedly die. You try to run the app again, but it turns out the original never truly shut down completely.
What do you do? You kill the process. But how? Believe it or not, your best bet most often lies within the command line. Thankfully, Linux has every tool necessary to empower you, the user, to kill an errant process. However, before you immediately launch that command to kill the process, you first have to know what the process is. How do you take care of this layered task? It’s actually quite simple…once you know the tools at your disposal.
Let me introduce you to said tools.
The steps I’m going to outline will work on almost every Linux distribution, whether it is a desktop or a server. I will be dealing strictly with the command line, so open up your terminal and prepare to type.
Locating the process
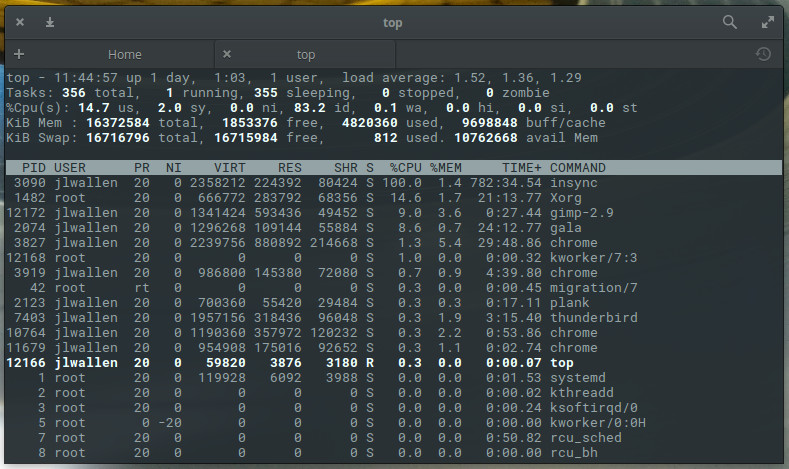
The first step in killing the unresponsive process is locating it. There are two commands I use to locate a process: top and ps. Top is a tool every administrator should get to know. With top, you get a full listing of currently running process. From the command line, issue top to see a list of your running processes (Figure 1).
Figure 1: The top command gives you plenty of information.
From this list you will see some rather important information. Say, for example, Chrome has become unresponsive. According to our top display, we can discern there are four instances of chrome running with Process IDs (PID) 3827, 3919, 10764, and 11679. This information will be important to have with one particular method of killing the process.
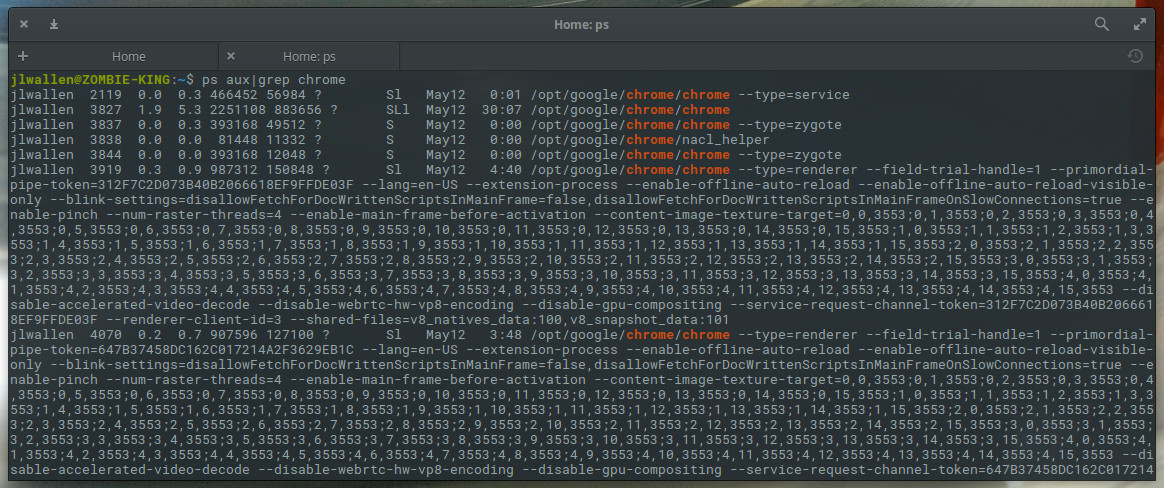
Although top is incredibly handy, it’s not always the most efficient means of getting the information you need. Let’s say you know the Chrome process is what you need to kill, and you don’t want to have to glance through the real-time information offered by top. For that, you can make use of the ps command and filter the output through grep. The ps command reports a snapshot of a current process and grep prints lines matching a pattern. The reason why we filter ps through grep is simple: If you issue the ps command by itself, you will get a snapshot listing of all current processes. We only want the listing associated with Chrome. So this command would look like:
ps aux | grep chrome
The aux options are as follows:
a = show processes for all users
u = display the process’s user/owner
x = also show processes not attached to a terminal
The x option is important when you’re hunting for information regarding a graphical application.
When you issue the command above, you’ll be given more information than you need (Figure 2) for the killing of a process, but it is sometimes more efficient than using top.
Figure 2: Locating the necessary information with the ps command.
Killing the process
Now we come to the task of killing the process. We have two pieces of information that will help us kill the errant process:
Process name
Process ID
Which you use will determine the command used for termination. There are two commands used to kill a process:
kill – Kill a process by ID
killall – Kill a process by name
There are also different signals that can be sent to both kill commands. What signal you send will be determined by what results you want from the kill command. For instance, you can send the HUP (hang up) signal to the kill command, which will effectively restart the process. This is always a wise choice when you need the process to immediately restart (such as in the case of a daemon). You can get a list of all the signals that can be sent to the kill command by issuing kill -l. You’ll find quite a large number of signals (Figure 3).
Figure 3: The available kill signals.
The most common kill signals are:
Signal Name
Single Value
Effect
SIGHUP
1
Hangup
SIGINT
2
Interrupt from keyboard
SIGKILL
9
Kill signal
SIGTERM
15
Termination signal
SIGSTOP
17, 19, 23
Stop the process
What’s nice about this is that you can use the Signal Value in place of the Signal Name. So you don’t have to memorize all of the names of the various signals. So, let’s now use the kill command to kill our instance of chrome. The structure for this command would be:
kill SIGNAL PID
Where SIGNAL is the signal to be sent and PID is the Process ID to be killed. We already know, from our ps command that the IDs we want to kill are 3827, 3919, 10764, and 11679. So to send the kill signal, we’d issue the commands:
Once we’ve issued the above commands, all of the chrome processes will have been successfully killed.
Let’s take the easy route! If we already know the process we want to kill is named chrome, we can make use of the killall command and send the same signal the process like so:
killall -9 chrome
The only caveat to the above command is that it may not catch all of the running chrome processes. If, after running the above command, you issue the ps aux|grep chrome command and see remaining processes running, your best bet is to go back to the kill command and send signal 9 to terminate the process by PID.
Ending processes made easy
As you can see, killing errant processes isn’t nearly as challenging as you might have thought. When I wind up with a stubborn process, I tend to start off with the killall command as it is the most efficient route to termination. However, when you wind up with a really feisty process, the kill command is the way to go.
Learn more about Linux through the free “Introduction to Linux” course from The Linux Foundation and edX.
API, for application programming interface, is one of those acronyms that is used everywhere from command-line tools to enterprise Java code to Ruby on Rails web apps. Unless you write every single line of code from scratch, you’re going to be interacting with external software components, each with its own API. Even if you do write something entirely from scratch, a well-designed software application will have internal APIs to help organize code and make components more reusable.
Diving a little deeper, an API is a specification of possible interactions with a software component. For example, if a car was a software component, its API would include information about the ability to accelerate, brake, and turn on the radio. It would also include information about how to accelerate: Put your foot on the gas pedal and push. The “what” and “how” information come together in the API definition, which is abstract and separate from the car itself.
Let’s dig in by looking at the Java API and the Twitter API as examples. First, we’ll get a quick picture of these two APIs and how they fulfill the definition of “what” and “how.”
Hackers that can intercept your encrypted emails, or steal your emails from your computer or a server, may be able to decrypt them taking advantage of new vulnerabilities found in the way some email clients treat HTML.
On Monday, the world was reminded once again that the almost 30-year-old encryption protocol PGP does still exist, and, yes, it still kinda sucks.
Mind you, the protocol itself is not really the problem. The crypto is solid. The problem is the way it’s implemented, and the ecosystem around it. What’s new is that a group of researchers has found a clever way for hackers to decrypt some PGP-encrypted emails….
If you have disabled the PGP plugin from your mail client and saved a copy of an encrypted email to your desktop, this guide will help you read that message in as safe a way as possible given what we know about the vulnerability described by EFAIL.
Note that the first three steps (opening the terminal) will vary between desktop environments.
Open the Activities view by clicking all the way in the top left corner of your screen.
2. Type “terminal” into the search bar, and press Enter. This will open the command prompt.
In 2008, if you wanted to build a network, you had to build it from the same switch and router equipment that everyone else had, according to Nick McKeown, co-founder of Barefoot Networks, speaking as part of a panel of networking experts at Open Networking Summit North America.
Equipment was closed, proprietary, and vertically integrated with features already baked in, McKeown noted. And, “network management was a dirty word. If you wanted to manage a network of switches, you had to write your own scripts over a lousy, cruddy CLI, and everybody had their own way of doing it in order to try to make their network different from everybody else’s.”
All this changed when Stanford University Ph.D. student Martin Casado had the bold idea to rebuild the Stanford network out of custom-built switches and access points, he said.
The other day at work I needed to edit 200 files at once. I wanted to do something pretty simple: basically, I had files that looked like this:
foo:
  - bar
  - baz
  - bananas
and I wanted to insert an extra line after the baz line that said elephant
foo:
  - bar
  - baz
  - elephant
  - bananas
I had one extra weird requirement which was that some of the lines were indented with 2 spaces, and some with 4 spaces. The - elephant line needed to have the same indentation as the previous line.
The “news” is that Microsemi and SiFive have collaborated on an expansion board that’s based on Microsemi’s RISC-V-based Polarfire FPGAs. The expansion board makes it easier for developers to write Linux-based applications targeting RISC-V using the Mi-V RISC-V ecosystem.
RISC-V is a free and open instruction-set architecture (ISA) that processor vendors are beginning to rally around. For the architecture to really take off, it’s products like these that are required, products that encourage and simply software development.
It has been more than a decade since the ifconfig command has been deprecated on Linux in favor of the iproute2 project, which contains the magical tool ip. Many online tutorial resources still refer to old command-line tools like ifconfig, route, and netstat. The goal of this tutorial is to share some of the simple networking-related things you can do easily using the ip tool instead.
Find your IP address
[dneary@host]$ ip addr show
[snip]
44: wlp4s0: <BROADCAST,MULTICAST,UP,LOWER_UP> mtu 1500 qdisc mq state UP group default qlen 1000
        link/ether 5c:e0:c5:c7:f0:f1 brd ff:ff:ff:ff:ff:ff
        inet 10.16.196.113/23 brd 10.16.197.255 scope global dynamic wlp4s0
        valid_lft 74830sec preferred_lft 74830sec
        inet6 fe80::5ee0:c5ff:fec7:f0f1/64 scope link
        valid_lft forever preferred_lft forever
ip addr show will show you a lot of information about all of your network link devices. In this case, my wireless Ethernet card (wlp4s0) is the IPv4 address (the inet field) 10.16.196.113/23. The /23 means that there are 23 bits of the 32 bits in the IP address, which will be shared by all of the IP addresses in this subnet. IP addresses in the subnet will range from 10.16.196.0 to 10.16.197.254. The broadcast address for the subnet (the brd field after the IP address) 10.16.197.255 is reserved for broadcast traffic to all hosts on the subnet.
A trip to KubeCon + CloudNativeCon reveals a community hard at work building an open, agile and scalable cloud platform to fuel the boom in ubiquitous services….
To understand the importance of Kubernetes we need to return to containers briefly. Containers, by design, use less resources than virtual machines (VMs) as they share an OS and run ‘closer to the metal’. For developers, the technology has enabled them to package, ship and run their applications in isolated containers that run virtually anywhere. When continuous integration/continuous delivery software (e.g. Jenkins) and practices are added into the mix, this enables companies to benefit from nimble and responsive automation and it significantly speeds up development. For example, any changes that developers make to the source code will automatically trigger the creation, testing and deployment of a new container to staging and then into production.
The idea of a container allowing one process only to run inside it has also led on to microservices. This is where applications are broken down into their processes and placed inside a container, which makes a lot of sense in the enterprise world where greater efficiencies are constantly being sought.
However, this explosion of containerised apps has created the need for a way to manage or ‘orchestrate’ thousands of containers.