Linux and recursion are on very good speaking terms. In fact, a number of Linux commands recurse without ever being asked, while others have to be coaxed with just the right option.
When is recursion most helpful and how can you use it to make your tasks easier? Let’s run through some useful examples and see.
Easy recursion with ls
First, the ls command seems like a good place to start. This command will only list the files and directories in the current or specified directory unless asked to work a little harder. It will include the contents of directories only if you add a -R option.
In today’s tutorial we are going to show you how to find large files in Linux. One of the most common things you will do as a Linux system administrator is finding unneeded large files that consume disk space, and removing them to free up space for applications that actually need it. Let’s dive in and find out how we can find, large files in Linux.
1. Finding largest directories and files in Linux
First we are going to look at how we can find the largest directories and files in linux combined, execute the following command to find the top 10 largest directories and files on your Linux server:
Modern Linux distributions tend to target a variety of users. Some claim to offer a flavor of the open source platform that anyone can use. And, I’ve seen some such claims succeed with aplomb, while others fall flat. Q4OS is one of those odd distributions that doesn’t bother to make such a claim but pulls off the feat anyway.
So, who is the primary market for Q4OS? According to its website, the distribution is a:
“fast and powerful operating system based on the latest technologies while offering highly productive desktop environment. We focus on security, reliability, long-term stability and conservative integration of verified new features. System is distinguished by speed and very low hardware requirements, runs great on brand new machines as well as legacy computers. It is also very applicable for virtualization and cloud computing.”
What’s very interesting here is that the Q4OS developers offer commercial support for the desktop. Said support can cover the likes of system customization (including core level API programming) as well as user interface modifications.
Once you understand this (and have installed Q4OS), the target audience becomes quite obvious: Business users looking for a Windows XP/7 replacement. But that should not prevent home users from giving Q4OS at try. It’s a Linux distribution that has a few unique tools that come together to make a solid desktop distribution.
Let’s take a look at Q4OS and see if it’s a version of Linux that might work for you.
What Q4OS all about
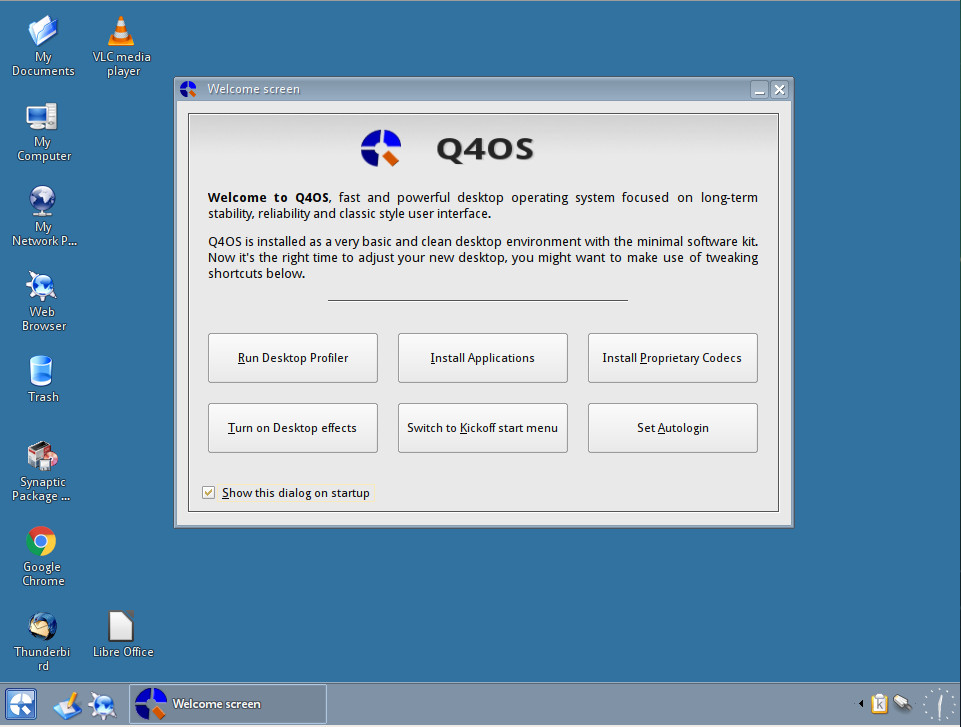
Q4OS that does an admirable job of being the open source equivalent of Windows XP/7. Out of the box, it pulls this off with the help of the Trinity Desktop (a fork of KDE). With a few tricks up its sleeve, Q4OS turns the Trinity Desktop into a remarkably similar desktop (Figure 1).
Figure 1: The Q4OS default desktop.
When you fire up the desktop, you will be greeted by a Welcome screen that makes it very easy for new users to start setting up their desktop with just a few clicks. From this window, you can:
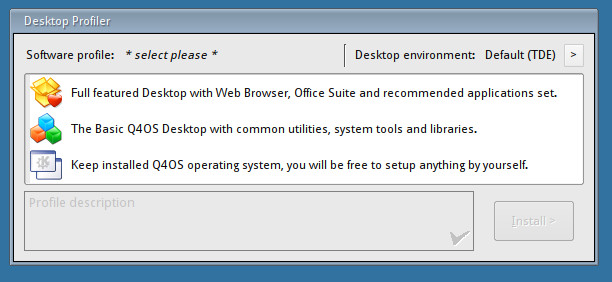
Run the Desktop Profiler (which allows you to select which desktop environment to use as well as between a full-featured desktop, a basic desktop, or a minimal desktop—Figure 2).
Install applications (which opens the Synaptic Package Manager).
Install proprietary codecs (which installs all the necessary media codecs for playing audio and video).
Turn on Desktop effects (if you want more eye candy, turn this on).
Switch to Kickoff start menu (switches from the default start menu to the newer kickoff menu).
Set Autologin (allows you to set login such that it won’t require your password upon boot).
Figure 2: The Desktop Profiler allows you to further customize your desktop experience.
If you want to install a different desktop environment, open up the Desktop Profiler and then click the Desktop environments drop-down, in the upper left corner of the window. A new window will appear, where you can select your desktop of choice from the drop-down (Figure 3). Once back at the main Profiler Window, select which type of desktop profile you want, and then click Install.
Figure 3: Installing a different desktop is quite simple from within the Desktop Profiler.
Note that installing a different desktop will not wipe the default desktop. Instead, it will allow you to select between the two desktops (at the login screen).
Installed software
After selecting full-featured desktop, from the Desktop Profiler, I found the following user applications ready to go:
LibreOffice 5.2.7.2
VLC 2.2.7
Google Chrome 64.0.3282
Thunderbird 52.6.0 (Includes Lightning addon)
Synaptic 0.84.2
Konqueror 14.0.5
Firefox 52.6.0
Shotwell 0.24.5
Obviously some of those applications are well out of date. Since this distribution is based on Debian, we can run and update/upgrade with the commands:
sudo apt updatesudo apt upgrade
However, after running both commands, it seems everything is up to date. This particular release (2.4) is an LTS release (supported until 2022). Because of this, expect software to be a bit behind. If you want to test out the bleeding edge version (based on Debian “Buster”), you can download the testing image here.
Security oddity
There is one rather disturbing “feature” found in Q4OS. In the developer’s quest to make the distribution closely resemble Windows, they’ve made it such that installing software (from the command line) doesn’t require a password! You read that correctly. If you open the Synaptic package manager, you’re asked for a password. However (and this is a big however), open up a terminal window and issue a command likesudo apt-get install gimp. At this point, the software will install… without requiring the user to type a sudo password.
Did you cringe at that? You should.
I get it, the developers want to ease away the burden of Linux and make a platform the masses could easily adapt to. They’ve done a splendid job of doing just that. However, in the process of doing so, they’ve bypassed a crucial means of security. Is having as near an XP/7 clone as you can find on Linux worth that lack of security? I would say that if it enables more people to use Linux, then yes. But the fact that they’ve required a password for Synaptic (the GUI tool most Windows users would default to for software installation) and not for the command-line tool makes no sense. On top of that, bypassing passwords for the apt and dpkg commands could make for a significant security issue.
Fear not, there is a fix. For those that prefer to require passwords for the command line installation of software, you can open up the file /etc/sudoers.d/30_q4os_apt and comment out the following three lines:
Once commented out, save and close the file, and reboot the system. At this point, users will now be prompted for a password, should they run the apt-get, apt-key, or dpkg commands.
A worthy contender
Setting aside the security curiosity, Q4OS is one of the best attempts at recreating Windows XP/7 I’ve come across in a while. If you have users who fear change, and you want to migrate them away from Windows, this distribution might be exactly what you need. I would, however, highly recommend you re-enable passwords for the apt-get, apt-key, and dpkg commands… just to be on the safe side.
In any case, the addition of the Desktop Profiler, and the ability to easily install alternative desktops, makes Q4OS a distribution that just about anyone could use.
Learn more about Linux through the free “Introduction to Linux” course from The Linux Foundation and edX.
This week in open source and Linux news, Google’s Accelerated Mobile Pages will now support web browsing in email, an op-ed on the continued value of the open source community and more! Read this week’s digest to stay in the open source know.
1) Google is bringing its open source Accelerated Mobile Pages (AMP) capabilities to email today
In a previous article, we learned about the threats to a Kubernetes deployment that may result in a multitude of compromises and undesirable scenarios. With these threat models in mind, we can now explore Kubernetes security along four major tenets:
authentication and authorization
resource isolation
hardening and network security
logging and auditing.
We look at security from the perspective of containers, Kubernetes deployment itself and network security. Such a holistic approach is needed to ensure that containers are deployed securely and that the attack surface is minimized. The best practices that arise from each of the above tenets apply to any Kubernetes deployment, whether you’re self-hosting a cluster or employing a managed service.
In rough order of their appearance in the DevOps pipeline, based on real-world user feedback, here are the most essential DevOps tools:In some of these 10 major categories, just one tool rules the roost, such as Docker for application containers and Jenkins for CI/CD. In others, DevOps practitioners view a handful of tools as interchangeable, depending on personal preferences and the IT environment’s specific requirements.
1. Source code repository
The first step in a DevOps process is a version-controlled source code repository where developers check in, check out and manage code. Most CI and application deployment tools respond automatically to code commits in such repositories, and a DevOps process that doesn’t start with source code control is a nonstarter in the eyes of practitioners.
The Xen Project is comprised of a diverse set of member companies and contributors that are committed to the growth and success of the Xen Project Hypervisor. The Xen Project Hypervisor is a staple technology for server and cloud vendors, and is gaining traction in the embedded, security and automotive space. This blog series highlights the companies contributing to the changes and growth being made to the Xen Project and how the Xen Project technology bolsters their business.
Name: Kevin Tian Title: Principal Engineer of Open Source Technology Center Company: Intel
When did you join the Xen Project and why/how is your organizations involved?
My journey with Xen Project has been ~13 years now (since 2005), with a focus on hardware-assisted virtualization using Intel® Virtualization Technology (Intel® VT). I’m acting as the maintainer for VT-x/VT-d sub-system in the Xen Project community. The Xen Project is the first open source virtualization project embracing Intel® VT and is a leading community in demonstrating new hardware virtualization features.
The Defense Department launched the Code.mil website on Tuesday, a new, streamlined portal for its similarly named Code.mil initiative, a collaborative approach to meeting the government’s open source policy.
The site features a suite of new tools, including checklists that links to offer guidance, and represents “an evolution of the Code.mil project,” according to Ari Chivukula, policy wrangler for the Defense Digital Service.
SRT, the open source video transport protocol that enables the delivery of high-quality and secure, low latency video, has been integrated into GStreamer.
Transmitting low delay, high quality video over the Internet is hard. The trade-off is normally between video quality and transmission delay (or latency). Internet video has up to now been segregated into two segments: video streaming and video calls. On the first side, streaming video has taken over the world of the video distribution using segmented streaming technologies such as HLS and DASH, allowing services like Netflix to flourish. On the second side, you have VoIP systems, which are generally targeted a relatively low bitrate using low latency technologies such as RTP and WebRTC, and they don’t result in a broadcast grade result. SRT bridges that gap by allowing the transfer of broadcast grade video at low latencies.
The SRT protocol achieves these goal using two techniques. First, if a packet is lost, it will retransmit it, but it will only do that for a certain amount of time which is determined by the configured latency, this means that the latency is bounded by the application. Second, it tries to guess the available bandwidth based on the algorithms from UDT, this means that it can then avoid sending at a rate that exceeds the link’s capacity, but it also makes this information available to the application (to the encoder) so that it can adjust the encoding bitrate to not exceed the available bandwidth ensuring the best possible quality. Using the combination of these techniques, we can achieve broadcast grade video over the Internet if the bandwidth is sufficient.
At Collabora, we’re very excited with the possibilities created by SRT, so we decided to integrate it into GStreamer, the most versatile multimedia framework out there!
Technology is evolving faster than the speed of light. Well, not quite, but you get the picture. Blockchain, Artificial Intelligence, OpenStack, progressive web apps – they are all set to make an impact this year. You might be accustomed to navigating your forex trading platform or building a website in WordPress, but how familiar are you with the following?
Artificial Intelligence
Thirty years ago, machine learning and AI were the stuff of science fiction. The notion that AI would one day be in your homes was a little frightening given that Terminator was in the cinema. Today, machine learning and Artificial Intelligence are evolving fast. Chatbots take care of front-line customer service and driverless cars are in production. Indeed, Andrew Ng from Baidu predicts that driverless cars will available from 2020 and in full production by 2021, so this is one area that is sure to expand in 2018.
Blockchain Technology
Bitcoin has hit the headlines numerous times in the last twelve months. After reaching the heady heights of a snip under $20,000 in December 2017, bitcoin has since taken a dramatic tumble. The cryptocurrency lost $67 billion in one week at the beginning of February, after major banks announced they were banning the use of credit cards to buy bitcoin. Other cryptocurrencies have followed suit, but the underlying blockchain technology is sound and analysts believe it will grow and prosper in 2018.
OpenStack
OpenStack is the future. This is an operating system that runs in the cloud and it has a lot of advantages. For starters, it offers a flexible ecosystem at low cost and it can easily support mission-critical applications. But, there are some challenges to be faced, most notably, OpenStack’s dependency on servers, virtualisation, and its complex structure. Nevertheless, OpenStack has the backing of several major software companies and acceptance rates are expected to soar in 2018.
Progressive Web Apps
Progressive web apps are the perfect combination of a website and an app. Progressive web apps don’t need to be downloaded, but they offer a better UX when compared to viewing a website. Progressive web apps update information in real time and they run in HTTPS. They are fast and responsive, and in today’s high-octane world where users demand convenience, this is essential.
The Internet of Things
The Internet of Things allows the interconnection of everyday devices. It isn’t a new concept, but the reach of the IoT looks set to grow in 2018. Autonomous Decentralized Peer-to-Peer Telemetry is a major part of evolving IoT technology. It uses the principles of blockchain technology to deliver a de-centralised network that allows devices and “things” to communicate without a central command centre. It could prove to be a major evolution in the world of tech.
Other technology trends worthy of a mention include the latest generation of programming languages. Rust is an exciting alternative to Python and C, so programmers predict Rust will become a viable choice in 2018. R is another up-and-coming opensource programming language. This is also one to watch in 2018.