The Linux kernel development community remains extremely busy, as shown in the recent Linux Kernel Development Report, written by Jonathan Corbet and Greg Kroah-Hartman. Since the 4.7 release, just under 83,000 changesets have been merged from 4,319 individual developers representing 519 known corporations.
Part of this busy development process involves the kernel testing infrastructure. According to the report, the “zero-day build and boot robot” system alone found 223 bugs (all of which were fixed) during the most recent reporting period. The in-kernel self-test framework continues to improve and will someday be a comprehensive test suite for the kernel.
It’s also important for learners to be able to distinguish what the encryption they are using to protect their information does and does not protect against. One way to clarify this conversation is to point out two different types of encryption for their information in transit: transport-layer encryption, and end-to-end encryption.
We created a GIF demo to illustrate the difference between transport-layer encryption and end-to-end encryption. We show a service many participants are familiar with (Google Hangouts over a HTTPS connection), and a tool that may be new to participants (Tor Messenger using an end-to-end encryption protocol called “Off-the-Record” or “OTR”).
As many beginner participants are new to seeing an end-to-end encrypted chat tool like Tor Messenger, we recommend giving learners some context as to what’s happening. You might want to use this GIF for explaining how end-to-end encryption can be helpful in preventing a third-party service from seeing the content of the chat.
ASCII plays a much more important role on our systems than generating techno-art. Let’s explore the commands that allow you to see how it works.
ASCII came about to circumvent the problem that different types of electronic systems were storing text in different ways. They all used some form of ones and zeroes (or ONs and OFFs), but the issue of compatibility became important when they needed to interact. So, ASCII was developed primarily to provide encoding consistency. It became a standard in the U.S. in 1960. Initially, ASCII characters used only 7 bits. Some years later, ASCII was extended to use all 8 bits in each byte.
That said, it is important to understand that ASCII, the American Standard Code for Information Interchange is not used on all computers. In fact, most Linux systems today use UTF-8 — a standard closely related to ASCII but not quite identical. In UTF-8, the classic ASCII characters are encoded in 7 bits and characters with greater values use two bytes.
“Today i finally recognized that unit tests are a critical part of my programming flow” — Ashley Williams, Twitter.
Long-time Node.js advocate Ashley Williams kicked off her recent Twitter thread in the same sort of stream of consciousness that many devs go through when they are coming to terms with the truth: Unit testing is annoying but necessary.
Unit testing is an essential part of developing software applications. Also called component testing, it is all about isolating one unit of code to verify that it’s working as it should be. And unlike many types of testing, this is usually done by the developer of the code itself.
I’m going to walk you through a few of the pieces involved in net-booting a Raspberry Pi and then talk about the challenges of running cloud native apps on a net-booted RPi.
It’s undeniable – Raspberry Pis capture the imagination of techies of all ages. Combine several Raspberry Pis into a cluster and you now have an x10 or x100 multiplier, but there are some problems with SD Cards. Netbooting is meant to fix this – but there are some limitations to its usefulness.
The Kubernetes community is extending the reach of the container orchestration platform into the field of machine learning.
Kubeflow is an open source project that supports machine learning stacks on Kubernetes. The project is housed within the Kubernetes project, which is part of the Cloud Native Computing Foundation (CNCF). CNCF is, of course, housed within the Linux Foundation.
Kubeflow includes the JupyterHub platform for creating and managing Jupyter notebook servers that are used by data science and research groups; a Tensorflow Customer Resource for managing compute resources to a specific cluster size; and a Tensorflow Serving container to house the machine learning work.
Enterprises, end users, and governments faced no shortage of security challenges in 2017. Some of those same challenges will continue in 2018, and there will be new problems to solve in 2018 as well.
eWeek presents 18 security predictions for 2018 for the year ahead from 18 security experts.
If you run a small business, you might need an in-house operating system to serve as a veritable multi-tool. Many businesses opt for Microsoft Windows Small Business Server. However, if you’re looking to cut costs and work with open source software, you have plenty of choices, each of which can perfectly function to meet your small business needs.
One such option is the CentOS 7 based Nethserver. It’s an outstanding small business platform that’s flexible enough to be just what you need and nothing more. Once installed, you can add the software necessary make business happen. Nethserver is quick to install, easy to set up, and simple to manage.
The versions
When you visit the official site of Nethserver, you will notice there are different versions of the platform. Specifically, a Community and an Enterprise edition. I’m going to be discussing the Community options as it offers plenty of features, is community supported, and free.
Did I say “plenty of features”? I did. The feature list for the Community edition of Nethserver includes:
Easy to use web-based interface
Software Center, where you can add only the packages you need
Full data backup
Manual upgrades
CentOS 7 foundation for solid security and reliability
Built-in Samba Active Directory Controller
Nextcloud integration
Certificate management
Transparent HTTPS proxy
Greatly improved firewall
Built-in email server
The Software Center especially should appeal to many administrators and business owners. Why? Because Nethserver allows you to install only what you need to make your workflow manageable and easy.
Let’s install Nethserver
Installing Nethserver is as easy as installing CentOS 7. In fact, it’s exactly like the installation of everyone’s favorite open source server platform. If you’ve installed CentOS 7, you won’t have any trouble installing Nethserver. And the installation of the basic platform can be completed in about five to ten minutes.
Once you’ve downloaded the Nethserver ISO, burn it to a disk or USB drive, or place it in a directory your virtual machine platform can access. I’ll be installing Nethserver via VirtualBox, so there is at least one small variation to the installation. Said variation is making sure to set the Networking option (in VirtualBox) to Bridged mode (otherwise, the machines on your network will not be able to reach your Nethserver instance). Other than that, boot the Nethserver ISO and begin the installation.
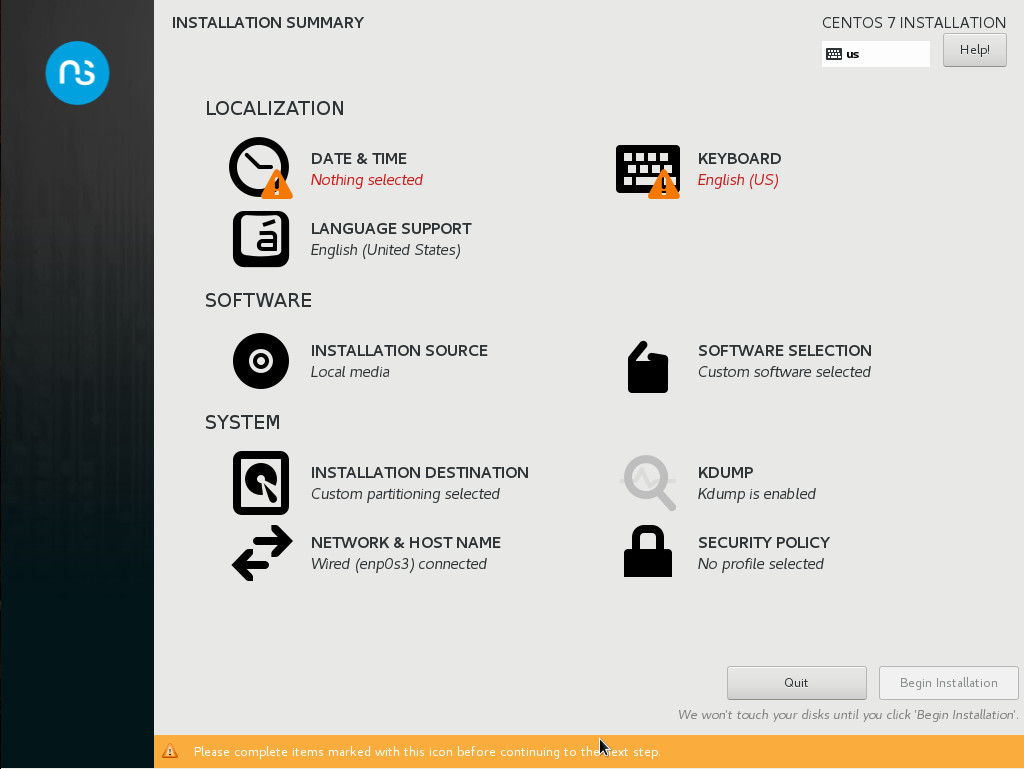
As you can see (Figure 1), the Nethserver installation doesn’t change anything from CentOS 7.
Figure 1: A familiar face for the installation should make Nethserver a cinch to get up and running.
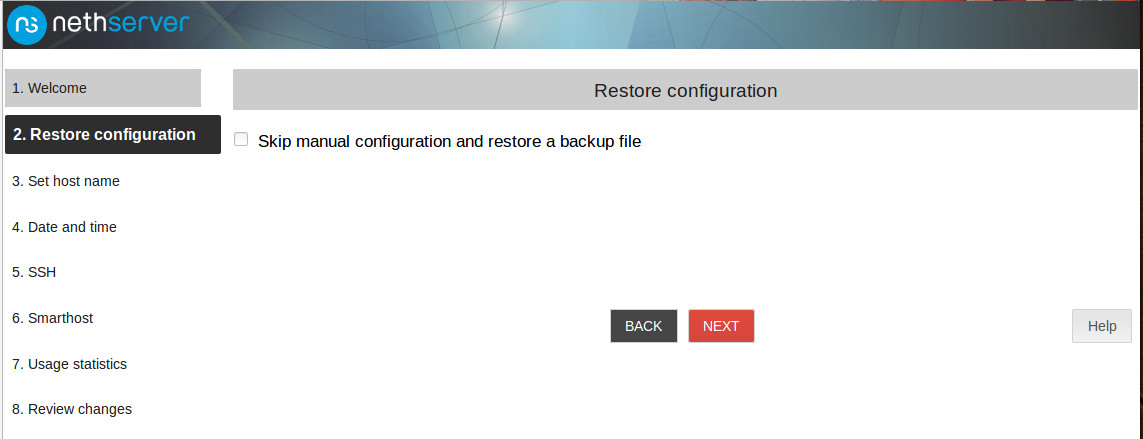
After completing the basic installation, Nethserver will reboot. Upon rebooting, you will need to log in with the credentials you created during the installation. Once authenticated, you will be dropped into a bash prompt. Chances are, you may have not configured networking to use a static address. If that’s the case, issue the command ifconfig from the prompt to find your Nethserver IP address (we’ll change it to static in a bit). With that IP address in hand, point a browser (on the same network) to https://SERVER_IP (Where SERVER_IP is the actual address of your Nethserver machine). In the next few screens you will need to answer some fairly simple questions. The first of these screens is just to welcome you to the setup wizard. Click NEXT. In the resulting window, you are asked if you want to skip the manual configuration and restore a backup file (Figure 2).
Figure 2: You can restore Nethserver from a backup file.
If this is a new installation, keep the box unchecked and click NEXT.
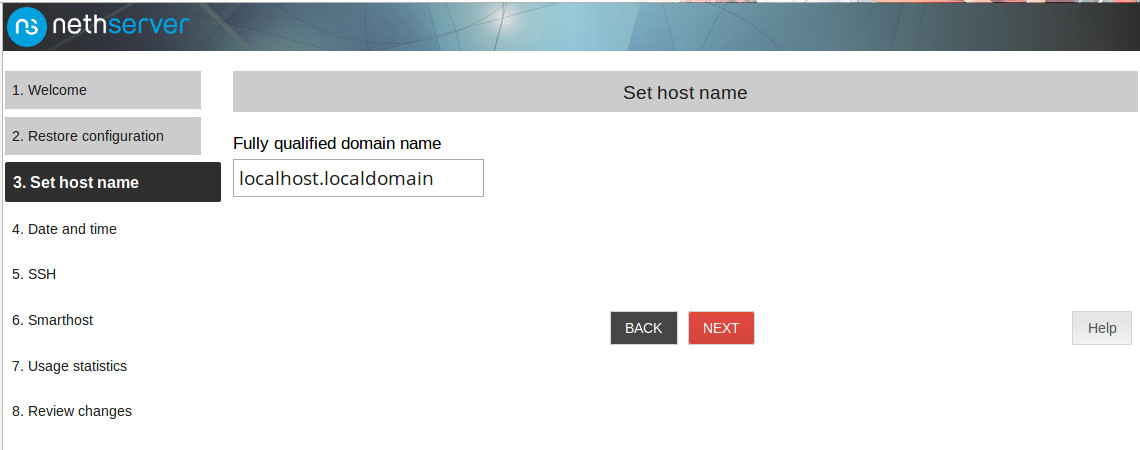
It’s time to set a fully qualified domain name. This is especially important for two reasons:
If you need to access this server from outside your LAN.
If you will need to send email from Nethserver to the outside world.
Chances are, you’re going to need that FDQN here (Figure 3). If you don’t have one, you can always use something like nethserver.localhost.localdomain and use the box for test purposes. However, once you need to start using Nethserver as a real business-class solution, you’ll need that FDQN.
Figure 3: Setting your FDQN.
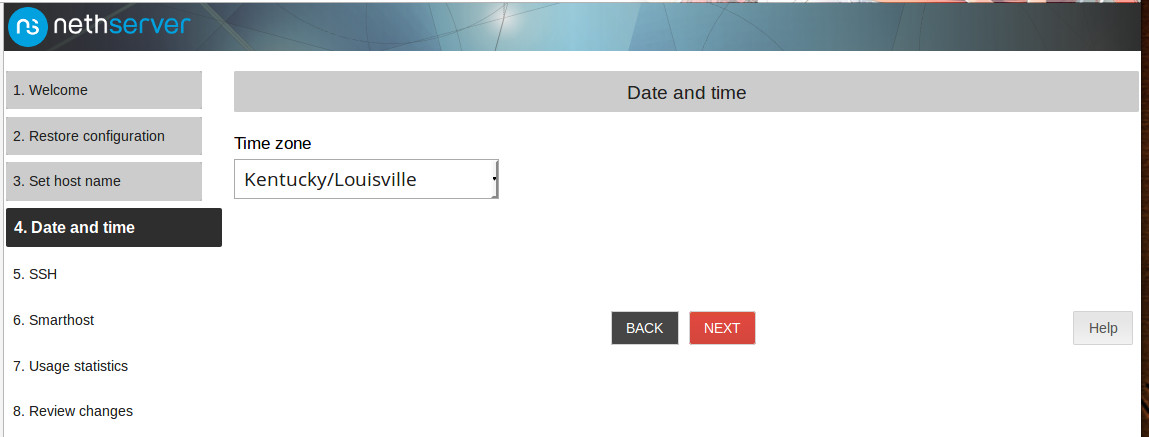
The next few screens require you to do the following:
Set your timezone.
Set the SSH port (the default is 22, Nethserver recommends using port 2222).
Agree (or disagree) to send usage statistics.
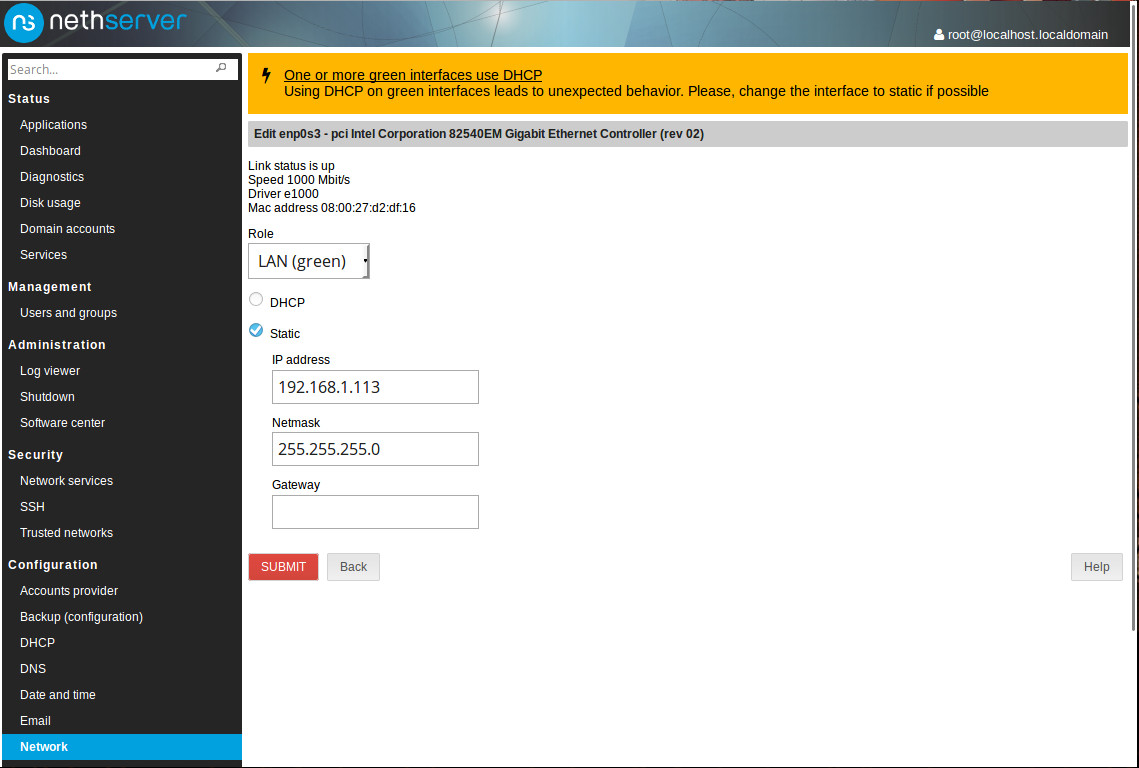
Once you’ve completed the above screens of the wizard, you will land on the main Nethserver page, where you will be prompted to change the server from a DHCP to Static IP address (Figure 4).
Figure 4: Switching the network interface from DHCP to Static.
Click the Edit button, select static (when prompted), and fill out the details for the static address (Figure 5).
Figure 5: Setting the details for a static address.
Once you’ve done that, you will see a DNS tab, where you can set the necessary DNS servers. Chances are, Nethserver picked up the DNS servers from your network’s router. If you find Nethserver cannot reach the outside world, make sure to visit the DNS option and make that change.
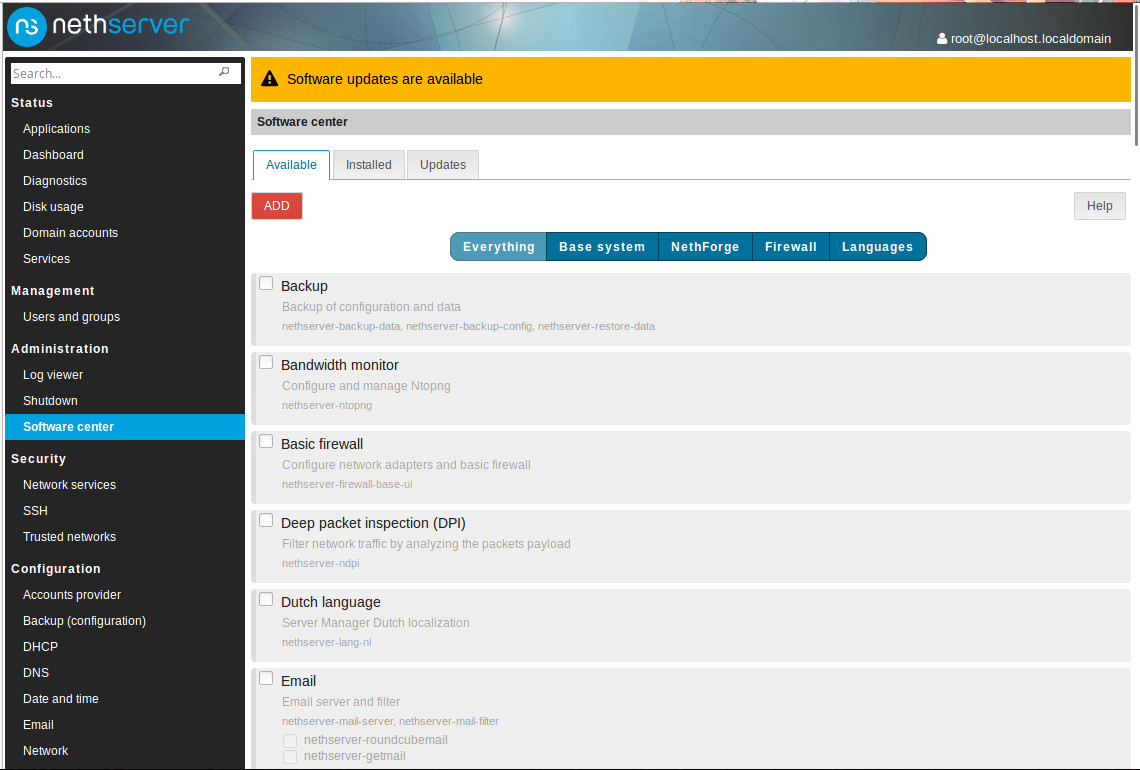
Adding software
At this point, you need to install software. To do this, click on the Software Center entry under Administration. The first time you click the Software Center entry, it will take some time for it to populate the titles, before it becomes available. Give it time and the Software Center will finally appear, ready for you to install everything you need (Figure 6).
Figure 6: The Nethserver Software Center.
As this is a new installation, you will probably be informed of available updates. Before you install any software, click on the Updates tab and then click DOWNLOAD AND INSTALL. I will warn you that, because this is a new install, the upgrade process can take some time. Step away from the keyboard and undertake some other task. When you come back, you will probably see yet another DOWNLOAD AND INSTALL button. I recommend rebooting before you attempt to download and install the next upgrade. Keep repeating that until there are no more updates to download and install. Once there are no more updates, comb through the listing of software and install everything you need to make Nethserver your perfect small business server.
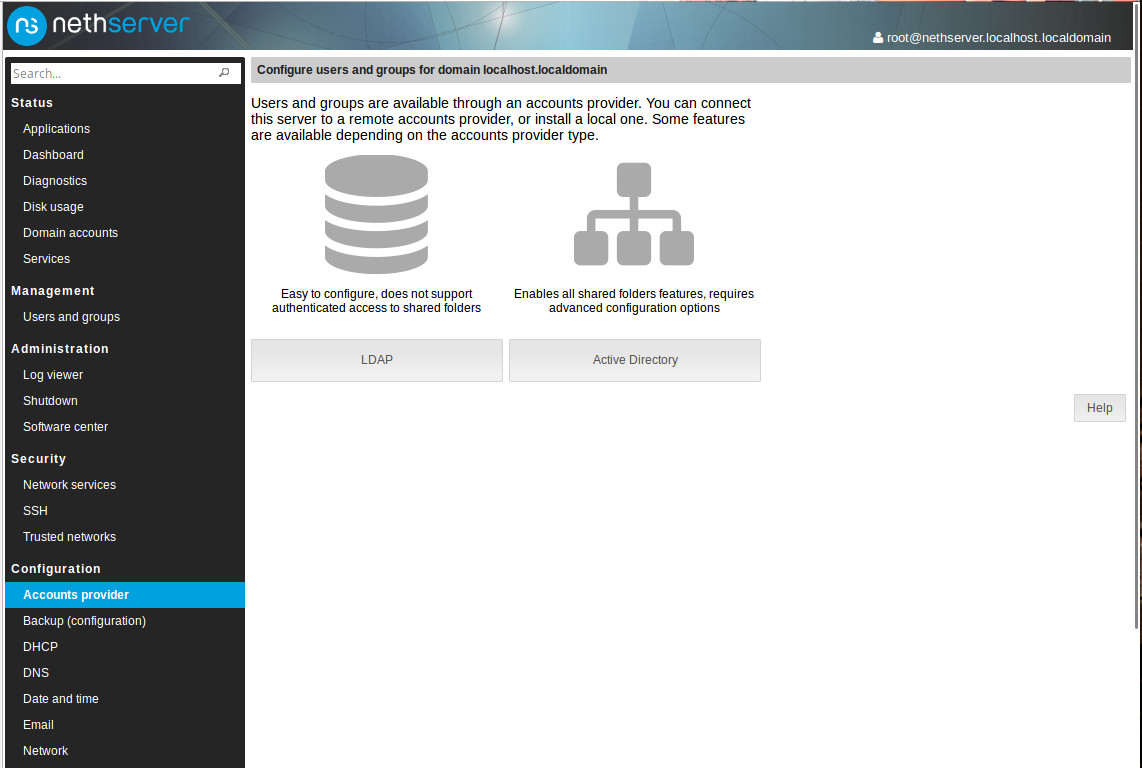
Adding users
Adding users for Nethserver isn’t quite the same as it might be on other Linux servers. You must first decide the method to be used to serve as the user directory. When you go to Management > Users and groups, you will be prompted to select between LDAP and Active Directory (Figure 7).
Figure 7: Selecting your directory service for users and groups.
The route you choose will depend upon your needs. If you select LDAP, you will then have to set up a local LDAP server or bind a remote LDAP server. If you go the Active Directory route, you will have to either join a domain or create a new domain. Once you’ve either created a new local LDAP server or created a new Domain, you can then begin the process of adding users and groups.
Make it yours
That’s the gist of getting Nethserver up and running. Beyond that point, you will have to install and configure the server to make it perfectly fit your small business needs. Nethserver is very powerful and could easily take the place of the more costly Microsoft Small Business server. Give Nethserver a go and see if it doesn’t make for an outstanding solution for your business.
Learn more about Linux through the free “Introduction to Linux” course from The Linux Foundation and edX.
Both proprietary and open source development tends to have more developers than testers. As a result, automated testing has become increasingly common. In the last year, fuzzing — testing with dummy or random data — has become particularly widespread, and its popularity seems likely to continue.
Fuzzing’s name is newer than the concept itself. Computer scientist Gerald Weinberg recalls that when he worked at IBM and Mercury Project in the late 1950s “it was our standard practice to test programs by inputting decks of punch cards taken from the trash. We also used decks of random number punch cards. We weren’t networked in those days, so we weren’t much worried about security, but our random/trash decks often turned up undesirable behavior.
Companies are leveraging containers on a massive scale to rapidly package and deliver software applications. But because it is difficult for organizations to see the components and dependencies in all their container images, the security risks associated with containerized software delivery has become a hot topic in DevOps. This puts the spotlight on Operations teams to find security vulnerabilities in the production environment.
Black Duck isn’t the only organization to identify this trend. The National Institute of Standards and Technology (NIST) published the “Application Container Security Guide” in September to address the security risks associated with container adoption.
Chances are, hackers are aware of the growing popularity of containers as well, which is why we compiled eight takeaways from NIST’s report on container security so you can be proactive about vulnerabilities in your production environment.