Ozone is Chromium’s next-gen platform abstraction layer for graphics and input. When developing either Ozone itself or an application that uses Ozone, it is often beneficial to be able to run the code on the development machine, which is usually a typical GNU/Linux desktop system, since doing so speeds up the development cycle.
By Alexandros Frantzis, Senior Software Engineer at Collabora.
The X11 backend for Ozone works without much trouble on a Linux desktop system. However, getting the DRM/GBM backend to run on such a system, which I recently needed to do as part of my work at Collabora, turned out to be significantly less straightforward. In this guide I will describe all the steps that are required to run Chromium with Ozone-GBM on a typical GNU/Linux desktop system.
Building Chromium
The Chromium developer documentation provides detailed build instructions for Linux. For this guide, we have to ensure that we enable Ozone and that the target OS for the build is “chromeos”:
$ gn gen out/OzoneChromeOS
$ gn args --args='use_ozone=true target_os="chromeos"' out/OzoneChromeOS
$ ninja -C out/OzoneChromeOS chrome
Building a functional minigbm
Ozone-GBM uses the GBM API to create buffers. However, it doesn’t use Mesa’s GBM implementation, but ships its own in the form of the minigbm library. The Chromium source code contains a copy of the library under third_party, but uses it only for building and testing purposes without enabling any of the minigbm hardware drivers.
In order to run Ozone-GBM on real hardware we need to create a build of minigbm that supports our target GPU. For the purposes of this guide, the simplest way to provide a functional minigbm is to build it independently and provide it at runtime to Chromium using LD_LIBRARY_PATH.
First we need to get the minigbm source code with:
minigbm depends on libdrm, so we have to ensure that we have the development files for the libdrm library and the vendor specific extensions. On a Debian/Ubuntu system we can get everything we need by installing the libdrm-dev package:
$ sudo apt install libdrm-dev
We can now build minigbm with the correct flags to ensure the proper GPU driver is supported:
$ make CPPFLAGS="-DDRV_I915" DRV_I915=1
Note that we need to provide the driver flag both as a preprocessor definition and a Make variable. Other driver flags for common desktop GPUs are DRV_RADEON and DRV_AMDGPU (but see below for amdgpu).
Finally we need to create a link with the proper file name so that chrome can find the library:
According to the recent Linux Kernel Development Report, the Linux operating system runs 90 percent of the public cloud workload, has 62 percent of the embedded market share, and 100 percent of the TOP500 supercomputers. It also runs 82 percent of the world’s smartphones and nine of the top ten public clouds. However, the sustained growth of this open source ecosystem would not be possible without the steady development of the Linux kernel.
In this series, we are highlighting the ongoing work of some Linux kernel contributors. Here, Mauro Carvalho Chehab, Open Source Director at Samsung Research Brazil, answers a few questions about his work on the kernel.
A majority of workers over 30 are worried about losing their jobs because of the ageism in tech, according to a recent report from Visier, an employee data analytics company. It pulled HR data from over 100 enterprise companies and mining the data to obtain answers to workforce questions and the results of this survey.
According to Dave Weisbeck, Visier chief strategy officer, it’s not a surprise to anyone that there is ageism in tech. But, he said in an interview, it plays out in a way that is more subtle than we might imagine.
The Findings: The Good
When we think of the term ageism in the IT sector, we generally think of how employers and project managers will systematically or casually discriminate against individuals simply on the basis of their age.
If Docker is your container service of choice, you know how easy it is to create and deploy containers. Chances are you’ve already done so and have numerous containers running on your network. However, do you know how well those containers are performing? If you’re familiar with Linux, you might wish there were an top/htop app geared specifically for containers.
There is.
That’s right, one of the best means of monitoring your containers is an open source tool, found on Github, called ctop. With this app, you can get a quick overview of your containers, their names, IDs, and how much CPU, Memory, and Network Rx/Tx data. Ctop even allows you to filter what you’re viewing, and gives you an expanded view of a selected container. Although it may not offer a massive amount of features, it does the job and does it well. The tool is easy to install, and even easier to use. I’ll demonstrate on a Ubuntu 16.04 platform, but ctop can be installed on nearly any Linux distribution.
After years of pushing toward total domination, Linux finally did it. It is running on all 500 of the TOP500 supercomputers in the world, and who knows how many more after that. That’s even more impressive than Intel’s domination of the list, with 92 percent of the processors in the top 500.
So, how did Linux get here? How did this upstart operating system created by a college student from Finland 26 years ago steamroll Unix, a creation of Bell Labs and supported by giants like IBM and Sun Microsystems and HP, Microsoft’s Windows, and other Unix derivatives?
It was a confluence of things, all of which aligned perfectly for Linux. For starters, the Unixes were fragmented and tied to vendor processors. You had AT&T, through its Bell Labs arm, licensing Unix System V to vendors who then made their own specific flavor. Sun Microsystems made Solaris, IBM made AIX, HP had HP-UX and SGI had IRIX. None of them was compatible, and at best, porting required a recompile if you were lucky.
To be effective, software engineers must hone their problem-solving skills and master a complex craft that requires years of study and practice. Despite what newcomers might think, understanding a programming language, a framework or even algorithms is not the hard part of building software.
For example, languages are easy, especially the C-inspired imperative ones. There are only 32 keywords in the C language, and their meaning is easy to master…
Building software is more about solving problems than writing code or understanding technologies. Becoming good at solving problems requires a lot of practice and experience. A software engineer is a problem solver first, and a coder second. Computer languages, frameworks, and algorithms are tools that you can learn by studying. Solving problems, however, is complicated and hard to learn other than through long practice and applied mentorship.
Containers are all the rage, and with good reason. As discussed previously, containers allow you to quickly and easily deploy new services and applications onto your network, without requiring too much in the way of added system resources. Containers are more cost-effective than using dedicated hardware or virtual machines, and they’re easier to update and reuse.
Best of all, containers love Linux (and vice versa). Without much trouble or time, you can get a Linux server up and running with Docker and deploying containers. But, which Linux distribution is best suited for the deployment of your containers? There are alot of options. You could go with a standard Ubuntu Server platform (which makes installing Docker and deploying containers incredibly easy), or you could opt for a lighter weight distribution — one geared specifically for the purpose of deploying containers.
Photon manages to stay slim by only installing what is absolutely necessary to run the Docker daemon. In the end, the distribution comes in around 300 MB. This is just enough Linux make it all work. The key features to Photon are:
Photon can be used via ISO, OVA, Amazon Machine Image, Google Compute Engine image, and Azure VHD. I’ll show you how to install Photon on VirtualBox, using an ISO image. The installation takes about five minutes and, in the end, you’ll have a virtual machine, ready to deploy containers.
Creating the virtual machine
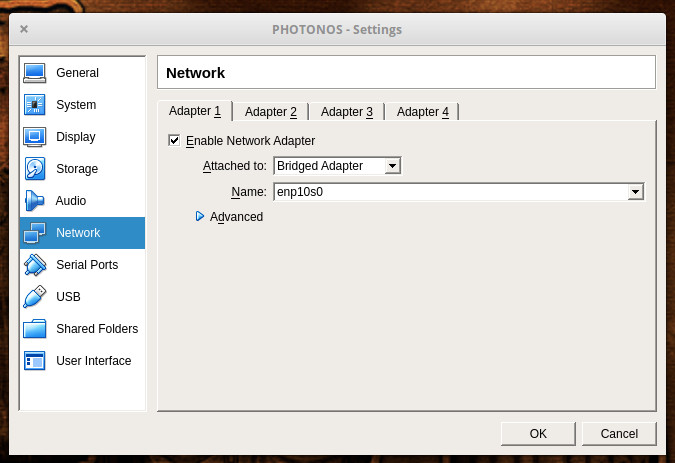
Before you deploy that first container, you have to create the virtual machine and install Photon. To do this, open up VirtualBox and click the New button. Walk through the Create Virtual Machine wizard (giving Photon the necessary resources, based on the usage you predict the container server will need). Once you’ve created the virtual machine, you need to first make a change to the settings. Select the newly created virtual machine (in the left pane of the VirtualBox main window) and then click Settings. In the resulting window, click on Network (from the left navigation).
In the Networking window (Figure 1), you need to change the Attached to drop-down to Bridged Adapter. This will ensure your Photon server is reachable from your network. Once you’ve made that change, click OK.
Figure 1: Changing the VirtualBox network settings for Photon.
Select your Photon virtual machine from the left navigation and then click Start. You will be prompted to locate and attach the IOS image. Once you’ve done that, Photon will boot up and prompt you to hit Enter to begin the installation. The installation is ncurses based (there is no GUI), but it’s incredibly simple.
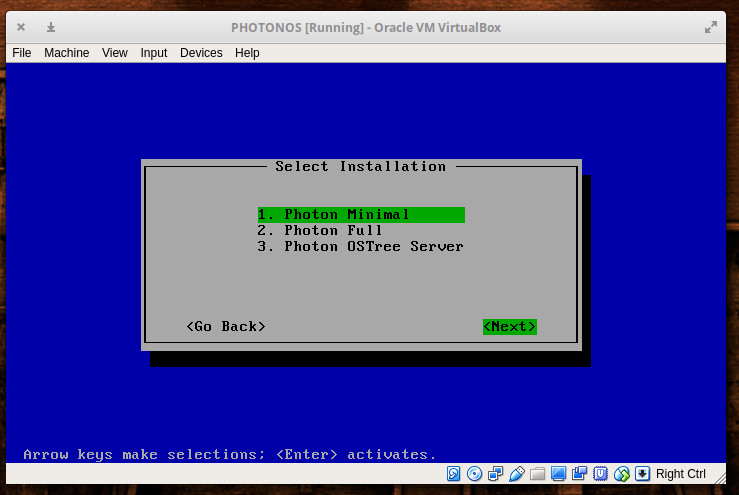
In the next screen (Figure 2), you will be asked if you want to do a Minimal, Full, or OSTree Server. I opted to go the Full route. Select whichever option you require and hit enter.
Figure 2: Selecting your installation type.
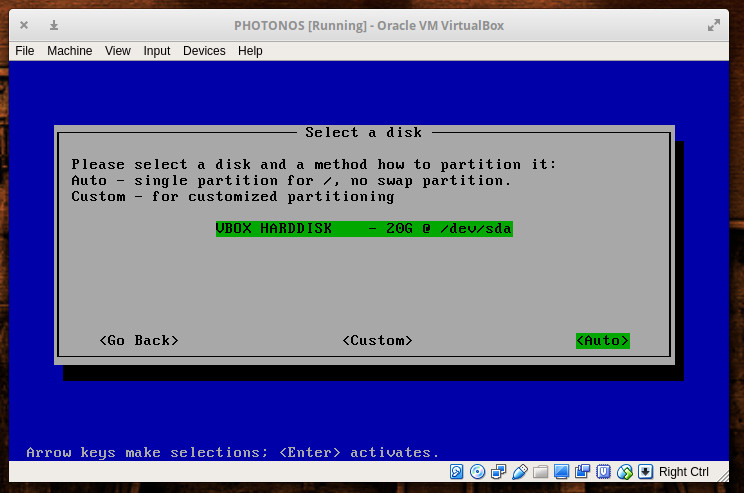
In the next window, select the disk that will house Photon. Since we’re installing this as a virtual machine, there will be only one disk listed (Figure 3). Tab down to Auto and hit Enter on your keyboard. The installation will then require you to type (and verify) an administrator password. Once you’ve done that, the installation will begin and finish in less than five minutes.
Figure 3: Selecting your hard disk for the Photon installation.
Once the installation completes, reboot the virtual machine and log in with the username root and the password you created during installation. You are ready to start working.
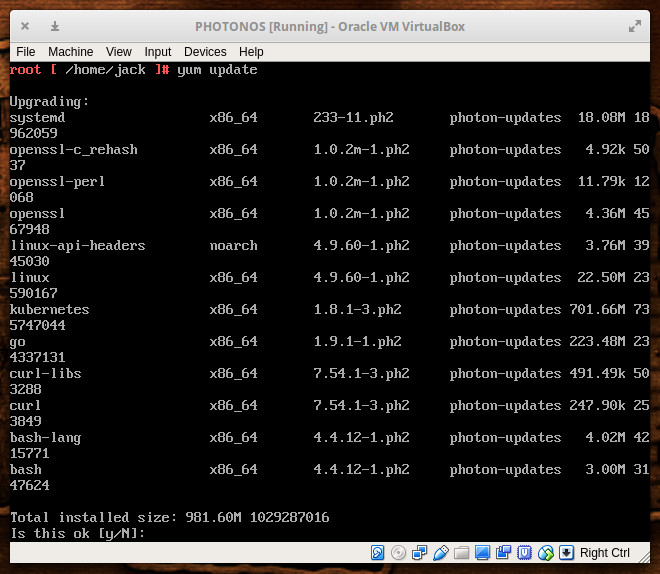
Before you begin using Docker on Photon, you’ll want to upgrade the platform. Photon uses theyumpackage manager, so login as root and issue the command yum update. If there are any updates available, you’ll be asked to okay the process (Figure 4).
Figure 4: Updating Photon.
Usage
As I mentioned, Photon comes with everything you need to deploy containers or even create a Kubernetes cluster. However, out of the box, there are a few things you’ll need to do. The first thing is to enable the Docker daemon to run at start. To do this, issue the commands:
systemctl start dockersystemctl enable docker
Now we need to create a standard user, so we’re not running the docker command as root. To do this, issue the following commands:
useradd -m USERNAMEpasswd USERNAME
Where USERNAME is the name of the user to add.
Next we need to add the new user to the dockergroup with the command:
usermod -a -G docker USERNAME
Where USERNAME is the name of the user just created.
Log out as the root user and log back in as the newly created user. You can now work with the docker command without having to make use of sudo or switching to the root user. Pull down an image from Docker Hub and start deploying containers.
An outstanding container platform
Photon is, without a doubt, an outstanding platform, geared specifically for containers. Do note that Photon is an open source project, so there is no paid support to be had. If you find yourself having trouble with Photon, hop on over to the Issues tab in the Photon Project’s Github page, where you can read and post about issues. And if you’re interested in forking Photon, you’ll find the source code on the project’s official Github page.
Give Photon a try and see if it doesn’t make deploying Docker containers and/or Kubernetes clusters significantly easier.
Learn more about Linux through the free “Introduction to Linux” course from The Linux Foundation and edX.
Massive data breaches over the past several years have shown that you can’t trust online service providers to keep your account information secure. So, if you haven’t done this until now, it’s time to carefully consider what and how you share with such companies, starting with your password.
First off, if you continue to use the same password for multiple accounts across different websites, you’re doing online security wrong. Just head over to HaveIBeenPwned.com and marvel at the list of user databases that have been compromised over the past 10 years.
Go through the descriptions of those breaches and one thing will become clear: It typically takes years before data thefts are discovered by the affected services. During that time the stolen information is sold among cybercriminals who exploit it for profit.
If you’re a hacker or a security company, chances are you’ve had a very good year. If you’re one of the enterprises that lost millions because of malware, then not so much.
“With an expanding threat landscape, cybersecurity is the No. 1 priority for businesses worldwide,” Cisco CEO Chuck Robbins said on a conference call with investors.
Aside from bigger breaches and more security spending, what should companies expect in the year ahead?
Hello! Last week, I thought I knew how users and groups worked on Linux. Here is what I thought:
Every process belongs to a user (like julia)
When a process tries to read a file owned by a group, Linux a) checks if the user julia can access the file, and b) checks which groups julia belongs to, and whether any of those groups owns & can access that file
If either of those is true (or if the ‘any’ bits are set right) then the process can access the file
So, for example, if a process is owned by the julia user and julia is in the awesome group, then the process would be allowed to read this file.