Home Blog Page 495

Top 5 Container Mistakes that Cause Security Problems

Given that many companies are still wrapping their arms around the potential of container technology and how to best leverage it, there is still a lot of experimentation with containers. 

Developers are working in their own sandboxes, setting them up on their laptops and then putting them into production. The issue, though, is that if containers are done without security measures in mind, you may not have the agility you want with the right controls.

As a result, unknown content can end up in containers, even with today’s growing marketing container tools. Kristen Newcomer, security strategist at RedHat, says before putting containers into production, you need to ask, “What’s the right process to manage this? How do I make sure things are controlled and managed as I would any other application?”

Read more at CSO

Fiddling with Linux Processes in Memory

I’ve seen many people using the terms process, thread and program interchangeably. However, under legitimate glossary, processes, threads and programs represent different definitions. Here is my take on it

Program : A set of instructions written to perform a specific function(s), which holds memory on the disk.

Process : When we run the written program (i.e. the executable, obtained after compiling and linking), it creates its own memory space in the RAM. This running instance is a process. I like to call it a program in action.

Thread: Thread is like a building block of a process. A process can have one or more threads running, where all the threads in a process share the same virtual address space and system resources.

Processes in Memory

Well, we know that a running process occupies memory in RAM. But then what next? how is this memory allocated, and how does it work?

 
0*4jNY_EsI-JezhoV6.jpg

In this article, I am aiming to get good hold of memory layout of linux processes, which might involve some linux-OS specific concepts and a bit of understanding of memory management. However, I have tried to focus more on fun and experiential learnings.

While a process is running, it is performing a certain task, and, it may have to use the system resources. A very basic example to illustrate a system resource is a file on the disk. In order to read a file from the file system, it has be accessed. Now, what if another process has to access the same file on the disk? Who will decide whether it should be allowed to be accessed or not? Moreover for all the allowed accesses, it is the operating system, i.e. the linux in our case, which has to manage all the accesses to the file.

How Linux manages its resources is, it does not allow any user running process to directly access any of the system resource. It offers system calls, which are called from the user space to use the system resources. Only when a process enters the kernel space it can access the file, and the kernel keeps track of the opened files in the form of kernel file tables.

For reference, system memory in Linux can be divided into two distinct regions: kernel space and user space. Kernel space is where the kernel (i.e., the core of the operating system) executes(i.e., runs) and provides its services.[Reference: here]

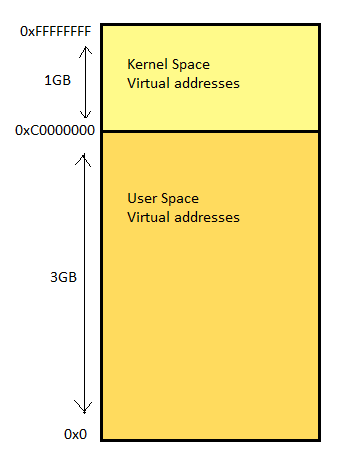
In memory, every running process is given 4GB of virtual address space considering a 32-bit architecture. The lower 3GB virtual addresses is accessible to the user space portion of the process and the upper 1GB is accessible to the kernel space portion. Following is a diagram illustrating the 4GB process virtual address space.

 
0*9HZm_lMogTQv9ht2.

The above process memory split of 1GB to kernel space and 3GB to user space is changeable though, as per the need. However, in most of the cases, 1GB/3GB split suits the best.

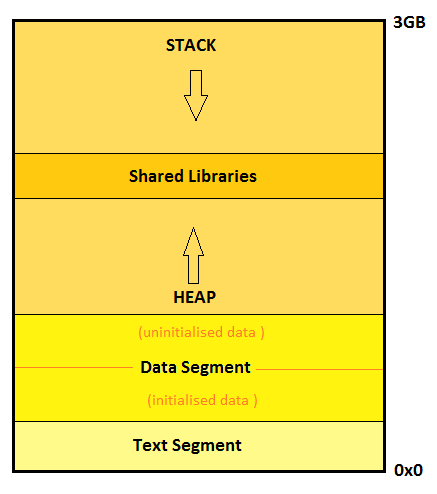
Zooming into the user space address memory layout, there are various segments in a process. Following is a diagram to illustrate a picture:

 
0*C1QG-6JxNYursyVu.

The above diagram is an abstract snapshot of a generic process image in memory. We see the memory has been categorized into various segments in accordance with the ELF format. ELF (Executable and Linking format) is a common standard file format for executables and libraries on unix-like systems. Let us walk through these segments and see what is in store there.

Text Segment

The executable binary is mapped onto this text segment and therefore is a read only segment for the process. Basically, this segment contains the instructions to be followed by the processor in a language that the processor understands (machine language :D). Hence this is also called the code segment. In certain scenarios, where multiple processes are created out of the same program, Linux allows sharing of the text segment to avoid reloading the same instructions.

Data Segment

This segment cannot be shared among processes. The data segment is internally parted into two areas.

One part of the segment memory holds all the initialized data variables i.e. initialized global variables or static variables.

The second part, also called the BSS segment of the process image has the uninitialized data of the program, which includes the global variables which have not been initialized. However, upon the onset of the process, all the data of the BSS segment is zero-initialized.

Heap

Whenever the programmer needs to allocate memory during runtime, heap is the segment from which the memory is provided.

Stack

The stack contains all the local variables used in the program considering their respective local scopes. Whenever a local variable is defined, it is pushed into the stack and whenever the scope for that local variable ends, it is popped out.

The stack might be decreasing or increasing in linear addresses depending upon the underlying architecture.

Shared Libraries

This is no segment as such. In case we have dynamically linked our program to shared objects, shared objects are loaded at the runtime. This part of memory help the process in mapping and accessing the exposed functions which from the shared libraries.

The process stats

Now, we are ready ready to see the real memory address numbers in the memory. However, getting down into the memory, it is very helpful if one knows and understands the intricacies of concepts like paging, physical address mappings, etc which is out of scope of this article.

Nevertheless, I am trying to keep it as simple and broad as possible.

To begin with, we need to write a code. I just randomly chose a mathematical program which gives us the sum of squares of numbers in a list.

const size_t SIZE = 6;
int main()
{
    std::vector<int32_t> list;
    int64_t sqSum = 0;
    int32_t initialVal = 1;
    // Populate the list some random way
    for (uint32_t i = 0; i < SIZE; i++)
    {
         list.push_back(initialVal * i);
    }
    sleep(100);
    //Compute square sum
    for (uint32_t i = 0; i < SIZE; i++)
    {
        sqSum += (list.at(i)*list.at(i));
    }
    std::cout << “Squared Sum is : “ <<sqSum<<std::endl;
    return 0;
}

Well, we have the ‘sleep()’ call in there because, we want the process to be valid for sometime. While the process is sleeping, we want to explore the memory layout of the process before it ends.

We compile the program and run it in the background.

$g++ -g -Wall -std=c++11 squareSum.cpp -o squareSum
$./squareSum &bg

To get any information regarding a process, PID is the prime key. Hence, we need to retrieve the assigned PID of our process.

$ ps
PID TTY TIME CMD
18009 pts/19 00:00:00 bash
19014 pts/19 00:00:00 squareSum
19095 pts/19 00:00:00 ps

In order to get the complete status of our newly created process including the status, size of memory segments, etc, we do

$ cat /proc/19014/status

Well, this is a command to retrieve data using /proc file system which is a special linux file system providing information about system and processes. We will see, procfs is really helpful in getting more and more about the current processes.

The output I see on my system is

Name: squareSum
State: S (sleeping)
Tgid: 19014
Ngid: 0
Pid: 19014
PPid: 18009
TracerPid: 0
Uid: 1000 1000 1000 1000
Gid: 1000 1000 1000 1000
FDSize: 256
Groups: 4 24 27 30 46 113 128 1000
NStgid: 19014
NSpid: 19014
NSpgid: 19014
NSsid: 18009
VmPeak: 13276 kB
VmSize: 13276 kB
VmLck: 0 kB
VmPin: 0 kB
VmHWM: 1552 kB
VmRSS: 1552 kB
VmData: 280 kB
VmStk: 136 kB
VmExe: 12 kB
VmLib: 4564 kB
VmPTE: 48 kB
VmPMD: 12 kB
VmSwap: 0 kB
HugetlbPages: 0 kB
Threads: 1
SigQ: 0/3797
SigPnd: 0000000000000000
ShdPnd: 0000000000000000
SigBlk: 0000000000000000
SigIgn: 0000000000000000
SigCgt: 0000000000000000
CapInh: 0000000000000000
CapPrm: 0000000000000000
CapEff: 0000000000000000
CapBnd: 0000003fffffffff
CapAmb: 0000000000000000
Seccomp: 0
Cpus_allowed: ffffffff
Cpus_allowed_list: 0–31
Mems_allowed: 00000000,00000001
Mems_allowed_list: 0
voluntary_ctxt_switches: 1
nonvoluntary_ctxt_switches: 0

The output gives us a beautiful picture of our process.

It is fine, if one is not able to understand what each and every value in the output means. The more one plays around and experiment, the more concepts gets absorbed in our minds.

Although, at the moment it is significant to know the following :

State: S (sleeping)

Since, the process is currently having a valid PID, only because of the sleep() call, hence we know the process is sleeping.

Tgid: 19014

The thread group ID(Tgid) here is same as the PID of the process

Pid: 19014

Nothing new here, we already are familiar with this number.

PPid: 18009

The parent ID. In our case, the bash shell is the parent process as we executed the binary from the shell. To confirm, just note the PID of ‘bash’ from the ‘ps’ command output.

$ps
PID TTY TIME CMD
18009 pts/19 00:00:00 bash
22228 pts/19 00:00:00 ps

VmPeak: 13276 kB

As the name suggests, it is the peak memory size of the process. It also infers that the memory size of the process keeps on varying.

VmSize: 13276 kB

The current size of the virtual memory being used by the process.

VmData: 280 kB

The size of the data segment of the process in memory.

VmStk: 136 kB

The size of the stack segment of the process in memory

VmExe: 12 kB

The size of the text segment of the process in memory is 4KB

VmLib: 4564 kB

The size of virtual memory occupied by the shared objects is 1788KB.

Threads: 1

The number of threads. Since, we never started any new thread, just the main thread is running.

If you are interested to learn the complete output of your process, the man page is very helpful.

The real addresses

It’s time to jump into the addresses of the segments of our process. The process segments are also termed as virtual areas in the kernel terminology. Worth mentioning, the addresses we see in this section are all virtual addresses.

We shall pick up the same squareSum program what we wrote in the previous section.

Let us create our process and get it running and sleeping 🙂

$./squareSum &

We again will use the procfs to get the absolute process virtual memory mapping to each segment. Here is how I do it:

cat /proc/<process pid>/maps

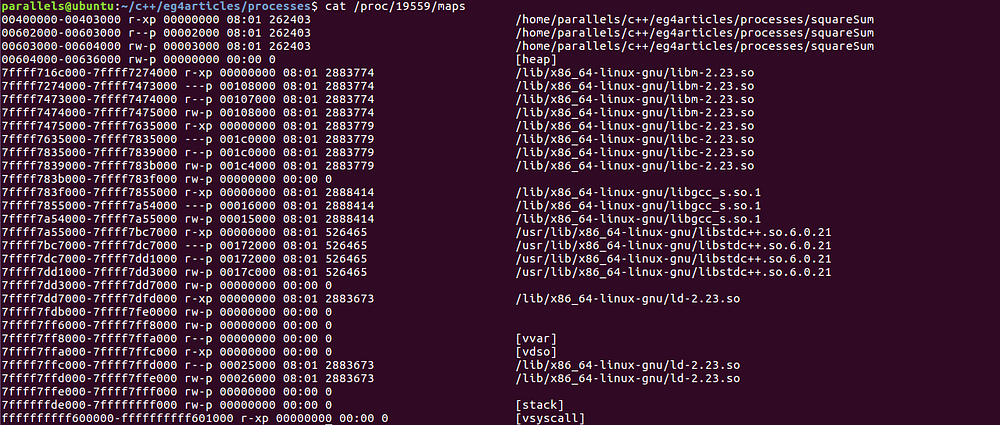
The memory maps from my system looks like

$ cat /proc/25371/maps
00400000–00403000 r-xp 00000000 08:01 262403 /home/parallels/c++/eg4articles/processes/squareSum
00602000–00603000 r — p 00002000 08:01 262403 /home/parallels/c++/eg4articles/processes/squareSum
00603000–00604000 rw-p 00003000 08:01 262403 /home/parallels/c++/eg4articles/processes/squareSum
00df2000–00e24000 rw-p 00000000 00:00 0 [heap]
7f87f7979000–7f87f7a81000 r-xp 00000000 08:01 2888287 /lib/x86_64-linux-gnu/libm-2.23.so
7f87f7a81000–7f87f7c80000 — -p 00108000 08:01 2888287 /lib/x86_64-linux-gnu/libm-2.23.so
7f87f7c80000–7f87f7c81000 r — p 00107000 08:01 2888287 /lib/x86_64-linux-gnu/libm-2.23.so
7f87f7c81000–7f87f7c82000 rw-p 00108000 08:01 2888287 /lib/x86_64-linux-gnu/libm-2.23.so
7f87f7c82000–7f87f7e41000 r-xp 00000000 08:01 2888281 /lib/x86_64-linux-gnu/libc-2.23.so
7f87f7e41000–7f87f8041000 — -p 001bf000 08:01 2888281 /lib/x86_64-linux-gnu/libc-2.23.so
7f87f8041000–7f87f8045000 r — p 001bf000 08:01 2888281 /lib/x86_64-linux-gnu/libc-2.23.so
7f87f8045000–7f87f8047000 rw-p 001c3000 08:01 2888281 /lib/x86_64-linux-gnu/libc-2.23.so
7f87f8047000–7f87f804b000 rw-p 00000000 00:00 0
7f87f804b000–7f87f8061000 r-xp 00000000 08:01 2888414 /lib/x86_64-linux-gnu/libgcc_s.so.1
7f87f8061000–7f87f8260000 — -p 00016000 08:01 2888414 /lib/x86_64-linux-gnu/libgcc_s.so.1
7f87f8260000–7f87f8261000 rw-p 00015000 08:01 2888414 /lib/x86_64-linux-gnu/libgcc_s.so.1
7f87f8261000–7f87f83d3000 r-xp 00000000 08:01 526465 /usr/lib/x86_64-linux-gnu/libstdc++.so.6.0.21
7f87f83d3000–7f87f85d3000 — -p 00172000 08:01 526465 /usr/lib/x86_64-linux-gnu/libstdc++.so.6.0.21
7f87f85d3000–7f87f85dd000 r — p 00172000 08:01 526465 /usr/lib/x86_64-linux-gnu/libstdc++.so.6.0.21
7f87f85dd000–7f87f85df000 rw-p 0017c000 08:01 526465 /usr/lib/x86_64-linux-gnu/libstdc++.so.6.0.21
7f87f85df000–7f87f85e3000 rw-p 00000000 00:00 0
7f87f85e3000–7f87f8609000 r-xp 00000000 08:01 2888270 /lib/x86_64-linux-gnu/ld-2.23.so
7f87f87ec000–7f87f87f1000 rw-p 00000000 00:00 0
7f87f8806000–7f87f8808000 rw-p 00000000 00:00 0
7f87f8808000–7f87f8809000 r — p 00025000 08:01 2888270 /lib/x86_64-linux-gnu/ld-2.23.so
7f87f8809000–7f87f880a000 rw-p 00026000 08:01 2888270 /lib/x86_64-linux-gnu/ld-2.23.so
7f87f880a000–7f87f880b000 rw-p 00000000 00:00 0
7ffe71238000–7ffe71259000 rw-p 00000000 00:00 0 [stack]
7ffe712c4000–7ffe712c6000 r — p 00000000 00:00 0 [vvar]
7ffe712c6000–7ffe712c8000 r-xp 00000000 00:00 0 [vdso]
ffffffffff600000-ffffffffff601000 r-xp 00000000 00:00 0 [vsyscall]

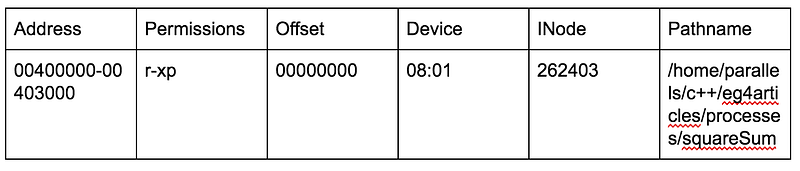
Aahh… multitude of hexadecimal numbers. I love it! Welcome to the world of memory addresses! Following table illustrates what each column of our output mean:

 
0*s8djrlrHzrz75zdV.

The best resource to learn what each column means and signifies is our very own wise man pages

$man proc

Here is my attempt to provide brief introductions by taking reference from the man page:

Address :

The start address and the end address in the process that the mapping occupies

Permissions:

Set of permissions where,

r means readable
w means writable
x means executable
p means private i.e it is not shared.
s means shared

Offset:

The offset in the file where the mapping begins. Not every mapping is mapped from a file, so the value of offset is zero in that case.

Device :

In the form “major number : minor number” of the associated device, as in, the file from which this mapping is mapped from. Again, the mappings which are not mapped from any file, value is 00:00.

INode:

I-node of the related file.

Pathname:

The path of the related file. Its blank in case there is no related file.

In order to identify the segments, we check the access permissions associated with each segment. Let us take the first segment i.e. the first row of the output.

00400000–00403000 r-xp 00000000 08:01 262403 /home/parallels/c++/eg4articles/processes/squareSum

The access permissions implies it is a readable and executable private segment. From all the segment descriptions, we can make out it is the text segment. The text segment is the read-only with contains the instructions from the binary. Looking at the related file, it is not hard to guess, the region from virtual address 0x00400000 to 0x00403000 is our text segment.

Moving on to the next row

00602000–00603000 r — p 00002000 08:01 262403 /home/parallels/c++/eg4articles/processes/squareSum

From the permissions, this looks like a read-only private segment. This is one of the additional read-only segment a process can possess.

The next one,

00603000–00604000 rw-p 00003000 08:01 262403 /home/parallels/c++/eg4articles/processes/squareSum

Again, noticing the access permissions, its a read/write segment which points to the data segment of the process.

The following next row again looks like a segment with read/write permissions.

00df2000–00e24000 rw-p 00000000 00:00 0 [heap]

It is the heap segment as indicated by the map entry itself. However, notice, it is not related to any file (as offset = major # = minor # = inode = 0).

The next ones, again reads like text segment, read-only segment and data segment respectively, but the related file is a shared object. As we can see we are linking to: libm (GNU Math), libc, libgc, libstdc++ and ld.

7f87f7979000–7f87f7a81000 r-xp 00000000 08:01 2888287 /lib/x86_64-linux-gnu/libm-2.23.so
7f87f7a81000–7f87f7c80000 — -p 00108000 08:01 2888287 /lib/x86_64-linux-gnu/libm-2.23.so
7f87f7c80000–7f87f7c81000 r — p 00107000 08:01 2888287 /lib/x86_64-linux-gnu/libm-2.23.so
7f87f7c81000–7f87f7c82000 rw-p 00108000 08:01 2888287 /lib/x86_64-linux-gnu/libm-2.23.so
7f87f7c82000–7f87f7e41000 r-xp 00000000 08:01 2888281 /lib/x86_64-linux-gnu/libc-2.23.so
7f87f7e41000–7f87f8041000 — -p 001bf000 08:01 2888281 /lib/x86_64-linux-gnu/libc-2.23.so
7f87f8041000–7f87f8045000 r — p 001bf000 08:01 2888281 /lib/x86_64-linux-gnu/libc-2.23.so
7f87f8045000–7f87f8047000 rw-p 001c3000 08:01 2888281 /lib/x86_64-linux-gnu/libc-2.23.so
7f87f8047000–7f87f804b000 rw-p 00000000 00:00 0

Note that, although these segments are mapped out of a shared object, though currently in this virtual memory area, they are not shared. Hence the permissions states them as private memory mapping.

We also see some mappings inside the linked shared objects, where have pathnames as blank. These are anonymous mappings, hence sources are unknown.

Besides, we have more additional mappings as we can see below:

7f87f880a000–7f87f880b000 rw-p 00000000 00:00 0

The first one represents yet another anonymous read/write segment which may be used as a backing store.

7ffe71238000–7ffe71259000 rw-p 00000000 00:00 0 [stack]

The next one with [Stack], is the main thread’s stack segment which enfolds the local variables. The stack mapping can also be listed as [Stack:<threadID>] where it represents the stack for the specified thread ID.

7ffe712c4000–7ffe712c6000 r — p 00000000 00:00 0 [vvar]

I’ll talk about the [vvar] mapping with [vsyscall] mappings, as they are tied to the same concepts.

7ffe712c6000–7ffe712c8000 r-xp 00000000 00:00 0 [vdso]

The above one, though not related to any file, but specifies itself by [vdso]. It is a special memory area for kernel provided shared library to aid userspace call to kernel-space. The abbreviated full form is virtual dynamically linked shared object.

ffffffffff600000-ffffffffff601000 r-xp 00000000 00:00 0 [vsyscall]
7ffe712c4000–7ffe712c6000 r — p 00000000 00:00 0 [vvar]

The above two mappings are related to the concepts of how system calls work. As we know, the system calls uses the kernel address space and needs the switch to kernel mode from the user mode. However, these context switching are overheads. To make things work faster, Linux allows to put the read-only system calls into the user process address space, so that they are accessible without the need to switch to the kernel mode. These user-space functions which can access the kernel space informations are called virtual system calls. Hence, we see the mapping for [vsyscall]. As we can see from the permissions in the mapping, it is read only, private and executable segment. To aid virtual system calls, variables from the kernel address space are mapped to the user-space addresses. This mapping is [vvar] as we see here. Its also important to understand here, that now kernel variables will have two address — kernel-space a address and mapped user-space address. Though the later has restricted permissions.

A simple exercise

As a very basic experiment, let’s print addresses of the variables we use and match what range and mapping it belongs to.

I use gdb to take a peek at addresses of the variables, however feel free to add another std::cout in the program, if you like.

$ gdb squareSum
(gdb) run
Starting program: /home/parallels/c++/eg4articles/processes/squareSum
Breakpoint 1, main () at squareSum.cpp:21
21 sqSum += (list.at(i)*list.at(i));
(gdb) print&sqSum
$2 = (int64_t *) 0x7fffffffdde8

Here is the process memory map of my current squareSum process:

 
0*X5mU7rqSWpN9sQx2.

Studying the addresses in the procfs mapping, we see that the local variables belong to the stack segment, as stack memory begins at address 0x7ffffffde000 and end at 0x7ffffffff000. The address of the local variable ‘local_size’ is ‘0x7fffffffdde8’ which is

0x7ffffffde000    >   0x7fffffffdde8   <   0x7ffffffff000
|stack-start-addr|     |local_size addr|   |stack-end-addr|

Therefore, the mapping we are interested in is,

7ffe71238000-7ffe71259000 rw-p 00000000 00:00 0                         [stack]

Well, nothing new except the feeling of fulfillment to see our local variable actually sits inside the stack. 🙂

One more

So, now, we know the virtual addresses of the process memory areas and we’ve also experienced the joy to see that the local variables address within the main thread’s stack. Let’s explore more addresses in the space. However, this time I’ll write another program using more of the varied memory areas.

My next program converts a number to a string.

// global variables
uint32_t g_initializedNum = 1210;
uint32_t g_uninitializedNum;
/*convert a number to a string*/
int main()
{
    //local variables
    uint32_t local_size = 1;
    unsigned char *heap_str = NULL; // will find a place in heap
    int32_t local_i = 0;
    uint32_t local_temp = 0;
    /*Determine the length of our output
    string i.e how many numbers form our number*/
    g_uninitializedNum = g_initializedNum;
    while (1)
    {
        g_uninitializedNum /= 10;
        if (!g_uninitializedNum)
        {
            break;
        }
        local_size++;
    }
    printf(“ The computed local size is %dn”, local_size);
    // Allocate memory for string of
    //computed size + 1 for terminating
    // null character
    heap_str = (unsigned char*) std::malloc ((local_size + 1) * sizeof(unsigned char));
    if (heap_str == NULL)
    {
        printf(“Memory error!n”);
        exit(1);
    }
    g_uninitializedNum = g_initializedNum;
    for (local_i = local_size — 1;local_i >= 0 ; local_i--)
    {
        local_temp = g_uninitializedNum % 10;
        heap_str[local_i] = local_temp + ‘0’;
        g_uninitializedNum /= 10;
    }
    heap_str[local_size] = 0;
    printf(“The output string is %s n”, heap_str);
    //We need time to get hold of the memory maps
    sleep(100);
    // Free the heap memory
    std::free(heap_str);
    return 0;
}

My intention while writing the above code was to sprinkle the variables in different memory segments, hence pardon the liberty I have taken against writing the most efficient and optimized code. 🙂

We are all set for the fun!

$ g++ -g -Wall num2string.cpp -o num2string
$ gdb num2string
51 heap_str[local_size] = 0;
(gdb) print &g_initializedNum
$1 = (uint32_t *) 0x601078 <g_initializedNum>
(gdb) print &g_uninitializedNum
$2 = (uint32_t *) 0x601080 <g_uninitializedNum>
(gdb) print &local_size
$3 = (uint32_t *) 0x7fffffffde0c
(gdb) print heap_str
$4 = (unsigned char *) 0x614030 “1210”

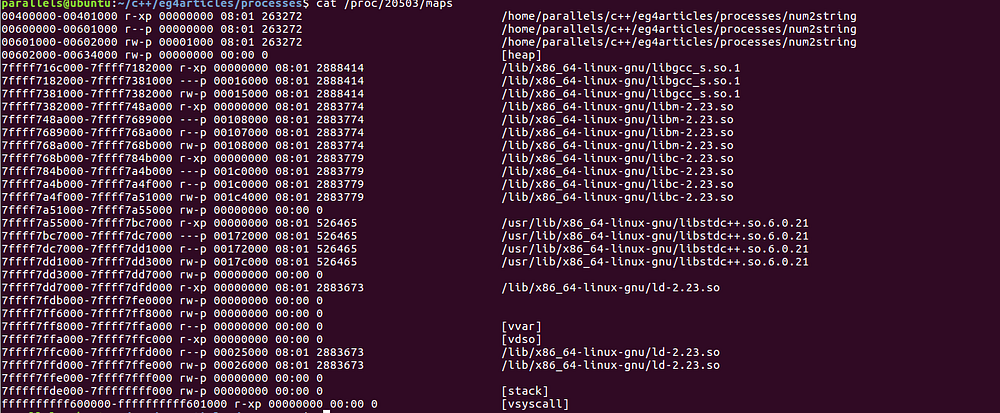
Let me grab the mappings as well for our currently running num2string process:

 
0*W1NWzKdaaGkFgrCF.

We got all the data to analyze.

Picking up the global variables:

$1 = (uint32_t *) 0x601078 <g_initializedNum>

Here is the mapping where it belongs:

00601000–00602000 rw-p 00001000 08:01 263272 /home/parallels/c++/eg4articles/processes/num2string

It is the data segment mapping with read/write permissions.

With the uninitialized global variables,

$2 = (uint32_t *) 0x601080 <g_uninitializedNum>

We can see this variable is placed right next to the other global variable in the data segment:

00601000–00602000 rw-p 00001000 08:01 263272 /home/parallels/c++/eg4articles/processes/num2string

The memory address for the local variables seems to be coming to another mapping.

(gdb) print &local_size
$3 = (uint32_t *) 0x7fffffffde0c

Going back to our memory map, here is where it belongs:

7ffffffde000–7ffffffff000 rw-p 00000000 00:00 0 [stack]

Next one is our dynamically allocated memory. Lets see the memory address is in the heap mapping addresses.

(gdb) print heap_str
$4 = (unsigned char *) 0x614030 “1210”

Here is the mapping the address falls into:

00602000–00634000 rw-p 00000000 00:00 0 [heap]

Quite obvious and still feels good to see.

Creating Processes in programs

Standard C facilitates creating processes from a running process. Another interesting and vital fact is that, when a process creates a new process, both the two processes have their own separate memories in the RAM, where each of the process have their own individual process memory segments.

Let’s look at the two popular ways of creating new processes in a program.

The system() method

There is a convenient option to run commandline commands/executables from within a program. It is done through the system() method.

The syntax from the man page looks like:

int system(const char *command);

It takes a command in the format of a string as its input argument and returns the command status after the command completion.

Here is an example program to illustrate the use of the system() method

int main()
{
    int retcode = 0;
    retcode = system(“cat sys.c”);
    return retcode;
}

Compiling and running the built binary,

$ gcc sys.c -Wall -o sys
$./sys

The output I get is:

int main()
{
    int retcode = 0;
    retcode = system(“cat sys.c”);
    return retcode;
}

Pretty much as we expected. It runs the command given to the system() method which displays the contents of the ‘sys.c’ file on the standard output.

However, interesting to know is that it isn’t the ‘sys’ process which created the new process running ‘cat’ executable. With the system() method, it creates new process ‘shell’ and hands over the command to it, which in turn triggers the ‘cat’ command and creates that process. To confirm, let us run our squareSum binary from our source and check its parent process.

Here is the modified source, to trigger squareSum

int main()
{
    int retcode = 0;
    retcode = system(“./squareSum”);
    return retcode;
}

We build the source and run the binary in the background.

$ gcc sys.c -Wall -o sys
$./sys &

We know running ‘squareSum’ executable is a blocking call as it has a 100 sec sleep().

Therefore, in the meanwhile, we wish to see what all processes are running and their PID’s.

$ ps
PID TTY TIME CMD
5543 pts/2 00:00:00 bash
14847 pts/2 00:00:00 sys
14848 pts/2 00:00:00 sh
14849 pts/2 00:00:00 squareSum
14883 pts/2 00:00:00 ps

We get an inkling from the running ‘sh’ process that it must have been started by the system() call in the ‘sys’ process. Along with, we also notice the ‘squareSum’ process running, which has been launched from within our program using the ‘system()’ call.

To check the parent process of ‘squareSum’, we use the linux command ‘ps’ as

$ ps -f
UID PID PPID C STIME TTY TIME CMD
paralle+ 5543 5536 0 06:02 pts/2 00:00:00 bash
paralle+ 14847 5543 0 14:06 pts/2 00:00:00 ./sys
paralle+ 14848 14847 0 14:06 pts/2 00:00:00 sh -c ./squareSum
paralle+ 14849 14848 0 14:06 pts/2 00:00:00 ./squareSum
paralle+ 14929 5543 0 14:06 pts/2 00:00:00 ps -f

Note: One can also use the procfs as /proc/14849/status to know the PPID of the ‘squareSum’ process.

From the ‘ps -f’ output, we are interested in following processes,

paralle+ 14847 5543 0 14:06 pts/2 00:00:00 ./sys
paralle+ 14848 14847 0 14:06 pts/2 00:00:00 sh -c ./squareSum
paralle+ 14849 14848 0 14:06 pts/2 00:00:00 ./squareSum

./squareSum sets forth the PPID as ‘14848’ which is the PID of the shell process (i.e. sh -c ./squareSum). Moreover, the PPID of the shell process is ‘14847’ which is the PID of our ‘sys’ process.

Caveat Although, using the ‘system()’ method is pretty convenient, it has limitations and drawbacks too. Since, it uses shell to run the command, the behavior of the command will depend upon what shell it is using. If the shell is compromised in security, using the ‘system()’ method could be hazardous.

The fork() method

The fork() call is used to create a duplicate child process as the parent process which is calling it. So, from the point, the fork() call was made, both the parent and the child process starts executing the same program instructions following the fork() call.

The syntax from the man page is

#include <unistd.h >
pid_t fork(void);

Notice we have a data-type provided for the PIDs

pid_t

Therefore, if we want to store a PID in a variable, we now know what data-type it should be.

Although we have additional new processes initiating after a fork() is called, there is one distinguishing value to identity the parent vs child process. This distinguishing value is the PID value returned by the fork() call. The parent process will will see the PID returned as the pid of the newly spawned child process. However, in the newly created child process, this PID return value will be zero

Further, we shall experience using the fork() method in a a very basic program which looks like.

int main()
{
    pid_t pid_child = 0;
    int a = 12;
    int b = 3;
    int result = -1;
    printf(“All set to create another processn”);
    pid_child = fork();
    if (pid_child)
    {
        result = a + b;
        printf(“Root process : The result is %dn”, result);
    }
    else
    {
        /*The pid_child = 0*/
        result = a * b;
        printf(“Child process : The result is %dn”, result);
    }
    /*Buying time to check the running processes*/
    sleep(100);
    return 0;
}

In the above example source code, we do two different operations in both the child and parent processes. In the parent process, the value returned by fork() would be a valid PID i.e. non-zero positive value. However, in the child process instance, the variable value would be just zero, as this process has just been created.

Well, are sending both the processes to sleep for 100 seconds.

Time to compile and launch the process:

$ gcc -Wall forkExample.c -o forkExample
$ ./forkExample &
[1] 17338
$ All set to create another process
Root process : The result is 15
Child process : The result is 36

The processes are now sleeping after printing the results. Meanwhile, let us check the active process information.

$ ps -f
UID PID PPID C STIME TTY TIME CMD
paralle+ 5543 5536 0 06:02 pts/2 00:00:00 bash
paralle+ 17338 5543 0 14:19 pts/2 00:00:00 ./forkExample
paralle+ 17339 17338 0 14:19 pts/2 00:00:00 ./forkExample
paralle+ 17430 5543 0 14:20 pts/2 00:00:00 ps -f

From the above output, we identify our two processes with the same command.

One of them [PID =17338 : CMD = ./forkExample] is our ‘Root’ process which has the PPID [= 5536], same as of the ‘bash’ and second one [ PID = 17339 : CMD = ./forkExample] is the ‘Child’ process which has the PPID [ = 17338] same as as the PID of the first one..

Thats all for today. Hope you enjoyed fiddling around with the linux processes.

$ps

PID CMD

333 PenProcess

$kill -9 333

DevOps Fundamentals, Part 6: Automated Testing

This is the final installment of our series covering the DevOps Fundamentals: Implementing Continuous Delivery (LFS261) training course from The Linux Foundation. So far, we have looked at:

This time we’ll cover automated testing. There are nine principles; these are based on work by Elisabeth Hendrickson, Pivotal’s Vice President of Data R&D, who did a brilliant presentation on Agile testing overview.

This is a very important part of the Continuous Delivery pipeline, and an important way of thinking about how things need to be done.

Nine principles:

  • Change the adversarial mindset to a collaboration mindset.

  • Change the dev then test mindset to test and dev mindset.

  • Instead of having a test team, you have an everyone tests team.

  • Test early, test often, and shorten the feedback loop.

  • Tests should have reasonable expectations.

  • Fix bugs when you find them.

  • Reduce test documentation, automate the expectation.

  • Done means released and tested.

  • Test implement vs. implement test

Test-driven development (TDD) means you write tests before you write the code. Tests should always be running. That includes every commit, nightly functional testing, smoke tests and stability testing, performance testing, zero configuration, zero downtime, and more. Watch the following video for details:

Now let’s see how automated testing plays out. In the full training course, we talk about system testing, performance testing, load testing, security testing, even configuration management, like behavior-driven testing (BDD). The point is that there is a lot of opportunity for testing, and the list goes way beyond this.

In the example of Google, as shown in the video below, there are some interesting statistics from a few years ago related to automated testing. They have 4,000+ projects in active development, with 5500+ code submissions per day, and more than 75 million test cases run daily — that number is more than 100 million now.

Another area that is really getting hot is DevSecOps. There is a lot there: security testing, SQL injection, cross-site scripting, unprotected redirects, remote code execution — all the things that need to be caught in a post- or pre-deployment.

It used to be that software bugs were evaluated by one group, and another group evaluated security bugs, or security vulnerabilities, or security defects. Now, everything is in the same place. It includes both the delivery of software and the security in the pipeline as it is happening. DevSecOps is a hot topic, and there’s some fascinating stuff going on all over the globe with this.

That wraps up our series previewing the DevOps Fundamentals training course. You can, of course, watch the video below for more details, and you can access all the free sample chapter videos now.

This course is written and presented by John Willis (@botchagalupe), who has worked in the IT management industry for more than 35 years.

All Stacked Up: A Case Study

For all those who have followed our series so far, we want to thank you for your time, and we’re glad you can join us for this last installment! For those coming to this article on its own, we encourage you to go back and read the rest of our series, starting with our first post. In this final article, we will take a tour through a working case study created by Kenzan. The project leverages Yarn, webpack™, and TypeScript in not one but two GitHub repositories that anyone can clone, run, tinker with, and contribute back to.

Meet the Repos

For this case study, we will demonstrate the stack with React, while the other demonstration stack uses Angular:

Why Create Two Repositories?

Great question! There are a few principal objectives we hope to showcase throughout this case study, which will help to address why we went with two repositories.

  • This stack is intended to be flexible and interoperate easily with any modern JavaScript library or framework. Providing two versions that meet similar goals provides a better apples-to-apples comparison.

  • In line with the motivations behind TodoMVC, each repository has a reference app of equal feature parity.

  • With this case study, we can get down to a lower level on the implementation details, which is something we wanted to be mindful of during the other articles.

  • This article and the accompanying repositories aim to demonstrate the stack in an intuitive and straightforward approach. This will help you understand why a file is there and why a configuration option is what it is.

  • We chose to eschew using any sort of generators or CLI tools (like Yeoman, Angular CLI, or Create React App) so we can showcase just the technologies themselves as they are, at their least abstract.

Why Not Just Keep It Simple?

It does feel right to address the absence of a “vanilla” stack example. The simple answer is that, at Kenzan and in the industry as a whole, there are few scenarios where a major project would start without the use of some library or framework and all the nuances that come into play with that. For example, while AngularJS has the concept of modules and dependency injection, the developer still has to ensure correct load order of all JavaScript files, or else risk seeing $injector errors in the browser console.

The goal of this case study is to help readers understand the basics. It’s also to provide exposure to real-world scenarios that factor in the unanticipated complexity that often comes with welding multiple technologies together. These complexities aren’t always immediately obvious from the outside looking in. Our hope is to identify these technical distinctions so that you can better understand what is specific to React or Angular, and what is common to any basic implementation of the stack.

Ultimately, Kenzan believes that Developer Experience is a critical component in successfully delivering an application. We want to balance that fine line between prescriptiveness and flexibility, and allow teams to decide on how to cover the “last mile” of the stack—be it with Angular, React, Vue, or something of your own creation. With that, let’s dive into our stack!

QQl9XxQUpJC7enyK7IK1N2Mz94DwBxLAaNKnJo0j

Exercise – Get Ready, Fork, Clone!

Before you continue, we recommend that you fork and clone the React repository, and install dependencies using Yarn. That way you can follow along as we go through the repository in detail. There will also be a couple of exercises that we encourage you to try.

1. You will need to have the correct version of node and Yarn on your system. For details, see the “Project Setup” section in the README:

https://github.com/kenzanlabs/react-webpack-stack#project-setup

2. Fork the React repo:

https://github.com/kenzanlabs/react-webpack-stack

3. Clone your fork of the repo.

4. Open a terminal window and change to the root directory of the cloned repo. Then, install dependencies:

yarn install

Need some help? See the GitHub documentation on forking and cloning a repository.

Repository Overview

Starting at the root of our project, let’s review some key files and configuration patterns we’ve adopted.

Documentation

Every project should always have a robust README to ensure a good onboarding experience, and to act as a general reference for project practices and decisions. Important sections to include are an Overview, Installation/Setup, Usage (if it’s a library), Development Workflows, and Release Management. Other sections can be added, or links to external documentation can be used as needed.

For projects hosted on GitHub, there are helpful features including templates for issues and pull requests (PRs) as well as for contributing guidelines. You can find them in the .github/ directory of the project. If you are interested to learn more about GitHub best practices, check out Kenzan’s blog post on managing an open source project in GitHub.

Configuration and Code Quality

All configuration files for all tools used in the project are kept at the root of the project. These range from enforcing consistent code quality standards and best practices, to configuring our build tools like webpack or Karma.

  • .babelrc – Configuration for Babel when using Jest to run unit tests, and for transpiling our ES2015-generated TypeScript. This lets us leverage great plugins from the Babel ecosystem, like babel-preset-env, which provides more fine-grained control of the output of our JavaScript, and which pulls in plugins and polyfills as needed. (Imagine Can I Use as an npm package.)

  • .editorconfig – Rules for EditorConfig, a popular IDE-based plugin for high-level formatting rules.

  • .eslintrc – Linting and style rules for ESLint®. A consistent style guide is critical for a project. While this project primarily relies on TSLint, we still want to ensure consistency in any JavaScript files in the project (like our webpack configuration files and unit tests). When it comes to linting, whatever the opinions of the team are, the most important thing is to pick a definitive rule set and enforce that throughout the entire codebase.

  • jest.config.js / karma.conf.js – Configuration files for Jest (React) and Karma (Angular) respectively. Unit testing is a critical part of application development at Kenzan. We chose Jest and Karma for their deep understanding of the ecosystems they support, as they were created by the respective projects they are most associated with. For more on our principles and practices around unit testing, check out this video on test-driven development from a recent Kenzan-hosted Meetup.  It should be noted there is no reason one could use Jest to test Angular, or Karma to test React.

  • tsconfig.json / tslint.json – Configuration files for TypeScript (one for the TypeScript compiler and one for TSLint). We’ll cover these more in depth in the TypeScript section of this article.

  • webpack.config.*.js – webpack configuration files for the project. These are divided into three parts for composability across our different development lifecycles (more on this later).

  • yarn.lock – The auto-generated lock file for Yarn. The lock file should always be committed to the repository when there are dependency changes to the project’s package.json.

Project Layout

A designated src/ directory contains all of the project’s source code. The directory is organized into general categories, following a component-based paradigm.

  • index.js – The main entry point into the project. This acts as the application’s bootstrapping “glue” mechanism to kick off the app.

  • vendor.js – Third party npm dependencies. These let us configure wepack and provide an additional entry point.

  • components/ – The application’s components. Component-driven development is a mature development practice and is strongly advocated by all modern frameworks. Common examples are header, footer, navigation, contacts-list, and so on.

  • services/ – The application’s services. Generally, a service is a class that handles data or connects to a backend, and that does not interact with the DOM in any meaningful way.

  • views/ – Interchangeable with pages or screens. These are (container) components mapped to routes in an application, and serve as the shell or wrapper for a tree of components. Common examples are a Home or About page. The main goal is to support easy composition of components.

Development Workflows

The installation steps in the README only tell a developer to install Yarn and run yarn install. Other than that, all you know is that the project uses webpack and TypeScript. So how do you actually start working on the project? The README must have forgotten to document how to install the rest of the stack, right? Let’s take a look at a project’s package.json, specifically the scripts section.

What we see are commands you can run with the Yarn CLI, using yarn run. These command do the work of calling webpack or Jest, without us having to install any additional development tools. TypeScript, webpack, and the like come with CLI commands of their own. These become available on the command line locally to the project after running yarn install. We can see the entire list available in the node_modules/.bin/ directory. (The list will vary slightly repo to repo.)

K3atRyjvxvhrCrV0saTfVqx6blPTcPk9Iv_eD6bh

The entire project and all of its dependencies, whether for runtime or development, are portable and maintenance free. In addition, we chose to base our scripts on the concept of development “goals” or tasks (akin to Maven lifecycles). This provides a consistent methodology that can be applied to any project. Tasks are run by executing yarn run <script-name> or just yarn <script-name> as run is assumed.

  • develop – Used for development. This task leverages our “develop” webpack configuration (webpack.config.develop.js) and starts webpack-dev-server.

  • build – Runs a production build using webpack and our “prod” webpack configuration (webpack.config.prod.js).

  • lint – Convenience task for linting all files in the application.

  • test Runs unit tests, both locally and as part of a CI build process.

  • serve – Runs a production webpack build and serves it up locally. It is important to be able to easily run a production build locally, for example, to tackle a production-only bug.

What is important here is that our scripts are focused and deliberate. They are intended to be named intuitively and in a way that can be applied to any project. One nice feature about this setup is that the developer doesn’t have to know about the tools being used under the hood. If the team decides to choose a different testing framework, the script and dependencies just need to be updated. As far as anyone else is concerned, yarn test will continue to just work.

Continuous Integration

Let’s briefly talk about Continuous Integration. If you look in the bin/ folder, you will see a build script called build.sh. For all our projects at Kenzan, being able to run a build against any change to the repository is critical to ensure that building the project from scratch is reliable and stable.  This includes installing dependencies, running tests, linting, and of course a production webpack build.

At Kenzan, we use Jenkins with our clients to automate the building and deployment of PRs and projects. For our open source projects, like these two repositories, we have chosen to use CircleCI instead. That’s because it is a hosted and managed CI platform that we can share with all contributors. You can see the configuration in the .circleci/config.yml file in the repository.

Whatever CI tool is used, it’s important to have a consistent Continuous Integration server or environment where we can execute a versioned build script (build.sh). The build script runs each time a PR is opened or updated. Automation around deployments, while out of scope here, is a critical part of any infrastructure for our project. That’s why we felt it was important to showcase at least the “CI” in “CI/CD”, as a reflection of our best practices and standards.

webpack

For webpack, the main point to review is our configuration composition, which follows the recommendations of the webpack advanced usage documentation. During the discussion about configuration, code quality, and npm scripts, we mentioned that there are three configuration files: webpack.config.develop.js, webpack.config.prod.js, and a shared config called webpack.config.common.js. Let’s start with the common config.

webpack Config – Common

Creating a common configuration file lets us create additional composable and focused webpack configurations to support various goals, like develop and build. The common configuration is principally responsible for the following concerns.

  • entry / output – The point from where webpack will start building the dependency graph of our application, and the location of the build output.

  • rules (loaders) – File processing for our application that will handle our styles, images, TypeScript, HTML, and anything else that is required to build our application from source code and vendor dependencies.

  • plugins – Shared post compilation for:

    • Injecting our script and style paths into index.html using HtmlWebpackPlugin.
    • Configuring code splitting using CommonsChunkPlugin. In this case, we are creating a common chunk, unsurprisingly called “common”, which includes the common code from our entry points. This can be part of an effective caching strategy.
    • Exposing non-modular vendor libraries (like jQuery® references in Bootstrap) to webpack using the ProvidePlugin. The left side is the global reference as found in the vendor code. The right side tells webpack to map that reference to the equivalent of a require(‘jquery’) command.

Note: For React with HMR support, we have added react-hot-loader to our TypeScript loader configuration

Note: For Angular, we needed to add the ContextReplacementPlugin to resolve a warning emitted by Angular. We also disabled minification of HTML in our rule configuration based on an issue with html-loader that we ran into.

We will now look at how we can re-use this configuration using webpack-merge to support our develop and production workflows.

webpack Config – Develop

Using webpack-merge, we can compose our own webpack configuration together, to reduce duplication and bloat. If we examine the webpack.config.develop.js file, we can see there’s actually very little to it. We require our common configuration and pass that to webpack-merge along with an additional object just for our development-related webpack configuration.

  • output – For HMR, we need to configure an output file.

  • webpack-dev-server – Configuration for our local development server. Note that this is where we enabled the hot flag to enable HMR.

  • rules (loaders) – Special development-specific SCSS/CSS file processing. For development only, we have a loader configuration for SCSS/CSS that puts all our styles in a <style> tag. This is less intensive for development workflows.

  • plugins – Development-specific plugins:

    • Hot Module Replacement makes the magic happen. You’ll get to experience HMR yourself in the exercise below!

webpack Config – Prod

For our production builds, we will use webpack.config.prod.js. As with webpack.config.develop.js, we include our common configuration, and pass in an object along with additional production-specific configurations.

  • rules (loaders) – Used to generate a standalone .css file using ExtractTextPlugin, for better control over debugging, caching, and distribution of the application’s CSS.

  • plugins – Production-specific plugins:

    • webpackMd5Hash – Used to generate a [chunkhash] based on the contents of our files. This is an effective technique to implement as part of a caching strategy, as we can use the file contents, and whether they changed or not, to dynamically determine the file name generated by webpack. In this way, a chunk or file can cache bust itself only when needed. Pretty neat!

    • UglifyJSPlugin – When shipping an application to production, it is important to minify and strip out all excess whitespace and comments from our files, to help reduce the overall bundle size. This plugin does exactly as advertised!

    • ExtractTextPlugin – Used to generate a standalone .css file for better control over debugging, caching, and distribution of the application’s CSS (as opposed to the approach we used just for development purposes).

Exercise – Swap Modules with HMR

One of the great features we discussed in our webpack article is Hot Module Replacement (HMR). HMR lets you make changes to parts of a running application (such as changing HTML, JavaScript, or CSS) without having to reload the entire application, while it preserves any current state.

This is huge. Think back to our example of filling out a form, from our article on webpack. Imagine you want to test validation rules or submit/rejection functionality. Every change to the code in most build pipelines would reload the entire page, forcing the developer to tediously walk back through all the steps of filling out the form. Help us, HMR!

To demonstrate, let’s work through an example to see how HMR can save developers time during the development process.

Note: For now, given the complexities of Angular and our desire to keep the repos simple, you will only be able to use the React repo to complete this exercise. We’ll be doing a followup on HMR in Angular on the Kenzan Tech Blog, so stay tuned!

1. To begin, start the webpack development server (webpack-dev-server). Open a terminal window and change to the root directory of the cloned repo. Then run the develop task:

yarn develop

A browser window opens and loads the application’s home page. You’ll see a button to add a new contact.

2. Click Add contact to display a form for adding a new contact. There are fields for name, email, phone, and more.

3. Fill out part of the form with some user information, like your first and last name.

eMx5gfIWRkXhHL4nC5y32FciyZKI4_dn8nYeHmM-

Here’s where it gets fun. We’re going to try making some style changes. The background color of the page is a little on the plain side, so let’s change it. Normally we would expect this to reload our page and force us to fill out all the form fields again. But will it?

4. In a text editor, open src/components/bootstrap/bootstrap.scss and add the following CSS:

body {
background-color: #2aabd2;
}

5. Save the change to bootstrap.scss. When you do, the develop task automatically runs again. Look at that—the page changed color, but our form field entries were preserved. The state of our component remained unchanged!

yYAIUUIiInonodQHvLUG3q89bObU1VF7zfZx7EYu

That’s pretty cool. But you might be thinking there’s no way this will work if you change the actual ContactsListForm component. Let’s put that to the test.

6. In a text editor, open src/components/contacts-list-form/contacts-list-form.tsx (for React) or src/components/contacts-list-form/contacts-list-form.html (for Angular).

7. Let’s change the label for the First Name field to note that it’s required. Find the following text:

<label className=' control-label' htmlFor='firstname'>First Name</label>

And add (required) after the field label, like so:

<label className=' control-label' htmlFor='firstname'>First Name (required)</label>

JRIyJ4i0bF2WqOZCdqRicJ8AW7ZlKtpPmokddC-g

Hopefully this has helped demonstrate the power of HMR, as well as the kind of infrastructure and development platform webpack brings to the table.

TypeScript

As our previous article on TypeScript focused primarily on syntax, this walkthrough will focus on the configuration elements of TypeScript.

TSConfig (tsconfig.json)

TypeScript allows developers to use a JSON file to configure the TypeScript compiler. That config is automatically used when the compiler (tsc) is invoked (via command line, webpack loader, or the like). While we won’t go over every TypeScript compiler option available, let’s discuss a few options that are most meaningful to the setup of these projects.

  • noImplicitAny – This is set to true and requires everything (argument, return value, variable, and so on) in our application to require a type.

  • target – Specifies the version of the compiled JavaScript output we want from the TypeScript compiler. In our case, since we want to take advantage of Babel to further refine our generated JavaScript for production, we choose to have TypeScript output ES2015-compatible JavaScript.

  • module – We chose “commonjs” here since we have certain external npm packages that don’t support ECMAScript module syntax. Otherwise we would have chosen ES2015.

  • awesomeTypescriptLoaderOptions (useBabel) – Configuration specifically for the webpack loader awesome-typescript-loader. As the name implies, it really is awesome! We think so especially for its support of Babel, which is important to us because, as mentioned before, we think babel-preset-env is a powerful and versatile tool. We love the ability to write in TypeScript but transpile down to JavaScript that only polyfills the native browser features missing from our target browser demographic, delivering a much more fine-grained and slimmer bundle to our users.

Note: For our React repository, we enable the JSX flag to enable JSX support in the TypeScript compiler.

Note: For our Angular repository, we enabled the emitDecoratorMetadata and expirementalDecorators options since Angular leverages the ES2016 Decorators feature,

TSLint (tslint.json)

When it comes to linting and coding styles, every team and project has its preferences. At Kenzan, we understand those preferences are important and meaningful, and they they were picked for a reason. Our focus is not so much on what a team decides, but rather that the team makes these decisions binary (for example, the linter will either pass or fail on a given rule violation). This isn’t meant to be nitpicky but rather to ensure consistency, especially for code reviews.

One thing that we are excited to follow is a WIP (work-in-progress) plugin for ESLint that would extend to TypeScript files, allowing for consistent rules across all JavaScript projects.

Type Definitions (@types)

It is worth touching upon how TypeScript type definitions are managed. As discussed in our last article, Type Definitions are an important part of the TypeScript ecosystem. They allow non-TypeScript projects to play nicely within the TypeScript based ecosystem of your application. If you look in package.json, you will see a number of entries in the devDependencies section that start with @types/. This is the new workflow successor to using typings, available in TypeScript 2.0+. It allows developers to install definition files available from Definitely Typed using their package manager without any additional configuration. An example using Yarn would look like:

# we use the --dev flag since @types are only needed for development
$ yarn add @types/react --dev

Note: For those who may not be familiar with @ syntax, this is referred to as a scoped package.

Exercise – Try Out TypeScript

To demonstrate some of the features of TypeScript and how they improve the developer experience, let’s start making some changes and see what happens.

1. Open a terminal window and change to the root directory of the cloned repo. Then run the develop task:

yarn develop

A browser window opens and loads the application UI.

2. In a text editor, open src/views/home/home.tsx and find the following text:

{ContactService.buildName(contact)}

3. Also open src/services/contact.service.tsx and find our interface (ContactInterface) and our class (ContactService).

You’ll notice that buildName takes a single parameter, of type ContactInteface, which itself defines the properties and value types of a “contact” in the context of our application. In our case, a contact has properties like firstName, lastName, phone, and email. Some of these properties are optional, as denoted by a question mark (?).

4. Let’s make a change to the code in home.tsx to see TypeScript in action. Instead of passing a ContactInteface parameter, pass a string (like your name) instead:

{ContactService.buildName('Owen')}

5. Save the change to home.tsx. When you do, the develop task is automatically run again. You’ll immediately see an error in the terminal, indicating that we are calling buildName incorrectly.

AqquHcFFIBkunAwI9Iz9gyNM8ZhUPvobz8JAyckN

Luckily, most IDEs have TypeScript support, so a developer can get feedback that way as well. Here’s an example:

MuUZJiXynRQq8w1tiYCVyN9uULmR0qi5a7fir148

6. Let’s try another experiment. First, undo the change you made to home.tsx and save the file. (Notice in the terminal that it builds correctly now.)

7. Now let’s make a change to ContactInterface in contact.service.ts. We’ll remove firstName from the interface. Find the following line and delete it:

firstName: string;

8. Save the file and notice what happens in the terminal when the develop task automatically runs.

As we saw in the previous example, TypeScript can let us know if we are using part of our application incorrectly. This safety net is especially helpful in maintaining integrity in the entire application.

mJ0C7cIhvJBDvQ_WhxuRRwZhy59rot0RPHZ5GRGP

This time, we see two errors pop up in two different files. The errors show all the places where this change will cause an issue. This is helpful for refactoring, or just for catching an errant mistake by a developer at build time.

The type system of the application, in particular through the use of interfaces, helps developers ensure integrity throughout the codebase by providing core objects that can model our application domain and keep all components in sync. So we can see that, as a project grows and scales, TypeScript becomes more valuable at communicating the potential widespread impact of a given change.

As soon as you save the file, the develop task runs, and this time it should be happily error-free. Thanks, TypeScript!

Conclusion

We hope that this case study on our modern front-end stack has been valuable, and that it provided a good complement to our blog series. We strived to make sure the technologies used and the decisions made were as deliberate and intuitive as possible, so that the best practices we’re promoting are as accessible as possible. We hope you will contribute and ask questions through the issue trackers of our repositories. And if you have an improvement you would like to make, please feel free to submit a PR!

Kenzan is a software engineering and full service consulting firm that provides customized, end-to-end solutions that drive change through digital transformation. Combining leadership with technical expertise, Kenzan works with partners and clients to craft solutions that leverage cutting-edge technology, from ideation to development and delivery. Specializing in application and platform development, architecture consulting, and digital transformation, Kenzan empowers companies to put technology first.

Read the previous articles in the series:

A Modern Day Front-End Development Stack

Untangling Package Management in JavaScript Applications

Faster Tied Together: Bundling Your App with webpack

TypeScript: Our Type of JavaScript

How To Move Into a Cloud Career from Traditional IT

There is a great deal of interest from those with traditional IT skills—such as enterprise architects, developers, and networking engineers—to steer themselves into a cloud computing career that will not only provide job protection, but pay better as well.

However, the path to cloud computing riches is not that clear for most.

The good news: There is a path for many IT pros into the cloud. This article shows you how to map a path to those jobs from your current state if you are an enterprise architect, database admin, application developer, system admin, test-and-acceptance engineer, or networking engineer.

Read more at InfoWorld

Why Containers Are the Best Way to Test Software Performance

Containers can simulate real-life workloads for enterprise applications without the high cost of other solutions.

Software performance and scalability are frequent topics when we talk about application development. A big reason for that is an application’s performance and scalability directly affect its success in the market. An application, no matter how good its user interface, won’t claim market share if its response time is sluggish.

This is why we spend so much time improving an application’s performance and scalability as its user base grows.

Read more at OpenSource.com

An Intro to Compilers

A compiler is just a program that translates other programs. Traditional compilers translate source code into executable machine code that your computer understands. (Some compilers translate source code into another programming language. These compilers are called source-to-source translators or transpilers.) LLVM is a widely used compiler project, consisting of many modular compiler tools.

Traditional compiler design comprises three parts: 

Read more at Nicole Orchard

The Search for the Killer App of Unikernels

When a radically different technology comes along it usually takes time before we figure out how to apply it. When we had steam engines running factories there was one engine in each factory with a giant driveshaft running through the whole factory. When the electric engine came along people started replacing the giant steam engine with a giant electric motor. It took time before people understood that they could deploy several small motors in different parts of the factory and connect electric cables rather than having a common driveshaft. It takes time to understand the technology and its applicability.

The situation with unikernels is similar. We have this new thing and to some extent we’re using it to replace some general purpose operating system workloads. But we’re still very much limited by how we think about operating systems and computers.

Read more at Unikernel.org

Hacker-Proof Coding

Generally, computer code is written without any formal processes, and the main metric for testing it is simply trying it out and seeing whether it or not works. Testing does not necessarily guarantee all the bases have been covered that might occur at runtime, or that it would prevent a malicious attacker who reads the program from devising something clever with which to undermine it. Formal software verification relies on mathematical theorems and reasoning and uses deductive techniques to check the most critical aspects of a system. Proponents say this technique is making hacker-proof software possible.

“A lot of the ways attackers take over programs on machines and the Internet is by exploiting security vulnerabilities, and there are many kinds, such as the buffer overrun vulnerability, to which safe languages are just immune,” notes Andrew Appel, professor of computer science at Princeton University, who is considered an expert in the program verification field.

Formal software verification uses methods that don’t rely on running the program; rather, they analyze program text to prove things about its behavior on any possible input. 

Read more at Communications of ACM

This Week in Open Source News: AGL Reveals Latest Platform, OSS For Mainstream Business & More

This week in open source news, AGL reveals new infotainment platform, mainstream enterprises derive the most benefit from OSS, and more! Read on to stay on top of the latest open source news. 

1) Automotive Grade Linux (AGL) recently revealed the latest infotainment platform along with a new Virtualization Expert Group (EG-VIRT) to develop a virtualized architecture.

Linux Foundation Focuses on Bringing Virtualization to Your Car– RCRWireless News

2) “Combing through the last few quarters of earnings transcripts, it’s clear that open source has arrived…but to very different destinations, depending on the company.”

Open Source is Driving Digital Transformation, According to Mainstream Businesses– Tech Republic

3) Amazon Web Services joined the Cloud Native Computing Foundation (CNCF), (open source home of the Kubernetes project,) as a Platinum Member.

AWS joins the Cloud Native Computing Foundation– TechCrunch

4) “On August 24 and 25, the Ubuntu Desktop team will be holding a “Fit and Finish Sprint,” where they will aggressively test GNOME.”

Canonical Needs Your Help Transitioning Ubuntu Linux From Unity to GNOME– BetaNews

5) The VoltaStream Zero (an open source integrated audio module in the same form as a Raspberry Pi Zero) has launched.

Raspberry Pi Zero Clone: This Open Source Board Offers Chromecast-Quality Sound– ZDNet