Home Blog Page 618

What You Need to Know About the Tech Pay Gap and Job Posts

There’s a long tradition in which employers ask candidates in job posts and applications for salary requirements or for their salary history. The practice is so common, most professionals don’t give the question a second thought. But asking for salary history in a job post can actually perpetuate the wage gap.

That’s why Massachusetts signed a new equal pay act into law that prohibits employers from asking job candidates about salary history in application materials and the interview. The reasoning behind the act is that when compensation is based on past numbers, it only perpetuates past disparities, especially because women typically earn less than men in their first job.

In addition, people tend to make judgments and assumptions about a candidate’s value based on what they earned in a previous position, whether they mean to or not. 

Read more at TechCrunch

Tips and Tricks for Making VM Migration More Secure

A challenge for any cloud installation is the constant tradeoff of availability versus security. In general, the more fluid your cloud system (i.e., making virtualized resources available on demand more quickly and easily), the more your system becomes open to certain cyberattacks. This tradeoff is perhaps most acute during active virtual machine (VM) migration, when a VM is moved from one physical host to another transparently, without disruption of the VM’s operations. Live virtual machine migration is a crucial operation in the day-to-day management of modern cloud environment.

For the most part, VM migration executed by modern hypervisors, both commercial proprietary and open source, satisfy the security requirements of a typical private cloud. Certain cloud systems, however, may require additional security. For example, consider a system that must provide greater guarantees that the virtual resources and virtual machine operations on a single platform are isolated between different (and possible competing) organizations. For these more restrictive cloud installations, VM migration becomes a potential weak link in a company’s security profile. What do these advanced security threats look like?

Advanced cyberattacks that are specific to VM migration

  • Spoofing: Mimicking a server to gain unauthorized access. This is essentially a variation of the traditional man-in-the-middle (MITM) attack.

  • Thrashing: A sophisticated denial-of-service (DOS) attack. In this case, the attacker deliberately disrupts the migration process at calculated intervals, so the migration is continually restarted over and over, consuming extra compute and network resources as a result. An alternative attack, for systems with automatic migration as part of an orchestration-level load balancing strategy, the DOS attack attempts to force repeated VM migration to burden system resources.

  • Smash and Grab: Forcing a VM image, either at the source or destination server host, into a bad state for the purpose of disrupting operations or exfiltrating data.

  • Bait and Switch: Creating a deliberate failure at a precise moment in the migration process so that a valid copy of a virtual machine is present on both the source and destination host servers simultaneously. The intent of this attack is to exfiltrate information without detection.

Before addressing a possible remedy to each of these attacks, a few more details regarding VM migration are necessary. First, in this context we are only concerned about active VM migration, or migration that does not interrupt the operation of migrating VMs. Migration of a VM that has been halted or powered down is not considered here. Also, the approaches we describe here are limited to the hypervisor and its associated toolstack. Any security profile must also include the hardware platform and network infrastructure, of course, but for this discussion these facets of the system are out of scope.

Lastly, the type of storage employed by the cloud has a big impact on VM migration. Networked storage, via protocols such as iSCSI, NFS, or FibreChannel, are more complicated to configure and maintain than local server storage, but simplify (and speed up) migration because the VM image itself typically does not need to be copied across a network to a separate physical storage device.

Note, however, that the attacks listed above are not solved by using networked storage. While the risk is somewhat alleviated by reducing exposure of the VM image to the network, and the timing window to exploit the migration process is significantly shortened with shared storage, these attacks remain viable. State data and VM metadata still must be passed over the network between server hosts, and the attacks outlined above rely on the corruption of the migration process itself.

With the ground rules understood, let’s dive into a basic approach to address each of the migration cyberattacks.

How to address VM migration cyberattacks

Spoofing: Man-in-the-middle attacks are well studied, and modern hypervisors should already utilize the proper authentication protocols integrated within its migration process to prevent this class of attack. The most common variations of Xen, for example, include public key infrastructure support for mutual authentication via certificate authorities or shared keys to guard against MITM attacks. For any new installation, it is worth verifying that proper authentication is available and configured properly.

Thrashing: External DOS attacks are usually best addressed outside of the hypervisor, within the network infrastructure. Systems that use orchestration software to automate VM migration for load balancing, or even defensive purposes, should be configured to guard against DOS attacks as well. Automated migration requests should be throttled to prevent network contention and avoid overloading a single host.

Smash and Grab: This attack attempts to disrupt the migration process at an opportune moment so that the VM state data is corrupted or forced out of sync with the VM image at the source or destination server, rendering the VM either temporarily or permanently disabled. A smash-and-grab attack could behave like DOS attack over the network, or could be enacted by malware in the hypervisor. In both incarnations, this attack tests how well the migration process recovers from intermittent failures, and how well the migration process can be rolled back to a prior stable state.

The robustness of a migration recovery scheme varies greatly from one hypervisor toolstack to another. Regardless, there are a few steps that can minimize this type of threat:

  • First, before initiating a migration, you should regularly create snapshots of the important VM images, so that you always have a stable image to go back to in case disaster strikes. This is common practice but bears repeating because it is often forgotten.

  • Second, many hypervisor toolstacks support customization of the migration process via scripts. For example the XAPI toolstack has hooks for pre- and post-migration scripts, where an industrious system designer or admin can insert their own recovery support at both the source and destination hosts. Support can be added to validate that the migration is successful, for instance, and bolster recovery procedures if a failure has occurred. These scripts also provide a means of adding special configuration support for specific VMs after a successful migration, such as adjusting permissions, or updating runtime parameters.

  • Third, and perhaps most importantly, when a VM migration completes, either successfully or unsuccessfully, it is likely that an old footprint of the migrated image is still hanging around. For successful migrations, a footprint will remain on the source server, while failed migration attempts often result in a residual footprint remaining on the destination server. While the hypervisor toolstack may delete the old VM image file after completion, very few toolstacks actually erase the image from disk storage. The bits representing the VM image are still on disk, and are vulnerable to exfiltration by malware. For systems with high security requirements, it is therefore necessary to extend the toolstack to zeroize (i.e., fill with zeroes) the blocks on disk previously representing an old VM image, or fill the blocks with random values. Depending on the storage device, hardware support may exist for this as well.

Bait and Switch: We can approach the bait-and-switch attack as a variation of the smash-and-grab attack, and the mitigation of this threat is the same. For the bait-and-switch attack to succeed, a residual copy of the aborted VM migration attempt must remain on the destination server. If the VM footprint is immediately scrubbed from the disk, the risk of this attack is also greatly reduced.

In summary, it is important to understand the security implications of active migration. The system behavior under specific attack scenarios and failure conditions during the migration process must be taken into full account when designing and configuring a modern cloud environment. Luckily, if you follow the steps above, you maybe be able to avoid the security risks associated with VM migration.

John Shackleton is a principal research scientist at Adventium Labs, where he is the technical lead for a series of research and development projects focused on virtualization and system security, in both commercial and government computing environments.

Stay one step ahead of malicious hackers with The Linux Foundation’s Linux Security Fundamentals course. Download the sample chapter today!

Hitachi Increases Investment in Open Source With Linux Foundation Platinum Membership

We are thrilled to announce that Hitachi has become the latest Linux Foundation Platinum member, joining existing Platinum members Cisco, Fujitsu, Huawei, IBM, Intel, Microsoft, NEC, Oracle, Qualcomm and Samsung. Hitachi has been a supporter of The Linux Foundation and Linux since 2000, and was previously a Linux Foundation Gold member. The company decided to upgrade its membership to Platinum in order to further support The Linux Foundation’s work, and open source development in general.

Hitachi is already a member of numerous Linux Foundation projects, such as Automotive Grade Linux, Civil Infrastructure Platform, Cloud Foundry Foundation, Core Infrastructure Initiative, Hyperledger and OpenDaylight. Platinum membership will enable Hitachi to help contribute further to these and other important open source projects.

Linux Foundation Platinum members have demonstrated a sincere dedication to open source by joining at the highest level. As a Platinum member, Hitachi will pay a $500,000 annual membership fee to support The Linux Foundation’s open source projects and initiatives. The company will also now occupy one of 14 seats on the Linux Foundation Board of Directors that are reserved for Platinum members.


Compiling to Containers by Brendan Burns, Microsoft

In this talk, Brendan Burns shows how a general purpose programming language (in this case JavaScript) can be used to write programs that compile to a distributed system of containers that is then deployed onto Docker containers.

Arrive On Time With NTP — Part 2: Security Options

In the first article in this series, I provided a brief overview of NTP and explained why NTP services are critical to a healthy infrastructure. Now, let’s get our hands dirty and look at some security concerns and important NTP options to lock down your servers.

Attacks On NTP

One nasty attack that recently caused the Internet community to sit up and take note involved what’s called a Reflection Attack. In essence, by spoofing IP addresses, it was possible to ask a third-party machine to respond to an unsuspecting victim with a barrage of unwelcome data. Multiplied by thousands of machines, it was possible to slow down, or even bring to a halt, some of the largest Internet Service Providers’ (ISPs) and enterprises’ infrastructure. These Distributed Denial of Service (DDoS) attacks forced some rapid patching along with some community hand-holding to keep services up and running while hundreds of thousands of machines were patched, reconfigured, or upgraded out of necessity.

This particular attack took advantage of a command referred to as monlist or MON_GETLIST. This command is found in older versions of NTP and allows a machine to query up to the last 600 hosts that have requested the time from that NTP server. Clearly, the monlist functionality is an ideal route to generating a great deal of traffic off of a very small initial request.

Thankfully, newer versions of NTP no longer respect these requests, and it’s relatively easy — if you have access to the file /etc/ntp/conf on your NTP server — to add the following line to disable it:

disable monitor

Firewalling

There’s little doubt that it is a worthwhile pursuit to harden your NTP servers. To what extent you go to however is obviously up to you. If you are using the kernel-based Netfilter’s IPtables then you would allow access to your NTP Servers by punching a hole through your firewall as so:

# iptables -A INPUT -p udp --dport 123 -j ACCEPT 

# iptables -A OUTPUT -p udp --sport 123 -j ACCEPT

This configuration is not the best solution by any means as any machine can connect to your NTP servers if you haven’t locked down the relevant NTP configuration. We will look at tightening this up with a little more detail shortly.

Configuration

Fully understanding all of the configuration options that NTP can offer — including authentication, peering, and monitoring — might be considered a Herculean task, but let’s continue with our overview of the subject matter in hand.

It’s probably helpful to distinguish a little between two common tools. The interactive ntpdc program is a “special” query tool, which can be used to probe an NTP server about its current configuration and additionally make changes to that config.

With a somewhat similar name, the ntpq tool is for standard queries, however, such as looking up any of your upstream machines (like printing a list of peers by typing “peer” for example) from which you are receiving the latest time. It tends to be mostly used to monitor your NTP infrastructure to help you keep an eye on its performance as opposed to making changes and special queries.

Back to IPtables for a moment: if you wanted to allow your NTP client to look up NTP queries from an upstream server, you could use rules such as these:

# iptables -A OUTPUT -p udp --dport 123 -j ACCEPT 

# iptables -A INPUT -p udp --sport 123 -j ACCEPT

On your NTP client, you can test which servers you have connected to, like so:

# ntpq -p

The results of which can be seen in the example below:   

remote              refid              st t when poll reach   delay   offset    jitter

=====================================================

10.10.10.100    .STEP.          16 u    -  1024    0    0.000    0.000     0.000

clock.ubuntu.   .STEP.          16 u   63 1024   34    0.870   70.168   3.725

time.ntp.orgl     10.1.1.1          3 u   71 1024   37    0.811  -35.751  26.362

As you can see, we’re connecting to three NTP servers for reliability. These are known as our “peers.” The “STEP” entries are “kiss codes” and show that our client has updated (and corrected) its time having connected to the pertinent servers. Under the “st” field, we can see the Stratum number allocated to each server.

Restrict

It is the NTP daemon, ntpd, option called restrict that offers a way of configuring access controls as to who can set the time on their wristwatches using our server. Be warned that initially at least its syntax may seem a little counterintuitive. If you get lost at any point, thankfully there’s a hillock-sized number of man pages available to you. Simply prepend the man command to any of these manuals on the command line, such as man ntp_mon, to view them:

ntpd, ntp_auth, ntp_mon, ntp_acc, ntp_clock, ntp_misc

Under the manual for ntp_acc, we can see a multitude of restrict options. Along the lines of traditional Access Control Lists (ACLs), the clever ntpd will allow you to grow a list of IP addresses and ranges that you want to permit. To fully harden your NTP infrastructure, however, authentication should be employed, which is a subject for another day.

I mentioned that restrict was a little counterintuitive as far as options go, here is what ntpd expects to see if we want to open up NTP server to our localhost (with IP address “127.0.0.1”). This allows the localhost to have full access without any restrictions and not, as you might think, restrict its access:

restrict 127.0.0.1

The above assists with IPv4 addressing and the IPv6 equivalent would look like this:

restrict -6 ::1

Conversely, when we want to subjugate one or several hosts, we add options to the end of that command, like so:

restrict 10.10.10.0 mask 255.255.255.0 nomodify notrap

The example above deals with 254 hosts on a Class C subnet. Let’s look at some of the many other options available to the restrict option and how they manipulate NTP. It’s worth mentioning that DNS names can also be used instead of IP addresses; however, be warned that poorly maintained domain name services can cause havoc with your NTP infrastructure. In the UK, for example, it’s recommended to configure your NTP servers and clients to look upstream to these DNS names inside the /etc/ntp.conf file:

server 0.uk.pool.ntp.org
server 1.uk.pool.ntp.org
server 2.uk.pool.ntp.org
server 3.uk.pool.ntp.org

You may well ask why. There’s very good reason, as we can see from this DNS lookup, on just the first entry in the list, for public NTP servers available to the United Kingdom:

# host 0.uk.pool.ntp.org


85.119.80.232

178.18.118.13

217.114.59.3

176.126.242.239

In our abbreviated DNS lookup results, even the first DNS name “0.uk.pool.ntp.org” offers the resilience of four unique IP addresses, some of which may also be several machines and be hosted on resilient network links too perhaps.

Next time, I’ll finish up this NTP series with more configuration options for a secure setup.  

Chris Binnie is a Technical Consultant with 20 years of Linux experience and a writer for Linux Magazine and Admin Magazine. His new book Linux Server Security: Hack and Defend teaches you how to launch sophisticated attacks, make your servers invisible and crack complex passwords.

Advance your career in Linux System Administration! Check out the Essentials of System Administration course from The Linux Foundation.


Democratizing Distributed Systems with Metaparticle

The best way to take some of the difficulty out of distributed systems is to include the creation of infrastructure directly in code, rather than creating separate config files. Brendan Burns, a software engineer at Microsoft, presented his solution to this problem at KubeCon last November.

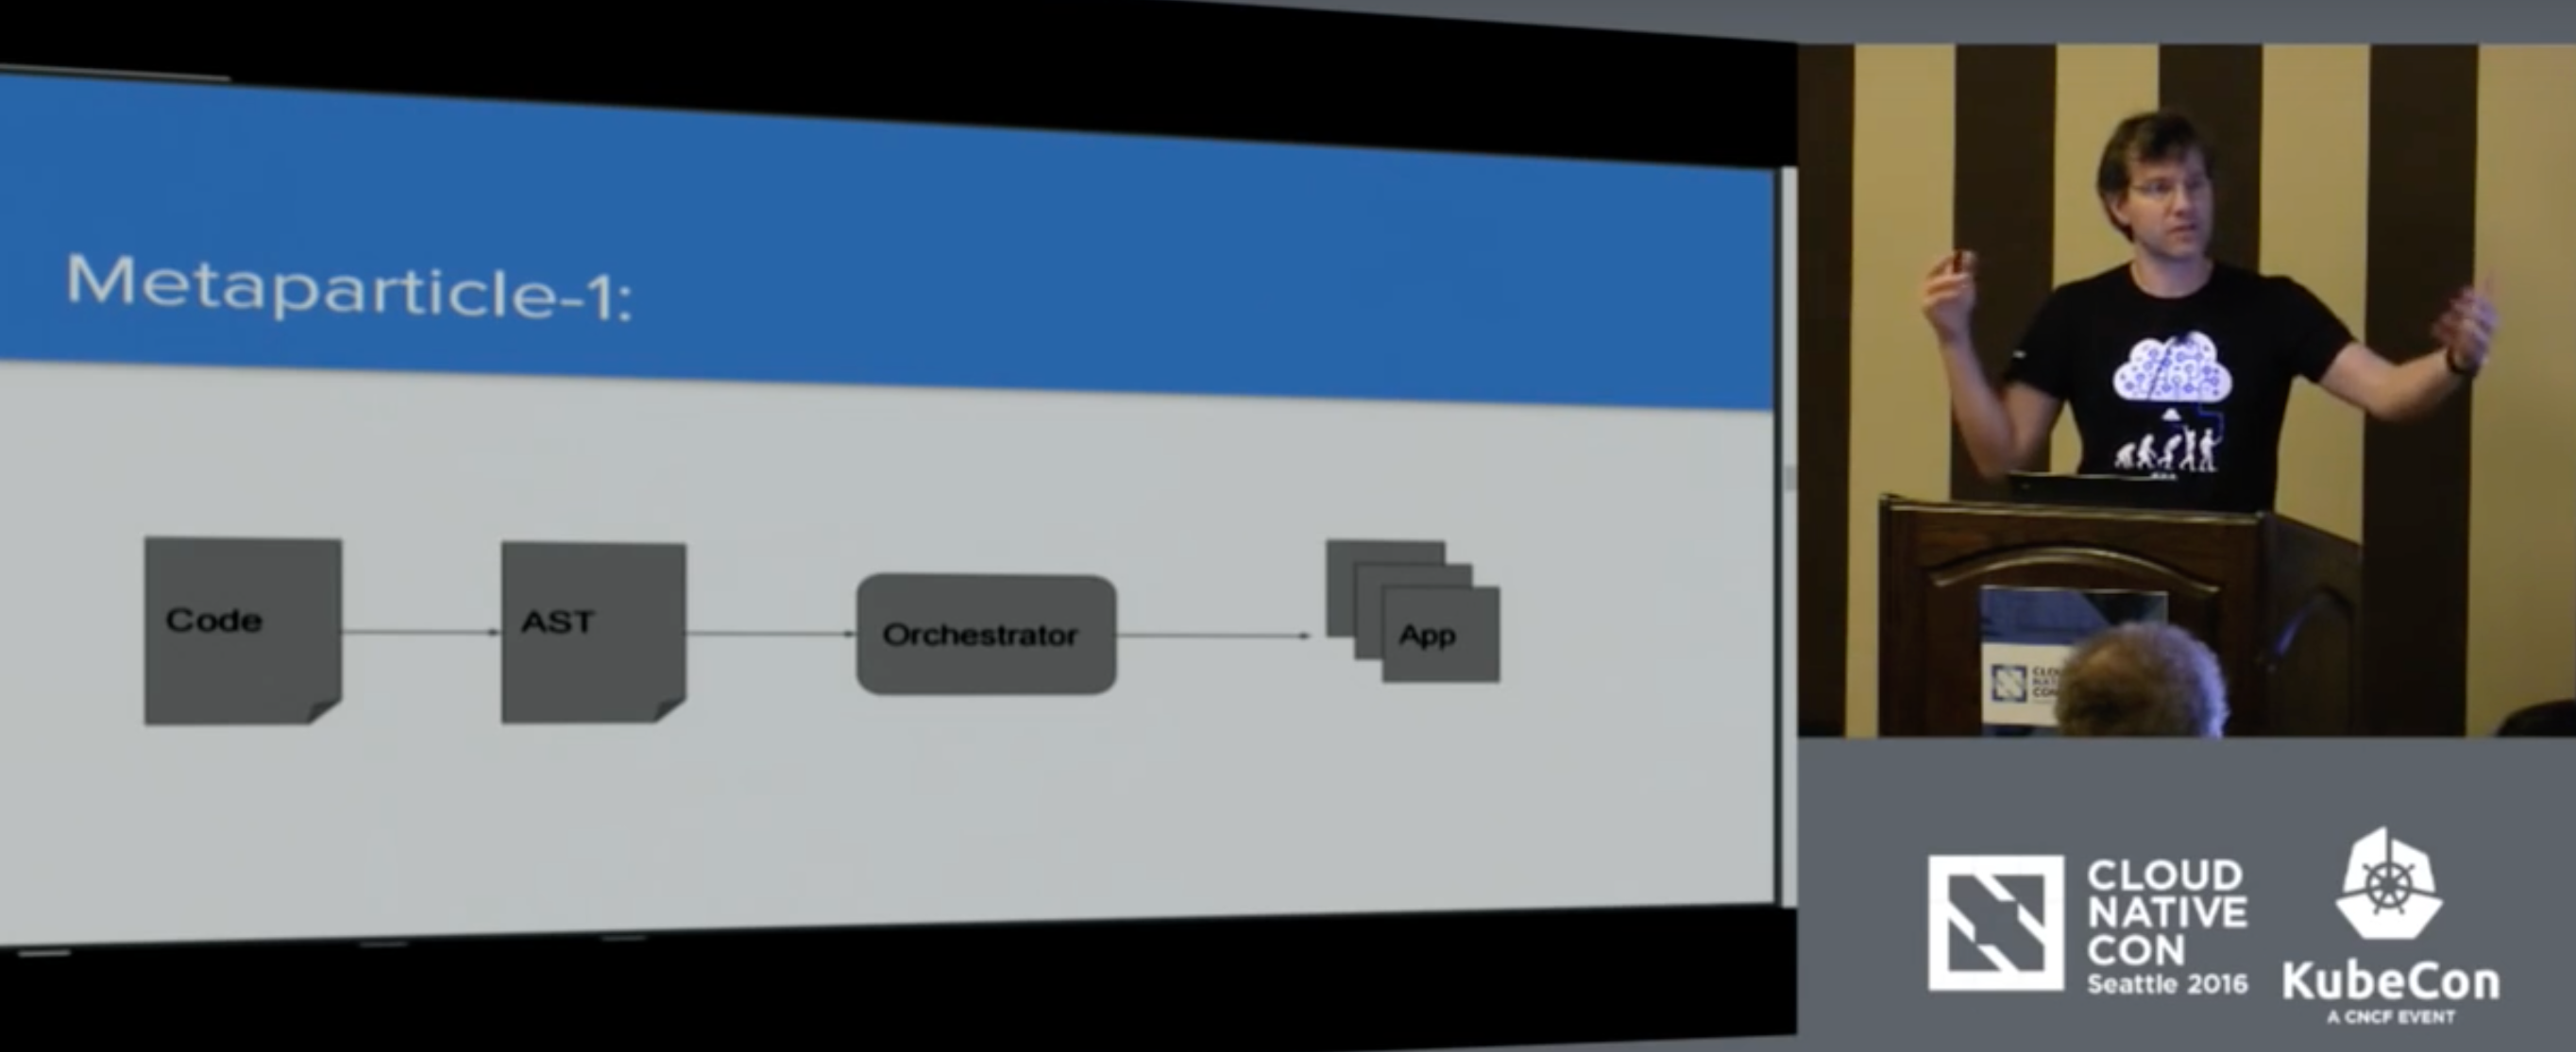
His project, called Metaparticle, is in its earliest stages, and so far Burns has been the only contributor. But, at its core, it’s the same as the compiler for a classic application.

“The basic idea is just like we had that compiler before for taking the source code and turning it into assembly language that then turns into machine instructions. We have the same kind of idea,” Burns said. “We have code, we turn it into an abstract syntax tree, we feed it into the orchestrator and the app pops out — the distributed app pops out the other side.”

During his presentation and demo, Burns said that as applications evolved into client/server applications, config files were separated from code. He said that “tortuous divorce” has led us to where we are now: creating distributed systems, like those with Kubernetes, has gotten too difficult.

“We’ve decided that abstraction is not worth our time,” Burns said. “It’s not that we can’t do it. It’s not that we’re not smart enough to figure out assembly language. It’s that if we were all still doing assembling language, I don’t think any of us would be in this room.

“Kubernetes literally would not exist if we were all still programming in assembly language and, yet, I think we’re writing our distributed systems in assembly,” Burns continued. “In talking about deploying this set of pods and this service and these pieces, the building blocks that we’re putting together, they’re not concepts. They’re just assembly language instructions. If we’re going to really build our systems and we’re gonna move on from where we are, it has to get easier. So the genesis for a lot of this work was to say, ‘How do we write our systems in code?’”

In his presentation, Burns used Node.js to demonstrate how distributed systems can be created in just a few lines of code. Through Metaparticle, Burns is hoping to make distributed systems easier to create and hoping more programmers will find ways to solve their problems using platforms like Kubernetes.

“We democratized mobile development,” Burns said. “We’ve democratized web development. We haven’t democratized distributed system development, and it’s time that we did.”

Watch the complete presentation below:

Want to learn more about Kubernetes? Pre-order now and save 50% on this new, online, self-paced Kubernetes Fundamentals course from The Linux Foundation. Sign Up Now >>

An Introduction to Linux Filesystems

This article is intended to be a very high-level discussion of Linux filesystem concepts. It is not intended to be a low-level description of how a particular filesystem type, such as EXT4, works, nor is it intended to be a tutorial of filesystem commands.

Every general-purpose computer needs to store data of various types on a hard disk drive (HDD) or some equivalent, such as a USB memory stick. There are a couple reasons for this. First, RAM loses its contents when the computer is switched off. There are non-volatile types of RAM that can maintain the data stored there after power is removed (such as flash RAM that is used in USB memory sticks and solid state drives), but flash RAM is much more expensive than standard, volatile RAM like DDR3 and other, similar types.

Read more at OpenSource.com

Using Grep-Like Commands for Non-Text Files

In the previous article, I showed how to use the grep command, which is great at finding text files that contain a string or pattern. The idea of directly searching in a “grep-like” way is so useful that there are additional commands to let you search right into PDF documents and handle XML files more naturally. Things do not stop there, as you could consider raw network traffic a collection of data that you want to “grep” for information, too.

Grep on PDF files

Packages are available in Debian and Fedora Linux for pdfgrep. For testing, I grabbed version 1.2 of the Open Document Format specification. Running the following command found the matches for “ruby” in the specification. Adding the -H option will print the filename for each match (just as the regular grep does). The -n option is slightly different to regular grep. In regular grep, -n prints the line number that matches; in pdfgrep, the -n option will instead show the page number.

$ pdfgrep ruby OpenDocument-v1.2.pdf 
  6.4 <text:ruby
     6.4.2 <text:ruby
     6.4.3 <text:ruby
 17.10 <style:ruby-properties>..................................................................................................
     19.874.30 <text:ruby
     19.874.31 <text:ruby-text>..................................................................................................
 20.303 style:layout-grid-ruby-below......................................................................................... 783
 20.304 style:layout-grid-ruby-height........................................................................................ 783
 20.341 style:ruby
 20.342 style:ruby

$ pdfgrep -Hn ruby OpenDocument-v1.2.pdf 
OpenDocument-v1.2.pdf:10:   6.4 <text:ruby
OpenDocument-v1.2.pdf:10:      6.4.2 <text:ruby
OpenDocument-v1.2.pdf:10:      6.4.3 <text:ruby
OpenDocument-v1.2.pdf:26:  17.10 <style:ruby

Many other command-line options in pdfgrep operate like the ones in regular grep. You can use -i to ignore the case when searching, -c to see just the number of times the pattern was found, -C to show a given amount of context around matches, -r/-R to recursively search, –include and –-exclude to limit recursive searches, and -m to stop searching a file after a given number of matches.

Because PDF files can be encrypted, pdfgrep also has the –password option to allow you to provide decryption keys. You might consider the –unac option to be somewhat logically grouped into the -i (case-insensitive) class of options. With this option, accents and ligatures are removed from both the search pattern and the content as it is considered. So the single character æ will be considered as “ae” instead. This makes it simpler to find things when typing at a console. Another interesting option in pdfgrep is -p, which shows the number of matches on a page.

Grep for XML

On Fedora Linux, you can dnf install xgrep to get access to the xgrep command. The first thing you might like to do with xgrep is search using -x to look for an XPath expression as shown below.

$ cat sample.xml 
<root>
 <sampledata>
   <foo>Foo Text</foo>
   <bar name="barname">Bar text</bar>
 </sampledata>
</root>

$ xgrep -x '//foo[contains(.,"Foo")]' sample.xml 
<!--         Start of node set (XPath: //foo[contains(.,"Foo")])                 -->
<!--         Node   0 in node set               -->

   <foo>Foo Text</foo>

<!--         End of node set                    -->

$ xgrep -x '//bar[@name="barname"]' sample.xml 
<!--         Start of node set (XPath: //bar[@name="barname"])                 -->
<!--         Node   0 in node set               -->

   <bar name="barname">Bar text</bar>

<!--         End of node set                    -->

The xgrep -s option lets you poke around in XML elements looking for a regular expression. This might work slightly differently from what you expect at the start. The format for the pattern is to pick the element you are interested in and then use one or more subelement/regex/ expressions to limit the matches.

The example below will always print an entire sampledata element, and we limit the search to only those with a bar subelement that matches the ‘Bar’ regular expression. I didn’t find a way to pick off just the bar element, so it seems you are always looking for a specific XML element and limiting the results based on matching the subelements.

$ xgrep -s 'sampledata:bar/Bar/' sample.xml 
<!--         Start of node set (Search: sampledata:bar/Bar/)                 -->
<!--         Node   0 in node set               -->

 <sampledata>
   <foo>Foo Text</foo>
   <bar name="barname">Bar text</bar>
 </sampledata>

<!--         End of node set                    -->

As you can see from this example, xgrep is more about finding matching structure in an XML document. As such it doesn’t implement many of the normal grep command line options. There is also no support for file system recursion built into xgrep, so you have to combine with the find command as shown in the previous article if you want to dig around.

grep your network with ngrep

The ngrep project provides many of the features of grep but works directly on network traffic instead of files. Just running ngrep with the pattern you are after will sift through network packets until something matching is seen, and then you will get a message showing the network packet that matched and the hosts and ports that were communicating. Unless you have specially set up network permissions, you will likely have to run ngrep as the root user to get full access to raw network traffic.

# ngrep foobar
interface: eth1 (192.168.10.0/255.255.255.0)
filter: ((ip || ip6) || (vlan && (ip || ip6)))
match: foobar
###########...######
T 192.168.10.2:738 -> 192.168.10.77:2049 [AP]
.......2...........foobar.. 
...
################################################################
464 received, 0 dropped

Note that the pattern is an extended regular expression, not just a string. So you could find many types of foo using for example fooba[rz].

Similar to regular grep, ngrep supports (-i) for case insensitive search, (-w) for whole word matching, (-v) to invert the result, only showing packets that do not match your pattern, and (-n) to match only a given number of packets before exiting.

The ngrep tool also supports options to timestamp the matching packets with -t to print a timestamp when a match occurs, or -T to show the time delta between matches. You can also shut down connections using the -K option to kill TCP connections that match your pattern. If you are looking at low-level packets you might like to use -x to dump the packet as hexadecimal.

A very handy use for ngrep is to ensure that the network communications that you think are secure really have any security to them at all. This can easily be the case with apps on a phone. If you start ngrep with a reasonably rare string like “mysecretsarehere” and then send that same string in the app, you shouldn’t see it being found by ngrep. Just because you can’t see it in ngrep doesn’t mean the app or communication is secure, but at least there is something being done by the app to try to protect your data that is sent over the Internet.

grep your mail

While the name might be a little misleading, mboxgrep can search mbox files and maildir folders. I found that I had to use the -m option to tell mboxgrep that I wanted to look inside a maildir folder instead of a mailbox. The following command will directly search for matching messages in a maildir folder.

$ cd ~/mail/.Software
$ mboxgrep -m maildir "open source program delight" .

The mboxgrep tool has options to search only the header or body of emails, and you can choose between fcntl, flock, or no file locking during the search depending on your needs. mboxgrep can also recurse into your mail, handy if you have many subfolders you would like to search.

Wrap up

The grep tool has been a go-to tool for finding text files for decades. There are now a growing collection of grep-like tools that allow you to use the same syntax to find other matching things. Those things might be specific file formats — like XML and PDF — or you might consider searching network traffic for interesting events.

Learn more about Linux through the free “Introduction to Linux” course from The Linux Foundation and edX.

Q&A with Arpit Joshipura, Head of Networking for The Linux Foundation

Arpit Joshipura became the Linux Foundation’s new general manager for networking and orchestration in December 2016. He’s tasked with a pretty tall order. He needs to harmonize all the different Linux Foundation open source groups that are working on aspects of network virtualization.

Joshipura may be the right person for the job as his 30 years of experience is broad — ranging from engineering, to management, to chief marketing officer (CMO) roles. Most recently he was VP of marketing with Prevoty, an application security company. Prior to that he served as VP of marketing at Dell after the company acquired Force10 Networks, where he had been CMO.

Read more at SDx Central

Kubernetes Logging As Easy As 1..2..3

If you’re considering or have already started using Kubernetes, one thing you absolutely cannot get around is having proper logging throughout your system to debug your applications in case of unexpected errors. 

 At Wercker, we use 3 technologies to set up our logging infrastructure:

  • AWS ElasticSearch Service to quickly and easily run logging aggregation infrastructure with minimal overhead above what we already manage
  • Fluentd to collect and aggregate our logs
  • Last but certainly not least, Wercker to bring everything together and deploy our brand spanking new logging infrastructure!

Read more at Wercker