Home Blog Page 638

5 Essential Linux Holiday Amusements

Yes, my fellow penguins, it is time for the annual ritual of having fun with silly Linux holiday commands! The fun of being a grownup is you get to make your own observances, and Linux silliness is one of mine. Without further ado let us plunge into our maelstrom of Linux holiday delights.

No More Alek’s Controllable Christmas Lights for Celiac Disease

One of my essential holiday activities was promoting and playing with Alek’s Controllable Christmas Lights for Celiac Disease, by Alek Komarnitsky (Figure 1). This wonderful project ran for over a decade and raised $83,000 for the Center for Celiac Research. Even more fun, it started as a prank that fooled the news networks.

Figure 1: Alek’s controllable Christmas lights (used with permission from Alek Komarnitsky).

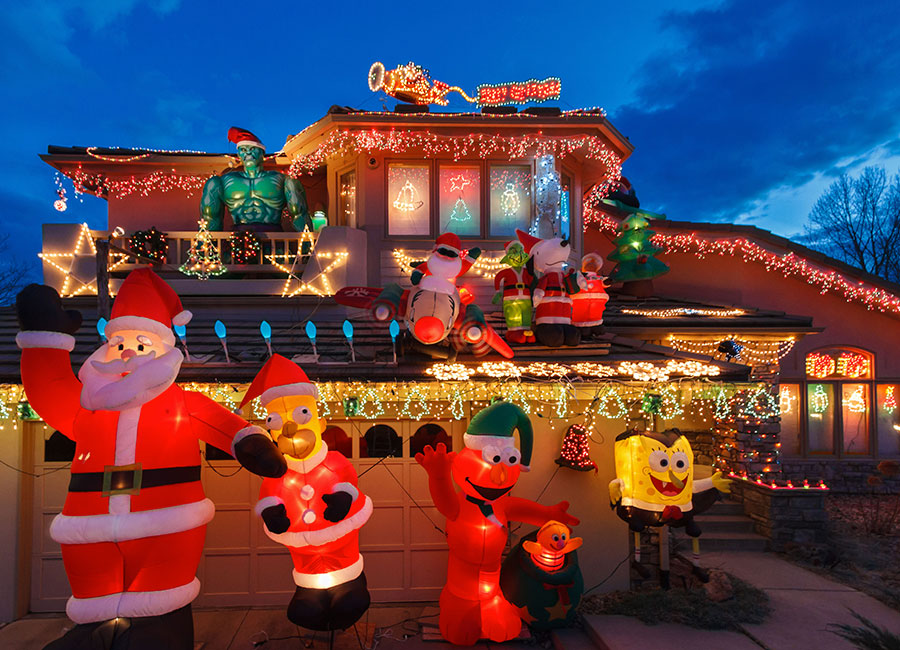
Alek’s Controllable Christmas Lights was a glorious mish-mash of lights and inflatable characters like Homer Simpson, the Incredible Hulk, Santa, SpongeBob SquarePants, the Grinch, and Snoopy that site visitors controlled from their Web browsers. You could turn the lights on and off, inflate and deflate the characters, post live messages, and spy on Alek in his workshop. Alek also ran Controllable Halloween Decorations.

The first incarnation went online in 2002. It was a simulation made with a series of still photos that changed frequently, giving the impression of remote control. There was no Webcam and no remote control; just a fun prank by a funny man. Then the news media got wind of it, and were all over it without bothering to do any fact-checking, and happily reported it as real. (Though it wasn’t the kind of story that called for relentless investigative reporters.) The high point of the prank came when Alek got a ride in an ABC news helicopter over his house, with his wife inside manipulating the lights. Eventually he confessed all, and then made it all real using X10 devices.

Alek retired the project in 2014 and sold all of his gear. It was awesome fun while it lasted. You may enjoy the full story, and the simulation has been resurrected for our amusement.

Cowsay Christmas!

Cowsay supports cowfiles for creating additional cowsay characters. Look at any of the files in /usr/share/cowsay/cows/ to see how easy it is to create your own. Cowsay is written in Perl, so you must escape Perl characters that require escapes, such as @ and . I made a simple cowfile, xmas-tree.cow, to display a little talking ASCII Christmas tree. I rather like Festivus, but the Festivus pole is too plain. Your cowfile must have the .cow extension, and if you put it in the default location of /usr/share/cowsay/cows/ you won’t have to specify the full path to use it. You can be as simple or as elaborate as you like, because that is also the fun of being a grownup. There are many online ASCII generators that will create a nice ASCII image from a photograph.


$ cowsay -f xmas-tree Holiday greetings to 
all the good peoples of the world!
 ___________________________________
/ Holiday greetings to all the good 
 peoples of the world!             /
 -----------------------------------
                 
             
             *                                          
            |/
            /o
           /*.'
           /'*'
          /o'*.o
          /.'o' 
         /'.*'.*.
         ^^^^^^^^^
            | |

ASCII Star Wars

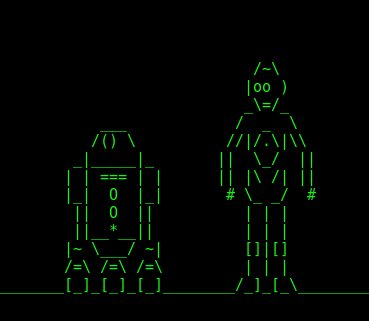
After all these years this still works; run telnet towel.blinkenlights.nl to see the complete ASCII Star Wars. (Remember, as grownups our holiday traditions can be anything we want, and Figure 2 shows one of mine.)
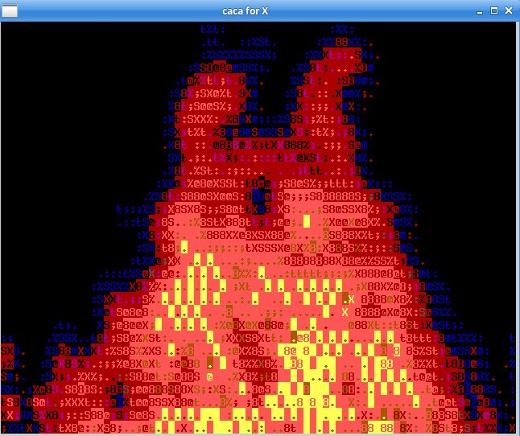
Figure 2: ASCII Star Wars.

Color ASCII Fire

Show of hands: who remembers the Yule Log TV program? Who still watches it? For those who are not familiar with it: Once upon a time, back before the Internet, we watched broadcast TV. This was an amazing invention where TV programs literally flew through the air and then landed in our TV sets. There were three network channels, ABC, NBC, and CBS, and if your reception was decent you also got PBS and local channels. Yes, somehow we made do with less than a dozen TV channels.

Programming ran on a schedule, and unlike today’s 24x7x365 world the channels often went dark after midnight. From Christmas Eve until the day after Christmas some networks broadcast the Yule log, which was a video of a cheery fire in a fireplace. No, really. I am not making this up, and you can find several Yule log videos on YouTube. Command-line fans can run their own cheery Yule fire in their favorite terminals; install caca-utils and run the cacafire command. Behold the result in Figure 3.

Figure 3: Ah, the yule fires of old.

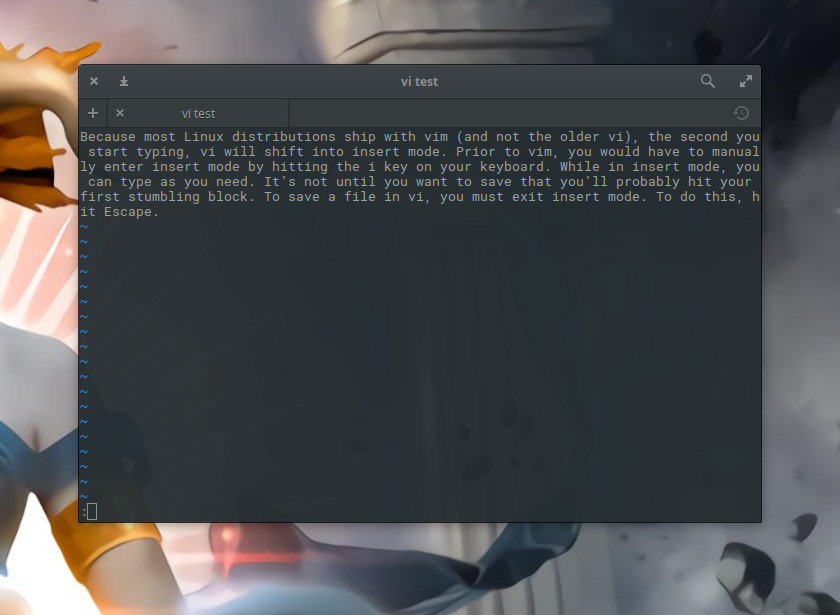
Holiday Star Wars Screensaver

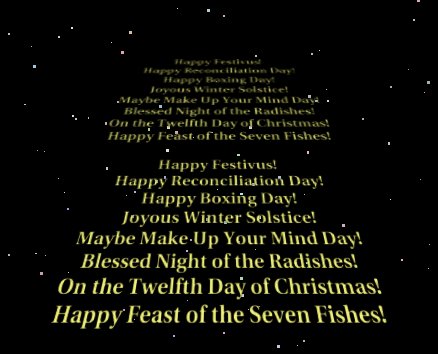
Install xscreensaver and xscreensaver-gl-extra. Open xscreensaver and find the Star Wars screensaver. This is a cool screensaver that plays a text crawl just like the opening credits of the original Star Wars movie, which you can also find on YouTube. The groovy thing about the Star Wars screensaver is you can easily customize it to display your own text. All you do is write whatever you want in a text file. Then go to the Advanced tab and enter the full path to your file on the Text File line in the Text Manipulation section. Then play the preview and you will see your text (Figure 4).

Figure 4: Build your own Star Wars-inspired scrolling screensaver.

Happy Holidays!

Happy holidays and happy New Year everyone, thank you for supporting Linux.com, Linux, and free/open source software. See you next year!

Advance your career in system administration! Check out the Essentials of System Administration course from The Linux Foundation.

An Introduction to Text Editors — Get to Know nano and vim

At some point in your Linux administration career, you are going to edit a configuration file, write a Bash script, code, take a note, or any given task associated with text editors. When you do, you will turn to one of the popular text editors available to the Linux platform.

  • vim

  • nano

These are two tools that might strike fear in the hearts of newbies and put seasoned users at ease. They are the text-based editors that Linux administrators turn to when the need arises…and it will arise. To that end, it is in the best interest to every fledgling Linux user to get to know one (or both) of these editors. In this article, I’ll get you up to speed on using each, so that you can can feel confident in your ability to write, edit, and manage your Linux configuration files, scripts, and more.

Nano

Nano has been my editor of choice for a very long time. Because I don’t code nearly as much I used to, I typically have no need of the programming power found in vi. Most often, I simply need to create a Bash script or tweak a configuration file. For that, I turn to the simplicity of Nano.

Nano offers text editing without the steeper learning curve found in vi. In fact, nano is quite simple to use. I’ll walk you through the process of creating a file in nano, editing the file, and saving the file. Let’s say we’re going to create a backup script for the folder /home/me and we’re going to call that script backup_home. To open/create this file in nano, you will first open up your terminal and issue the command nano backup_home. Type the content of that file into the editor (Figure 1) and you can quickly save the file with the key combination [Ctrl]+[o].

Figure 1: Creating a file in nano.

The [Ctrl]+[o] combination is for “write out”. This will save what you’ve written so far and allow you to keep working. If, however, you’ve completed your work and want to save and exit, enter the key combination [Ctrl]+[x]. If you’ve made any edits since you last did a write out, nano will ask if you want to save your work before exiting (Figure 2).

Figure 2: Saving your work in nano.

Once you’ve saved work in nano, it will do some color coding, depending on the type of file you’ve written (in this example, we’ve written a Bash script, so it is applying the appropriate syntax highlighting).

You will also note, at the bottom of the window, a row of commands you can use with nano. Some of the more handy key combinations I use are:

  • [Ctrl]+[c] – print out the current line number

  • [Ctrl]+[k] – cut a line of text

  • [Ctrl]+[u] – uncut a line of text

  • [Ctrl]+[r] – read in from another file

A couple of notes on the above. The cut/uncut feature is a great way to move and or copy lines within nano. When you cut a line, it copies it to the nano buffer, so when you uncut, it will copy that line at the current cursor location. As for the read in tool, say you have another file on your local drive and you want the contents of that file to be copied into the current file you have open in nano.

For example: The file ~/Documents/script consists of code you want to add to your current script. Place your cursor where you want that new script to be placed, hit [Ctrl]+[r], type in ~/Documents/script, and hit the Enter key. The contents of script will be read into your current file.

Once you’ve completed your work, hit the combination [Ctrl]+[x] and, when prompted, type y (to save your work), and you’re done.

To get more help with nano, enter the combination [Ctrl]+[g] (while working in nano) to read the help file.

vim

If you’re looking for even more power (significantly so), you’ll turn to the likes of vim. What is vim? Vim stands for Vi IMproved. Vim is the evolution of the older vi editor and is a long-time favorite of programmers. The thing about vi is that it offers a pretty significant learning curve (which is why many newer Linux users immediately turn to nano). Let me give you a quick run-down of how to open a new document for editing, write in that document, and then save the document.
The first thing you must understand about vi is that it is a mode-oriented editor. There are two modes in vi:

  • Command

  • Insert

The vi editor opens in command mode. Let’s start a blank file with vi and add some text. From the terminal window, type vi ~/Documents/test (assuming you don’t already have a file called test in ~/Documents…if so, name this something else). In the vi window, type i (to enter Insert mode — Figure 3) and then start typing your text.

Figure 3: The vi window, ready for your text.

While in insert mode, you can type as you need. It’s not until you want to save that you’ll probably hit your first stumbling block. To save a file in vi, you must exit Insert mode. To do this, hit Escape. That’s it. At this point vi is out of Insert mode. Before you can send the save command to vi, you have to hit the key combination [Ctrl]+[:].

Figure 4: The vi prompt ready for your command.

You should now see a new prompt (indicated by the : character) at the bottom of the window (Figure 4) ready to accept your command.

To save the file, type w at the vi command prompt and hit the Enter key on your keyboard. Your text has been saved and you can continue editing. If you want to save and quit the file, hit [Ctrl]+[:] and then type wq at the command prompt. Your file will be saved and vi will close.

What if you want to exit the vi, but you haven’t made any changes to your open file? You can’t just type q at the vi command prompt, you have to type q!.

Finally, if you’re in command mode and you want to return to insert mode, simply type i and you’re ready to start typing again.

Some of the more useful vi commands (to be used when in command mode, and after hitting [Ctrl]+[:]) are:

  • h – move cursor one character to left

  • j – move cursor one line down

  • k – move cursor one line up

  • l – move cursor one character to right

  • w – move cursor one word to right

  • b – move cursor one word to left

  • 0 – move cursor to beginning of the current line

  • $ – move cursor to end of the current line

  • i – insert to left of current cursor position (this places you in insert mode)

  • a – append to right of current cursor position (this places you in insert mode)

  • dw – delete current word (this places you in insert mode)

  • cw – change current word (this places you in insert mode)

  • ~ – change case of current character

  • dd – delete the current line

  • D – delete everything on the line to right of the cursor

  • x – delete the current character

  • u – undo the last command

  • . – repeat the last command

  • :w – save the file, but don’t quit vi

  • :wq – save the file and quit vi

You see how this can get a bit confusing? There’s complexity in that power.

Don’t forget the man pages

I cannot imagine administering a Linux machine without having to make use of one of these tools. Naturally, if you’re machine includes a graphical desktop, you can always turn to GUI-based editors (e.g., GNU Emacs, Kate, Gedit, etc.), but when you’re looking at a GUI-less (or headless) server, you won’t have a choice but to use the likes of nano or vi. There is so much more to learn about both of these editors. To get as much as possible out of them, make sure to read the man pages for each (man nano and man vi).

Advance your career with Linux system administration skills. Check out the Essentials of System Administration course from The Linux Foundation.

How to Build Powerful and Productive Online Communities

We have all witnessed the significant shifts in technology in recent years. An application economy has formed, microservices and the cloud allow us to build large-scale systems, and virtual reality, augmented reality, health monitoring, and others are changing how we live, work, and play.

At the center of these shifts are the very people the technology is designed to serve. What you may be less familiar with though is that the way in which we empower and engage people has also seen a revolution; a revolution in how we build communities.

Read more at Geek.ly

Infosec in Review: Security Professionals Look Back at 2016

2016 was an exciting year in information security. There were mega-breaches, tons of new malware strains, inventive phishing attacks, and laws dealing with digital security and privacy. Each of these instances brought the security community to where we are now: on the cusp of 2017.

Even so, everything that happened in 2016 wasn’t equally significant. Some moments clearly stood out above the rest. 

Read more at Tripwire

Fast Rewind: 2016 Was a Wild Ride for HPC

Some years quietly sneak by – 2016 not so much. It’s safe to say there are always forces reshaping the HPC landscape but this year’s bunch seemed like a noisy lot. 

Among the noisemakers: TaihuLight, DGX-1/Pascal, Dell EMC & HPE-SGI et al., KNL to market, OPA-IB chest thumping, Fujitsu-ARM, new U.S. President-elect, BREXIT, JR’s Intel Exit, Exascale (whatever that means now), NCSA@30, whither NSCI, Deep Learning mania, HPC identity crisis…You get the picture.

Far from comprehensive and in no particular order – except perhaps starting with China’s remarkable double helping atop the Top500 List – here’s a brief review of ten 2016 trends and a few associated stories covered in HPCwire…

Read more at HPCwire

Debian-Based Raspbian GNU/Linux OS with PIXEL Desktop Out Now for PC and Mac

Raspberry Pi Founder Eben Upton proudly announced the availability of the Debian-based Raspbian GNU/Linux distribution with the recently introduced PIXEL desktop environment for PC and Mac.

As you might be aware of, Raspbian is the official Linux-based operating system for Raspberry Pi single-board computers. In the same manner, PIXEL is the new interface of Raspbian, launched in September 2016, based on the LXDE (Lightweight X11 Desktop Environment) project.

Read more at Softpedia

Coopetition: All’s Fair in Love and Open Source

“I have been up against tough competition all my life. I wouldn’t know how to get along without it.”
Walt Disney

PostgreSQL vs. MySQL. MongoDB vs. Cassandra. Solr vs. Elasticsearch. ReactJS vs. AngularJS. If you have an open source project that you are passionate about, chances are a competing project exists and is doing similar things, with users as passionate as yours. Despite the “we’re all happily sharing our code” vibe that many individuals in open source love to project, open source business, like any other, is filled with competition. Unlike other business models, however, open source presents unique challenges and opportunities when it comes to competition.
Read more at OpenSource.com

Googler: A Command Line Tool to Do ‘Google Search’ from Linux Terminal

Today, Google search is a well known and the most-used search engine on the World Wide Web (WWW), if you want to gather information from millions of servers on the Internet, then it is the number one and most reliable tool for that purpose plus much more.

Many people around the world mainly use Google search via a graphical web browser interface. However, command line geeks who are always glued to the terminal for their day-to-day system related tasks, face difficulties in accessing Google search from command-line, this is where Googler comes in handy.

Googler is a powerful, feature-rich and Python-based command line tool for accessing Google (Web & News) and Google Site Search within the Linux terminal.

Read the complete article at Tecmint

Swift Is Old, Why Should I Use it?

With emerging technology, there can be the thought that old is not good. It could lack the features and performance the business requires.  Cloud technology changes so much, do we still need something like Swift that predates OpenStack?

To answer this question, we must understand Swift’s unique architecture. Only with Swift can we harness the power of the BLOB.  

A central concept to Swift is the Binary Large OBject (BLOB). Instead of block storage, data is divided into some number of binary streams. Any file, of any format, can be reduced to a series of ones and zeros, sometimes referred to as serialization. Start at the first bit of a file and count ones and zeros until you have a  block, a megabyte or even five gigabytes. This becomes an object. The next number of bits becomes an object until there is no more file to divide into objects. These objects can be stored locally or sent to a Swift proxy server. The proxy server will send the object to a series of storage servicers where memcached will accept the object, at memory speeds. Definitely an advantage in the days before inexpensive solid state drives.

These independent objects can be placed anywhere, as long as they can be brought back together in the same order, which is what Swift does on our behalf through services. Swift uses three services to track the blobs, where they are stored, and who owns them:  

  • Object Servers

  • Container Servers

  • Account Servers

These services can be deployed on the same system, or individually across several systems. This allows the Swift cluster to scale and meet the changing needs of the storage. The three services are independant of one another and distribute their data among the available nodes. The distribution has led to the use of the term “ring services.” The distribution among the object, container, and account rings is not round-robin, as the name might imply. Instead it uses an algorithm that includes the device partition index and weights to determine which node the object or its replicas should store the object.

The Object Servers are responsible for storing the actual blobs. The object is stored as a file while the metadata is stored in extended attributes (xattrs). As long as the local filesystem supports xattrs you should be able to use it for local storage.  Each node could use its own filesystem, no need for the entire cluster to be the same.

The objects are stored relative to a container. The Container Server keeps a database of which objects are in which containers. It also maintains a total number of objects and how much storage each container is using.

The third of the “ring services” tracks container ownership and is maintained by the Account Server.  

While the most common deployment of Swift is that each new node runs all three services, it can be easily changed as necessary. Some services may be more active than others, and the node resource demands can be different per ring as well. The flexibility of Swift means we can change our cluster to meet the storage demands for size or speed as necessary. We can deploy more Object Servers without the need to use resources for additional Account Servers.

Swift architecture frees us from the common constraints often found with NAS systems. We can store any data, anywhere we want, on whichever hardware we want.  There is no vendor lock. Rackspace developed a forward thinking solution to cloud storage.  As an open source tool it has revolutionised enterprise storage.

I discuss Swift in more detail in my recent Linux Foundation webinar on OpenStack: Exploring Object Storage with Ceph and Swift.

Watch the full webinar on demand now (login required).

Guide to the Open Cloud: The State of Virtualization

Is virtualization still as strategically important as it was now that we are in the age of containers? According to a Red Hat survey of 900 enterprise IT administrators, systems architects, and IT managers across geographic regions and industries, the answer is a resounding yes. Virtualization adoption remains on the rise, and is integrated with many cloud deployments and platforms.

Red Hat’s survey showed that most respondents are using virtualization to drive server consolidation, increase provisioning time, and provide infrastructure for developers to build and deploy applications. According to a Red hat post: “Over the next two years, respondents indicated that they expect to increase both virtualized infrastructure and workloads by 18 percent and 20 percent, respectively. In terms of application mix, the most commonly virtualized workloads among respondents were web applications, including websites (73 percent), web application servers (70 percent) and databases (67 percent).

At the same time, virtualization does face challenges. Nearly 40 percent of respondents to Red Hat’s survey called out budgets and costs as a key challenge, likely related to the cost implications of migrating workloads to and maintaining virtualization environments. That is precisely where free and open source virtualization solutions are making an enormous difference. Open virtualization tools can be part of a broader strategy to provide developers and applications with the best possible infrastructure, integrating with containers, private clouds and public clouds.

The Linux Foundation recently announced the release of its 2016 report “Guide to the Open Cloud: Current Trends and Open Source Projects.” This third annual report provides a comprehensive look at the state of open cloud computing. You can download the report now, and one of the first things to notice is that it aggregates and analyzes research, illustrating how trends in containers, microservices, and more shape cloud computing. In fact, from IaaS to virtualization to DevOps configuration management, it provides descriptions and links to categorized projects central to today’s open cloud environment.

In this series of posts, we are calling out many of these projects, by category, providing extra insights on how the overall category is evolving. Below, you’ll find a collection of several important virtualization tools and the impact that they are having, along with links to their GitHub repositories, all gathered from the Guide to the Open Cloud:

Virtualization

KVM

KVM (Kernel-based Virtual Machine) is a full virtualization solution for Linux on x86 hardware containing virtualization extensions (Intel VT or AMD-V). It consists of a loadable kernel module, kvm.ko, that provides the core virtualization infrastructure and a processor specific module, kvm-intel.ko or kvm-amd.ko. It can run multiple virtual machines running unmodified Linux or Windows images. KVM mailing lists.

LXC

Linux Containers (LXC) are lightweight virtual machines enabled by functions within the Linux kernel, including cgroups, namespaces and security modules. Userspace tools coordinate kernel features and manipulate container images to create and manage system or application containers. LXC on GitHub.

LXD

LXD is Canonical’s container hypervisor and a new user experience for LXC. Developed in Go, it runs unmodified Linux operating systems and applications with VM-style operations. LXD on GitHub.

Xen Project

Xen Project, a Linux Foundation project, develops virtualization technologies for a number of different commercial and open source applications including server virtualization, Infrastructure as a Service (IaaS), desktop virtualization, security applications, embedded and hardware appliances on x86 and ARM CPU architectures, and supports a wide range of guest operating systems. Xen Project Git repositories.

Learn more about trends in open source cloud computing and see the full list of the top open source cloud computing projects. Download The Linux Foundation’s Guide to the Open Cloud report today!