In Go 1.7 we have a new package net/http/httptrace that provides a convenient mechanism for observing what happens during an HTTP request. In this article I will show how it can be used in the context of distributed tracing, by using OpenTracing API to instrument a client and a server and visualize the results in Zipkin UI.
First, a bit of an introduction.
What is Distributed Tracing and OpenTracing?
Distributed tracing is a technique for monitoring and profiling systems built on microservices architecture, popularized by such systems as X-Trace,Google’s Dapper and Twitter’s Zipkin. At its foundation is the idea ofdistributed context propagation, which involves associating certain metadata with every request as it enters the system, and propagating that metadata across thread and process boundaries as the request execution fans out to other microservices. If we assign a unique ID to each inbound request and carry it as part of the distributed context, we can then stitch together various profiling data from multiple threads and multiple processes into a single “trace” that represents the execution of the request by our system.
Industrial, rather than home, applications will likely dominate the Internet of Things (IoT) market in the years to come. Yet, in the early going, the home automation market has had the greatest visibility. And it hasn’t always been pretty.
Despite steady growth, retail sales have yet to achieve inflated expectations. Too many companies promised and failed to deliver interoperability with a growing catalog of often buggy smart home products. The lack of essential applications, complex installation, and in many cases, high prices, have also conspired against the segment.
Yet the smart home segment appears to be rebounding with the help of maturing technology and IoT interoperability standards. There is particular interest in connecting voice-enabled AI assistants with the smart home in products such as Amazon’s Echo. Google recently announced Google Home, a major competitor to Alexa. These are being joined by open source Linux smart home voice agents like Mycroft, Silk, and ZOE (see below).
Most home automation systems run on Linux hubs or revolve around higher-end Linux-based smart devices like the Nest Thermostat. Many of these have fairly open APIs for app development, although the hardware is usually locked down.
As we explored over the last two weeks, open source hackers can also build fully open smart home systems using personal computers or Linux hacker boards running open source IoT stacks. Developers are also hacking commercial hubs to load open software.
A few of the products in Linux.com’s August 2014 roundup of Linux-based IoT smart home hubs have been discontinued. These include the innovative, open source Ninja Sphere. Fortunately, Ninja Blocks was able to send units or refunds to backers before closing shop, and the software is free for continued experimentation.
This summer, Staples scrapped its Staples Connect system. The Connect devices will continue to be distributed by Z-Wave Products, including the Linux-based, Alljoyn-compliant D-Link Staples Connected Home Hub, even if D-Link is no longer promoting the hub with its other smart home cameras and devices.
One of the big early players — Revolv — was acquired by Alphabet-owned Nest. In April Revolv was discontinued, demonstrating the risks involved with buying into a home automation system.
Samsung’s acquisition of SmartThings has been more profitable. Not only has Samsung moved SmartThings to a more open, Linux-based platform, but it’s expanding with new devices and third-party device support. SmartThings remains one of the market leaders.
The heavily promoted Wink system, which was backed by GE and sold at Home Depot, suffered from negative reviews, and its owner, Quirky, entered bankruptcy. Wink was acquired by Flex, however, and last week released a much improved, $99 Wink Hub 2.0. Wink also announced a major new distributor with Walmart.
Wink confirmed that the new hub continues to run “a custom-built Linux OS,” supported with an updated, open Wink API based on RESTful. There’s also wide-ranging, third-party device support. The Wink hub is proprietary, but has been rooted and loaded with OpenHAB, as well as the similarly open source Home Assistant.
Like Staples Connect and Wink, Lowe’s Iris has survived thanks to a strong retail presence. This year, Iris 2.0 made substantial improvements to its lagging technology, including Microsoft Azure integration and AllJoyn and Amazon Echo compatibility.
Some home automation players, such as Insteon, continue to compete with a closed system. Similarly, the Lutron Smart Bridge is devoted to Lutron products using its proprietary ClearConnect wireless protocol, such as its Caseta dimmers. There’s also LG, with its proprietary SmarThinq, among others.The most popular proprietary system is Apple’s HomeKit, which draws upon a devoted customer base.
Some smart home systems, such as Vera, support just about any product with Z-Wave — a more proprietary technology than the similarly short-range ZigBee. The Google-backed Thread Group is aiming to replace both standards with its IPv6-infused, mesh-networking Thread protocol based on the similarly 802.15.4-based 6LoWPAN. For an open source software spin on Z-Wave, IoT hackers can turn to Open-ZWave, which is building an open source software library for Z-Wave PC controllers.
Newer IoT systems tend to support multiple wireless protocols, and have more open APIs, even if they are rarely fully open source. With the growing availability and sophistication of smart lighting products such as Philips Hue and Lifx, or smart locks from Kwikset, August, Schlage, Yale, hub/stack vendors do not need to field their own device competitors. Instead, they can focus on advanced software and hubs that are compliant with major smart devices and open source frameworks like The Linux Foundation hosted projects AllJoyn and IoTivity.
One of the bigger open source success stories in the smart home business is WigWag, which offers a hackable, Linux-based Relay hub along with a sampling of homegrown sensors, presence tags, and lighting devices. WigWag depends primarily, however, on third-party smart devices compatible with AllJoyn, IoTivity, and Thread. Another open source contender is Webee, which offers a self-learning hub that lets you use your TV as an interface.
Consumers tend to start off in the home IoT market by purchasing a single-purpose smart device such as a thermostat or smart lock, controlled via a smartphone app. The most successful product line without a central multipurpose hub is Nest Labs’ Nest Thermostat. Despite a leadership shakeup this year, the Alphabet-owned Nest continues as a market leader. Other popular hub/endpoint hybrids remaining from our 2014 list include Belkin’s WeMo and iControl’s Piper home security camera.
Voice assistants and analytics
Although some home automation systems feature wall-mounted touchscreens, the typical interface has been the smartphone app. Unfortunately, smartphones are overloaded with other duties, and have a tendency to get left behind in the other room. Even if you have a unified app for all your smart devices, digging into the menus can take time.
Voice response systems are increasingly seen as a more user-friendly smart home interface that can also extend to multimedia access and general web queries. A growing number of vendors including SmartThings and WeMo, as well as old-time home automation firms like Creston and Control4, are adding support for the popular Amazon Echo speaker/IoT hub. The main draw of the Echo is the Alexa voice agent, which enables the Echo to act as a voice-activated smart home hub.
The Echo is not open source, but last year Amazon opened up the Alexa SDK, thereby greatly extending its reach. Integrating with the Echo is certainly easier than hooking up with Apple’s proprietary, HomeKit, which remain popular in part due to its Siri voice integration.
Google and Microsoft are readying their own voice agents for smart home applications to compete with Alexa and Siri. Google Home offers a voice-enabled smart speaker, and Google is said to be encouraging other tech firms to build their own Google Home compatible devices built around its Google Cast and Google Assistant technologies.
Earlier this year, Microsoft announced that its Cortana voice assistant for Windows 10 would expand beyond its AllJoyn compatibility to support IoTivity. A Cortana-ready smart home product should follow in 2017.
Newcomers are challenging these tech giants with their own voice-enabled products. While the major voice agents are all cloud-based, the Linux-based ZOE smart home assistant works locally for greater privacy. The company says it plans to make ZOE open source.
A similar approach is being used by Silk Labs, whose AI-augmented Sensesurveillance camera and automation hub won Kickstarter funding earlier this year. In June, Silk Labs announced that it was cancelling the product to focus on software and OEM sales. Silk Labs has refunded backers, and has open sourced the Linux-based Silk platform behind Sense. Silk offers local control of AI analytics as well as voice, face, and gesture recognition.
Another open source smart hub with voice AI is Mycroft, which was crowdfunded a year ago, but has been delayed to an expected November launch. Mycroft offers an Echo-like hub that runs Snappy Ubuntu Core on a Raspberry Pi.
ZOE, Silk, Mycroft, and others are pushing a related trend toward AI analytics. The idea is to make home automation more autonomous and self-learning, so devices can truly interoperate intelligently without requiring constant attention via a smartphone app. Some of these systems use voice- and facial recognition to recognize who is in a space, and adjust settings accordingly.
Typically, AI is being introduced in the cloud, as with the optional cloud analytics available with the Nest Cam. As products add analytics, the question is whether local-only systems can compete with cloud services such as Alexa, Siri, Google Assistant, or IBM’s Watson IoT platform. In other words, can you have privacy and security, and also enjoy sophisticated, personalized automation?
In the next two articles, we’ll look at how operating systems are changing to adapt to evolving IoT requirements, and then we’ll finish up with a look at the future of IoT, with a special focus on industrial IoT.
The average life span of a container is short and getting shorter. While some organizations use containers as replacements for virtual machines, many are using them increasingly for elastic compute resources, with life spans measured in hours or even minutes. Containers allow an organization to treat the individual servers providing a service as disposable units, to be shut down or spun up on a whim when traffic or behavior dictates.
Since the value of an individual container is low, and startup time is short, a company can be far more aggressive about its scaling policies, allowing the container service to scale both up and down faster.
Ask people how to find funding for a technology project, and many of them will point to crowdsourcing sites. After all, theOculus Rift virtual reality headset, thePebble smartwatch, and even the low-cost Raspberry Pi computer were launched after their inventors collectively raised millions of dollars from contributors. If you happen to have an open source project that you want to get funded, what are some of your options?
As it turns out, there are numerous avenues for finding funding. Here, you’ll find some of the best options:
Mozilla’s MOSS Program
Last year, Mozilla launched theMozilla Open Source Support Program (MOSS) – a funding awards program specifically focused on supporting open source and free software. The program has already made a difference for a number of projects. Recently, Mozilla reported that it awarded a hefty $585,000 tonine open source projects in Q2 of this year alone. Here are just a few examples of funded projects:
PyPy. PyPy is afast,compliant alternative implementation of thePython language (2.7.10 and 3.3.5). Its developers tout its performance advantages over Python.
Tor: Tor is a system for using a distributed network to communicate anonymously and without being tracked. Mozilla wants its developers to significantly enhance the Tor network’s metrics infrastructure so that the performance of the network can be monitored and improvements made as appropriate.
Tails: Tails is a secure-by-default live operating system that focuses on preserving the user’s privacy and anonymity. Mozilla’s investments will go toward developing reproducible builds.
According to Mozilla: “If you think your project qualifies, we encourage you to apply…We are keen to enable applications from groups not currently connected with Mozilla and from communities outside the English-speaking free software world.
The Linux Foundation
The Linux Foundation not only provides a vendor-neutral collaborative platform that promotes open source for companies and individuals, but also helps foster like-minded diverse communities to help improve the quality, availability, and talent to produce open source software.
There are several foundations and independent organizations, such asThe Travis Foundation, focused on providing and finding funding for open source projects. The Travis Foundation is particularly known for connecting promising projects with sponsors.The Open Source Initiative andFree Software Foundation are also widely known for creating such connections.
Is your open source project going to drive a nonprofit initiative? If so, GitHub will give you your own “Organization GitHub Account” with unlimited private repositories and unlimited users. It’s not cash, but it’s a nice perk.
Meanwhile, crowdsourcing is indeed a fast-growing way for many projects to get funding. FromKickstarter toGoFundMe toFlattr andPledgie, project leaders can often reach sponsors through these avenues. You can find a good review of these channelshere.
Some open source projects start with one individual, but it’s increasingly common for projects originally launched at enterprises and smaller companies to get forked or otherwise branch out with their leaders seeking funding. Very promising companies arise from these scenarios. Mesosphere, for example, was launched based on the open source Apache Mesos project. Kubernetes began as an open source project at Google, but it is now helping to drive countless profit-driven initiatives.
If you or your team have a promising project, don’t give it short shrift. Funding may be much more obtainable than you think.
My son just turned 4, and he is super-excited about Halloween and zombies. So I planned to create a haunted house-like experience for him. The biggest challenge was to get audio-visual effects. I wanted spooky music synchronized with well-placed lighting.
Instead of buying some expensive Halloween decorations, I wanted to build them myself. I also wanted to be able to control the lights over the network. I looked around and didn’t find the perfect solution, so I did what DIY people do best: I picked and chose different pieces to create what I needed.
In this tutorial, I am going to share how you can build a board with Raspberry Pi and open source software that synchronizes music with lights for less than $20. You can place this board inside a plastic pumpkin decoration, for example, or attach LEDs to props and create spooky displays for Halloween. Be creative!
Here is what you need:
A Raspberry Pi 3 (v3 comes with WiFi and Bluetooth)
32 GB Micro SD card (minimum 16GB)
A PC monitor with HDMI port for initial setup
Keyboard and mouse (I recommend Logitech Wireless Touch Keyboard K400 with built-in Multi-Touch Touchpad)
5v 2A power supply (If you want full mobility then get a 5V battery bank for smartphones)
LEDs (minimum of eight, or more as desired)
220 Ohm resistors (one per LED, minimum of eight)
Speakers (get portable Logitech speakers)
Assembled Pi Cobbler Plus – Breakout Cable for Raspberry Pi A+ / B+ (I recommend this one from Adafruit as it has clear pin numbers)
Breadboard and wires (and a basic knowledge of how to use it)
Solderable breadboard (optional)
Software
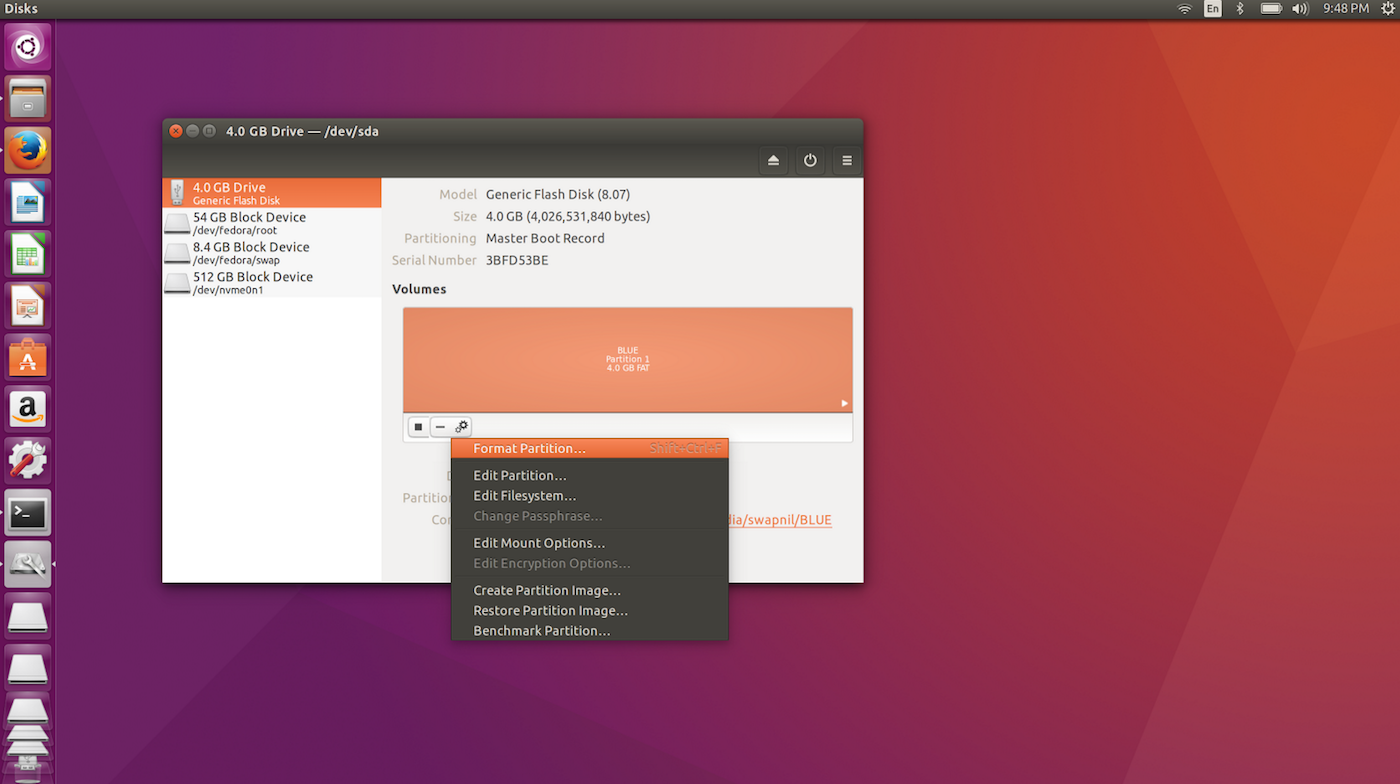
We will be using Linux-based Raspbian as the base operating system for this project. The easiest way to install Raspbian on your Pi is by using NOOBs. Plug in your Micro SD card to your PC and format it as FAT32 using Gnome Disk Utility (Figure 1).
Figure 1: Format Micro SD.
Then, change directory to the Micro SD card:
cd /path_of_USB
And unzip the NOOBS file into the Micro SD card:
unzip PATH_OF_NOOBS
In my case it was:
unzip /home/swapnil/Downloads/NOOBS_v1_9_2.zip
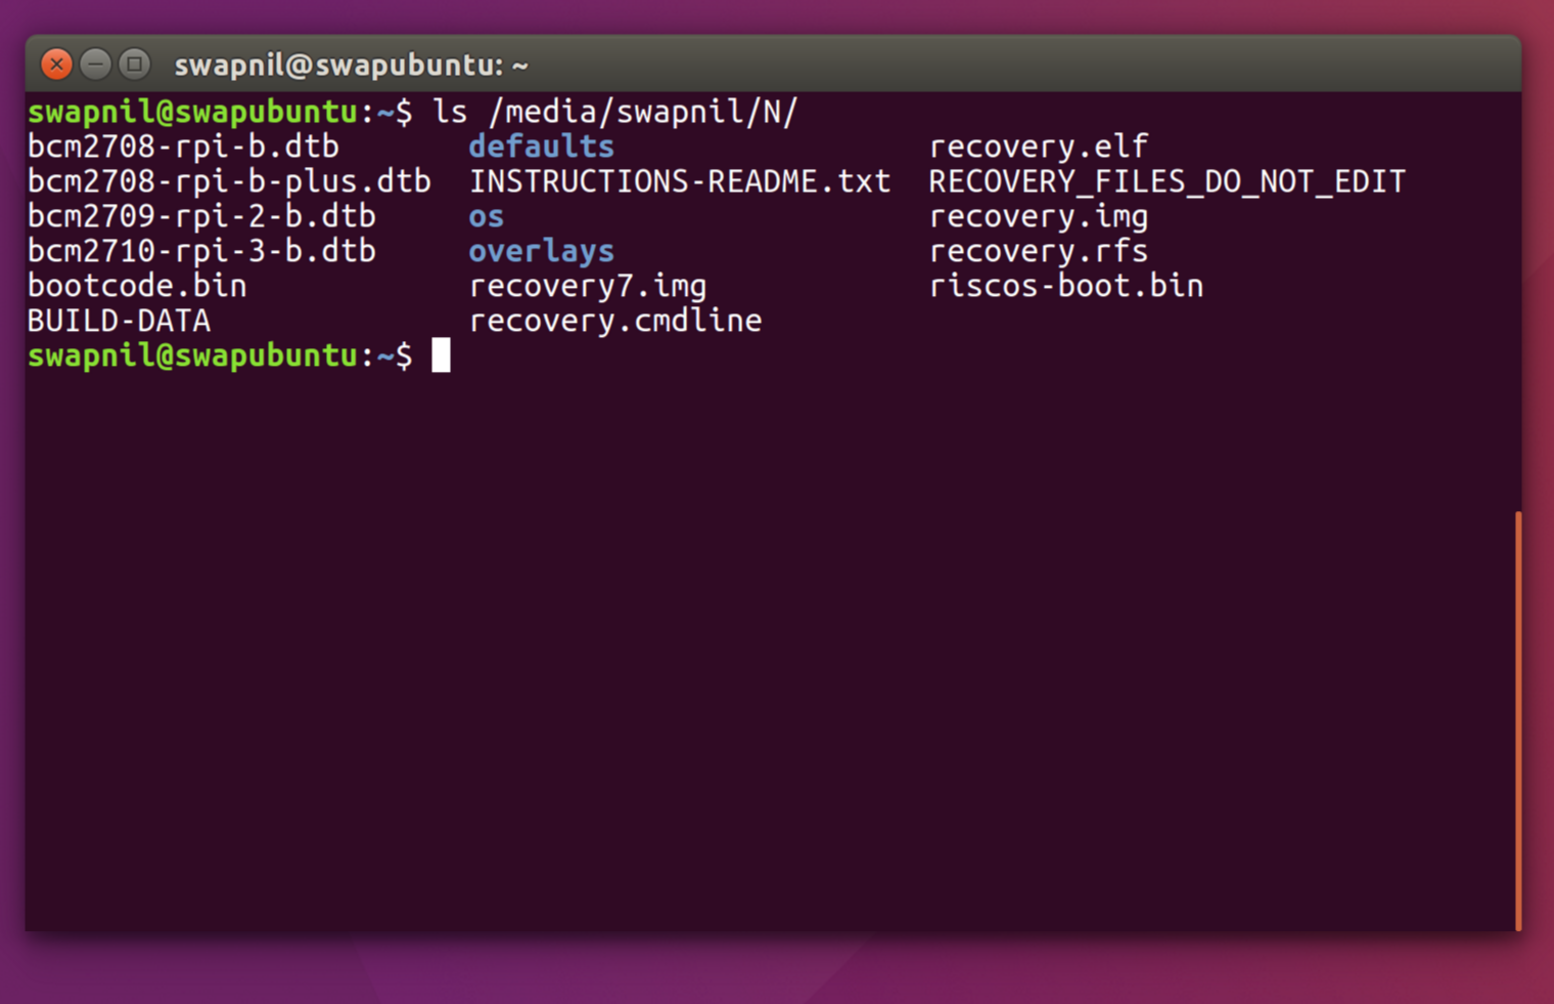
Ensure that all the content of the NOOBS folder is in the root directory of the Micro SD card.
ls /path_of_micro_SD_card/
You should see all these files there (Figure 2):
Figure 2: Files in root directory.
Prepare your Pi
Connect the Pi to the monitor using an HDMI cable and then connect the keyboard. Connect one end of the GPIO 40 Pin cable to the Pi and the other end to the breadboard using Adafruit Assembled Pi T-Cobbler Plus – GPIO Breakout board. Now plug in the Micro SD card and connect the power supply.
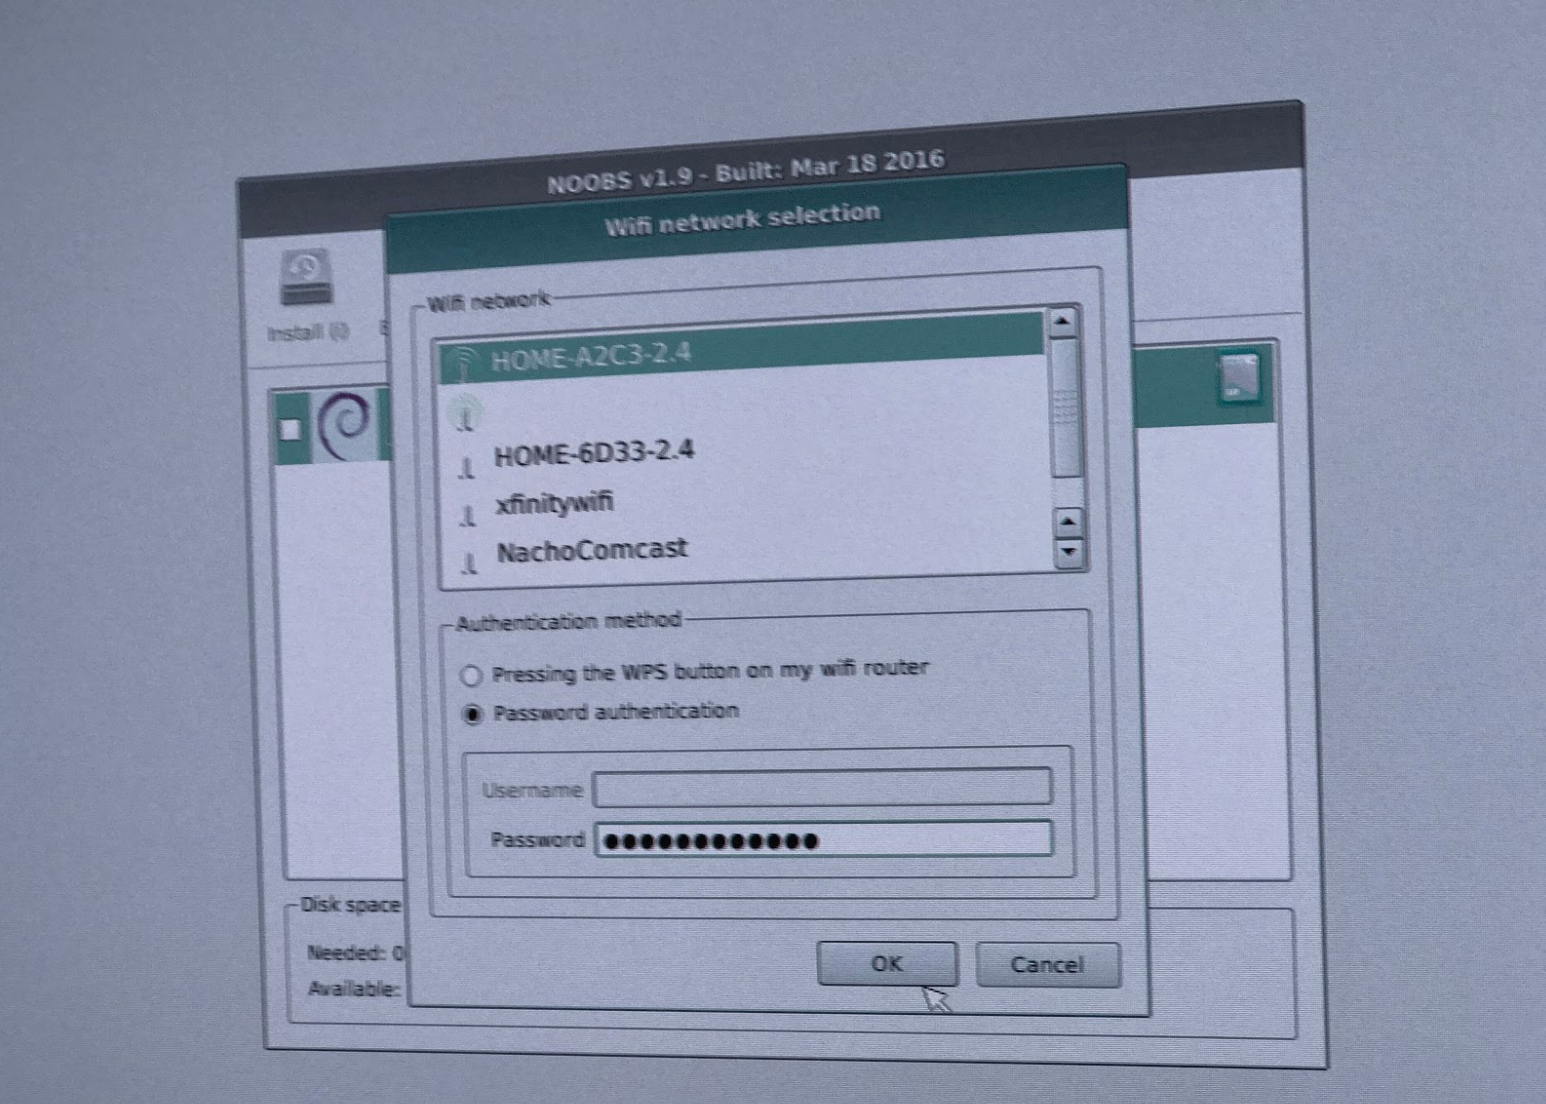
When NOOBS boots, you will see the option to connect to the wireless network. Because we will be using the Rasp Pi outside as a Halloween decoration, we need it to be wireless. Click on the wireless option and select the desired wireless network from the list (Figure 3).
Figure 3: Select wireless network.
NOOBS will offer several operating systems to choose from, select Raspbian and let the installation finish. Once the installation is finished, reboot the system. Once you boot into Raspbian, update your system:
sudo apt-get updatesudo apt-get dist-upgrade
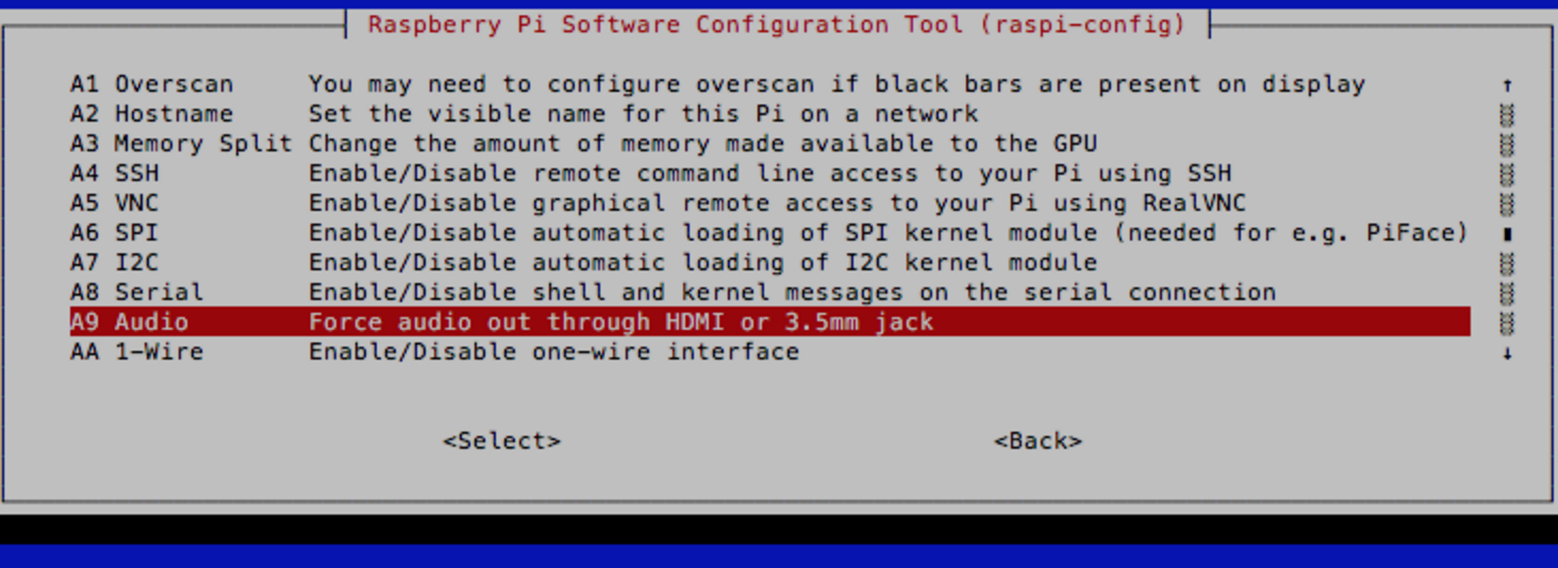
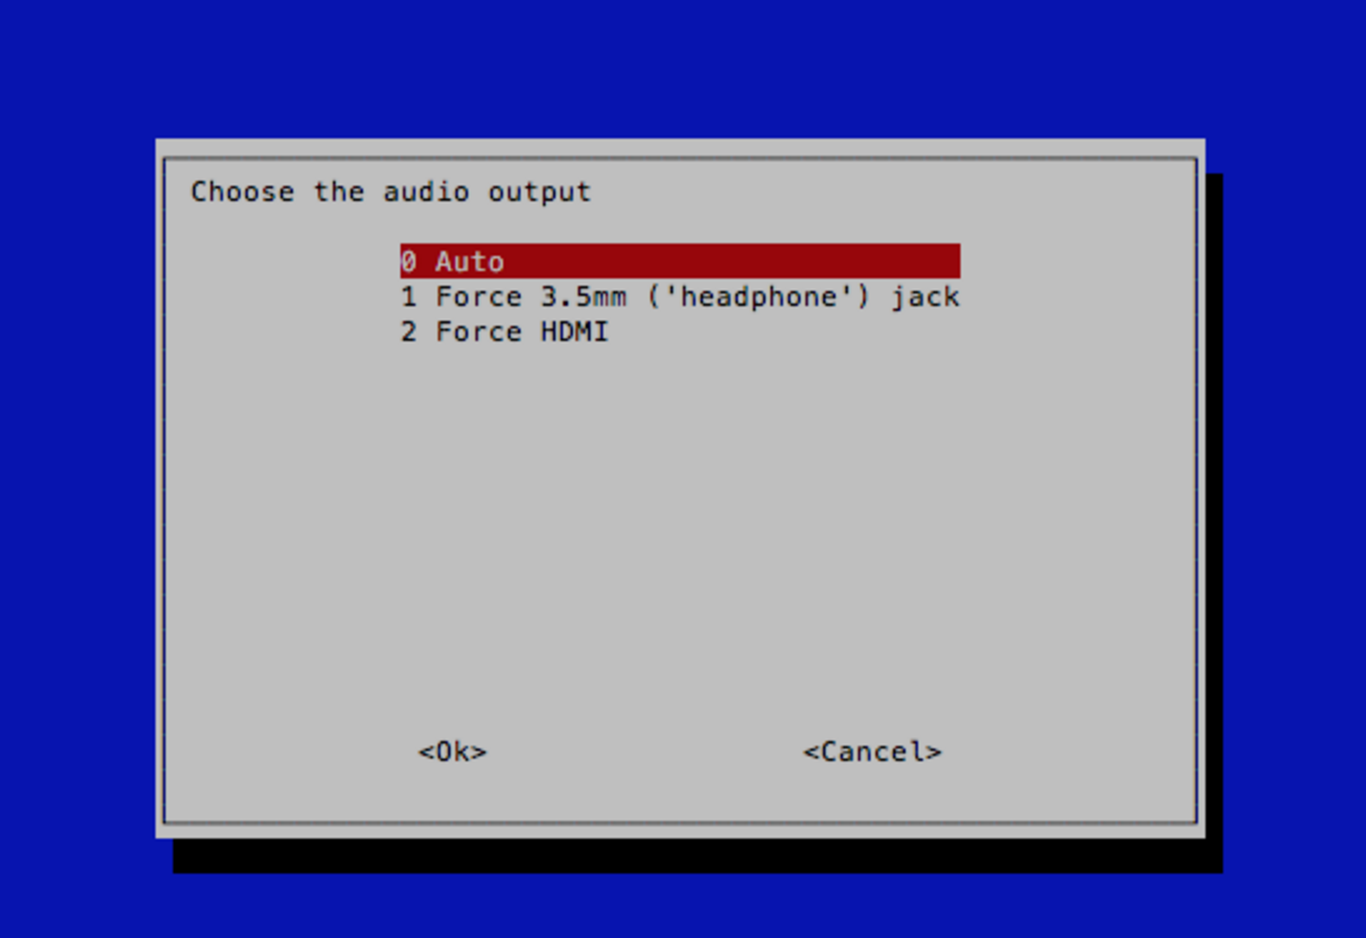
In order to use the sound output from the 3.5mm jack of Raspberry Pi, run the following command to open the configuration file of Raspbian:
sudo raspi-config
Then, go to Advanced>Audio and set audio out from 3.5mm jack (Figures 4 and 5).
Figure 4: Set audio out.
Figure 5: Select auto.
Install lightshow software
We are using the open source Lightshowpi project to control music and lights. Clone the project on your local machine:
Change directory to the newly created ‘/home/pi/lightshowpi’ folder:
cd lightshowpi
Grab the stable branch:
git fetch && git checkout stable
Install lightshowpi:
sudo ./install.sh
Reboot the system:
sudo reboot
Install LEDs on the Breadboard
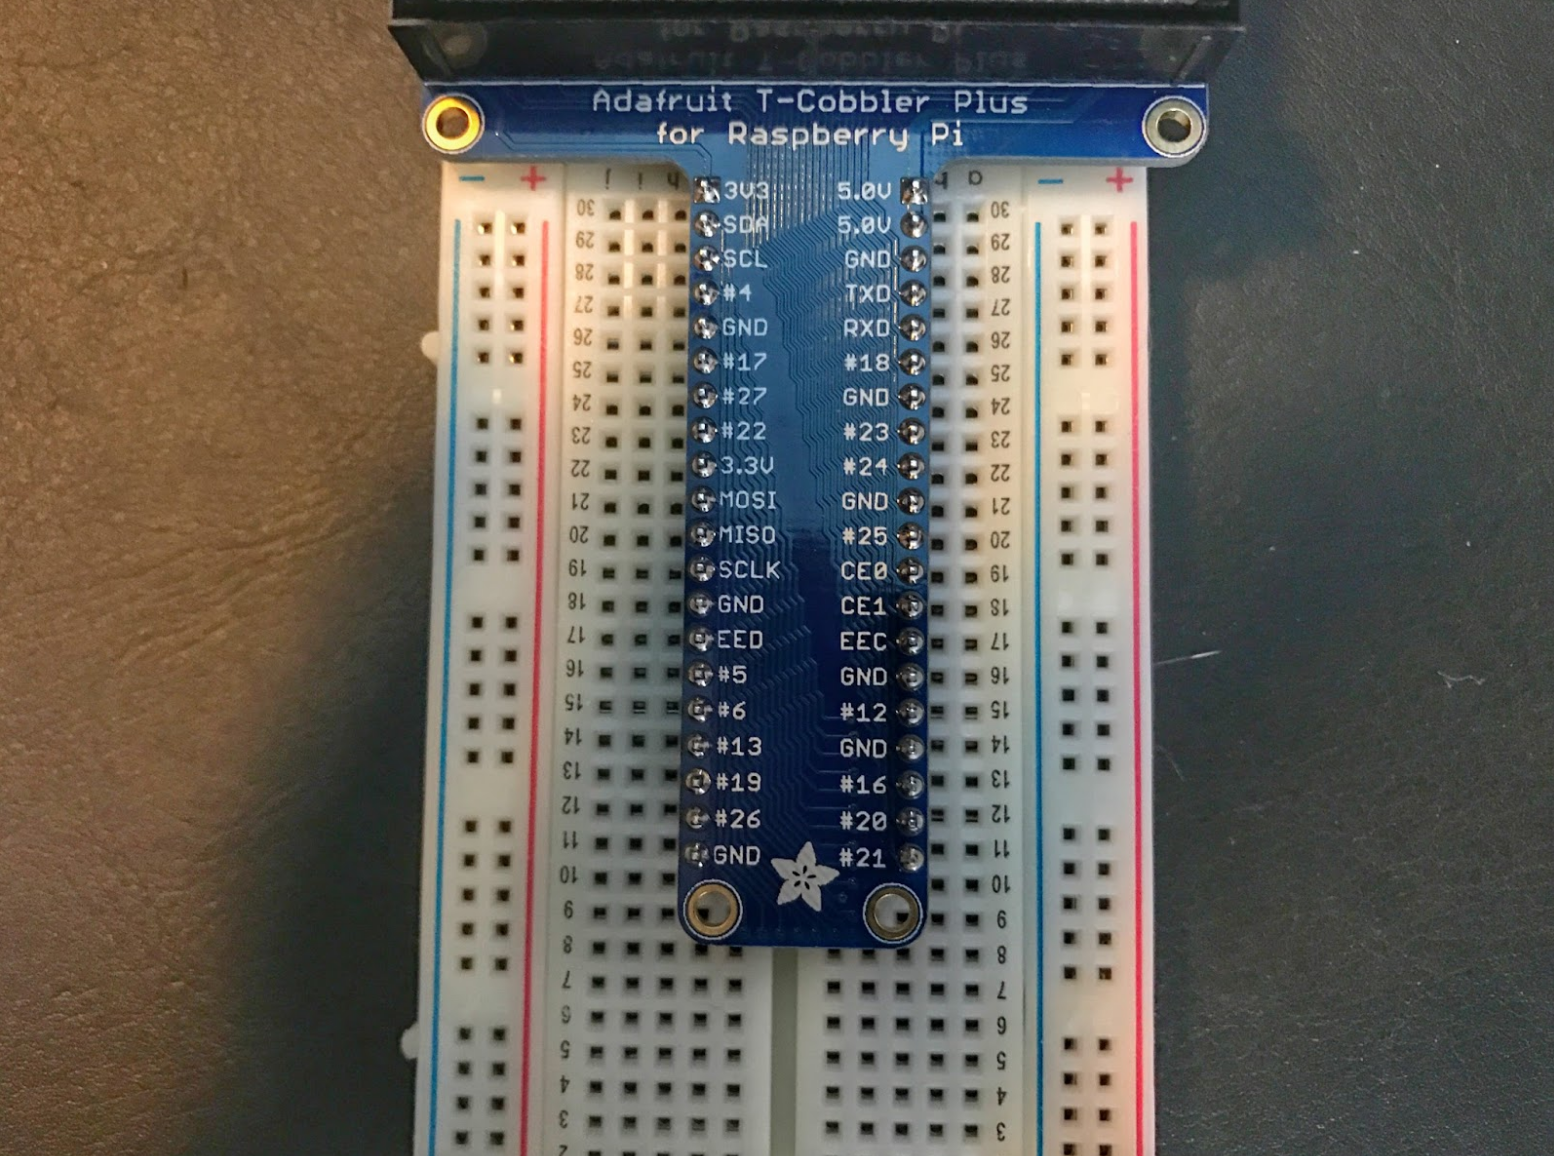
We need to set up the LED lights on the breadboard for initial testing. Now we need to find the right PIN of GPIO board for LED connections. I strongly recommend Adafruit’s Assembled Pi Cobbler Plus – Breakout Cable for Raspberry Pi. This cable comes with clearly marked PIN numbers, which will make it easier to connect to each corresponding PIN. Because we are using 8 LEDs for our setup, let’s find out which PINs are we going to use. Figure 6 shows a picture of the Adafruit’s breakout cable.
Figure 6: Adafruit’s breakout cable.
Each audio channel is represented by a number, starting from 0. Because we are using 8 channels, we have 0,1,2,3,4,5,6,7 channels for each LED. The GPIO pins we are going to use are: #4. #17, #18 #22, #23, #24, #25
Connect the LED for each channel with each GPIO PIN in this way:
GPIO
Channel / LED
LED
# 17
0
Red
# 18
1
Blue
# 27
2
Green
# 22
3
Purple
# 23
4
Yellow
# 24
5
White
# 25
6
Orange
# 4
7
Red
We now need to connect LEDs with the corresponding GPIO pins on the bread board. Figure 7 is a picture of the breadboard.
Figure 7: The breadboard.
And this is how the holes are connected internally (Figure 8).
Figure 8: Internal connections.
We are using 220Ω resistor with each LED and connecting the anode of each LED to the GPIO pins, whereas cathode goes to negative. Here is a simple circuit diagram (Figure 9).
Figure 9: Simple circuit diagram.
Tip: Long legs of LEDs are anodes, which are connected to positive supply, whereas short legs are cathodes, which are connected to negative supply.
Figure 10 shows the final setup on the breadboard:
Figure 10: Final setup on the breadboard.
Here you can see +5v (red wire) is coming from the 5v GPIO pin and negative (black wire) coming from the ground pin of GIO, and we plugged these wires into the positive and negative strip on breadboard (blue stripe is negative and red stripe is positive). Then we inserted small legs of the LEDs to the negative strips. We then used wires to connect the GPIO pins with each LED in series with 220Ω resistor. Our circuit is now complete.
Let’s check if the LEDs are working properly. Run the following command (from the lightshowpi directory):
You will see the output of each pin number in the terminal and the corresponding LED should blink. If all eight LEDs flash properly, we are on the right track. Exit the command with Ctrl+x or Ctrl+c.
Set up audio
Now let’s test the music-light synchronization. Lightshowpi comes with two mp3 sample files stored in the ‘music’ directory of the lightshowpi folder. Let’s play one of the two files:
If everything is configured correctly, you will get audio output that’s synchronized with the LEDs. You will see different LEDs lighting up responding to different audio frequencies. You can see a video of the setup that I uploaded to YouTube.
Upload your music to the Pi
You can simply copy songs to the music folder of lightshowpi and play the desired songs from the above command, but we are going to use a web-based interface that will allow us to control our Halloween lights from the web browser of our mobile phones. We are going to use webui project to achieve that. The webui script is written by Stephen Burning, which is also available as open source.
It works only on the local network, so ensure that your mobile phone is on the same network as is your Pi. Open a web browser on your phone and enter the IP address of your Pi with port 8080:
10.0.0.26:8080
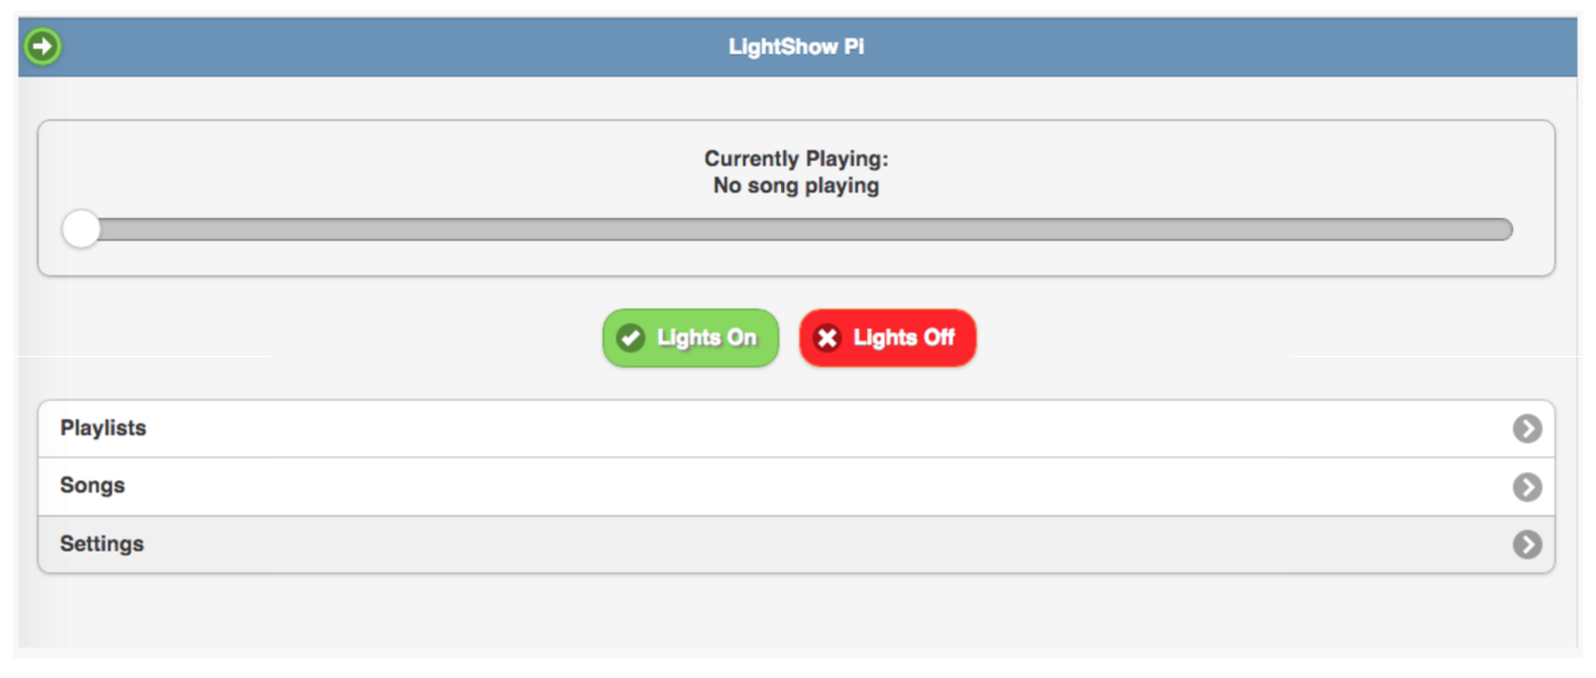
You should see this page (Figure 11):
Figure 11: Light controller.
Check if LEDs turn on and off by clicking on those buttons.
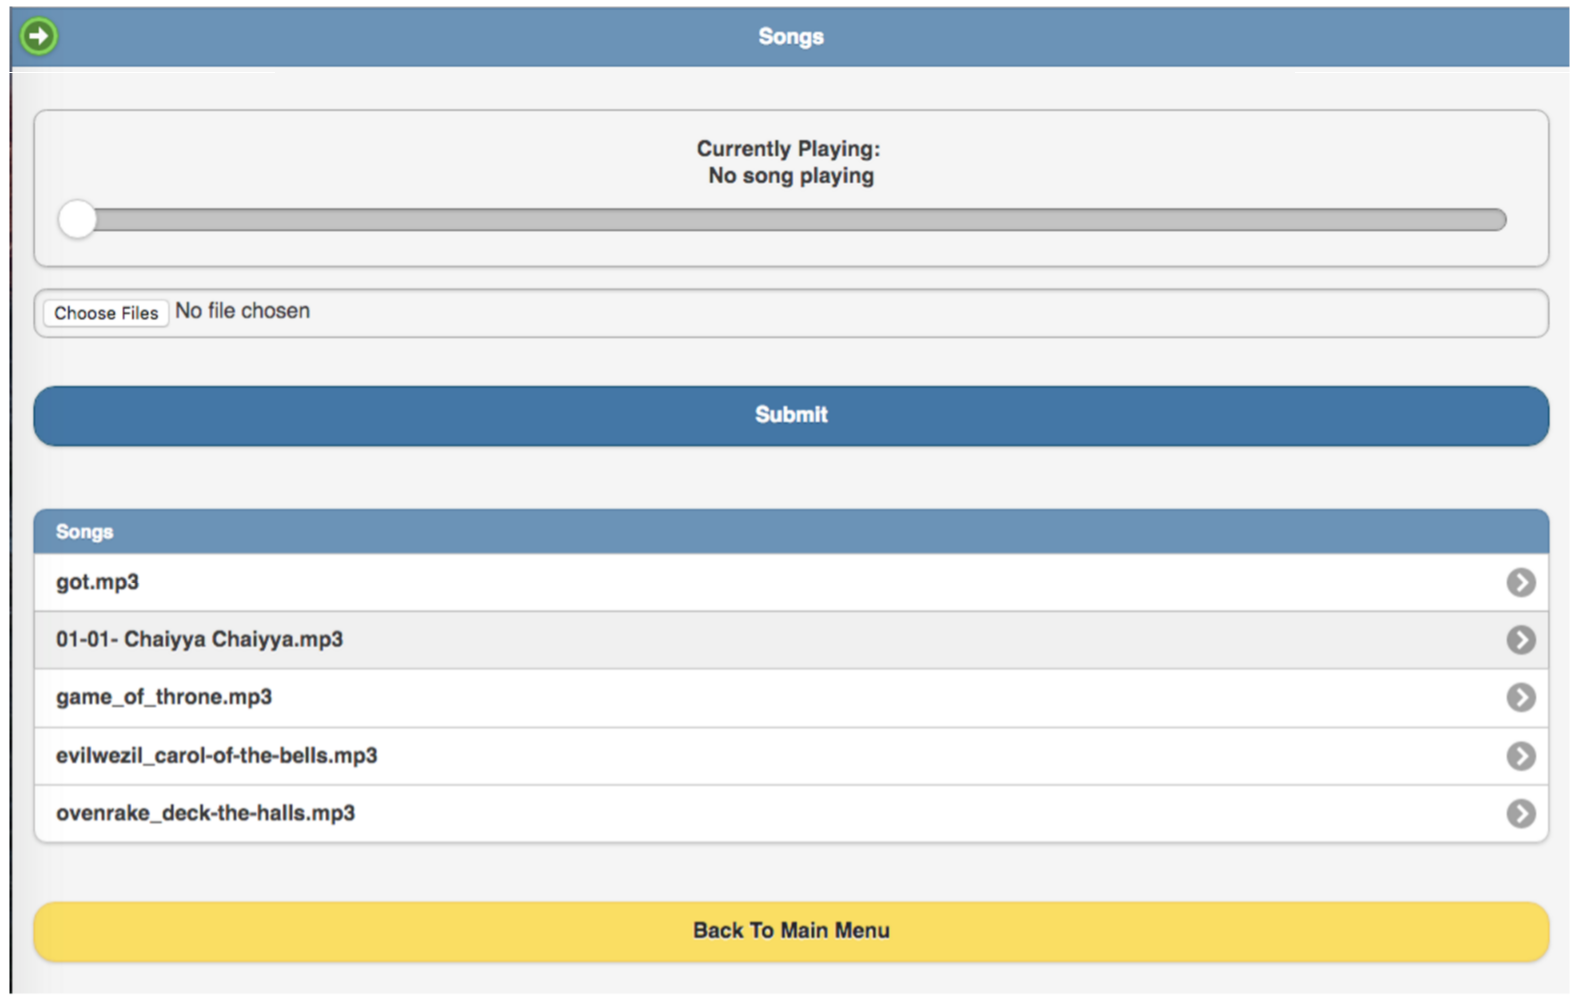
Then, you can click on songs and play your desired song and enjoy a light and music show (Figure 12). You can add more music files to your collection by clicking on ‘choose’ files, which will upload the music files to the music directory of the lightshowpi folder. You can also create a playlist so those songs will play automatically.
Figure 12: Song controller.
Once the whole setup is complete, you can either put the entire thing inside a ziplock bag and put inside a pumpkin or use long wires to control where you want to install LEDs inside the pumpkin. Just wrap long wire around LED legs and cover it with hot shrink sleeves or electrical tape to avoid shorting (Figure 13).
Figure 13: Wrap LEDs to prevent shorting.
I used a 5V iPhone battery bank and JBL GO Portable Wireless Bluetooth Speaker to achieve complete mobility. Just make sure that the pumpkin is within the wireless range of your router, so you can manage the song tracks from your phone.
Happy Halloween!
Credit where due
This project is a great example of open source; so many individuals have helped create this amazing experience. The project would not have been possible without the incredible work of Google software engineer Todd Giles and many other individuals have done around the the LightShowPi project. That’s the greatness of open source: you learn and benefit from each other. So, special thanks to Tom Enos, Stephen Burning, Benjamin Ellis, and many more.…
This post is the first of a two-part series that collects many of the technologies and services in the emergingserverless ecosystem. The installment covers providers of Functions-as-a-Service (FaaS) and Backend-as-a-Service (BaaS or mBaas for mobile providers). Check back soon for part two, which will cover everything we know about serverless platforms and frameworks.
Like the terms “microservices” and “containers” before it, “serverless” is a loaded word. Countless blogs have argued about the meaning or importance.
The first, obvious statement everyone makes is that, yes, there are servers or hardware of some sort somewhere in the system. But the point of “serverless” is not that servers aren’t used; it’s just that developers and administrators do not have to think about them.
How do you keep improving as a software engineer? Some pieces of advice are valid no matter your experience level, but often the advice will depend on where you are in your career.
If you’re a beginner, the best advice is to simply learn your language, frameworks, and tools top to bottom and gain more experience with a variety of different projects.
If you’re an experienced software developer, you should constantly try to find new ways to optimize your code for readability, performance, and maintainability, and then practice making well-reasoned decisions about where to focus time and resources in your code—whether it’s testing, performance optimization, or other technical debt.
Changing operating systems is a big step for anybody — all the more so because many users are uncertain about exactly what an operating system is.
However, switching from Windows to Linux is especially hard. The two operating systems have different assumptions and priorities, as well as different ways of doing things. As a result, it is easy for new Linux users to wind up confused because the expectations they have developed using Windows no longer apply.
For instance, here, in no particular order, are seven mistakes that refugees from Windows can fall into when they start to use Linux:
StormCrawler is an open source collection of reusable resources, mostly implemented in Java, for building low-latency, scalable web crawlers on Apache Storm. In his upcoming talk at ApacheCon, Julien Nioche, Director of DigitalPebble Ltd, will compare StormCrawler with similar projects, such as Apache Nutch, and present some real-life use cases.
We spoke with Nioche to learn more about StormCrawler and its capabilities.
Julien Nioche, Director of DigitalPebble Ltd.
Linux.com: What is StormCrawler and what does it do? Briefly, how does it work?
Julien Nioche: StormCrawler (SC) is an open source SDK for building distributed web crawlers with Apache Storm. The project is under Apache license v2 and consists of a collection of reusable resources and components, written mostly in Java. It is used for scraping data from web pages, indexing with search engines or archiving, and can run on a single machine or an entire Storm cluster with exactly the same code and a minimal number of resources to implement.
The code can be built with Maven and has a Maven archetype, which helps users bootstrap a fully working crawler project which can be used as a starting point.
Apache Storm handles the distribution of work across the cluster, error handling, monitoring and log capabilities, whereas StormCrawler focuses on the specific resources for crawling the web. The project aims at being as flexible and modular as possible and provides code for commonly used third-party tools, such as Apache SOLR or Elasticsearch.
Linux.com: Why did you choose ApacheStorm for this project?
Julien: I knew from my experience with batch-driven crawlers like Apache Nutch that stream-processing frameworks were probably the way I wanted to go for a new crawler. There were not so many resources around when I started working on StormCrawler two to three years ago (or at least less than now — there seems to be a new one cropping up every month), but luckily Storm was in incubation at Apache. I remember finding that its concepts were both simple and elegant, the community was already active, and I managed to leverage it pretty quickly to get some stuff up and running. That convinced me that this was a good platform to build on, and I am glad I chose it because the project has developed very nicely since, going from strength to strength with each release.
Linux.com: Can you describe some use cases? Who should be using StormCrawler?
Julien: There is a variety of web crawlers based on SC, which is possible thanks to its flexible and modular nature. The “Powered By” page on the wiki lists some of them. A very natural fit is for processing URLs coming as a stream (e.g., pages visited by some users). This is difficult to implement elegantly with batch-driven web crawlers, whereas StormCrawler can be both efficient and elegant for such cases.
There are also users who do traditional recursive crawls with it, for instance with Elasticsearch as a back end, or crawls that are more vertical in nature and aim at data scraping. A number of users are also using it on finite lists of URLs, without any link discovery.
StormCrawler comes out of the box with a set of resources, which help building web crawlers with minimal effort. What I really like is that with just a few files and a single Java class, you can build a web crawler that can be deployed on a large Storm cluster. Users also seem to find the flexibility of StormCrawler very attractive, and some of them have added custom components to a basic crawl topology relatively easily. Others love its performance and the fact that with continuous processing, they always get the most from their hardware: StormCrawler uses the CPU, bandwith, memory, and disk constantly.
Linux.com: Are there additional features or capabilities you would like to add? If so, what?
Julien: StormCrawler is constantly improving and, as the number of users and contributors grows, we get more and more bugfixes and new functionalities. One thing in particular that has been planned for some time is to have a Selenium-based protocol implementation to handle AJAX-based websites. Hopefully, we’ll get that added in a not-too-distant future. There are also external components, like the WARC resources that might be moved to the main repository.
Hear from leading open source technologists from Cloudera, Hortonworks, Uber, Red Hat, and more at Apache: Big Data and ApacheCon Europe on November 14-18 in Seville, Spain. Register Now >>
The merging of development and operations to speed product delivery, or DevOps, is all about agility, automation and information sharing. In DevOps, servers are often treated like cattle”that can be easily replaced, rather than individual pets”to be nurtured.