Home Blog Page 847

A Bunch of New ARM Hardware Will Be Supported With Linux 4.6

The ARM SoC updates were mailed out on Sunday afternoon for the Linux 4.6 kernel and it provides mainline support for thirteen new SoCs! 

Over a dozen new ARM System-on-a-Chips are new to the mainline Linux 4.6 kernel code. The newly-supported platforms include Axis Artpec-6 SoC (artpec6), TI keystone-k2g, Mediatek MT7623 (mt7623), Allwinner A83T SoC (a83t), NXP i.MX6QP SoC (imx6qp), ST Microelectronics stm32f469, Annapurna Labs Alpine (alpine-v2), Marvell Armada 3700 SoCs (armada-37xx), Marvell Armada 7000/8000 SoCs (armada-7xxx/8xxx), Amlogic S905 (meson-gxbb), Qualcomm Snapdragon 820 (msm8996), …

Read more at Phoronix

Meet ubuntuBSD, UNIX for Human Beings

meet-ubuntubsd-unix
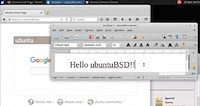
Today we have the great pleasure of introducing you to a new project that saw the light of the Internet for the first time this past weekend, on March 12, 2016. Meet ubuntuBSD!

What’s ubuntuBSD? Well, we’ve asked that ourselves when we first spotted the project created by Jon Boden, and it’s not that hard to figure out yourself, but just in case you’re not sure, we can tell you that ubuntuBSD promises to bring the power of the FreeBSD kernel to Ubuntu Linux. It is inspired by Debian GNU/kFreeBSD. ubuntuBSD looks like something that has never been done before, and as usual, we were very curious to see how it works, so we took it for a quick test drive. Please note that at the moment of writing this article, the ubuntuBSD project was in Beta stages of development, based on the FreeBSD 10.1 and Ubuntu 15.10 (Wily Werewolf).

Read more at Softpedia Linux News

Raspberry Pi 3: Raspbian Linux and NOOBS Distributions Updated

New releases of Raspbian GNU/Linux and the NOOBS installer package appeared on the Raspberry Pi Downloads page last week. These have come very soon after the initial Pi 3 support releases, so they appear to be primarily aimed at bug fixes and enhancements for the new hardware.

The Raspbian release notes mention that there are firmware and kernel updates. I couldn’t find any release notes or other information about the NOOBS release; hopefully that will come along soon. I have loaded and briefly tested both Raspbian and NOOBS on all of my various Raspberry Pi systems. The best news of this release is that the NOOBS installer now recognizes the Raspberry Pi 3 built-in wireless network adapter, so it is now possible to install from NOOBS on a Raspberry Pi 3 without having to use a wired network connection or a second wireless adapter.


Read more at ZDNet News

Linux Kernel 3.12.57 LTS Out Now with ALSA, EFI, and Xen Improvements, Bugfixes

linux-kernel-3-12-57On March 18, 2016, kernel developer Jiri Slaby announced the release of the fifty-seventh maintenance build of the long-term supported Linux 3.12 kernel series.

Earlier this week we announced several Linux kernel maintenance releases, including Linux kernel 4.4.6 LTS, Linux kernel 3.14.65 LTS, Linux kernel 3.10.101 LTS, Linux kernel 4.1.20 LTS, and Linux kernel 3.18.29 LTS, and today we’re informing our readers about the release of Linux kernel 3.12.57 LTS.

Most of the changes are, as expected, updates to various drivers, including ATA, EFI, GPU (mostly Radeon), Ethernet, MTD, IOMMU, USB, and Xen. “I’m announcing the release of the 3.12.57 kernel. All users of the 3.12 kernel series must upgrade,” said Jiri Slaby. 

How Community Building Can Help an Organization’s Bottom Line

OSDC beesRecently I’ve had several conversations with open source friends and colleagues, each discussion touching upon—but not directly focused on—the subject of why a company would/should/could support a community around a project it has released as free/open source, or more generally to support the communities of F/LOSS projects on which they rely. After the third one of these conversations I’d had in nearly as many weeks, I dusted off my freelance business consulting hat and started mapping out some of the business reasons why an organization might consider supporting communities.

In this article, I’ll look at community from a business perspective, including the effect community can have on an organization’s bottom line. Although there are communities everywhere, I’ll approach the topic—meaning, communities, their members, and their contributors—from a free/open source perspective.

Read more at OpenSource.com

Clair 1.0 Brings Advances in Container Security

CoreOS pushes the open-source container security project to the 1.0 milestone and production stability.

As container use grows, there is an increasing need to understand from a security perspective what is actually running in a container. That’s the goal of CoreOS’ Clair container security project, which officially hits the 1.0 milestone today, in an effort to help organizations validate container application security.

Clair was first announced in November 2015 as an open-source effort to identify vulnerable components inside containers. Container applications can integrate any number of different components that could potentially include known vulnerabilities.

Read more at eWeek

GitHub’s Atom 1.6 Hackable Text Editor Comes Bundled with NodeGit, New API

This past weekend, we had the great surprise to see Atom 1.6, the next major version of GitHub’s powerful, cross-platform and open-source hackable text editor exit the devel channel and enter the stable one.

Yes, you’re reading it right, Atom 1.6 has been promoted to the stable channel, and you can download it right now for your GNU/LinuxMac OS X, or Microsoft Windows box from its official website, or via ours. At the same time, the next major version, Atom 1.7, has entered the Beta channel.

Microsoft Eases Docker Container Migrations With Open Source Cloud Storage Plug-in

The new Docker Volume Plugin for Azure File Storage plug-in makes Docker containers less reliant on a host’s storage.

Microsoft has released new software that provides Docker developers and administrators with more container portability on Azure.The open-source Docker Volume Plugin for Azure File Storage—the source code of which is available on GitHub—uses Azure File Storage on Linux’s support of the Server Message Block (SMB) 3.0 protocol to disassociate Docker container data volumes from their host’s storage. In a typical deployment, a directory on the Docker host machine serves as the Docker container volume, complicating matters when users want to move containers between hosts.

Read more at eWeek


Attempt to set up RDO Mitaka at any given time (Delorean trunks)

Per  Delorean Documentation

The RDO project has a continuous integration pipeline that consists of multiple jobs that deploy and test OpenStack as accomplished by different installers. This vast test coverage attempts to ensure that there are no known issues either in packaging, in code or in the installers themselves.Once a Delorean consistent repository has undergone these tests successfully, it will be promoted to current-passed-ci. Current-passed-ci represents the latest and greatest
version of RDO trunk packages that were tested together successfully.

Set up delorean repos on all deployment nodes ( Controller,Storage,Compute)
# yum -y install yum-plugin-priorities
# cd /etc/yum.repos.d
# curl -O https://trunk.rdoproject.org/centos7-mitaka/delorean-deps.repo
# curl -O https://trunk.rdoproject.org/centos7-mitaka/current-passed-ci/delorean.repo

Complete text may be seen here

Introduction to Docker Compose Tool for Multi-Container Applications

Docker compose tutorial image

Docker is celebrating its third birthday this week, on March 23, but some of you may still not know about all the tools that come with Docker. In this blog we will introduce you to Docker Compose, one of the tools, which with the Docker Engine, Docker Machine and Docker Swarm, empowers developers to develop distributed applications.

If you have started working with Docker and are building container images for your application services, you most likely have noticed that after a while you may end up writing long `docker run` commands. These commands while very intuitive can become cumbersome to write, especially if you are developing a multi-container applications and spinning up containers quickly. 

Docker Compose is a “tool for defining and running your multi-container Docker applications”. Your applications can be defined in a YAML file where all the options that you used in `docker run` are now defined. Compose also allows you to manage your application as a single entity rather than dealing with individual containers.

In this tutorial we give you a brief introduction to Docker Compose, by building, you may have guessed…a Blog site.

Installing Docker Compose 

Just like the Docker engine, Compose is extremely easy to install. First verify that you have the Docker engine installed, since Compose will use it. Then if you are comfortable with it you can simply use `curl` to download the Compose binary. If you struggle with the following commands or need additional details, check the very good documentation

$ docker version
$ curl -L https://github.com/docker/compose/releases/download/1.6.2/docker-compose-`uname -s`-`uname -m` > /usr/local/bin/docker-compose
$ docker-compose version

Running a Ghost blog

While you can read the entire documentation and go through the compose reference manual. Nothing beats trying this out to discover a new tool. To dive straight into using Compose we are going to run a Ghost blog using containers.

You can run Ghost in a standalone mode which uses an embedded SQlite database in a single container. It is simple, and you do not need Compose for this, but it breaks the principles of single service functionality per container and will not allow you to scale any components of your blog if you need to. Let’s see how to do it anyway:

$ docker pull ghost
$ docker run -d --name ghost -p 80:2368 ghost

Once the above commands are successful, you should be able to access Ghost with your browser on port 80 of the Docker host you are using. Using a small trick, we will use this single container deployment to get the Ghost configuration file and modify it for a multi-container setup. Copy the Ghost configuration file located in the container to your local file system using the `docker cp` command like so:

$ docker cp -L ghost:/usr/src/ghost/config.js ./config.js
$ cat config.js

Edit the development section of the config.js file, to point to a Mysql database. We will assume that you can reach a Mysql database with a DNS name of `mysql`. We will setup a ghost database, with a Ghost user and a password set to `password`. You could also use a config file that takes advantage of environment variable. For simplicity, in this blog, we override the Ghost config file like so:

[config.js]
database: {
           client: 'mysql',
           connection: {
               host     : 'mysql',
               user     : 'ghost',
               password : 'password',
               database : 'ghost',
               charset  : 'utf8'
           }
       },

For that new configuration to be used, you need to create a Dockerfile that will be used to build your own local image of Ghost using your custom config file. You could do this several different ways, but building your own image with a two line Dockerfile is as easy as it gets. Here is the Dockerfile: 

FROM ghost
COPY ./config.js /var/lib/ghost/config.js

This new Docker image will be built automatically in your Docker Compose file using the `build` argument.

Your Compose file takes the following form. Two services are defined, a Mysql service and a Ghost service. The Mysql service is configured via environment variables set in the docker-compose file. We use the official Mysql Docker image that Compose will automatically pull from the Docker hub. Port 3306 is exposed to other containers in the same network. The Ghost service is based on our custom image; it depends on the Mysql service to ensure that the database will start first. We expose the default port of Ghost `2368` to port 80 of our Docker host.

[yaml]
version: '2'
services:
 mysql:  
  image: mysql
  container_name: mysql
  ports:
   - "3306"
  environment:
   - MYSQL_ROOT_PASSWORD=root
   - MYSQL_DATABASE=ghost
   - MYSQL_USER=ghost
   - MYSQL_PASSWORD=password
 ghost:  
  build: ./ghost
  container_name: ghost
  depends_on:
    - mysql
  ports:
    - "80:2368"

This would be the equivalent of running the following `docker run` commands: 

$ docker run -d --name mysql -e MYSQL_ROOT_PASSWORD=root -e MYSQL_DATABASE=ghost -e MYSQL_PASSWORD=password -e MYSQL_USER=ghost -p 3306 mysql
$ docker build -t myghost .
$ docker run -d --name ghost -p 80:2368 myghost

Keeping all these steps in a single YAML configuration file will be easier to maintain and evolve than writing your own Docker commands wrapper in bash scripts. Plus compose allows you to manage the entire app and individual services. 

To start your Compose application, you just need to run `docker-compose up -d`. The two containers will get started and will be properly connected to each other on the network. You can then open your browser at `http://localhost>` and start using Ghost. To create new posts go to `http://localhost/ghost/setup>` create an account and start editing your posts. Once the containers have started you can view the state of your application as simply as with `docker-compose ps`. 

Ghost blog on Docker compose

[bash]
$ docker-compose up -d
Starting mysql
Starting ghost
$ docker-compose ps
Name            Command            State            Ports          
------------------------------------------------------------------
ghost   /entrypoint.sh npm start   Up      0.0.0.0:80->2368/tcp    
mysql   /entrypoint.sh mysqld      Up      0.0.0.0:32770->3306/tcp

Note that if you have used Compose before, in this example we use version ‘2’ of Compose. Hence we do not need links. The two services will take advantage of the embedded DNS server now running on Docker engine 1.10 and will be able to find each other using their service name. Hence if you want to ping ‘ghost’ from the mysql container you can and vice versa: 

[bash]
$ docker exec -ti mysql bash
root@b1e66140ddb3:/# ping ghost
PING ghost (172.18.0.3): 56 data bytes
64 bytes from 172.18.0.3: icmp_seq=0 ttl=64 time=0.074 ms
64 bytes from 172.18.0.3: icmp_seq=1 ttl=64 time=0.222 ms

And voila! Docker Compose is a very handy tool that helps you write a distributed application definition in a single YAML file. It can handle most of the `docker run` options and since the last release also supports Docker networks and volumes. In following posts, we will dive into more advanced setup and use cases using Compose as well as the use of Docker Swarm to distribute your containers across a cluster of Docker hosts.