Home Blog Page 849

Robolinux 8.4 LTS “Raptor” Series Announced, Based on Debian GNU/Linux 8 Jessie

robolinux-8-4-lts-raptor-seriesThe developer of the Robolinux project has announced the release of his latest Robolinux 8.4 LTS “Raptor” series of Debian-based operating systems, which includes numerous software updates and performance improvements.

Usually, the Robolinux developer announces only one edition at a time for a new major release of the GNU/Linux distribution, but today’s announcement includes details about the availability for download of the Robolinux 8.4 LTS Cinnamon, MATE, Xfce, and LXDE editions, as both 64-bit and 32-bit variants.

How To Test Solid State Drive Health with GNOME Disks

Solid State Drives (SSDs) are slowly becoming the norm, with good reason. They are faster, and the latest iterations are more reliable than traditional drives. With no moving parts to wear out, these drives can (effectively) enjoy a longer life than standard platter-based drives.

Figure 1: The GNOME Disks main window.

Even though these drives are not prone to mechanical failure, you will still want to keep tabs on their health. After all, your data depends on the storing drives being sound and running properly. Many SSDs you purchase are shipped with software that can be used to monitor said health. However, most of that software is, as you might expect, Windows-only. Does that mean Linux users must remain in the dark as to their drive health? No. Thanks to a very handy tool called GNOME Disks, you can get a quick glimpse of your drive health and run standard tests on the drive.

With GNOME Disks, you can:

  • Get a quick glimpse of your drive’s health

  • Run standard tests against your drives

  • Format your drives

  • Create a disk image

  • Restore a disk image

  • Benchmark a disk

  • Power off a disk

All from a handy, user-friendly GUI tool.

Let’s install GNOME Disks and use it to test the health of your installed SSDs.

Installation

GNOME Disk is not limited to distributions running GNOME. In fact, I will demonstrate GNOME Disks from my Elementary OS Freya desktop. The installation is quite simple. If you’re using a non-Ubuntu-based distribution, the installation can be achieved by swapping out the package manager used on your system (i.e. dnf or zypper for apt-get).

The installation of GNOME Disks can be done from a single command. Here’s how:

  1. Open up a terminal window

  2. Issue the command sudo apt-get install gnome-disk-utility

  3. Type your sudo password and hit the Enter key

  4. Type y when prompted

  5. Allow the installation to complete

That’s it. GNOME Disks should now be installed. Go through your desktop menu, locate the app, and click to launch.

Using GNOME Disks

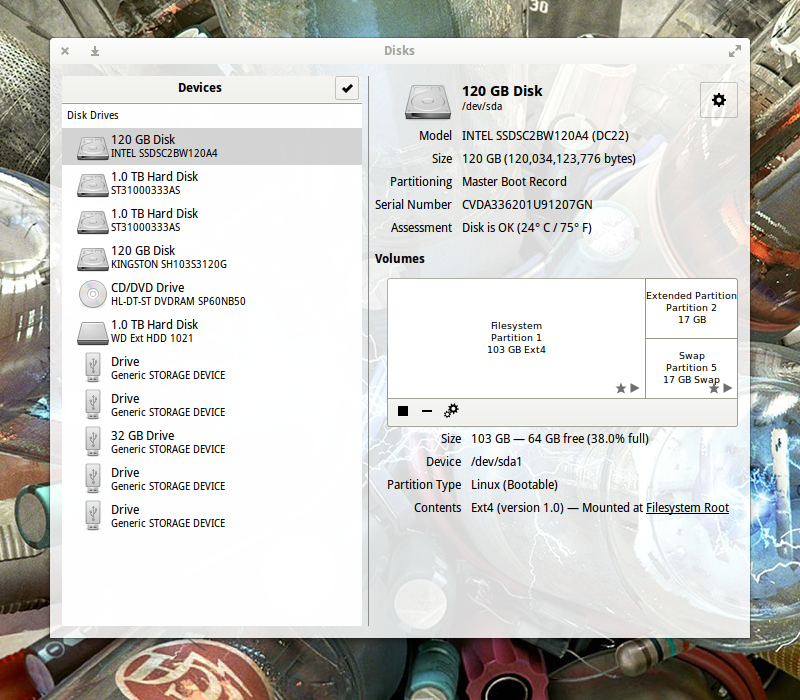
The GNOME Disks main window is laid out quite well (Figure 1 above).

From here you should see all of your attached drives. The SSDs will not be labeled any differently than the standard drives (unless the manufacturer included SSD in the name (as you see with the INTEL 120 GB SSD on my system—labeled SSDSC2BW120A4). Otherwise, it’ll be up to you to know which drives are SSDs and which are Standard.

Figure 2: To run a test, select the SMART Data & Self-Tests… option.

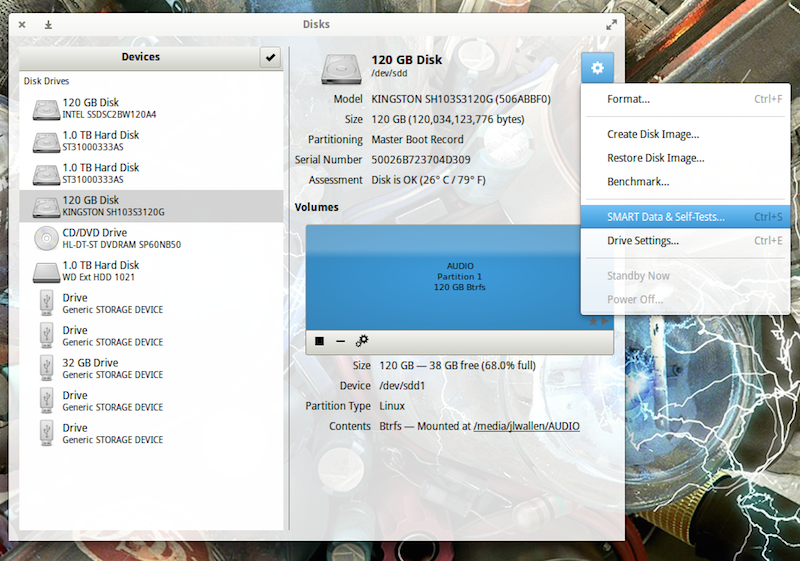
Let’s run a test. To do so, open up GNOME Disks and select the disk you want to test. You should automatically see a quick Assessment of the drive (size, partitioning, Serial number, health, and temp). Click on the gear icon and then, from the drop-down, select SMART Data & Self-Tests… (Figure 2).

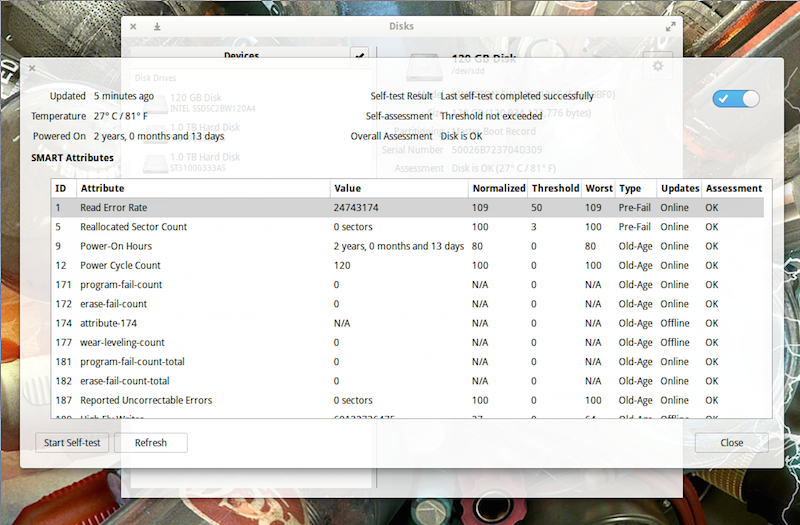
In the new window, you should see the results of the last test run (Figure 3). You should also see that the SMART (Self-Monitoring, Analysis and Reporting Technology) option is enabled (slider in the top right of the window). If SMART isn’t enabled, click the slider to enable.

To run a new test, click the Start Self-test button.

Figure 3: The most recent test results for this particular SSD came up OK.

When you click the Start Self-test button, a drop-down menu will appear, from which you can choose one of three tests:

  • Short—A collection of test routines that have the highest chance of detecting drive problems.

  • Extended—Tests complete disk surface and performs various test routines built into the drive.

  • Conveyance—Identify damage incurred during transporting of drive.

You will be required to enter your sudo password to continue on with the test. Once authenticated, the testing will begin. As the test runs, a progress meter will report the percentage of the test complete (as well as the Start button will change to Stop).

After the Self-Test completes, the new results will populate the window. One thing you will notice is that each SSD will return different test entries. Not all manufacturers follow the same standard. For example, I have two different SSDs installed in my System76 Leopard Extreme. The first (an Intel SSD) was installed by System76. The second, a Kingston SSD, was installed by me. If I run the SMART test on both, I see different tests appear in the results. For example, the Kingston drive doesn’t have Media_Wearout_Indicator enabled (whereas the Intel drive does). I confirmed this by using the smartmontools command:

sudo smartctl -a /dev/sda | grep Media_Wearout_Indicator

The above command reported (for the Intel drive):

233 Media_Wearout_Indicator 0x0032   092   092   000    Old_age   Always       -       0

For the Kingston, the same command returned nothing.

If the smartctl command is missing, you can install smartmontools with the command:

sudo apt-get install smartmontools

You can get a full listing of your drive health with the command:

sudo smartctl -a /dev/sdX

where X is the name of the drive.

However, one of the most important lines you’ll want to look for in the results, is Power-On Hours. This will tell you how many hours your drive has actually been in use. According to GNOME Disks, my Power-On Hours for both disks is shown in Figure 4.

Figure 4: Kingston results are on top, Intel on bottom.

According to smartctl, that breaks down to:

  • Kingston—17868h+55m+21.280s

  • Intel—13833 (194 68 0)

Both of those figures are accurate.

How Many Power-On Hours Should You Expect?

How many Power-On Hours you will get depends on the make and model of your drive. Most modern SSDs should easily last 3-5 years under a heavy server load. Your best bet, however, is to check with your manufacturer. Just five short years ago, SSD manufacturers were reporting lifespans of around 10,000 Power-On Hours.

Clearly, my two drives have already exceeded that. Of course, getting a true estimate is much more complicated than this (you should factor in write-cycles, temperature, etc.) However, modern SSDs are capable of actually outliving the machine’s housing them. If you’re paranoid about data loss (and you should be), it’s good to know that getting a quick glance into the health of your SSDs is nothing more than a user-friendly GUI away.

GNOME Disks happens to be one of the best means of assessing drive health in Linux with a GUI. Give this tool a try and keep tabs on your drive health with ease.

Google Shares Details of Its Software-Defined Load Balancer

The Maglev software-defined load balancer, which runs on commodity Linux servers, has been critical to Google Cloud Platform for eight years, company says. As it’s already done with other areas of its massive datacenter infrastructure, Google this week gave enterprises a peek at Maglev,the software-defined network load balancer the company has been using since 2008 to handle traffic to Google services.Maglev, like most of Google’s networking systems, was built internally. But unlike Jupiter, the custom network fabric connecting Google’s data centers, Maglev runs on commodity Linux servers and does not require any specialized rack deployment, Google said in a blog post describing the technology.

According to Google, Maglev uses an approach known as Equal Cost Multipath (ECMP) to distribute network packets evenly to all Maglev machines in a cluster.

Read more at eWeek

JavaScript Most Popular Language: Stack Overflow Report

According to the latest Stack Overflow developer survey, JavaScript is the most popular programming language and Rust is most loved.

Stack Overflow, the popular question-and-answer community site for developers, today released the results of its annual developer survey, which indicates, among other things, that JavaScript is the most popular programming language among respondents. More than 50,000 developers—56,033 to be exact—in 173 countries around the world responded to the survey.

While the 2016 Stack Overflow survey only reached .4 percent of the estimated 15 million developers worldwide, a large majority of respondents (85.3 percent of full-stack developers) cited JavaScript as the programming language they most commonly use. Meanwhile, 32.2 percent of respondents cited Angular as the most important technology to them and 27.1 cited Node.js—giving JavaScript and JavaScript based technologies three of the top 10 slots among the most popular technologies used by developers. Angular was number five and Node.js came in at number eight.

Read more at eWeek

42 Best Free Linux Email Software

Email is arguably one of the most popular and useful functions of a Linux system. Fortunately, there is a wide selection of free email software available on the Linux platform which is stable, feature laden, and ideal for personal and business environments. Send and receive emails, run a mail server, filter spam, administer a mailing list are just some of the options explored in this article.

To provide an insight into the quality of software that is available, we have compiled a list of 42 high quality Linux email applications, covering a broad spectrum of uses. There’s a mix of desktop and server based applications included. Hopefully, there will be something of interest for all types of users.

<A HREF=”http://www.linuxlinks.com/article/20160318025009703/EmailApps.html“>Full article</A>

Check if a machine runs on 64 bit or 32 bit Processor/Linux OS?

Q. How can I check if my server is running on a 64 bit processor and running 64 bit OS or 32 bit operating system?

Before answering above question we have to understand below points.

We can run a 32-bit Operating system on a 64 bit processor/system.
We can run a 64-bit operating system on a 64 bit processor/system.
We cannot run a 64-bit operating system on a 32-bit processor/system.
We can run a 32-bit operating system on a 32-bit processor/system.

Once we are clear about the above 4 points then we can see if our machine have a 64 bit processor or not.

How to check if my CPU is a 64-bit supported processor or not?

There are two commands to check if it’s a 64 bit processor or not

Option 1 : use lscpu command to check if it supports multiple CPU operation modes(either 16, 32 or 64 bit mode).

as a normal/root user execute below command

lscpu | grep op-mode

Sample output on a 64-bit processor

This e-mail address is being protected from spambots. You need JavaScript enabled to view it
 :~$ lscpu | grep op-mode
CPU op-mode(s): 32-bit, 64-bit

Sample output on a 32-bit processor

[surendra@www ~]$ lscpu | grep op-modeCPU op-mode(s): 32-bit

If you observe the first output will say that your CPU supports both 32-bit as well as 64 bit operating systems. This indicates that it’s 64-bit processor from our above 4 rules. But in the second machine it say’s only 32-bit CPU mode which indicates its a 32 bit processor.

Option 2: Use proc file system file CPU info to get the processor type.

grep -w lm /proc/cpuinfo

Sample output on a 64-bit processor when searching for lm(long mode) bit is set or not

grep -w lm /proc/cpuinfoflags : tm pbe syscall nx rdtscp lm constant_tsc arch_perfmon pebs bts rep_good nopl xtopology nonstop_tsc aperfmperf pni pclmulqdq dtes64 monitor ds_cpl vmx est tm2 ssse3 cx16 xtpr

Sample output on a 32-bit processor when search for lm(long mode) bit.

grep -w lm /proc/cpuinfo

[surendra@www ~]$ grep lm /proc/cpuinfo

If you don’t get any output that indicates its not a 64 bit processor.

How to check if my Operating system is a 64-bit or 32-bit?

Before knowing about this you should know about i386, i486 etc naming convention.

What is difference between i386, i486, i586, and i686 OS?

Read Full post:   http://www.linuxnix.com/find-determine-if-a-machine-runs-64-bit-linux-os-or-not/


Manjaro LXQt 16.03 – Video Overview and Screenshot tours

Manjaro LXQt 16.03 has been released and announced by the developers of the Manjaro community. this release shipped with the latest build of the next-generation LXQt desktop environment (LXQt 0.10) and powered by the long-term supported Linux kernel 4.4.x. Manjaro LXQt 16.03 uses the same build of the Manjaro Linux which is already in use in the Manjaro Linux Cinnamon 16.02 and the Manjaro Linux Deepin 16.03.

More Details : Manjaro LXQt 16.03 – Video Overview and Screenshot tours

How to install TYPO3 7 with Nginx and MariaDB on Debian 8 (Jessie)

This tutorial shows how to install and configure a TYPO3 (version 7) web site on a Debian 8 (Jessie) server that has Nginx installed as web server and MariaDB as the database server. Typo3 is an enterprise class CMS system written in PHP which has a large user and developer community.

Read more at HowtoForge

Node.js Buffer API Changes

By James M Snell.  I recently landed Node.js Pull Request https://github.com/nodejs/node/pull/4682 into the master branch. It’s important to understand what it does and what changes are in store for the upcoming Node.js v6 release.

The Node.js Buffer API is one of the most extensively used APIs in Node. There is, however, a challenge. About three months ago, a discussion started around ambiguities and usability issues that exist when using the “Buffer()” method to create new Buffer instances. Take the following example, for instance:

const jsonString = getJsonStringSomehow();
const myBuffer = Buffer(JSON.parse(jsonString));

Many developers may or may not be familiar with the fact that it is possible to generate a JSON representation of a Buffer instance, pass that around, and create a new Buffer from that JSON string. For instance, given the following Buffer instance:

Buffer([1,2,3])

The JSON representation is:

{“type”:”Buffer”,”data”:[1,2,3]}

The example code above essentially takes that JSON string, parses it, and passes it off to the Buffer constructor to create the new Buffer. Easy. But there’s a problem. What happens if the jsonString happens to simply be a number instead of the actual JSON representation of the Buffer?

const jsonString = '100';
const myBuffer = Buffer(JSON.parse(jsonString));

What many developers do not realize is the fact that passing this jsonString to JSON.parse(jsonString) will successfully parse the input as a JSON Number. Passing this number into the Buffer constructor will cause the Buffer to be created by allocating new, uninitialized memory. This uninitialized memory can contain potentially sensitive data that can end up being leaked if not handled appropriately.

While the behavior of the Buffer constructor has been well documented for quite some time, the fact that the Buffer constructor implements significantly different behavior based on what kinds of values are passed into it represents a fundamental API usability issue that if not understood can lead a developer to inadvertently introduce significant bugs and vulnerabilities into their applications. To fix this https://github.com/nodejs/node/pull/4682 introduces a number of new constructor methods used to create Buffer instances. The existing Buffer() constructor will continue to work, but starting with the upcoming release of Node.js v6, it is recommended that all developers begin migrating their code to use the new constructors.

// Allocate *initialized* memory. It will be zero-filled by default.
// The optional fill and encoding parameters can be used to specify
// an alternate fill value.
Buffer.alloc(size[, fill[, encoding[[)
// Allocate *uninitialized* memory
Buffer.allocUnsafe(size)
// Create a Buffer from a String, Array, Buffer, or ArrayBuffer
Buffer.from(str[, encoding])
Buffer.from(array)
Buffer.from(buffer)
Buffer.from(arrayBuffer[, offset[, length[[)

The new Buffer.allocUnsafe(size) method is the direct replacement for the existing Buffer(size) constructor where size is the number of bytes to allocate for the newly created Buffer. It is important to understand that the memory allocated by this method is uninitialized and must be overwritten completely in order to avoid accidentally leaking data when the Buffer is read out.

The new Buffer.alloc(size[, fill[, encoding[[) method, on the other hand always allocates Buffer instances with initialized memory. If the fill parameter is left undefined, the instance will be zero-filled. If the fill parameter is provided, the new Buffer is filled automatically. This is generally the equivalent to the existing Buffer(size).fill(val) pattern.

The various Buffer.from() methods are the direct replacement to the equivalent Buffer(str[, encoding]), Buffer(array), Buffer(buffer), and Buffer(arrayBuffer) constructors. The key difference with Buffer.from() is that an error will be thrown in the first argument passed is a Number.

Another significant addition coming in v6 is the introduction of the zero-fill-buffers command-line flag. Setting this flag when launching Node will force all Buffers created using Buffer.allocUnsafe(), Buffer(size), and SlowBuffer(size) to be zero-filled by default, overriding the existing default behavior.

$ node
> Buffer.allocUnsafe(10)
<Buffer 50 04 80 02 01 00 00 00 0a 00>
$ node --zero-fill-buffers
> Buffer.allocUnsafe(10)
<Buffer 00 00 00 00 00 00 00 00 00 00>

Using this new command line flag, developers can continue to safely use older modules that have not yet been updated to use the new constructor APIs and that may not be currently properly validating the input to the Buffer() constructor.

With these changes, you may be wondering what is going to happen to the existing Buffer() constructor. The answer is simple: nothing much. This pull request adds a note to the documentation that the existing Buffer() constructors have been deprecated however the constructor will continue to operate without any changes. In Node.js core terms we call this a “soft deprecation” or “docs only deprecation”. Existing code that uses the Buffer() constructor will continue to operate as it has before.

It must be noted, however, that an additional change is being considered for the Buffer(size) constructor. Currently (and historically), Buffer(size) has always allocated uninitialized memory. The additional change being considered is to switch that so that Buffer(size) will allocate initialized memory by default. If this change is made, it will have to be backported to all Node.js release streams (v5, v4, v0.12 and v0.10). The decision to make this change is still being discussed. For now, however, Buffer(size) continues to operate as it always has.

snellJames M Snell is IBM Technical Lead for Node.js

This article originally posted on Medium.

ProtonMail’s Encrypted Email Service Exits Beta, Adds iOS, Android Apps

protonmail-55-pmAs Apple continues to battle the US Government’s desire to work around the security of its mobile operating system, European encrypted email startup,ProtonMail, is choosing the latest skirmish in the crypto wars to launch its end-to-end encrypted email service out of beta — switching from invite-only to public sign ups today.

It’s also launching its first native iOS and Android apps. Previously the free encrypted email client has been accessible via a web interface. The company has open sourced its web interface to bolster trust in its end-to-end encryption. The new mobile apps will also be open source in time.

Read more at TechCrunch