
Managing storage devices — whether they are internal hard drives, SSDs, PCIe SSDs, or external USB devices — is always a tricky task. With a tiny mistake, you may lose data or wrongly format your drive in a way that can lead to data corruption. In this article, I will talk about some of the basics of storage devices on Linux. The article is aimed at beginners and new users of Linux.
There are many graphics tools to manage your hard drive. If you happen to use Gnome, then the Disks tool is quite useful. However, every once in a while I come across issues where it throws errors and fails to format a drive. I prefer to use the command line, as it’s much easier and fail safe.
How to find what is connected or plugged to your system
Using ‘lsblk’ is the simplest and easiest way to find all block devices connected to your system. As you can see, the lsblk command is showing me my SSD ‘sda’ where Linux Mint 18.1 is installed, ‘sdb’ is a USB Flash Drive, and ‘sdc’ is 1TB internal hard drive.
Understanding the lsblk output
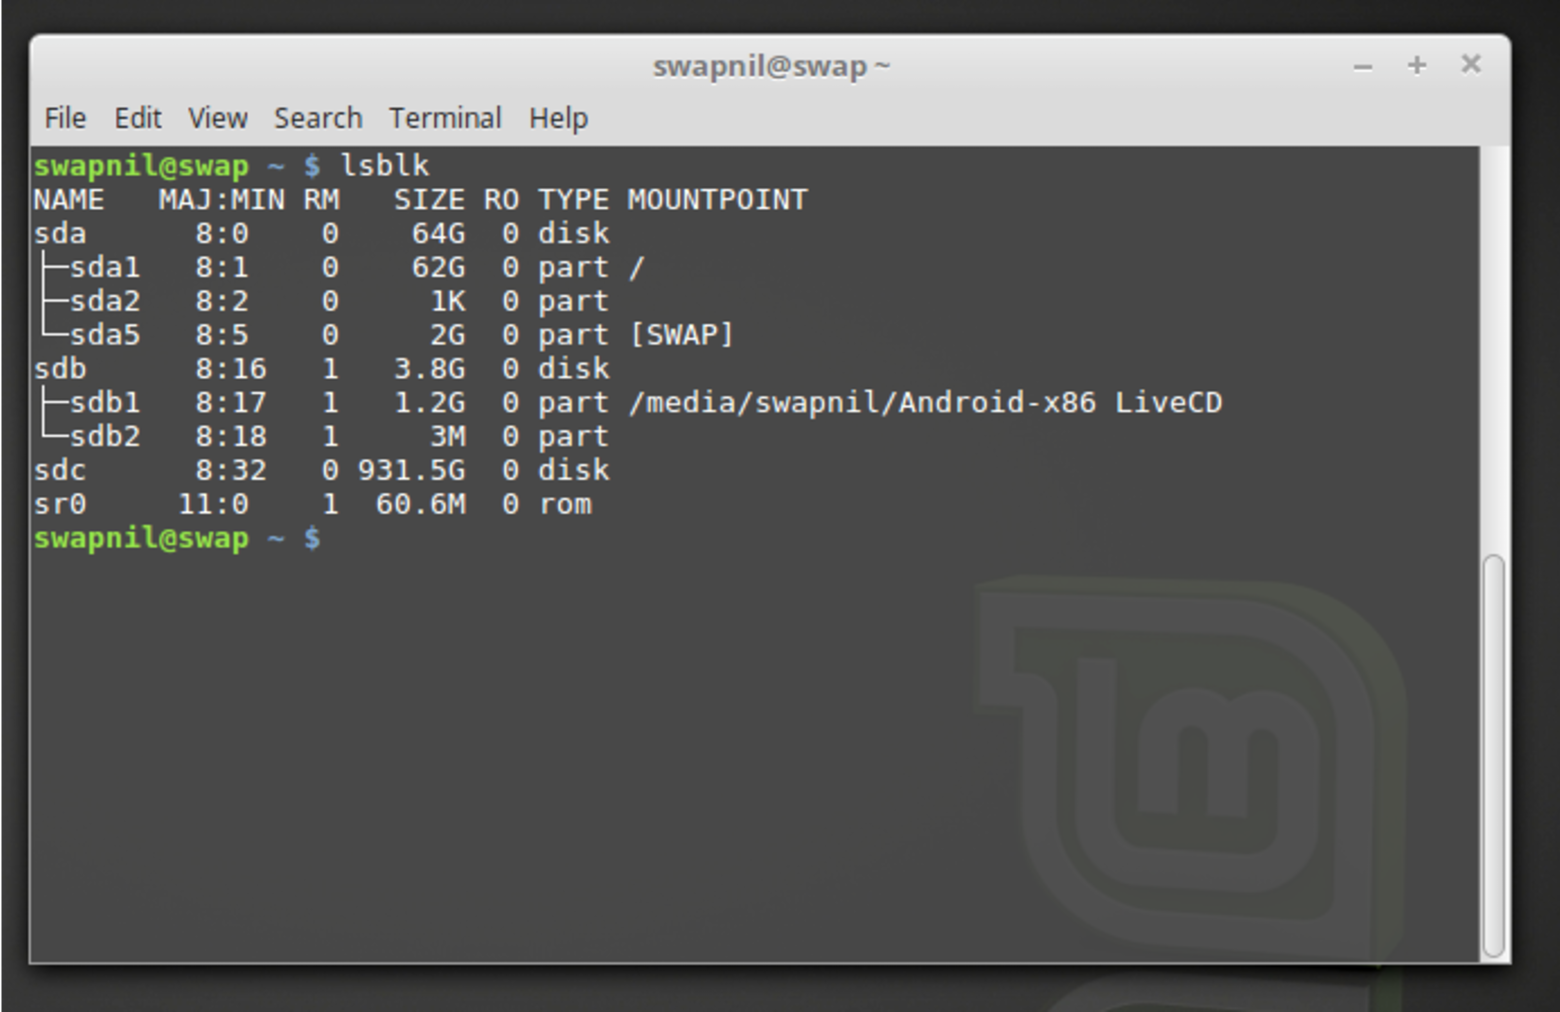
In the figure above, the NAME column gives out the name of the device (it’s not consistent and can change based on which device was mounted first). ‘sda’, ‘sdb’, ‘sdc’ etc. are the block device names and ‘sda1’, ‘sda2’… denote the partitions on each device. MAJ:MIN denotes the major and minor device number. RM tells whether the device is removable, and in this example, you can see that the USB drive ‘sdb’ is a removable device.
Obviously, the SIZE column tells about usable storage space on the device. RO tells whether the device is read only, such as a DVD drive or write protected Flash drive. TYPE tells whether it’s a disk or partition, and you can see that block device name with numbers ‘sda1, sda2…’ are marked as partitions. The last column tells about the mount point.
The lsblk command is capable of giving out more information about storage devices, but we are keeping our focus on formatting a device.
Format a drive completely with a brand new partition table
There is no dearth of quality tools in the Linux world, and we tend to use the ones we like. In this tutorial, I am using ‘parted’ as it’s easy to use and can handle both MBR and GPT partitioning tables, but feel free to use your favorite partitioning tool. I will be formatting a 3.8GB USB flash drive. The procedure can be used on any storage device, external or internal.
sudo parted /dev/sdb
Doublecheck to make sure to add the block device you want to format; otherwise, parted will run on ‘sda’ or the drive where your OS is installed and you may end up with a broken system. The tool is extremely powerful and choosing the wrong device may lead to valuable data loss, so please use caution while formatting your drives.
After entering the password, you will notice (parted) added, which means you are now inside the parted utility.
Now we have to create a new partition table. There is good old MBR (master boot record) and newer GPT (guid partition table). Comparison between the two is beyond the scope of this story. In this example, we will use MBR.
(parted) mklabel msdos
Here ‘mklabel’ creates the partition table and ‘msdos’ will use MBR. Now we can create partitions. This is the basic format of the command:
(parted) mkpart ‘type of partition’ ‘file system’ start end
If I want to use all the space and create one big partition I will run this command:
(parted) mkpart primary ext4 1MiB 100%
Here 100% means it will use all the available space. But if I want to create more than one partition, I will run this command:
(parted) mkpart primary ext4 1MiB 2GB
Here it will create a partition with 2GB storage. Next, we’ll create another partition, but because we already have one partition, the end point of previous partition is now the starting point of the next partition.
(parted) mkpart primary ext4 2GB 5GB
This command will create a second partition of 3GB. If you want to create one more partition for the remaining space, you know the end point and the start point:
(parted) mkpart primary ext4 5GB 100%
You can replace ‘ext4’ with desired file type: ntfs, vfat, btrfs…
To see how the partitioning has worked, run the print command:
(parted) print
It will display the partitions you created. If everything looks as expected, you can exit the partitioning tool by typing ‘quit’:
(parted) quit
Running the lsblk command will show the newly created partitions. We need to now format these partitions before we mount and use them. In my machine, there are now three partitions on sdb: sdb1, sdb2, sdb3. We will format each with ext4.
sudo mkfs.ext4 /dev/sdb1
Repeat the same step for each drive — just change the block device name and number.
Now, your drives are formatted. If it’s an external drive like a USB drive, just unplug and plug it to mount it.
Learn more about Linux through the free “Introduction to Linux” course from The Linux Foundation and edX.


