Podcasting is hot. You can find a podcast covering nearly any topic. If you’re looking to join in on that medium, and your platform of choice is Linux ─ you’re in luck. Audacity is a free, open source, cross-platform recording and editing tool that is perfectly suited for podcasting (or recording/editing music, lectures, and other bits of audio).
One of the best things about Audacity is its incredibly shallow learning curve. This isn’t ProTools or Ardour (which are both perfectly suited as full-blown digital audio recording studio software), so you’re not going to be bogged down with a learning curve best suited for engineers. Audacity is so simple, anyone can jump in and start recording almost immediately.
But that ease of entry doesn’t guarantee you’ll get the most out of the tool. There are plenty of tips and tricks to help you ramp up your experience so it’s more efficient, effective and, in the end, you’ll wind up with better sounding audio.
Let’s dive in.
Default sample rate
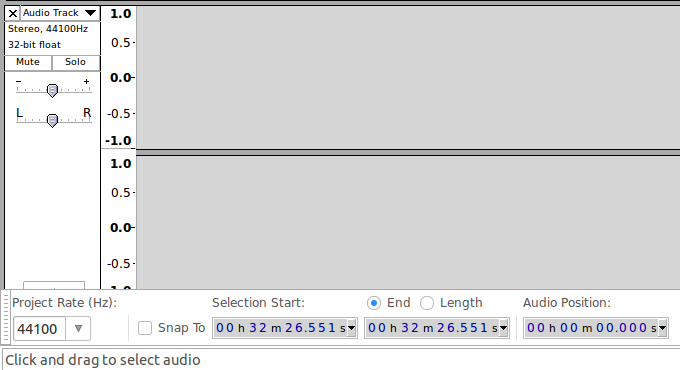
Before you do any recording, you need to make sure your project is set to a sample rate that encompasses the entire range of human hearing (up to 22050 Hertz). The ideal for this (that will also create files that aren’t overly large) is 44100 Hz. This also happens to be the same bitrate used on CD quality recordings. You can set this on a per-project basis by clicking the Project Rate drop-down in the lower left corner of the Audacity window (Figure 1).
If you want to make 44100 the default rate for all projects, you can do so in Edit > Preferences > Quality > Default Sample Rate (Figure 2).
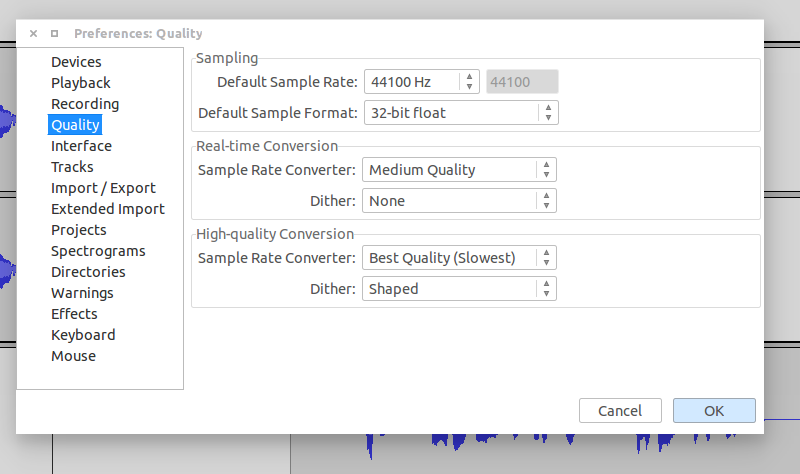
You should also select 32-bit float from the Format drop-down.
MP3 Export Options
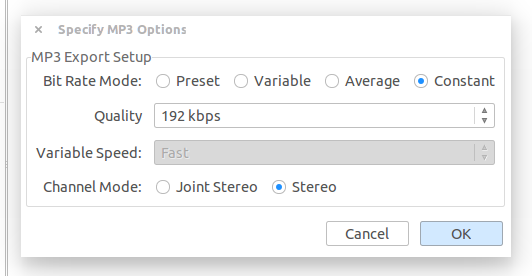
This one slips by many users at first. By default, Audacity chooses a lower quality format for exporting (to save file size). For many instances (such as Audible.com files), you cannot use anything below 192 kbps. In fact, 192 kbps (kilobit per second) is ideal for higher quality exports. You also want to export your files in Stereo mode (as opposed to Joint Stereo) ─ to keep the stereo tracks separate.
Finding these options isn’t exactly intuitive ─ you’ll not find the options anywhere in Preferences. Instead, when you go to export your file, you’ll see an Options button. Click that and then set the values as shown in Figure 3.
Once you’ve set those options, they will be the defaults for every project.
Noise
This is one of the first things you need to focus on. As you record, plenty of sounds will find their way into your project. Pops, clicks, breaths ─ the bane of every podcaster’s existence. I have found a very easy way to rid projects of these sounds. There is one caveat to this ─ you must do so with an eye on keeping your project natural. Not all breath sounds should be removed. I tend to only remove breaths that sound out of place or are a bit heavy. With that said, how is this done?
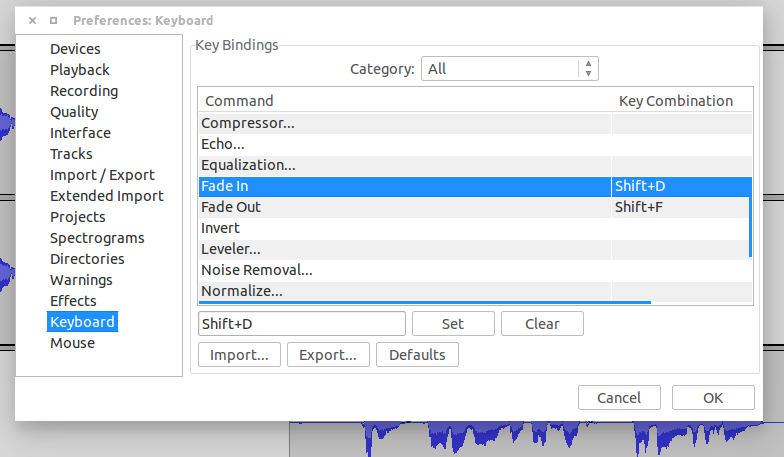
You could go through and highlight the sound or breath and simply delete it. This can sometimes lead to unnatural dropoffs in sound. To that end, I have developed a trick. Audacity has a number of really great filters ─ among them are Fade In and Fade Out. I attach keyboard shortcuts to these two filters so I can quickly highlight a section of noise to be removed and hit the keyboard shortcuts for these two filters and voila!, noise is gone.
To create the keyboard shortcuts, follow these steps:
-
Click Edit > Preferences
-
Go to Keyboard
-
Locate the Fade In entry
-
Click on the text area to the left of the Set button (Figure 4)
-
Hold down the keyboard shortcut you want to use
-
Click Set
-
Repeat these steps for the Fade Out command (using a different shortcut).
All you have to do now is highlight the section and click the shortcut for Fade In and then the shortcut for Fade out and your noise is gone ─ without the unwanted sound drop off.
Normalize and bass boost
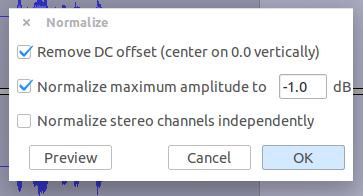
This is one trick I use with every recording. When you have a recording that takes multiple days to finish, there will be days that are louder than others. Or, if you piece together a project from multiple sources, the source files won’t all be at the same level. Those projects need to be normalized. Normalizing sets the peak amplitude for each track ─ so that one track isn’t louder than another ─ as well as balances the difference between stereo tracks. I don’t usually normalize until I’ve exported to MP3. Once the MP3 is exported, I open that file back up in Audacity, do a select all (Ctrl+A) and then click Effect > Normalize. I tend to use -1.0 decibel (dB) on the amplitude (Figure 5) and enable Remove DC offset.
Finally … all our bass are belong to Audacity! After a project is normalized, I also go back and boost the bass. This gives the sound a much richer quality. The mileage you get from this will, of course, depend upon your source. If you’ve just recorded a James Earl Jonesian voice, adding bass might cause the sound to distort. So use this feature with a nod to the source.
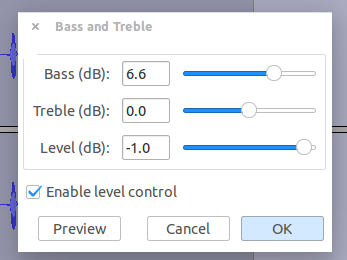
To add bass to a track, you use the Bass and Treble filter. Select the entire track and then click Effect > Bass and Treble. When the popup opens (Figure 6), adjust the bass to taste (press Preview to hear how it sounds).
Remember, don’t go overboard with the bass ─ you could muddy up the quality of your recording. A little goes a long way in this instance.
At this point, you should have much better quality with your Audacity end results. There are quite a lot of other ways to boost your efficiency and quality with this amazing recording tool, but these will get you started on the journey.


