Creating appropriate menus for your app is vital to creating a good user experience. In the last tutorial, we looked at creating the options menu with XML and also at adding items programmatically. In this tutorial, we’ll look at contextual menus — menus which relate to a particular part of the view.
As of Android 3.0, there are two types of contextual menu: old-style floating menus, which float on the screen, anchored to the element clicked on; and contextual action mode (Android 3.0 and up), in which a contextual action bar (CAB) appears at the top of the screen. The CAB is now the preferred way of providing a contextual menu, but if your code is compatible with Android 2.3 or earlier, you should also provide a floating version to fall back to. We’ll cover both options and also look at how to include both in your code.
We’ll use the same basic GridView code as in the last tutorial, and our contextual menu entry will use the Intent code from the GridView tutorial, which fires a URL associated with the image clicked on.
Floating Menus
We’ll start with the floating contextual menu, which you’ll use for devices running a version older than API 11. First, let’s create our XML menu, res/menu/grid_element_menu.xml:
<?xml version="1.0" encoding="utf-8"?>
<menu xmlns:android="http://schemas.android.com/apk/res/android" >
    <item
         android:id="@+id/showUrl"
         android:title="@string/showUrl_title"/>
</menu>
Next, we handle it in the GridViewTestActivity code. We need to add a call to register the grid items for the context menu, and implement onCreateContextMenu():
protected void onCreate(Bundle savedInstanceState) {
 // as before
 gridview.setAdapter(gridadapter);
 registerForContextMenu(gridview);
 // rest as before
}
public void onCreateContextMenu(ContextMenu menu, View v,
                                ContextMenuInfo menuInfo) {
  super.onCreateContextMenu(menu, v, menuInfo);
  MenuInflater inflater = getMenuInflater();
  inflater.inflate(R.menu.grid_element_menu, menu);
}
registerForContextMenu() associates the provided View (gridview) with a context menu. If the View is GridView or ListView, doing this registers all its items for the same context menu. For other Views, you would need to register each View for its own individual context menu. onCreateContextMenu() works exactly the same way as the last tutorial’s onCreateOptionsMenu(), inflating the menu from XML.
Finally, in order to do the right thing when the user clicks on a menu item, we need to implement onContextItemSelected():
public boolean onContextItemSelected(MenuItem item) {
  AdapterContextMenuInfo info = (AdapterContextMenuInfo) item.getMenuInfo();
  switch (item.getItemId()) {
    case R.id.showUrl:
      Intent i = new Intent(Intent.ACTION_VIEW);
      i.setData(Uri.parse(gridadapter.getItem(info.position).
                          getImageUrlString()));
      startActivity(i);
      return true;
    default:
      return super.onContextItemSelected(item);
  }
}
Here we only have one menu item so far, but we allow for adding more by using a switch statement. This also allows for handing menu items up to a superclass.
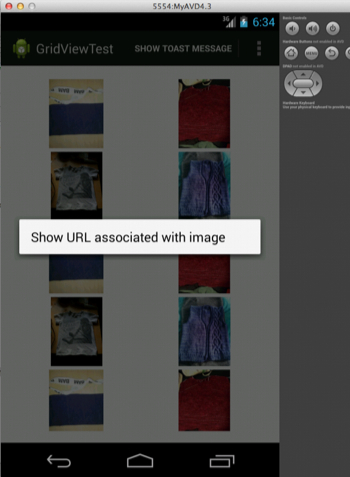
Compile and run, and you’ll see your floating menu when you long-click on an item.

Contextual Action Menu
Moving on from the floating contextual menu to the now-preferred contextual action bar (CAB). There are two ways to create a CAB. If you want to attach the CAB to a specific single view, you can use ActionMode.Callback. (This is discussed in detail in the Android menus docs.) However, this doesn’t work so well with a ListView or GridView. For those, you’re better off implementing a MultiChoiceModeListener. This allows the user to pick multiple items and then apply a single option to them. Here however we’re only applying our sample choice to a single item, to demonstrate the interface. When creating your app, consider carefully which menus to use under which circumstances to create the best user experience.
The MultiChoiceModeListener looks like this (in GridViewTestActivity):
private MultiChoiceModeListener modeListener = new MultiChoiceModeListener() {

  int itemSelectedPosition;
  public boolean onCreateActionMode(ActionMode mode, Menu menu) {
    MenuInflater inflater = mode.getMenuInflater();
    inflater.inflate(R.menu.grid_element_menu, menu);
    return true;
  }

  public void onItemCheckedStateChanged(ActionMode mode, int position,
                                        long id, boolean checked) {
    itemSelectedPosition = position;
  }
  public boolean onPrepareActionMode(ActionMode mode, Menu menu) {
 	// Used for updates to CAB after invalidate() request
    return false;
  }
  public boolean onActionItemClicked(ActionMode mode, MenuItem item) {
    switch (item.getItemId()) {
      case R.id.showUrl:
        Intent i = new Intent(Intent.ACTION_VIEW);
        i.setData(Uri.parse(gridadapter.getItem(itemSelectedPosition).
                            getImageUrlString()));
       	startActivity(i);
       	mode.finish();
        return true;
      default:
        return false;
    }
  }
  public void onDestroyActionMode(ActionMode mode) {
    // do nothing
  }

};
If you compare this code to the floating contextual menu or to the options menu, you’ll see a lot of similarities. We inflate the menu when it’s first created, and onActionItemClicked() once again has the switch code we’ve seen before. This time though we need to get the position of the selected item from another method, onItemCheckedStateChanged(). Note that as we only have a single int to store the item position in, every time an item is selected or unselected, this int will be overwritten. This means that we only ever send a single URL (of the item most recently clicked) with the Intent. If we wanted to be able to act on multiple items (eg to delete them, or to share them all), we would need to keep track of all the items selected.
Having created the MultiChoiceModeListener, it just takes two lines to set it up in GridViewTestActivity:
protected void onCreate(Bundle savedInstanceState) {
  // as before
  gridview.setChoiceMode(GridView.CHOICE_MODE_MULTIPLE_MODAL);
  gridview.setMultiChoiceModeListener(modeListener);
}
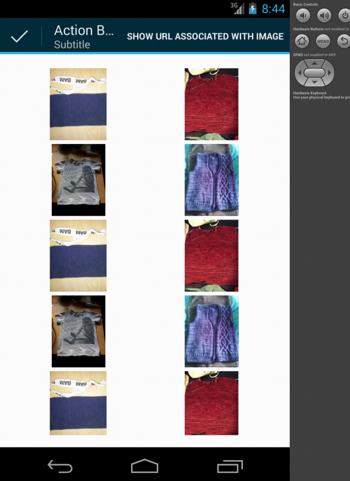
Compile and run, and a long-click will produce the CAB.
You can also use the ActionMode to make changes in the contextual action bar. For example, you can set a custom title or subtitle:
public boolean onCreateActionMode(ActionMode mode, Menu menu) {
  // as before
  mode.setTitle("Action Bar!");
  mode.setSubtitle("Subtitle");
  return true;
}
This screenshot shows where they’ll appear. See the ActionMode docs for other options.

Another improvement in the code would be to change the background color of any selected items, or to set up a checkbox, to show which item(s) have been selected.
Handling Fallback
If you code both the floating menu and the CAB, and run it on an Android device running API 11 or higher, the floating menu will be ignored in favour of the CAB, which is now the preferred option for contextual menus. To make your code run using the floating menu, on earlier API versions as well, you can code an API check:
protected void onCreate(Bundle savedInstanceState) {
  // as before
  // next line replaces setChoiceMode() and setMultiChoice..() lines
  setUpContextualActionBar();
}
private void setUpContextualActionBar() {
  if (Build.VERSION.SDK_INT >= Build.VERSION_CODES.HONEYCOMB) {
    gridview.setChoiceMode(GridView.CHOICE_MODE_MULTIPLE_MODAL);
    gridview.setMultiChoiceModeListener(new MultiChoiceModeListener() {
      // code to set up MultiChoiceModeListener as before
  });
  }
}
You’ll also need to add a note at the start of the class, to suppress API compatibility warnings and allow the code to compile:
@SuppressLint("NewApi") public class GridViewTestActivity extends Activity
You should only do this if you are very certain that you’ve wrapped all of your new API code in appropriate if clauses or otherwise protected it. For more on supporting multiple platforms and APIs, see the Android docs.
For more in this series see:


