
The OpenShot video editor gets my pick for best combination of features and ease of use. It may be the only video editor you’ll ever need. Use it to combine video footage, audio tracks, and still images. You can have captions, animated titles, overdubs, “Ken Burns” effects, and capture directly from a tethered camcorder. Then you can export your video to your desired format for YouTube, high definition, television broadcast, Blu-ray, and even the new WebM streaming format.
To follow this tutorial you’ll need some video files from any kind of camcorder to play with, some audio files, and some still images.

Gah Linux Audio
The biggest hassle I’ve experienced with OpenShot is due to the crazed state of Linux audio. I have three audio devices: a USB headset, onboard sound with front and rear ports, and a MobilePre USB audio interface. I use a number of KDE4 applications in my Xfce desktop and these drag in a megaton of dependencies including Phonon, the KDE audio manager. Phonon has a nasty habit of changing my settings and disabling devices at random. Phonon cannot be turned off, and if you try to remove Phonon it takes all KDE4 applications and libraries, plus LibreOffice with it. Which is a rather petulant, scorched-earth reaction to being deleted. As Ernest Tubbs sang, “Thanks. Thanks a lot.”
But I did find a way to disable Phonon by installing the phonon-backend-null package. This is a wonderful Debian package that replaces the default VLC and Gstreamer backends with a bitbucket, thereby rendering it ineffective. Xfce has good PulseAudio integration, and PulseAudio does a nice job of audio routing. OpenShot does not have a soundcard chooser, so it only looks for your default sound card. PulseAudio lets you route it to something else, like a headset, which might be a nice courtesy when you’re editing and playing the same audio clips over and over.

Make a Movie!
With that out of the way, let’s make a movie! OpenShot relies on FFmpeg for reading and manipulating multimedia files, which is a wise choice because FFmpeg handles pretty much anything you throw at it. My little camcorder emits MOD files. MOD is a ridiculous fake file format used in some Canon, Panasonic, and JVC camcorders, and it is nothing more than MPEG2 with a different file extension, which you can see in most any graphical Linux file manager. If you ever have any MOD video files that your computer doesn’t know how to handle (Linux is not fooled, but certain other popular operating systems weep and give up), then simply rename them from .mod to .mpg. Seriously. That’s all it takes.
Fire up OpenShot and create a project with File > New Project. Always archive your project files, because these let you go back and easily edit your projects. Next, import some video. You can do this from the File menu, or click the green cross in the toolbar. Now drag your imported file to a track and click the green Play button in the Preview window (figure 2.) The Preview pane plays all of your tracks at once. You can preview any individual file by right-clicking on it in the Project Files pane.
 Take a look at the Track menu (figure 3), because while it looks rather spare, there is a bundle of useful functionality.
First note the eyeball and audio icons under Track 2, and on the video track itself. These turn the video and audio on and off. You can do these globally, for the whole track, or per each individual clip in a track. I often mute the audio because what comes out of the camera is poor quality and full of noise. Then I can add a separate audio track that is all nice and clean and pleasant to hear. Narrations and music are easy, because they don’t have to be synchronized precisely. Overdubbing dialog is more finicky. A good way to handle this is to mic your actors separately, perhaps with a Lavalier or a boom mic, rather than relying on the camera microphone. Then it’s fairly easy to synchronize the audio with the video by dragging the tracks with your cursor, or using right-click > Shift. Shift is a great way to position your clips precisely; use an unsigned number like 10.5 to move a clip 10.5 seconds closer to the end, and -10.5 to move it closer to the beginning.
 Now let’s mute the audio in the video file, and add a nice separate audio track by importing the audio and dragging it to the other track (figure 4).
Hit the Play button in the Preview window, and you’ll hear your new audio track accompanying the video. Right-click on either your video or audio clip to apply effects such as fades, zooms, duration, volume level, and frame layout (figure 5). The Properties menu gives you the most control.
 Want to clip a clip? Click on the scissors icon to activate the razor tool. (Yes, that does seem a little confused.) Click at the point that you want to remove. This creates a dotted line, dividing your clip into two clips. Then right-click > Remove Clip to delete the part you don’t want.
Ken Burns Effect
Now let’s throw in some still images. Again, use the right-click menu to control duration and apply any effects that you want. You can even apply a Ken Burns-type effect to still images, which is artistic zooming and panning. It’s not very refined in OpenShot, but it’s easy and nice enough. Right-click on your still image and go to Properties > Layout. The Height and Width properties adjust the size, X axis controls horizontal movement, Y axis controls vertical movement, and the Alpha channel controls fade-out. The Key Frame dropdown at the top just means beginning and ending settings, from the first frame to the last frame. So do this to emulate a slow upward pan and zoom:
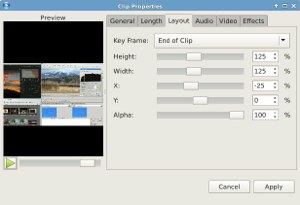
For the Start of Clip:
Height     75%
Width      75%
X           10
Y           -25
Alpha       100
For the End of Clip:
Height     125%
Width      125%
X           10
Y           25
Alpha       100
 You can preview this right in the Layout tab. The speed of the zooms is proportional to the length of the clip.
Exporting
When you’re satisfied with your masterpiece, use File > Export to export to your chosen format and quality level (figure 7).
This is just a bare introduction to the wonderful OpenShot, and you can do many sophisticated operations with it. Visit the excellent manual to learn more, though I expect you’ll learn plenty by simply using it.


