Does anyone do any serious disconnected computing? I daresay not. We install and update our Linuxes over the Internet, and install new software, and look up information online. Networking is essential to a Linux system, and has always been integral even as our favorite glossy proprietary operating systems couldn’t network their ways out of paper bags. I like to think of IPC– inter-process communication– as a form of internal networking between processes, though wiser network gurus may disagree.
Networking in Linux is easier than it used to be in the olden days. Why, I haven’t customized a kernel in dog’s years, which was something we had to do a fair bit back in the days of walking uphill both ways in the snow. But it’s not quite pure magic yet and we still need to know a few things. Let’s start with routing between subnets. Dividing even a small network into subnets is a useful management tool for security, and for allocating resources such as file and printer shares and Internet access. You can isolate your subnets from each other, or allow them to talk to each other.
The easiest way to enable routing between subnets is to connect all subnets to a single router, using a physical network interface for each subnet. The simplest example of this is a broadband router (cable, DSL, what-have-you) that provides both wired Ethernet and a wireless access point, like the popular Linksys WRT54GL. The WRT54GL includes an integrated 4-port Ethernet switch, and because it is powered by DD-WRT it supplies a full range of network services: name services, VPN, SSH, firewall, routing, hotspot, and online gaming services.
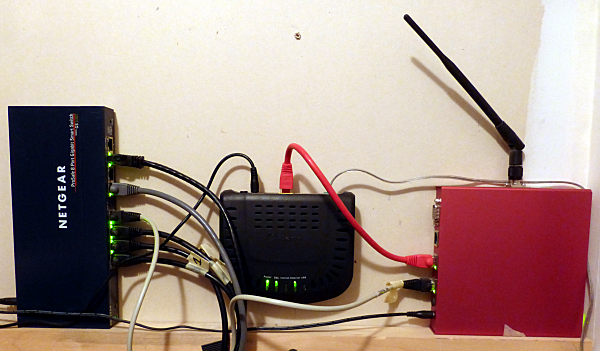
Figure 1 shows a slightly more complex setup: Netgear gigabit smart switch, DSL modem, and homegrown Debian Linux-powered router and wireless access point on a PC Engines ALIX board inside a festive red case. The ALIX serves as firewall, Internet gateway, and name server.
The connectivity goes like this:
Big bad Internets > DSL modem > PC Engines ALIX firewall/router > switch > wired nodes
                                          Wireless access point>  wireless nodes
Debian on the ALIX is configured to act as a router by forwarding IPv4 packets with this rule in /etc/sysctl.conf:
net.ipv4.ip_forward = 1

The ALIX board has three wired Ethernet interfaces, so adding a third subnet means adding one more switch. Plus configuring the interface, adding the new subnet to the DHCP/DNS server, adding some forwarding rules for sharing the Internet connection, and configuring clients. Dnsmasq is a great DNS/DHCP LAN server, and you can learn all about it at Dnsmasq For Easy LAN Name Services.
If you don’t need shared Internet access you can stop right here, because your router will forward all traffic between your subnets without any further configuration. You can add subnets until your floor collapses under the weight and Linux will keep right on forwarding packets.
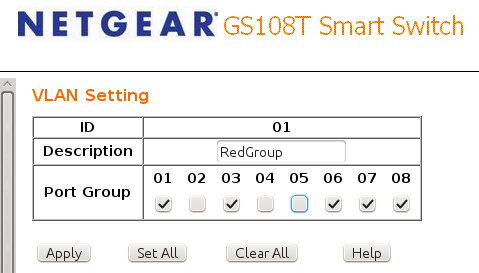
It is also possible to connect multiple subnets to a single switch, but that depends on the switch. Some will do it without a fuss, and some won’t. If you have a switch with enough ports for all of your subnets then you really want to set up some virtual LANs (VLANs). Good gigabit Ethernet switches are dirt cheap, even ones that support VLANs. They should have nice Web interfaces that make configuring VLANs as easy as checking a few boxes (figure 2).
You can also run multiple subnets from a single Ethernet interface, because you can assign multiple IP addresses to a single interface. I don’t mean aliases, but addresses, using the ip command:
$ sudo ip addr add 192.168.3.100/24 dev eth0
Use ip addr show to see your new address. This does not survive a reboot, so on Debian your /etc/network/interfaces should look like this to preserve your configuration:
iface eth0 inet static
   address 192.168.1.100
   netmask 255.255.255.0
   broadcast 192.168.1.255
   up ip addr add 192.168.3.100/24 dev eth0
   down ip addr del 192.168.3.100/24 dev eth0
And you’ll see it in your routing table:
$ route
Kernel IP routing table
Destination     Gateway    Genmask         Flags Metric Ref    Use Iface
192.168.3.0     *          255.255.255.0   U     0      0        0 eth0
192.168.2.0     *          255.255.255.0   U     0      0        0 ath0
192.168.1.0     *          255.255.255.0   U     0      0        0 eth0
1.2.3.0         *          255.255.252.0   U     0      0        0 eth1
default          ip-1-2-3- 0.0.0.0         UG    0      0        0 eth1
Sharing an Internet Connection
Sharing an Internet connection is a whole ‘nother kettle of clams, because it means sharing a single external IP address among multiple LAN hosts. This means writing forwarding and rewriting rules, which we do with packet filters such as pfsense and Netfilter/iptables. I use iptables, because why not, I went to all the trouble of learning the derned thing. You can thank NAT (network address translation) for complicating the life of the network admin. NAT has allowed us to stretch the limited pool of IPv4 addresses beyond all expectations, even in this glorious year 2013 when we were supposed to be migrated to IPv6. It’s a clever hack and I admire its ingenuity. But it’s still a hack and it gets in the way because network applications have to be NAT-aware, and because we need to employ address rewriting and TCP forwarding to move traffic in and out of our LANs. Take a look at this set of iptables rules to illustrate. This rule rewrites the source addresses of all packets leaving the LAN to the public IP address on the gateway:
ipt="/sbin/iptables"
WAN_IFACE="eth1"
WAN_IP="1.2.3.4"
$ipt -t nat -A POSTROUTING -o $WAN_IFACE -j SNAT --to-source $WAN_IP
Of course you must replace “1.2.3.4” with your own WAN address. If you have a dynamic WAN IP address, then you must use a rule like this:
$ipt -t nat -A POSTROUTING -o $WAN_IFACE -j MASQUERADE
MASQUERADE incurs more overhead because it probes for which IP address to use for every packet. Then you have to provide a path for incoming packets. These rules allows established sessions to continue:
$ipt -A INPUT -m state --state RELATED,ESTABLISHED -j ACCEPT
$ipt -A FORWARD -i $WAN_IFACE -o $LAN_IFACE -m state --state ESTABLISHED,RELATED -j ACCEPT
We wouldn’t need all this folderol if we could use direct addressing instead of having to navigate NAT. And then, depending on how your packet filter is set up, you may also have to write specific rules to unblock traffic between your subnets, like this example that forwards all packets between a wired and wireless subnet:
LAN_IFACE="eth0"
WIFI_IFACE="ath0"
$ipt -A FORWARD -i $LAN_IFACE -o $WAN_IFACE -m state
  --state NEW,ESTABLISHED,RELATED -j ACCEPT
$ipt -A FORWARD -i $LAN_IFACE -o $WIFI_IFACE -m state
  --state NEW,ESTABLISHED,RELATED -j ACCEPT
While we’re on the subject of NAT, use the netstat-nat command on your Linux router to see all the NAT connections on your network:
#  netstat-nat -n
Proto NATed Address           Foreign Address       State
tcp   192.168.1.101:60038204.1.224.59:80       TIME_WAIT
tcp   192.168.1.101:4007174.20.20.111:80       TIME_WAIT
tcp   192.168.1.101:52499199.255.22.204:80     ESTABLISHED
tcp   192.168.1.105:5388574.130.20.34:443      ESTABLISHED
tcp   192.168.1.105:46416208.79.40.11:80       ESTABLISHED
tcp   192.168.1.110:41061199.15.47.106:80      TIME_WAIT
tcp   192.168.1.110:3634474.20.20.111:443      ESTABLISHED
That is just a tiny sample and you will see dozens or hundreds of entries. If you omit -n it shows hostnames instead of IP addresses. You can see all source NAT (SNAT) with netstat-nat -S and destination NAT (DNAT) with netstat-nat -D. netstat-nat -L shows NAT connections only on the router. You can query specific hosts like this:
# netstat-nat -s studio
Proto NATed Address              Foreign Address                State
tcp   server.network.net:57323     74.20.20.111:https             ESTABLISHED
tcp   server.network.net:44637     74.20.20.111:https             ESTABLISHED
tcp   server.network.net:32814     ec2-101-23-22-444.compute-:www ESTABLISHED
tcp   server.network.net:48745     www.server.com:www             ESTABLISHED
tcp   server.network.net:36625     stats.server.com:www           TIME_WAIT
Run netstat-nat -h to see all options.
Computer networking is deep dark complications, so these resources should be helpful.
Dnsmasq For Easy LAN Name Services IPv6 Crash Course For Linux
Another IPv6 Crash Course For Linux: Real IPv6 Addresses, Routing, Name Services
Whose Fault is it When Your Internet Dies? Troubleshooting Networks with Linux
My own fabulous Linux Networking Cookbook


