If you’re a Linux user in a Exchange environment, you don’t have to give up Linux to communicate with your co-workers — just embrace Evolution. Using Evolution and the MAPI plugin, Linux users can connect to Microsoft Exchange with almost no trouble at all.
Evolution is one of the most powerful open source groupware clients. It’s as close to an Outlook clone as Linux has, and probably ever will have, particularly when it comes to connecting to Microsoft Exchange. To bridge the gap between Linux and Exchange, all you have to do is set up an Evolution add-on.
Believe it or not, this task is not terribly difficult. If your organization has an Exchange server using the MAPI protocol, Evolution has you covered. Let’s dig in and get Evolution connected to Exchange, so you can get back to work.
What You Will Need
Obviously you will need a working Linux installation with Evolution installed. You will also need to install the MAPI plugin for Evolution (more on that in a moment). Outside of the Linux environment you will need the following information:
- Address of Exchange server.
- Domain name.
- Exchange email password for your account.
Although it’s not a requirement, this task is made quite a bit easier if you join your Linux machine to your company’s domain. If you are interested in attempting this, you can read my article “How to join a Ubuntu machine to a Windows Domain“. When on your company’s domain, you won’t need the full address of the Exchange server, just the hostname.
Readying Evolution for MAPI
Out of the box, Evolution will not work with a MAPI server. To make this connection you have to install the Evolution plugin evolution-mapi. To do this follow these instructions:
- Open up your Add/Remove Software tool.
- Search for “mapi” (No quotes).
- Mark evolution-mapi for installation.
- Click Apply to install.
When the installation is complete, close out the Add/Remove Software tool and get ready to set up Evolution.
Setting up Evolution
The challenging part is over. Now you simply have to walk through the Account Setup Wizard (the same one you used when you first set up Evolution). Let’s walk through that process here.
Step 1: Open up the wizard.
To begin the Account wizard click Edit > Preferences. In this new window click on the Mail Accounts “tab” and then click the Add button, which will open up the Account wizard. The first screen is just the usual “Welcome” screen which you can click through.
 Step 2: Configure your identity
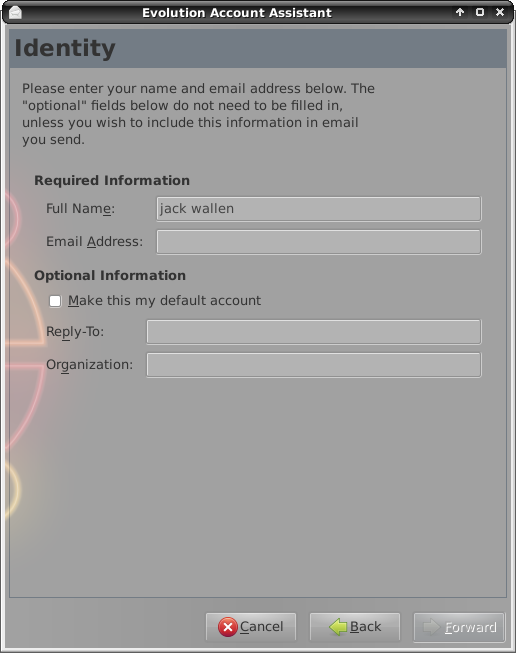
This is the first step that actually requires user input (besides pressing the Forward button). For this stage of the configuration (see Figure 1) you will need to fill out the following:
1) Full name.
2) Email address.
3) If you want this to be the default account.
4) Reply-to address.
5) Organization
None of the above should cause any problems as they are very straight-forward email account options. Once you have finished this page click Forward to continue.
Step 2: Incoming server settings
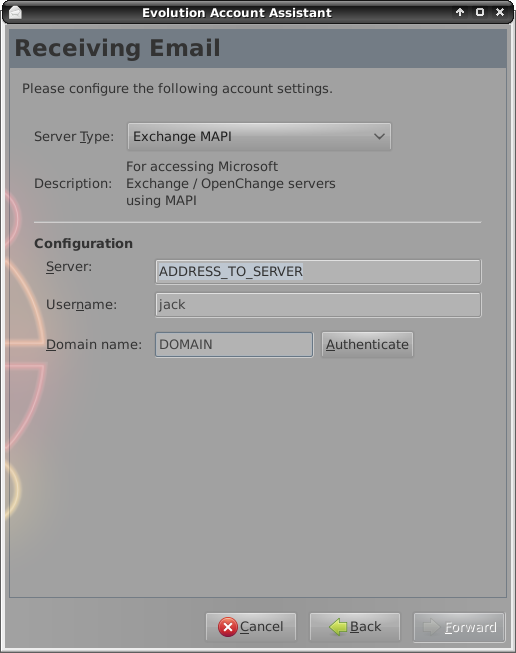
 This is the stage which might trip you up. Here you will configure the receiving email server settings (see Figure 2). Here you will need the following information:
1) Server Type: From this drop-down select Exchange MAPI.
2) Server: In this field enter the address to your Exchange server. If you have gone through the process of adding your machine to a Windows Domain you can just use the hostname of the Exchange server. Otherwise, use the IP address of the server.
3) Domain: Enter the domain your Exchange server is on. If you are unsure of that, it will be the portion of your user name you log in with that precedes the backslash. So if you log in with DOMAINjlwallen as your username, your domain will be DOMAIN.
After you’ve entered this information click the Authenticate button to make sure everything is good. Once you have authenticated, click on the Forward button to continue.
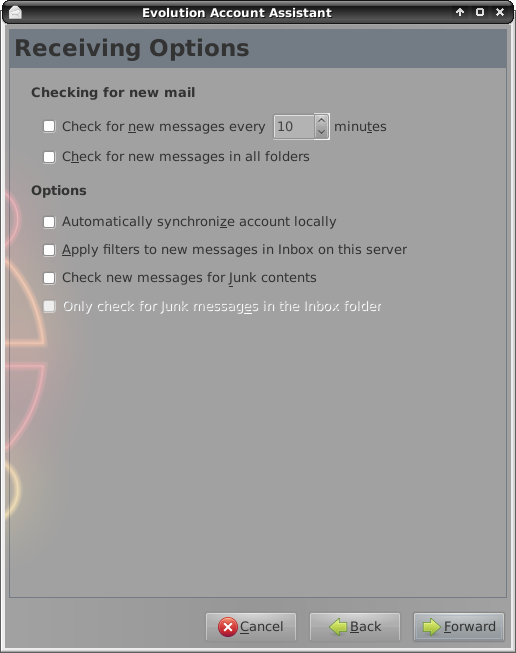
In this step you can configure a few options for your incoming server (see Figure 3). None of these options are required, but you might find some of them helpful. For instance, if you want Evolution to automatically check for email make sure you check the “Check for new messages every __ minutes” and then select how many minutes you want between each check.
You can also set up Evolution to automatically sync the local folders to the server folders. If you plan to use this “off line” this might be a good option. After you finish this set up, click the Forward button to continue.
Step 4: Name the account
This is the final window that requires user interaction. Here you only need to give your account a name. If you plan on having multiple accounts you might make sure this account name indicates it is an Exchange server. Give this account a name and click Forward and then, in the final screen, click Apply to save and close the wizard.
Depending upon how much email you have, how many folders you have, and how many calendar appointments (and contacts you have) the initial sync can take some time. Don’t assume nothing is happening because Evolution doesn’t respond right away. Let it complete its sync and then start poking around to make sure everything is up and running.
If, for some reason, you can not get your Evolution to authenticate, you will probably need to go through the process of adding your Linux machine to your company domain, which should resolve any authentication issues.
Final Thoughts
Someday there will be an open source replacement for the Microsoft Exchange server that’s widely adopted, and the business world will be a completely different landscape. Until then, Linux users are relegated to having to count on addons like evolution-mapi to be able to take advantage of the tools most people take for granted on a daily basis. But the times and tides are changing and one day tasks like this will be no-brainers.


