Firewall Builder is one of the most powerful graphical interfaces for creating iptables rules on Linux. Not only does it allow easy firewall creation through templates, Firewall Builder can create strong, secure firewalls from scratch, and even import firewalls from an iptables-save dump. Let’s take a look at building a firewall from scratch using Firewall Builder.
Thanks to the well designed tools included in Firewall Builder, these tasks are fairly simple to handle. I am going to demonstrate how to both build a firewall from scratch as well as import a pre-existing firewall. With this skills in hand, your firewall skills will be approaching Ninja level!
Building A Firewall From Scratch
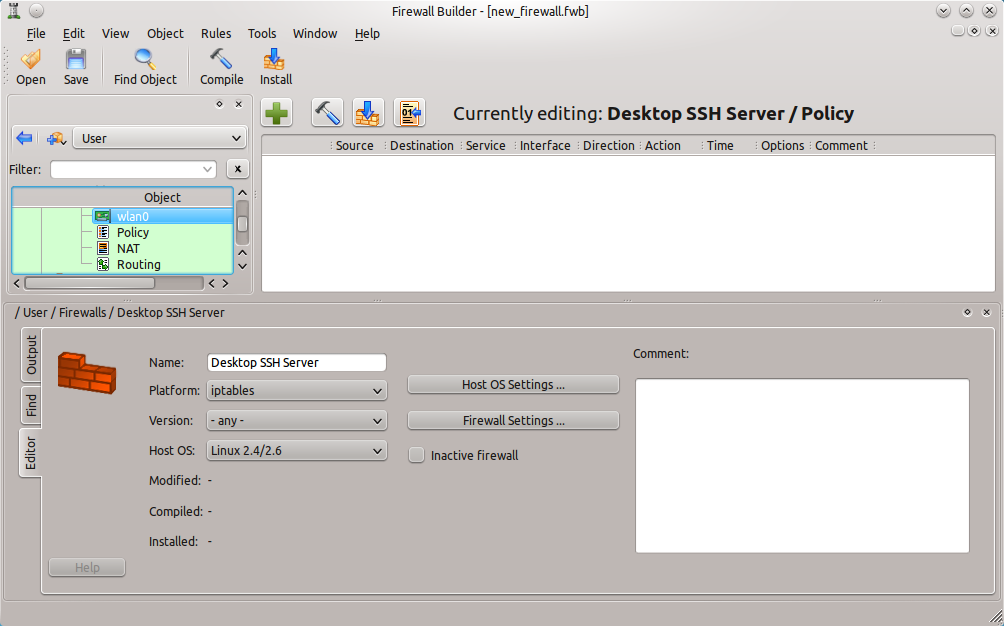
A few weeks ago we covered installing Firewall Builder and creating a firewall from a template. The first task this week is to create a brand new firewall from scratch. I want to go with the assumption that there is, at least, a fundamental understanding of how firewalls work (so there will be no explanation of such terms as input or output chain.) From within the Firewall Builder interface click on the Create New Firewall button (in the main pane) which will open up the “Creating new firewall object” wizard.
The first screen in the wizard requires the following information:
- Name of the new firewall object: This is the name of the firewall. Make this name significant to what the firewall is used on and its purpose (example: Desktop SSH Server).
- Choose software firewall is running: There are a few choices here: Cisco FWSM, Cisco IOS ACL, Cicso ASA (PIX), ipfilter, ipfw, iptables, PF, Unknown, and HP Procurve. For those setting the firewall up on a modern Linux system, the choice will most likely be iptables.
- Choose OS the new firewall runs on: Here the choice of operating systems is: Linux 2.4/2.6 OpenWRT, Sveasoft, IPCOP Firewall Appliance, secunet wall, DD-WRT (nvram), and DD-WRT (jffs).
- Use pre-configured firewall templates: This option is not used for manual creation of firewalls as it will create a firewall based on a template selection.
Adding Network Interfaces
The next screen requires interfaces to be added to the firewall. What is added will depend upon a couple of issues. The primary issue is how many interfaces are on the machine. Some machines (especially if the machine in question is being used as something like a VPN server) will require an external and internal networking interface. These interfaces can be set up manually or by using SNMP to auto-detect the interfaces. If SNMP is used the SNMP ‘read’ community string is required. Let’s manually add the network interfaces. For the purpose of this tutorial, I will start with a single interface and a loopback interface on a desktop installation. So check Configure Interfaces Manually and click the Next button.
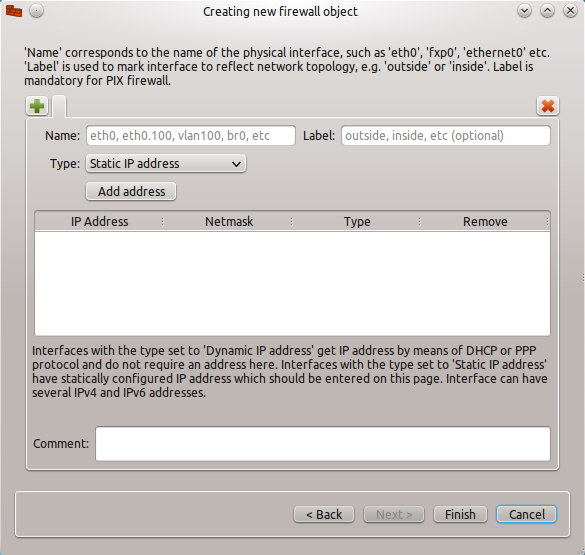
In the Interface window (see Figure 1) you have a few options to be configured:
- Name: The name of the interface. When using this on a Linux environment, the name will be in the standard format, such as eth0, vlan0, wlan0.
- Label: A human-readable label for the interface.
- Type: This will be either a Static IP Address, Dynamic IP Address, or an unnumbered IP Address. If the address is dynamic (DHCP) make sure to change the interface type by selecting radial check box for “Address is assigned dynamically”.
If necessary, comments can be added for extra notes about the interface.
Once the necessary information has been completed in the wizard, click the Finish button to continue on to the next phase of the firewall building.
Adding Rules
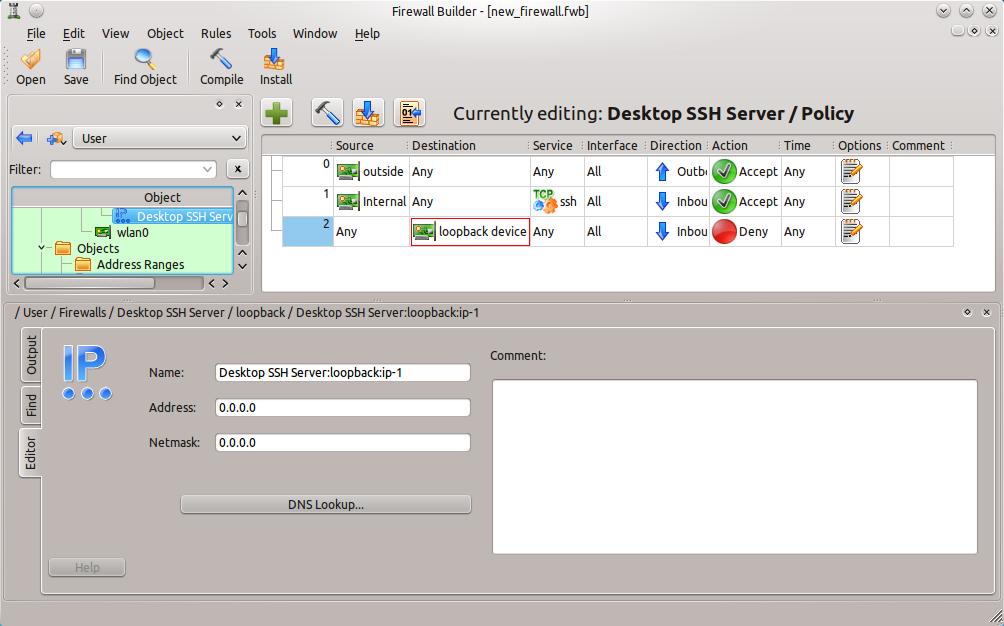
When the interfaces have been created, the main Firewall Builder will open (see Figure 2), where rules for the firewall chain can then be created. To create a rule for the chain click the Insert Rule (the “+”) button and a new, empty, rule will appear in the chain.
This is where the majority of the work is done in Firewall Builder.
When a new rule is added, the rule will be automatically set for the following:
- Source: Any
- Destination: Any
- Service: Any
- Interface: All
- Direction: Both
- Action: Deny
- Time: Any
- Options: Blank
- Comment: Blank
From the list it should be obvious that this rule denies all traffic (regardless of source or destination) coming in or going out of the machine. This isn’t going to do any good if that machine needs any sort of network traffic. So either more rules are in order or a modification of the existing rule is in order. Since the focus of this tutorial isn’t about how to create an effective firewall, I will just illustrate how to modify the existing rule. To modify rules objects are added or changed. This is where Firewall Builder really shines.
Modifying Rules
There are two ways to quickly (and directly) modify rules: Drag and drop or right-click. Drag and drop works by dragging objects from the left pane into the proper section of the rule. This works for interfaces, addresses, address ranges, hosts, networks, etc. Of course these objects must be created before they can be added to a rule.
The second method is the right-click. Say, for instance, the direction of a particular rule must be Inbound and not Both. To change this right-click the Direction entry and select Inbound from the list. This will automatically update the direction of traffic the rule will effect. What I want to do, with this firewall, is to allow secure shell traffic into the machine. Secure shell works over port 22 (by default), so to add the secure shell service to the rule, follow these steps:
- Select Standard from the Object Libraries drop-down.
- Expand the Services entry.
- Expand the TCP entry.
- Scroll down to find the ssh entry.
- Click and drag it to the Service entry in the rule.
There is still a problem with this rule. As of right now, the rule is still set to deny all traffic, going in both directions. The goal is to allow ssh traffic in. To do this take the following steps:
- Change the direction to Inbound by right-clicking the direction and selecting Inbound.
- Right-click the Action and select Accept.
- Switch back to the User Library from the Object Library drop-down.
- Select the interface that should allow ssh traffic in (use the Internal interface if the traffic will be coming from within the LAN, use the External interface if the traffic will be coming from the WAN.)
- Click and drag the interface to the Destination section of the rule.
- If logging is necessary, right-click the Options section and select Logging On.
Adding Interfaces After Your Firewall is Created
What if you decide you need more than a single interface? Simple. To add new interfaces scroll up (in the left navigation) until the name of the firewall appears (in this case “Desktop SSH Server”). Right-click the name of the firewall and then select New Interface from the resulting menu. In the new pane that appears in the Firewall Builder window, edit the information for the new interface. The ability to add interfaces to a firewall is not limited to the initial building phase. At any time a new interface can be added to the existing firewall. This feature comes in very handy when, say, an external interface is added to give a machine access to the WAN.
If the interfaces use DHCP for addresses, click the radial button labeled “Address is assigned dynamically” in the interface configuration box. If, however, the interfaces require a static IP, that address must be added manually. To do this right-click the interface and select New Address. In the new window (see Figure 3) enter the information for the address.
Make sure to assign both address and the correct Netmask.
Compiling and Installing
 The final step is to compile and install the firewall. This is as simple as pressing the Compile button (Icon directly to the right of the “+” icon) and, when that completes successfully, pressing the install button (Icon directly to the right of the Compile button). For the both the Compile and Install steps, a Wizard will open that will easily walk you through the process.
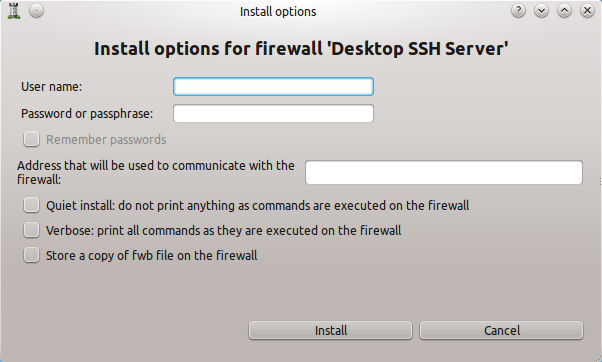
One issue to note for the installation: In order to successfully install the firewall, a user with administrative privileges will have to be used (by entering username/password in the Install Options Windows — See Figure 4.) Once the installation has succeeded, the firewall should be up and running. Do a test to make sure SSH traffic can get through and standard traffic can get out. If successful, the firewall is a go!
Building On This
In up-coming articles I will be building upon this secure shell firewall, so make sure to become as familiar with the fundamentals discussed here, so the next step in the process is just as simple.


