
Nearly five years after the first Raspberry Pi boards shipped, the device continues to far surpass its expected popularity, spreading well beyond its originally intended purpose as an educational tool. Though creator Eben Upton originally hoped to sell at most 10,000 boards, more than 10 million are now in the hands of students, teachers, and makers. In addition to three generations of the Raspberry Pi, you can also now have the even smaller Raspberry Pi Zero, as well as several additional products, from the Compute Module to the specially designed cameras, touchscreen, and assorted HATs (Hardware Attached on Top boards).
With so much available and so many possibilities, it can be intimidating to know where to start. Use these tips to learn some basic information about starting your own project. This article assumes you know what a Raspberry Pi is, how to connect things like a keyboard and a display, and how to use a Linux command line, but not much else. (See the official Raspberry Pi help videos for the basics.)
Which Pi do I have?
If you’ve had a Raspberry Pi sitting in your desk drawer for so long that you’re not even sure any more what version it is, you’re not alone. Whenever I give a talk on the Raspberry Pi, I ask how many people have one, and generally most of the room confesses to owning one while only a handful have actually used it.
Beyond the amount of RAM, which is the most obvious difference in the earlier boards, or big changes like the additional GPIO in later boards (which is easily apparent), there are some minor distinctions that can be useful to know as you plan your project or troubleshoot problems.
With some visual examination, you can generally figure out which board you have by looks alone, but there’s an easier way using the command line.
Start your Pi, open a terminal, and run the command
cat /proc/cpuinfo | grep 'Revision'
The output should be a four- or six-character string that indicates which board you have:
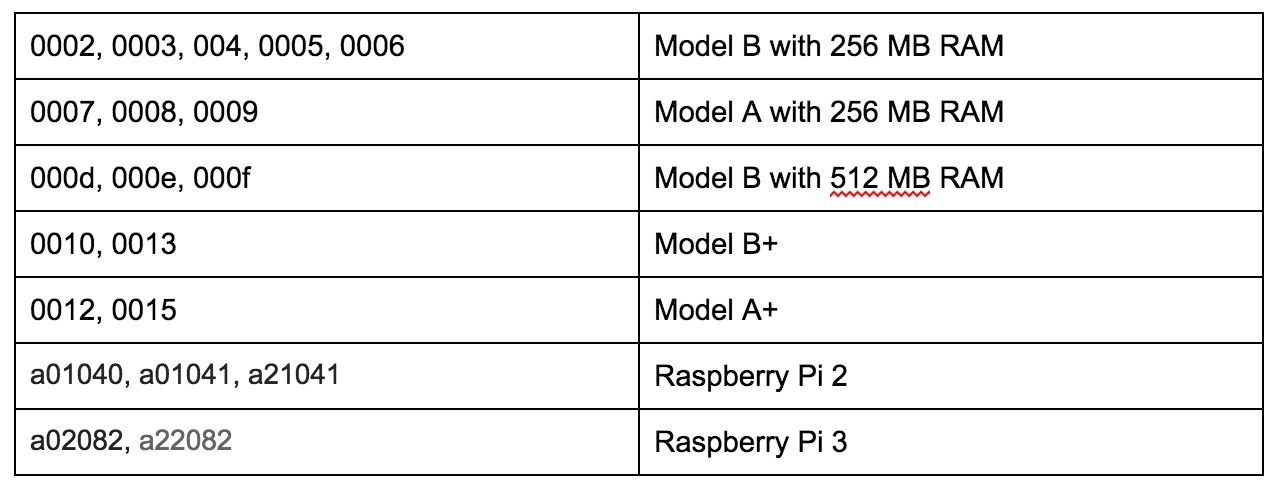
If you see a very long number that starts with “1000,” the part after that is the revision number, and the “1000” indicated that your board has been overvolted.
The following will give you a quick comparison of the major features across the various boards:

If you would like to see even more information about your board from the command line, try the following commands:
-
Hardware: cat /proc/cpuinfo
-
Version: cat /proc/version
-
Memory: cat /proc/memory
-
SD card partitions: cat /proc/cpuinfo
Power it up
You’re probably accustomed to some general truths about the electronics in your house. You plug them into the wall, flip an on/off switch, and they work. The Raspberry Pi is not one of these electronics. Getting a good power supply and cable that provide clean, adequate, consistent power is crucial to your Pi’s performance. And there’s no on/off switch. But that’s ok–you can make one.
How much power is enough?
If you think that insufficient power may be a problem (and if you’re having problems with a Pi, there’s a good chance it’s the power), you can check the actual voltage to see if you’re right.
On an older Model B, you’re looking for small holes on top of the board marked TP1 and TP2. On a Model B+ or Raspberry Pi 2 or 3, there are spots on the bottom of the board on the side with the SD card slot that are marked PP3 and PP7.
First, plug in all of the peripherals you’ll be using for your project. Use a multimeter set to 20 volts. Touch the red lead to TP1 or PP3 and the black lead to TP2 or PP7. The multimeter should read something close to 5 volts. Anything more than .25 volts variance is a problem, and the closer to 5, the better.
If you find your voltage is low, there are two most likely culprits:
-
Your power cable. The good news about the Raspberry Pi is that if you use an Android phone, you almost certainly already have a multitude of micro USB cables ready to power your Pi. The bad news is that if you picked that cable up from the discount bin, it may give your phone a slow drip that’s enough for a phone recharge, but your Pi won’t be amused by the dribble of electricity you’re offering.
-
Your devices. All those USB peripherals you’re plugging into it–even your lowly keyboard–are hungry for power. You should use a powered USB hub to help out.
Add a reset switch
Now that you know some basics, and you’ve tested your power source, you’re ready for a quick and easy project that will make your Pi feel more like the rest of the electronics you have. You’re going to add a simple reset switch.
Most of the electronics you own come with on/off switches. Because the Pi doesn’t, to restart it, you have to pull the power cable out altogether and reinsert it. The following instructions will let you start or reboot the Pi quickly without having to do so.
You’re looking for two holes on the board next to each other. One has a circular edge and the other a square. On the original Model B, they’re marked “P6” and are found near the HDMI port. On later Raspberry Pis, they’re marked “RUN” and can be found closer to the GPIO pins.
You can purchase strips of breakaway pin headers from anywhere you get other electronics supplies. Solder two of these pins into the P6/RUN holes, and you’ve created a CPU reset switch. All you have to do is touch a piece of metal across both pins.
From here, you can get as creative as you’d like about what to attach to use as the actual button. The simplest solution is to attach a 2-pin switch cable on the pins you attached.
Meet the GPIO
Aside from its low price point, the GPIO options on the Raspberry Pi are one of its most appealing features. They are also the part most likely to intimidate new users. (And if you think stepping on an errant Lego brick hurts, don’t leave your Pi with the GPIO side up on the floor!)
GPIO stands for “general purpose input/output,” which is exactly what these pins do. Nearly all of the awesome projects you’ve seen built with Raspberry Pis take advantage of these pins in some fashion. Their flexibility is their strength!
The earlier boards had 26 GPIO pins, while the Raspberry Pi 2 and 3 have 40. (Technically only 17 of the 26 and 28 of the 40 are GPIO, while the rest are power or ground pins.) They are referred to with pin numbers. The numbers aren’t in any logical order, so you need a diagram to make sure you’re using the right ones. (To add to the confusion, you will sometimes see them referred to by their physical pin numbers, which is the pins counted in order.) If you’re going to be using the GPIO frequently, I recommend Simon Monk’s Raspberry Leaf project, which is a tiny printout of the pins you can lay over them for reference. If you have a 26-pin Pi, you can print one yourself on Monk’s website, or if you have a 40-pin Pi, you can buy them from Adafruit in paper and hard versions.
Now that you know which is which, you’ll need a way to tell the pins what you want them to do, which is going to require a bit of programming. If you’re a beginner, the Pi part of the Raspberry Pi name comes from its original intent as a tool to teach Python, so in a way, you’re using the Pi for its original purpose! (Even if your endpoint is an automated coffeepot or killer robot.)
Of course, teaching you Python is well beyond the scope of this article, but there are plenty of resources waiting. Sparkfun and Adafruit both have starter tutorials for how to use the GPIO, and the Raspberry Pi Foundation’s learning resources include a Python Intro. If you prefer to go more in-depth with a book, there are a few options, including Learning Python with Raspberry Pi and Programming the Raspberry Pi: Getting Started with Python, written by the aforementioned Simon Monk.
Finally, Pinout.xyz can serve throughout your project as a reference tool for each of the pins.
Find a project
The best thing you can do now is start making something. Even if you’ve never written a line of code or touched a soldering iron, the Raspberry Pi is a perfect learning tool for those things and more. But what to build?
If you’re still nervous and want to have something useful that requires writing no code nor touching the GPIO, I recommend setting up Kodi (previously called XBMC). In minutes, you can turn your Pi into a functioning media center.
Once you’ve done that and you’re ready to get braver, think about what interests you. Video games? Home automation? Photography? Whatever it is, chances are good that someone has built something similar and offered their instructions online. Follow them. Make your own changes. Find improvements, or fix problems in the original version. That’s the best way to learn. And once you’ve done so, don’t forget to share what you’ve done with others.
To get you started on ideas, here are a few of my favorite projects for a variety of interests:
-
The Cupcade is the easiest way to build your own tiny gaming system. There are tons of video game build tutorials out there, but if you’re more interested in starting with a kit, this provides all the pieces you need for a satisfying project. (If you’re more of a builder and would like to go bigger, take a look at the Coffee Table Pi.)
-
Homebrewers who would like to take their brewing to the next level should try BrewPi.
-
If you have access to a 3D printer and would like an amusing but not terribly useful device where all the code’s been written for you, try the Pi Ball.
-
One of the most popular Pi projects is the MagicMirror. It’s customizable to your interests, useful to have in your house, and all of the code is on Github.
-
If you’d like to try robotics, the options are broad. Start with this DIY Hacking tutorial. Adafruit has an introductory robot tutorial as well. From there, the possibilities are up to you.
For 5 more fun projects for the Raspberry Pi 3, including a holiday light display and Minecraft Server, download the free E-book today!
Read the next articles in the series:
How to Build a Minecraft Server with Raspberry Pi 3
Build Your Own Netflix and Pandora With Raspberry Pi 3
Turn Raspberry Pi 3 Into a Powerful Media Player With RasPlex


