

So you’ve installed Elementary OS Freya and found it pretty rock solid. The more you use it, the more you like it. There’s a reason for that…Elementary OS Freya is one of the hottest Linux distributions available at the moment. It’s rock solid, elegant, and easy enough for anyone to use. But as you dig a bit deeper, you find there are certain aspects that require a bit of tweaking or additional software.
If you want to skip the exploration phase and get right to the tweaking of Elementary OS Freya, I have a short list of things you should immediately do, upon finalizing your installation. These tweaks and installations will cover a lot of ground and help your installation go from great to incredible in just a few short steps.
Let’s get to the tweaking.
Enable Canonical Partners repository
There’s plenty of great software available… but from a repository not enabled by default. Enabling this particular repository will add a number of important software titles to your Software Center, such as Skype, adobe-flashplugin, and even media codecs.
In order to enable this particular repository, do the following:
-
Click on Slingshot (the Applications menu in the upper left corner)
-
Type Software
-
Click on Software & Updates when it appears
-
Click on Other Software
-
Click to enable Canonical Partners (Figure 1)
-
When prompted, enter your sudo password and click Authenticate
-
Click Close.

When you click Close, apt will update so the new repository (and its software) is available.
Install additional drivers
Should your machine make use of graphics (such as NVidia) or networking (such as BCM) hardware that doesn’t work well with open source drivers, you may need to install additional (proprietary) drivers to get the most out of your system. If you’re not even sure what hardware your system has (and if it needs special software to improve performance), you can find out in the same tool used to add the above repository.
In the Software & Updates tool, you’ll find a tab for Additional Drivers. Click on that tab. If the system has determined there is software available for your particular hardware, it will be listed here and ready to be enabled (Figure 2). Select the option you want to use and then click Apply Changes.

Do note, that installing proprietary drivers isn’t always the best option. You might want to do a bit of research to see how your particular hardware will respond with the combination of Elementary OS Freya and a proprietary driver.
Enable restricted codecs
Out of the box, most things work. Due to regional restrictions, however, some multimedia files may not play. To get around that, you must install extra codecs. Once you’ve installed the Canonical Partners repository, this is actually a single command away. Open up a terminal window (Click on Slingshot, type terminal, and click to open the terminal) and enter the following command:
sudo apt-get install ubuntu-restricted-extras
Type your sudo password, hit the Enter key, and allow the software to install. Once the installation is complete, you should be able to enjoy those multimedia files.
Install LibreOffice
The one major piece of software you’ll find missing from Elementary OS Freya is an office suite. That’s not a problem as LibreOffice is free, open source, and ready to serve. Instead of installing LibreOffice from the Software Center (which will most likely be an out-of-date release), let’s install the latest version. Here’s how:
-
Download the necessary .deb main installer package that matches your architecture (either 32 or 64 bit) from this page
-
Save the file to your Downloads directory
-
Open up a terminal window
-
Change into the downloads directory with the command cd ~/Downloads
-
Extract the downloaded file with the command tar xvzf LibreOffice_XXX_Linux_YYY_deb.tar.gz (Where XXX is the release number and YYY is the architecture)
-
Change into the newly created directory with the command cd LibreOffice_XXX (Where XXX is the release number)
-
Change into the DEBS subdirectory with the command cd DEBS
-
Issue the command sudo dpkg -i *deb
-
Enter your sudo password and hit the Enter key
-
Allow the installation to finish.
If you open up the Slingshot and type libre you should now see entries for all the pieces that comprise the LibreOffice office suite.
Install Nemo
The default file manager, GNOME Files, is sufficient for some…but others may find it sorely lacking in features. Instead of giving GNOME Files a chance, why not just install a far more powerful and tweak-able file manager. For this, you’ll want to install Nemo. Here’s how:
-
Open up a terminal window
-
Add the requisite repository with the command sudo add-apt-repository ppa:webupd8team/nemo
-
Update apt with the command sudo apt-get update
-
Install Nemo and the file-roller plugin with the command sudo apt-get install nemo nemo-fileroller
Now, there’s a slight problem with using Nemo as it stands. When you issue the command nemo to start the file manager, it will attempt to manage your desktop (which you do not want, considering the Elementary OS Freya desktop cannot work with a third-party manager). To avoid that, issue the command nemo –no-desktop.
But what if you don’t want to start the new file manager from command line? The best way around that is to create a keyboard shortcut. Here’s how:
-
Open up Settings
-
Click on Keyboard
-
Click on Custom
-
Click the + button
-
Type the command nemo –no-desktop when prompted to enter the command
-
Hit the Enter key
-
Click where it says “Disabled” (Figure 3)
-
Click the keyboard shortcut you want to use (I prefer Super+F) to assign the key combination
-
Log out of Elementary OS and log back in for the changes to take effect

Install Tweaks
Similar to the Ubuntu Tweak Tool, Elementary has a Settings plugin that adds a number of new options. This tool is called Elementary Tweaks. This will give more appearance settings, font settings, Plank settings, and much more.
To install Tweaks, follow these steps:
-
Open up a terminal window
-
Add the necessary repository with the command sudo add-apt-repository ppa:mpstark/elementary-tweaks-daily
-
Update apt with the command sudo apt-get update
-
Install Tweaks with the command sudo apt-get install elementary-tweaks
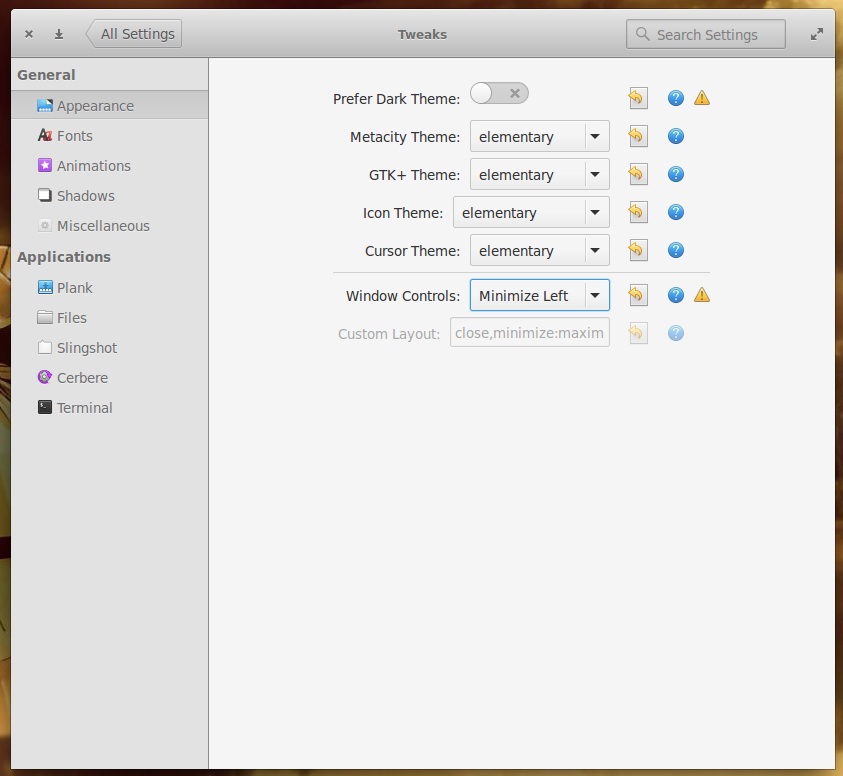
Once installed, you will find Elementary Tweaks in the Settings tool. Open Elementary Tweaks to find a number of added options (Figure 4).

Add minimize button to windows
One tiny issue you’ll notice is the lack of a minimize button on windows. If you’re like me, you depend upon that button quite a lot. Now that you have Elementary Tweaks installed, getting that button back is as simple as:
-
Opening Tweaks
-
Click on Appearance
-
Click the Window Controls drop-down
-
Select the option that best suits your needs (I opt for Minimize Left to mimic the Ubuntu Unity window control—Figure 5).
At this point, Elementary OS Freya should be tweaked to perfectly meet your needs. If not, there are still plenty of customizations you can manage from within the standard Settings tool and a vast amount of software to install to help you get the job done.


