
These days more people than ever feel compelled to get their e-mail fixed super-swiftly if it ever fails. When used several times a day, every day of the year, some of us feel truly bereft when e-mail isn’t available to us. There’s even recognised medical conditions relating to those who obsessively check their e-mails, forcing cognitive failures (whatever they may be) as they do so.
Clearly it’s important to set up your Mail Servers robustly in order to avoid a barrage of complaints from your users; even if an issue is caused by something out of your remit, upstream, as opposed to locally. This tutorial covers how to set up a Postfix mail server and test it.
One of the original Internet services was SMTP (the Simple Mail Transfer Protocol). Within its original RFC (Request For Comments 821) which was published in August 1982 there was a lot of forward planning and most likely as a result it remains one of the fundamental cornerstones of the Internet that we know and love today. A reminder of how a typical SMTP transaction looks is visible within the RFC itself:
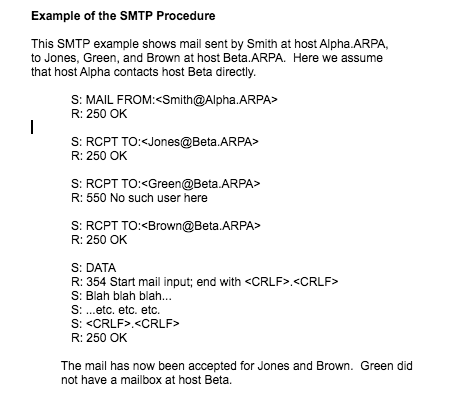
As intimated in Figure One there are actually only a handful of commands used in sending an e-mail. Let’s not forget everyone’s favourite “hello” command of course, namely the “HELO” command which initiates a connection, whereas “QUIT” closes it. The “HELO” command is as straightforward as this:
HELO chrisbinnie.tld
With the above line we are simply saying “Hi, I’m a Mail Server called chrisbinnie.tld” as the opening gambit in an e-mail exchange.
As simple, as the “simple” in SMTP is however, sometimes the server and client software involved in forwarding and receiving e-mails isn’t quite as straightforward as you might think.
Let’s have a quick look at getting the sending of outbound e-mails working from the command line and then we’ll explore how to install and test a very popular Mail Server.
Command Line SMTP
Sometimes, when testing a Mail Server’s installation, you need to send e-mails directly from the command line. When you’re not testing you might also need the same functionality from within system scripts. Let us briefly look at a miniscule package that is useful to have sitting alongside a Mail Server which fulfills that very requirement.
If you’re using any derivatives of Debbie and Ian’s favourite Linux distribution then you can install an outbound e-mail tool, run from the command line, to assist you in your testing endeavours as so:
apt-get install heirloom-mailx
There’s a lot of history behind the “mail” and “mailx” packages, which is so far-reaching and detailed that we’ll save it for another day, but trust me when I say that you are likely to have success on some, if not all, Red Hat derivatives by using the following command to install the package rather than using the Debian package name as so:
yum install mailx
Now that’s installed, here is a simple example of how we can send e-mail directly from the command line. The functionality which we have at our fingertips is not just that of the old style “mail” command (as truly clever as it was upon release) but instead we can also manipulate a number of other e-mail related tweaks too.
mailx -r 'script@binnie.tld' -s 'Subject Line' -a '/fullpath/.bashrc' -S 'smtp=localhost' 'chris@binnie.tld'
Having looked at our example you can clearly see that we can alter the “-r” option to change which “from line” is presented to the mail client when the e-mail is picked up at the other end. This is sometimes surprisingly difficult to get working with other command line Mail Clients so cherish the moment as a test e-mail arrives in your inbox and it doesn’t say that it’s been sent by “root@localhost” or something equally disappointing.
Hopefully the other options are equally easy to follow. The “-s” option lets you edit your e-mail’s subject whereas “-a” is the filename of your attachment. You might need to compress the file if the plain text file arrives with extra carriage returns. Also ensure that you’re definitely using the full path to the file if you have other issues with attachments. The above “mailx” command example can either be completed with “< /dev/null” appended to the end or by manually typing a dot and then hitting the Enter key. This dot acts as an End Of File (EOF) marker and is used to populate the body of the e-mail with some content, even if the content is non-existent. Here’s an example of that full command, without an attachment, for ease of reading:
mailx -r 'script@binnie.tld' -s 'Subject Line' -S 'smtp=localhost' 'chris@binnie.tld' < /dev/null
You can see that we’re using “/dev/null” to populate an empty e-mail body to save you interacting further with the software once you’ve hit the Enter key. Don’t be concerned if you see a warning of little consequence such as “Null body. Hope that’s okay.” which is helpfully telling you that there’s no content to the e-mail, just headers and a subject line.
Install Postfix, Undisputed Heavyweight Champion
On now to the star of the show, our Mail Server. The rocket-fueled MTA (Mail Transfer Agent) that is Postfix has such a wide array of features that quite honestly it’s a struggle to know where to begin. However starting with an overview of a handful of its features might help introduce them to any newcomers and additionally act as a refresher to anyone that’s used them before.
Rather than relying on an ISP’s SMTP Servers let’s have a quick look at running your own. Postfix was written by the award-winning programmer and physicist Wietse Venema, who brought us other excellent software packages such as TCP Wrappers and security tool SATAN (Security Administrator Tool for Analyzing Networks). The highly performant Postfix rapidly became my MTA of choice when I discovered it, having used “qmail” for years. Indeed it became the default MTA on a number of the larger Linux distributions shortly afterwards too. This is of benefit to anyone looking for a well-supported piece of software, with ever-increasing levels of unofficial online documentation, to help you solve a tricky problem.
I’m certain that one of the reasons that Postfix gained popularity was that even straight out of the box it’s relatively secure and should meet most people’s needs. As with many powerful software packages there’s a multitudinous array of features which range from the abstract, and therefore rarely needed, to those which many people will want to use.
I find that even when delving much deeper into the more complex facets of Postfix it’s remarkably difficult to get lost inside its config thanks to its undeniable simplicity. The installation of this powerhouse won’t keep you up at night, either. Simply use the correct commands for either Debian or Red Hat derivatives respectively as shown below:
apt-get install postfix
yum install postfix
From the console itself you’ll see a handful of colourful ANSI menu screens. Amongst other easy questions you need to answer when you’re asked you should choose “Internet Site” and then enter your Mail Server’s fully qualified hostname, including your Domain Name such as this example shows:
mail.chrisbinnie.tld
To all intents and purposes you’re up and running having followed those remarkably simple installation steps. Let’s, however, look at the main config file “/etc/postfix/main.cf” to get our bearings.
Upon opening that file you’re dutifully reminded that only a tiny percentage of the mammoth number of features available to Postfix are mentioned within it by default. You can query its many “postconf” options inside the manual as so:
man 5 postconf
If you’re sitting down and not prone to any sudden heart issues then I’ll surprise you with the fact that there’s around 8,800 lines of content in that single manual alone and Postfix uses several additional manuals too. The extensive, (almost entirely) crystal clear documentation is exceptionally readable and the simplicity of the config very rarely trips you up with its dependencies. This is a far cry from other MTAs I’ve battled with in the past and there’s no doubt Postfix should be heralded as a shining beacon of usability and functionality. Needless to say that it’s popularity speaks volumes.
Incidentally if you’re using Debian, or of course one of its derivatives like Ubuntu Linux, then if you mess up the installation steps you can always re-run the initialisation of Postfix like so:
dpkg-reconfigure postfix
On Red Hat derivatives apparently there isn’t a generic reconfiguration utility however some packages do offer similar support to help effectively reconfigure a piece of software’s basic configuration options from scratch; a little like a factory-reset I suppose, despite maintaining other config options afterwards.
Lay Of The Land
Now that we’ve got a working Mail Server we can forge ahead and examine some of its config. However before we do that consider another scenario briefly, partly to introduce Postfix’s preferred config syntax and also to see how to refresh Postfix after you’ve made any changes.
If you ever felt the need to only set up a Mail Server to send outbound e-mails from your localhost address (to avoid exposing an MTA on an external IP Address for example and/or running a fully configured MTA) then read on. You might want to do this in order to only allow software installed on your server to send outbound e-mails, for example, too. Think of it as a mini installation of sorts.
With Postfix this is quite possible to achieve with a simple change to your config file. Begin by making sure that this line appears as so:
inet_interfaces = localhost
As you can see there’s simply a “key: value” style of config formatting. It’s usual to separate multiple entries with commas. Add a space after the commas and it makes more sense when reading it back later on.
For comparison, by default, that setting would usually look like this:
inet_interfaces = all
Populating that key with multiple values (according to the online docs) might look like this for example:
inet_interfaces = 10.10.10.1, 127.0.0.1, [::1]
As you can see the entries sit nicely separated by commas and spaces. The final entry is the IPv4 “localhost” equivalent on IPv6 (and only applies to Postfix 2.2 onwards apparently).
There’s a good chance that you can simply reload Postfix after making changes, to only introduce a tiny pause in service, as opposed to a full restart. If I’m not sure I tend to try a reload first, especially on busy production servers. Typically config changes that need a restart (if my memory serves, they’re not needed that often) might be bigger alterations such as renewing expired TLS (Transport Layer Support) certificates and the like.
If you’re on a “systemd” Operating System then you can reload and restart Postfix respectively as so (or use “service postfix restart” or ““service postfix reload” or their equivalents):
systemctl reload postfix
systemctl restart postfix
Since we now have a functioning Mail Server, by using the magical “mailx” you can now send a test e-mail using a command along these lines:
mail -s “Local Outbound SMTP Test” chris@chrisbinnie.tld < /dev/null
The body of the e-mail will be empty (thanks to the null content from “/dev/null”). Otherwise hopefully your Inbox is now in receipt of a test e-mail.
Summary
Now that you have the basics you should have a good look at the main config file (found in “/etc/postfix/main.cf”) and visit the Postfix website to answer any queries you may have. Postfix is capable of some genuinely amazing functionality and once you get used to the config file’s syntax then you can use the docs on its website to add them to your config. I still find the fact that such a massive amount of config options are available staggering considering the rocket-powered performance that the powerful Postfix achieves.
In the next article, we’ll set up email aliases and do some troubleshooting on our Postfix server.
Chris Binnie is a Technical Consultant with 20 years of Linux experience and a writer for Linux Magazine and Admin Magazine. His new book Linux Server Security: Hack and Defend teaches you how to launch sophisticated attacks, make your servers invisible and crack complex passwords.


