
Are you an IT manager or a consulting firm in search of the ideal help desk ticketing system? Have you looked around for what seems like months only to find systems too pricey, too closed, too feature-deprived, or too complex to install or use? Or are you just beginning your search and have no idea where to look? If either description fits, you’re in luck as I have the help desk ticketing system that is just the ticket to meet your needs. The system I am referring to is osTicket and, as you would expect, the “os” stands for “open source.”
osTicket is one of the finest ticketing systems I have used. Not only is it easy; it’s fairly straight forward to install and, since it’s open source, it’s possible to alter the source to make osTicket better fit your needs. And when all is said and done, you will have a ticketing system that will work exactly as you need and for as long as you need it.
In this article I will show you how to install the osTicket system on top of an already running LAMP stack. If you haven’t already installed your LAMP stack check out my article, Easy LAMP Server Installation, for step by step instructions. Once you have that up and running, you are ready to go for osTicket.
Features
Before we move forward with the actual installation, let’s first highlight the features of osTicket – this way you will KNOW you want this system for sure. osTicket, like many open source systems, is full of outstanding features, including:
-
Web and email support: Users can submit tickets either by email or from a web portal.
-
Auto responses: Users (and staff) will receive auto-generated emails informing them of the status of their support request.
-
Internal notes: Staff can leave internal notes on tickets to help keep track of progress.
-
Alerts: Staff will receive auto-generated email alerts when a ticket has been assigned to them.
-
Role-based access: Various levels of access that allow staff to access specific features.
-
Assign/transfer tickets: Each ticket can be assigned to a staff member or transferred to a different staff member.
-
Various levels of priority for tickets.
And much more.
Now, let us get on with the installation.
Installation
As I mentioned before, you do have to have your LAMP server up and running. You will also need to create a database for the osTicket system to use. I like to use MySQL Workbench to create my databases (for more information on MySQL Workbench check out my article “Get to know MySQL Workbench“). Create a database called osticket and you are ready to download and start the installation.
Download the latest, greatest source from the osTicket download page and place it in your /var/www directory. Now, in order to prepare to launch the osTicket web installer, follow these steps. NOTE: I am going to demonstrate the following with Ubuntu, so all commands will use sudo. If you are using a different distribution, one that doesn’t use sudo, you will need to su to the root user to issue these commands.
-
Create a directory, called support, with the command sudo mkdir /var/www/support.
-
Unpack the osTicket archive with the command sudo tar xvzf osticket_XXX.tar.gz Where XXX is the release number.
-
Move all of the files from the /var/www/osticket-XXX directory (Where XXX is the release number) to the newly created support directory, with the command sudo mv /var/www/osticket-XXX/upload/* /var/www/support.
-
Rename the file ost-config.sample.php with the command sudo mv /var/www/support/include/ost-config.sample.php /var/www/support/include/ost-config.php.
-
Give the configuration file write permissions with the command sudo chmod 777 /var/www/support/include/ost-config.php.
You are now ready to point your browser to http://IP_TO_SERVER/support/ where the installation process will begin. Where IP_TO_SERVER is the address of the server hosting osTicket.
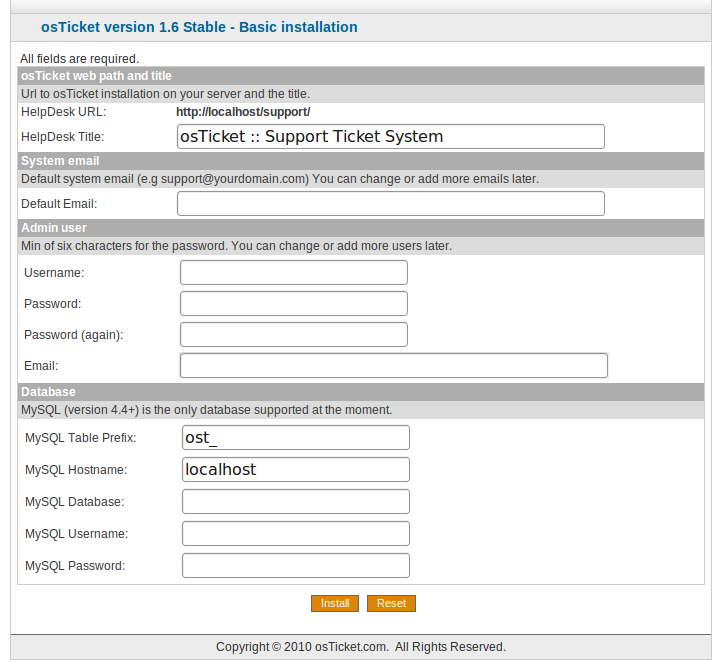 When you fire up the web installer, and you have taken care of the above steps, you will land on the page you see in Figure 1. All you need to do is fill in the missing pieces. All of the necessary fields are self-explanatory. One bit of information that might trip you up is that the default email address and the administrator’s email address can NOT be the same. For the default email address you will want to use something like This e-mail address is being protected from spambots. You need JavaScript enabled to view it
. Just make sure you use the database you created earlier (probably called osticket).
Once you have filled out all of the necessary information click the Install button and osTicket will install. Simple as that. There are, however, a few post-installation steps you must take. Those steps are:
1. Change the permissions of the configuration file with the command sudo chmod 644 /var/www/osticket/include/ost-config.php.
2. Delete the setup directory with the command sudo rm -rf /var/www/support/setup.
3. (OPTIONAL) By default, osTicket will send passwords unencrypted. You will want to install the mcrypt module to avoid this. Do so with the command sudo apt-get install mycrypt php5-mcrypt.
That’s it. You are now ready to log in to the Admin Panel of your osTicket installation. You will find that login at http://IP_OF_SERVER/scp/admin.php. Once there you will need to use the admin credentials you created on the web installation page.
 When you log in, the first thing you will notice is that your osTicket site is in offline mode (see Figure 2). Click on the Enable link and you will find yourself in the Settings tab of the Admin Panel. Check the box to enable the site and save your settings. Your osTicket system is now on line and ready to be fully configured to meet your needs.
Final Thoughts
The osTicket system is an amazing example of how open source software can meet and exceed the needs of today’s business. After following the steps in this article you should now have a working installation of this incredible piece of software. In follow-up articles I will show you how to fully realize the features of osTicket so that your help desk or consulting firm can handle the ever-growing needs of your clients and/or your staff.


