
Author: Nathan Willis
Alan Castonguay’s WPOpenID plugin turns any WordPress site into an OpenID consumer — meaning users can sign in to the blog with an OpenID identity to comment, post, or administer the site. The current release is tagged “86” (no decimal points in sight) and has been tested on WordPress versions 2.0.3 through 2.1.2. The project’s file releases and bug database are hosted at SourceForge.net, but for an install guide and documentation you need to read Castonguay’s introduction at his personal blog.
As with all third-party plugins, you must be careful when installing WPOpenID on a production site. This is doubly true with WPOpenID because it affects user account creation and login features: if something goes wrong, you could find yourself unable to log in to your WordPress site altogether.
The installation process is simple, following the same basic steps as most WordPress plugins. You first need to download a tar archive of the plugin and uncompress it into the wp-content/plugins sub-directory of your WordPress installation. Next, log in to your blog in a Web browser and visit the Plugins tab of the administration interface. The WPOpenID plugin will appear in the plugin list as “OpenID Registration.” Click on the Activate action, and the plugin installer will perform the necessary setup steps for you.
Once activated, you can configure WPOpenID through the “OpenID” tab that it creates under the WordPress admin interface’s Options tab. WPOpenID is bundled with a GPLed OpenID consumer library from JanRain. That library, in turn, can call on either the GMP or BCMath PHP libraries to perform some of its large-integer math. If your site’s PHP binary is compiled with either GMP or BCMath support, WPOpenID will use them to speed up the authentication process by doing some server-side hash calculations. If neither math package is present, don’t worry: WPOpenID gracefully falls back to simple mode, and asks the OpenID servers it contacts to do the hash checking instead. If you are not sure whether GMP or BCMath is installed, mouse over the status message in the OpenID Options tab; a detailed log will pop up indicating which libraries were found.
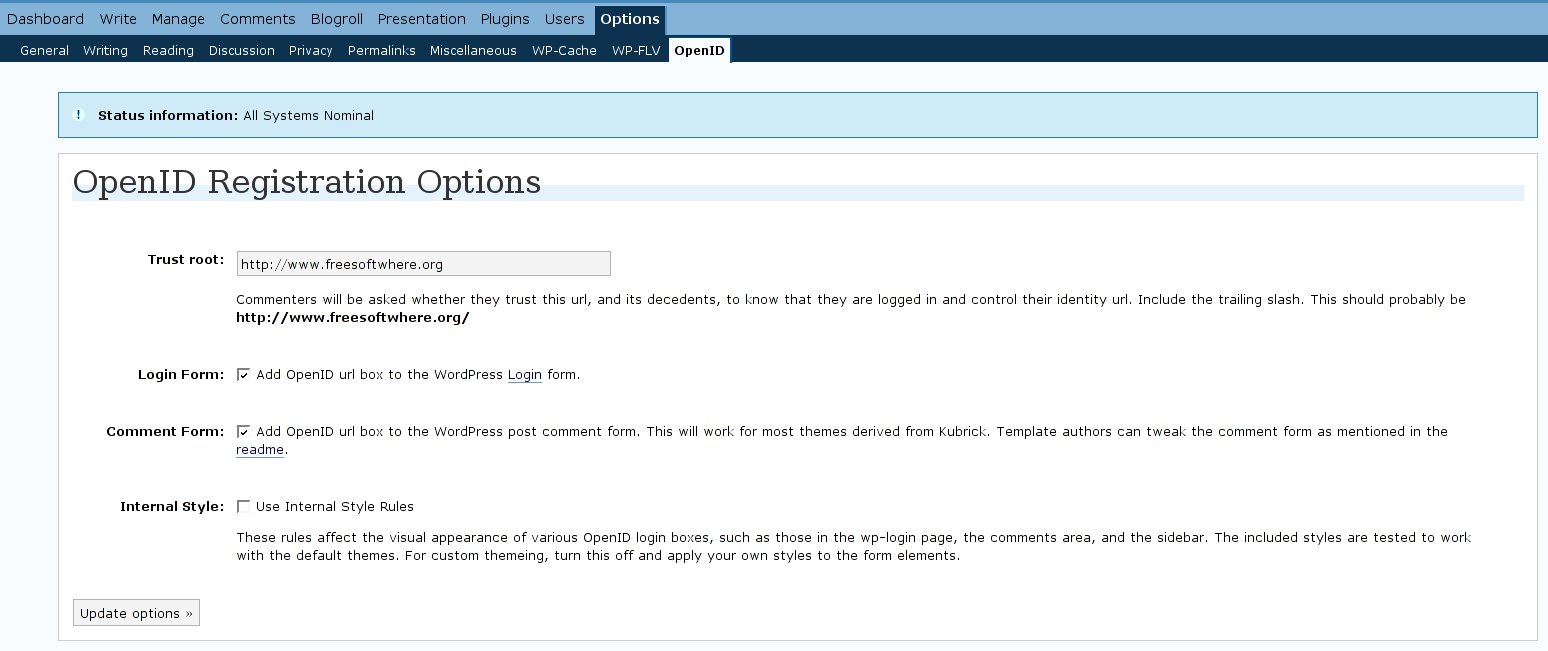
Options and decisions
| WPOpenID options. Click to enlarge. |
The WordPress Options tab gives you control over four WPOpenID factors: your site’s OpenID trust root, the style rules used in the OpenID login boxes, and whether to incorporate OpenID authentication into the login page and/or comment form. The trust root is simply the URL string that OpenID servers will ask visitors about when they try to log in; in most cases it will be your WordPress site’s base URL, though if you have a complicated setup with multiple blogs or subdomains and you want to keep the users separate, you may need to make the trust root more specific.
The style rules that ship with WPOpenID are designed to make the OpenID login boxes look like the rest of your site, but they are crafted for use with the default WordPress themes. Since my site uses a light-text-on-dark-background theme, I turned the style rules off and tweaked the look and feel to match that of my site by editing the CSS.
WPOpenID’s key feature is enabling OpenID logins for registered account holders via the login form and the comment form. You can toggle the OpenID login box off and on for each form. Which options best fit your needs depends on your other WordPress settings. In particular, recall that OpenID (and therefore WPOpenID) only involves authenticated users. You can configure WordPress to allow anonymous public comments — which would not involve OpenID or any other form of authentication.
Sites that do use authenticated users fall into two basic groups — discussion-oriented blogs and content management systems (CMS). In the discussion-oriented blog, most accounts are those created by visitors before leaving a comment. In the CMS, most accounts are for writers, editors, and administrators, and commenting may be turned off altogether.
A discussion blog will likely want the OpenID box in both the comment form and account login page, purely to offer a convenience to visitors. For a CMS, on the other hand, the advantage of using OpenID is offloading the responsibility of remembering passwords to the individual users. CMS sites might leave the comment form OpenID box turned off if they expect no one but already-logged-in users to leave comments.
Exploring OpenID for registered accounts
| A user account. Click to enlarge. |
If you allow visitors to create their own accounts, as in the “discussion blog” scenario, WPOpenID will present them with the option of creating their new account with an OpenID URL instead of picking a username.
Try registering an account on your blog via OpenID, then look at the account’s profile. When a new user account is registered through OpenID, the username will be a simplification of the new user’s provided OpenID identity URL. Like all WordPress usernames, that username is not editable. The rest of the profile and contact info options are just like any other registered user account — including the fact that you can set your display to be your first and last name, or even pick a totally unrelated nickname.
| A real OpenID comment, and a phony. Click to enlarge. |
This use case highlights one of OpenID’s limitations. You can visit any blog that supports OpenID authentication and create an account the old-fashioned way, but choose a username or display a nickname that looks like somebody else’s OpenID URL. WPOpenID does put a small OpenID logo next to usernames that authenticated via OpenID, but it still leaves plenty of room for confusion. Guarding against such abuse is left up to the site administrator.
Adding OpenID to existing sites
A common question about OpenID is whether you can add support for it to an existing Web site without wiping and reinitializing all the user accounts or some similar administrative headache. The short answer is yes, you can add OpenID without starting over from scratch.
To test the process, log in with a WordPress user account that existed before you installed WPOpenID (hint: even if there were no other users, the admin user must exist before you can even install the plugin). Next to the Your Profile link in the Profile tab is a new page titled Your OpenID Identities. Here you can associate your account with an OpenID identity after-the-fact — or more than one OpenID, if you choose.
Once you add your OpenID identity to the account, sign out. You will see that the WordPress login form allows you to sign in with either your OpenID URL or your existing username and password.
Moving forward
WPOpenID is not the only plugin for WordPress that enables OpenID sign-on, although it is the best-known. Several individuals maintain forks of WPOpenID, notably Will Norris’ WPOpenID+. Norris’ plugin adds several bug fixes and features, including an “unobtrusive mode” that attempts to remember visitors’ identities by autodiscovery, saving users from having to log in on repeat visits.
One outstanding question is whether OpenID support will make it into the core WordPress distribution. The idea is underdiscussion at WordPress.org, but as yet there is no consensus.
WordPress is one of the eight target projects mentioned by name in the OpenID Code Bounty. The bounty is sponsored by more than a dozen corporate contributors at iwantmyopenid.org, and aims to accelerate adoption of OpenID by offering cash awards to the first 10 qualifying projects to incorporate OpenID support. The eligibility requirements stipulate what constitutes a qualifying claim: the project must be open source, have at least 200,000 public users, and incorporate OpenID as a core feature, not just a plugin.
The list of suggested targets is chosen for volume, and includes packages as diverse as Slashcode, phpBB, MediaWiki, and Mailman. The first 10 qualifying projects to add OpenID functionality (as either a server or a consumer) stand to receive $5,000 each.
Regrettably no one is offering to hand out cash rewards to individual sites for adopting OpenID. But at least with add-ons like WordPress plugins, it is not difficult to do so.


