
Author: Cory Buford
Content-filtering proxies restrict Internet access privileges for users or groups across an entire network. They must be able to block unwanted content through keyword, URL, DNS, MIME, and image filtering. They need to authenticate and log a user’s Internet activity by monitoring and generating detailed reports of URLs accessed, and they must integrate antivirus or malware protection by accessing a reliable antivirus server. Fulfilling all these functions may be a lot to ask, but SafeSquid delivers on all counts.
Developed by Office Efficiencies India Private Limited (OEIPL), SafeSquid was originally intended to be a content filter plugin for the popular Internet proxy Squid. However, OEIPL decided to develop it into an open source proxy that fully utilizes Squid’s capability and integrates content filtering and protection. This HTTP 1.1 proxy’s features include HTTP and FTP proxy capabilities, including prefetching and reverse proxying; local and PAM authentication using LDAP or Active Directory Services; content filtering (by keyword, URL, pornographic image, MIME type, header, or categorized Web site); content security through integration with antivirus software such as Clam AntiVirus, Sophos, Kaspersky, and Internet Content Adaptation Protocol; redundancy through clustering; and report capability.
The latest free version is 4.2.2RC8.9B, while the commercial editions are based on version 4.1.1. I tried to obtain a trial version of the commercial edition but, after being redirected to the same page several times, I decided to grab the current version instead — they have since corrected the problem. The fixes and release notes show that this version is stable and includes major improvements on version 4.1.1.
The free version is also known as SafeSquid Free Composite 20, meaning that no more than 20 unique users can connect to the proxy at the same time. The Standard edition is divided into Plus, Server Message Block (SMB), Enterprise, and Advanced editions. All support up to 4,000 concurrent connections and differ only in the functionalities supported and price. SafeSquid also offers a subscription for its cProfile service, which classifies Web sites into categories depending on site content, such as news, webmail, adult, illegal, sports, hacking, and so forth. Pricing is dependent on the number of users and the subscription length. Commercial add-ons, such as a pornographic image filter, are also available to enhance your content filtering and security capability.
Deploying SafeSquid
To try the software, download the SafeSquid Free Composite 20 4.2.2RC8.9B .tar file. For optimal performance, you should install it on a machine with at least a Pentium III CPU and 512MB RAM. For 100 users, increasing the RAM to 1GB should do the job. Also, be sure that your system meets the other SafeSquid requirements.
Decompress the downloaded file, then follow the installation instructions. Be sure to enter a hostname that is resolvable by the DNS you’re using. You need to enter the exact address that you will type in the browser when entering the SafeSquid management console page. For example, if you’re using a certain hostname, use http://hostname rather than the IP address when accessing the management page. If there is no available hostname or if it cannot be resolved, enter the IP address as the hostname during setup and use that when accessing the management page. You won’t be able to see or change the configuration settings if you use a different hostname or IP address. The SafeSquid forum is helpful when attempting to resolve these sorts of issues.
Once the installation is complete, start the SafeSquid service using the script command /etc/init.rd/safesquid start.
I tested SafeSquid first as a proxy. After making sure that the service was running and that port 8080 was listening (you can change the port specification during installation), I set the proxy setting of my browser to 192.168.100.30:8080 — my SafeSquid address. I tried connecting to Google, but the browser returned a “Proxy refused connection” error. I tried browsing the SafeSquid server using its address as a proxy, and had no problem. I concluded that port 8080 was not yet allowed on the Linux firewall running on the proxy server. Once I opened the port, the other workstation was able to browse without problems.
Controlling access and content
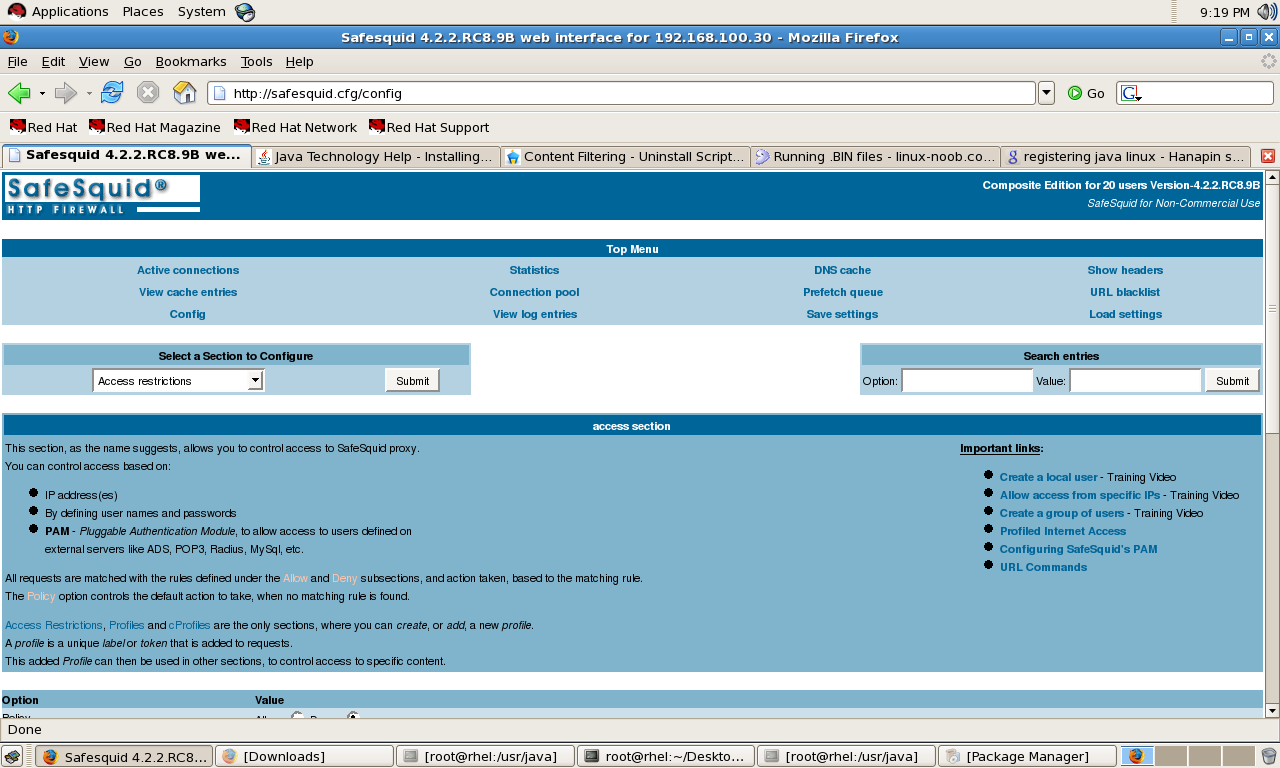
Once you have configured the browser proxy, go to http://safesquid.cfg/ to access the SafeSquid management page. In Config, you’ll see a drop-down list of options available for configuration. To control users’ Internet access, first configure Access Restriction. Its default global setting is Deny, which means that the proxy won’t allow anyone to browse. However, it also has a default policy that allows anyone to access the Internet, which negates the global policy. You will want to remove the default Allow policy and replace it with the specific users you wish to allow. They do this to show that setting the global policy to deny is a good practice while you create specific policy profiles under their policy Allow.
To specify users who can have access, add a new policy under Allow. Specify the name of the policy, its description, and the network address, or range of addresses, in which you will enforce the policy. Also, specify the username, password, and the user profile group to set restrictions by group. For example, you have users in the engineering department that need access to engineering sites, so you can create an engineering profile group consisting of people from that department to access the engineering sites. The software can create its own local database for users and groups, or it can rely on an existing LDAP or Active Directory to authenticate users and groups. Under each defined policy are the content filters, such as the pornography filter mentioned earlier, that SafeSquid can apply. You can also create your own content filter, but that takes some time and patience. These filters can also set which users have access to SafeSquid’s management.
If you have few users, creating a policy for each one may be acceptable, but for enterprise deployment, you should integrate SafeSquid into an authentication mechanism like LDAP or Active Directory by enabling PAM. The integration can be tricky, because you have to configure SafeSquid’s /etc/pam.d/safequid configuration file — see related discussions in the forum. If you are not currently using a directory service, adding a user to a profile group, especially when you want a certain content profile to be easily applied to a number of users, is the next most efficient alternative. You configure the access policy the same way you do firewall policy configuration.
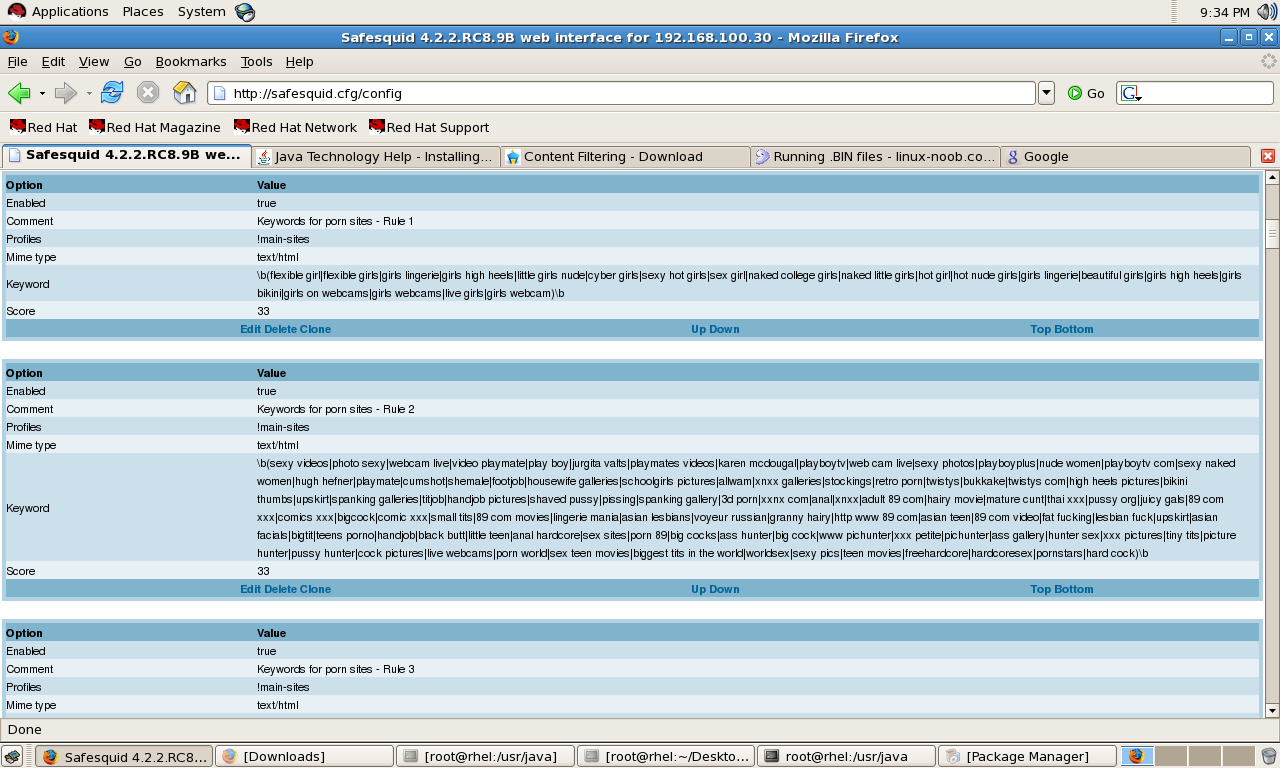
After creating your users you can proceed to control the content. The best way to control content is to use cProfile, the service that classifies Web sites depending on content into predefined categories. It’s like an online database that SafeSquid accesses to see the category of a specific Web site. Since the sites are already categorized, you can simply select what site categories to block or access. There’s no need to create custom profiles to filter Web sites, unless you have the time and patience to do so. However, if you do not have a subscription, you can filter by keyword, header, MIME type, URL, and DNS.
In my case, I downloaded the available pornographic and proxy site keyword filter profile from SafeSquid’s site and loaded them into SafeSquid’s configuration via the Load Settings option in the top menu. My keyword filter was then filled with several words and phrases to be blocked. If you want to block a site, keyword, or other content not present in the available predefined filter profiles, you need to create your own filter profile. This is especially true when you’re not subscribed to the commercial service for SafeSquid, and thus limited to the free predefined filter profiles. Since my primary concern was to block pornographic material, I used the newly installed pornographic filter profile in its default form — without expanding on the list of words and phrases to be blocked.
Upon saving the configuration, I tested the proxy and tried to browse from one of the other workstations. When I opened a browser to accesses the Internet via SafeSquid, the proxy asked me for a username and password to authenticate. Since the proxy authentication process is a part of the SafeSquid security, it extends to directory services as well. This is only requested once, at the beginning of the browser session. I used one of the user accounts and was able to browse. On Google, I tried to search for pornography-related terms, and SafeSquid blocked the result, displaying a SafeSquid logo and the URL that was blocked. I also tried entering a URL like playboy.com and was likewise blocked. So using only the free profile from SafeSquid seems to be sufficient to control content.
You can also create profiles that block ad banners, but you would have to specify an image, Flash file, or HTML template to replace the ad banner placed inside the SafeSquid server, unless you don’t mind displaying 404 errors when using HTML templates. I tried to download the pornographic image filter but, since you need to request it via email and I did not receive a reply from SafeSquid, I wasn’t able to obtain the trial license for it.
SafeSquid’s management page also lets you configure the antivirus capability, DNS blacklisting, file type filtering, external authentication, and more. You need to subscribe to the cProfile service or extensively modify some of the configuration files, and profile configuration can be tedious.
SafeSquid’s reporting seems to be sufficient in that it offers URLs blocked, number of requested pages fulfilled, DNS cache, user and IP address Internet usage, bandwidth used, and general system status (CPU usage, memory usage, and so on), but SafeSquid also offers you the ability to integrate external reporting tools, such as Webalizer and Calamaris via CLI. For a complete reference on configuration and to view some video tutorials, visit SafeSquid’s documentation page.
Conclusion
SafeSquid has just a couple of minor drawbacks. Although the GUI is easy to use, a first-time user might need a little time to get used to it. In addition, it’d be nice if SafeSquid integrated the external authentication settings within the GUI interface so that an administrator wouldn’t have to deal with configuration files.
Despite a couple of minor flaws, SafeSquid’s ease of management, continuous development, and great forum support put this proxy at the top of my list. Although it costs to use some additional features and for user support, it is worth the money for features that match or exceed those of its competitors. SafeSquid’s features are comparable to those normally seen on Unified Threat Management (UTM) boxes that cost thousands of dollars. With SafeSquid, you only need a low-end box (around $200 for a Pentium 4 with 1GB RAM), the SafeSquid edition (cost depends on users and functionalities), and the subscription, which can be less than the usual UTM subscription price. Best of all, for small offices with 20 or fewer users, most of SafeSquid’s features are free.
Categories:
- Reviews
- Internet & WWW


