
One of the really neat features of coding for a portable platform like a phone is that you can use its motion sensors to control the UI. How useful this is in a particular app varies from “neat gimmick” to “UI perfection” — admittedly the example here is more on the “gimmick” end of the spectrum, but it’ll get you started with using the Android motion sensors. We’ll carry on using the code from the previous three tutorials, but this time, we’re going to add a detector which enables you to start the timer by shaking the phone.
Accelerating…
Android has a whole raft of sensors, which are listed in the SensorEvent API, and which include the accelerometer, gyroscope, orientation, and some others. Not all devices will support all sensors. You can use SensorManager.getSensorList(Sensor.TYPE_ALL) to see a list of the available sensors.
However, all devices should include an accelerometer, and that’s what we’re going to use here. The regular accelerometer includes a contribution from gravity; so to establish the true acceleration of the device you need to apply a high-pass filter to the values returned (as described in the SensorEvent API docs). However, as of API level 9 (Android 2.3), there is also a linear accelerometer sensor type which has done this for you, and which just measures the acceleration of the device along each axis. We’re going to use this to save doing the hard work ourselves. (A gravity sensor type was also added in API level 9, should you happen to find yourself somewhere where gravity is non-Earth-standard.)
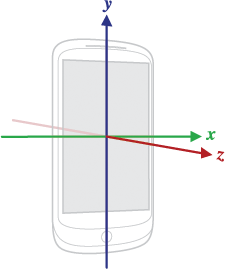 Android axes
A quick note about axes. The sensor X axis runs left-right across the screen (in its default orientation, so held in portrait mode for the average phone), the Y axis runs upwards along the screen, and the Z axis runs outwards from the screen (see the diagram in the SensorEvent API). These axes do NOT change direction when the device orientation changes, and more importantly, they are NOT the same as the co-ordinate system used by the Android 2D screen drawing APIs. We won’t need to deal with this issue in this code, but if you’re using the sensors for gameplay UI, it can be a bit of a headache, especially as the 3D co-ordinates are different again. Drawing things out on scraps of paper usually helps.
Sensing events
So, how do we set up our code to sense an accelerometer event? Easy: just make your Activity implement SensorEventListener:
public class CountdownActivity extends ListActivity
                               implements SensorEventListener {
  ...
}
To implement SensorEventListener, we’ll need to override onAccuracyChanged() and onSensorChanged(), but first, let’s get a SensorManager and Sensor set up:
public class CountdownActivity extends ListActivity
                               implements SensorEventListener {

  private SensorManager manager;
  private Sensor accel;
  public void onCreate(Bundle savedInstanceState) {
    super.onCreate(savedInstanceState);
    manager = (SensorManager)getSystemService(SENSOR_SERVICE);
    accel = manager.getDefaultSensor(Sensor.TYPE_LINEAR_ACCELERATION);
    // rest of onCreate code; see previous tutorials
  }
}
We now have an acceleration sensor to use, but currently it’s not actually been turned on. To do that, we need to implement onResume() and onPause():
protected void onResume() {
  super.onResume();
  manager.registerListener(this, accel, SensorManager.SENSOR_DELAY_GAME);
}
public void onPause() {
  super.onPause();
  manager.unregisterListener(this);
}
The EventListener will listen for events in the given sensor, with the given sensitivity. We’re using the GAME value for the sensor delay, which is sensitive enough for most games; you also have NORMAL, UI, and FASTEST. We can use this as the SensorEventListener to be registered, because we’ve implemented SensorEventListener in this Activity. Otherwise we’d have to write another class to handle this.
Note that we only have to register the Listener in onResume(); this is because onResume() is always run when onCreate() runs, so any code here will be run when the Activity is created, not just when it’s resumed. (There’s a diagram of the Android Activity lifecycle in the docs). It’s very important to remember to unregister your Listener when your Activity is paused. The system won’t do it automatically for you, and listening for events uses up a lot of battery. Draining the battery in the background tends to make you unpopular with users.
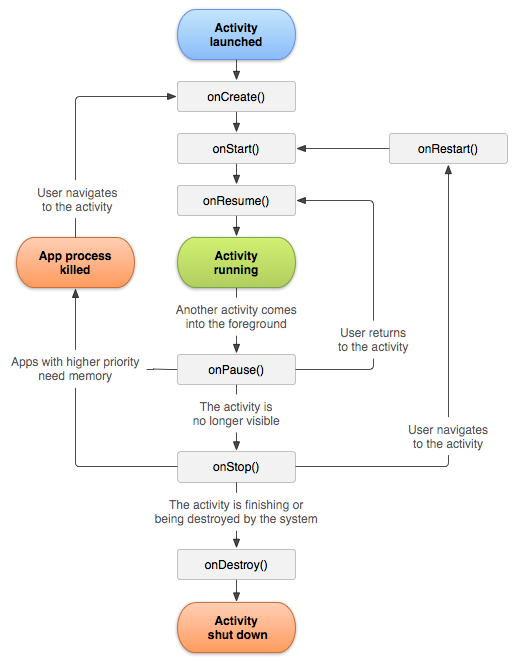 Android activity lifecycle
Having set everything up and registered the Listener, we need to write the methods that define what happens if a SensorEvent is detected:
public void onAccuracyChanged(Sensor sensor, int accuracy) {
  // not going to do anything with this.
}
public void onSensorChanged(SensorEvent event) {
  showTimer(countdownSeconds * MILLIS_PER_SECOND);
}
We’re not going to bother doing anything in particular if the sensor accuracy changes, as it doesn’t really interest us here. However, if the sensor changes at all, we’re going to interpret that as a shake, and show the timer (remember from previous tutorials that showTimer()also starts it; you might want to improve the code by breaking different parts of this out into different methods).
Compile it, run it (you’ll need to run it on a phone, not on the emulator, as described in previous tutorials), and you should be able to start the timer by shaking the phone. However, you’ll notice that only a very tiny movement restarts the timer — this is a bit more sensitive than we want. To improve this, we can get the actual values of the sensor event and only act if they are above a certain amount. I found that a threshold of 3 worked well, and this code doesn’t distinguish between the direction of the shake:
public void onSensorChanged(SensorEvent event) {
  int xValue = event.values[0];
  int yValue = event.values[1];
  int zValue = event.values[2];
  if (xValue + yValue + zValue > 3 ) {
    showTimer(countdownSeconds * MILLIS_PER_SECOND);
  }
This code now provides a basic interaction between the accelerometer and the timer, but there’s plenty more you could do to improve it. For example, you could write a method to stop the timer if the phone is shaken again. In general, adding some more detailed stop/start/reset code is probably useful as the app becomes more complicated. You can also play around with the sensor code a bit to get a better grasp of how the sensor works — you could for example use log output to find out what the values look like, or try varying them in different directions and acting differently on a sideways shake than an up and down shake. The best way to get to grips with the options and to improve your Android coding chops is to get experimenting and rewriting!
Image Credits
Axis Image and Activity lifecyle diagram: Portions of this page are reproduced from work created and shared by the Android Open Source Project and used according to terms described in the Creative Commons 2.5 Attribution License.


