Home Blog Page 1025

How To: Install/Upgrade to Linux Kernel 4.1.6 in Ubuntu/Linux Mint Systems

Full article here

    The Linux Kernel 4.1.6 is now available for the users, announced Linus Torvalds. This Linux Kernel version comes with plenty of fixes and improvements. This article will guide you to install or upgrade to Linux Kernel 4.1.6 in your Ubuntu or Linux Mint system.

Installation

For 32-Bit Systems

Download the .deb packages.

$ wget http://kernel.ubuntu.com/~kernel-ppa/mainline/v4.1.6-unstable/linux-headers-4.1.6-040106_4.1.6-040106.201508170230_all.deb
$ wget http://kernel.ubuntu.com/~kernel-ppa/mainline/v4.1.6-unstable/linux-headers-4.1.6-040106-generic_4.1.6-040106.201508170230_i386.deb
$ wget http://kernel.ubuntu.com/~kernel-ppa/mainline/v4.1.6-unstable/linux-image-4.1.6-040106-generic_4.1.6-040106.201508170230_i386.deb

Install them.

$ sudo dpkg -i linux-headers-4.1.6*.deb linux-image-4.1.6*.deb

Reboot the system.

sudo reboot

Read full article here

FileZilla Client 3.13.0 Released [How To Install In Ubuntu Linux Or Derivatives Distros]


FileZilla Client 3.13.0 Released [How To Install In Ubuntu Linux Or Derivatives Distros]

FileZilla is a free and open source FTP client. It’s available for all major operating systems including Windows, Mac and obviouslyLinux. The latest version includes couple of new features and few bug fixes that make it more stable. Let’s see how we can install/upgrade to FileZilla 3.13.0 in Ubuntu/Linux Mint or other Debian based Linux distros.

Read At LinuxAndUbuntu

LinuxCon Exclusive: Mark Shuttleworth Says Snappy Was Born Long Before CoreOS and the Atomic Project

Mark Shuttleworth, founder of Canonical and Ubuntu, made a surprise visit at LinuxCon. I sat down with him for a video interview and talked about Ubuntu on IBM’s new LinuxONE systems, Canonical’s plans for containers, open source in the enterprise space and much more.

Swapnil Bhartiya: You made a surprise entry during the keynote. What brought you to LinuxCon?

Mark Shuttleworth: I am here at LinuxCon to support IBM and Canonical in their announcement of Ubuntu on their new Linux-only super-high-end mainframe LinuxONE. …

Read more at IT World

CoreOS Adds Intel Clear Container Technology in Rocket Containers

Brandon Philips, CTO of CoreOS, discusses the latest Rocket 0.8 release, which integrates new Intel technology for container security. CoreOS is moving forward with its development of the Rocket (rkt) container technology, thanks to some help from Intel. The latest rkt 0.8 release became generally available on Aug. 19, integrating Intel’s Clear Containers technology, providing hardware-assisted container isolation and security. 

In a video interview with eWEEK, Philips details the latest development…

Read more at eWeek

The bcachefs Filesystem

Kent Overstreet, author of the bcache block caching layer, has announced that bcache has metamorphosed into a fully featured copy-on-write filesystem. “Well, years ago (going back to when I was still at Google), I and the other people working on bcache realized that what we were working on was, almost by accident, a good chunk of the functionality of a full blown filesystem – and there was a really clean and elegant design to be had there if we took it and ran with it. And a fast one – the main goal of bcachefs to match ext4 and xfs on performance and reliability, but with the features of btrfs/zfs.

Read more at LWN

Live Booting Linux

jack1-live-1“I’d like to give Linux a try, but I’m not sure how.”

I’ve heard that statement so many times over the years. During that period, my pat response has changed from something akin to “It’s worth the effort” to “It’s incredibly easy.” Linux is, actually, the single most easy operating system to “try out.” How is that possible? Two words… live booting.

For those of you who are familiar with Linux, this is not only old news, it’s also very basic:

  1. Download an ISO

  2. Burn the ISO to disk

  3. Boot your computer with the newly burned disk

  4. Try out the live distribution

For those not so familiar with Linux—but very much interested in giving the platform a try—I want to introduce you to the concept of live booting. Because most new machines don’t ship with optical drives, you will also learn how to create a bootable live USB flash drive (so you can carry Linux with you all the time).

What Is Live Booting

The concept of live booting is actually quite simple. With a live Linux distribution (not all distributions come in “live” flavors), you can boot your machine from either a CD/DVD disk or from a USB flash drive and choose to try out the operating system without making any changes to your hard drive.

How this works is by running the entire system from volatile memory (RAM). The operating system and all programs are usable, but run from memory. Because of this, you can boot the live system, test/use it for as long as you need, and then reboot the system (remembering to remove the live media) to return to your original system.

Live distributions can be used for several purposes:

  • Testing a Linux distribution: This is the best way to see if Linux is for you.

  • Testing hardware: If you’re unsure if your hardware will work with a Linux distribution, run it live and find out.

  • Kiosks or cafes: If you need a machine that can be booted fresh each day, a live linux distribution might be the solution for you.

Live distributions also form a collection of very important tools that handle crucial tasks, such as:

  • Data recovery

  • System recovery

  • Rescue and repair

  • PC Forensics

  • Boot repair

As I mentioned, not all Linux distributions offer a live solution. Here is a complete list of distributions available as live releases.

What Do You Do With That Downloaded File?

This is the crux of the issue. For live booting, you will have downloaded an ISO image (the file will end in the .iso file extension). What you have to do next is burn that file to a disk. If you’re burning the disk from within Windows, all you need to do is locate the downloaded file and double-click it to begin the burning process. However, as I mentioned earlier, many newer PCs do not ship with optical drives. If that is the case, what do you do?

You turn to the tried and true USB flash drive.

Once upon a time, you would have had to manage the creation of a bootable USB flash drive with the Linux command line. Now, however, there are plenty of tools available for just that purpose. One such tool is called UNetbootin. This easy to use app can create a bootable USB flash drive from a downloaded ISO file or can even download the necessary ISO file for you. UNetbootin is available for Windows, Mac, or Linux and can, within a few short minutes, have you booting a live Linux distribution.

Creating a Bootable Live Distribution on a USB Flash Drive

Let’s walk through the process of creating a live USB flash drive with UNetbootin. Download and install the application on your platform of choice (Windows, Linux, Mac) and grab a USB flash drive large enough to hold your distribution (4GB USB flash drive should accommodate most distributions).

With everything ready, here are the steps to creating a bootable USB flash drive with UNetbootin (from a downloaded ISO file from your distribution of choice):

  1. Insert your USB flash drive

  2. Launch the software (you’ll need administrator privileges)

  3. Check the box for Diskimage (see Figure 1 above)

  4. Click the browse button (indicated with three dots)

  5. Locate the downloaded ISO images

  6. Select USB Drive from the Type drop-down

  7. Select the location of your USB drive from the Drive drop-down

  8. Click OK

  9. Allow the creation of the live USB drive to complete

  10. Click Exit (not Reboot), when the process completes

jack-live-2If you happen to have a Ubuntu system handy, you can create a bootable flash drive without installing third-party software. To do this, follow these steps:

  1. Download your desired ISO image and save it to ~/Downloads

  2. Insert your USB drive

  3. Open the Dash

  4. Type startup

  5. Open the Startup Disk Creator

  6. Select your downloaded file from the list (Figure 2)

  7. Click Make Startup Disk

  8. When prompted, enter your admin password

One of the options available on the Ubuntu Startup Disk Creator is the ability to include extra space on the USB drive. This space is used for saving files—so you don’t lose everything when the system is rebooted. By doing this, you effectively create a portable Linux system that can be carried with you wherever you go.

Booting the USB Drive

With the live USB drive complete, you now need to insert the drive into the target computer (the computer to be used to run the live image) and boot up. If your machine doesn’t automatically boot from the USB drive, you may have to go into your machine’s BIOS and set the boot order such that external devices boot first (how this is done will vary, machine to machine).

jack-live-3
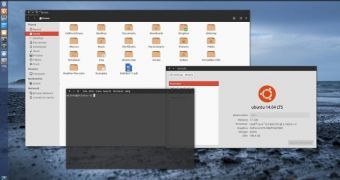
In most cases, you will be greeted with some form of the “Try” screen (Figure 3). To run the distribution as a live instance, click Try NAME (where NAME is the name of the distribution) and allow the desktop to load. Once the desktop is loaded, you’re ready to go.

Caveats to Running Live

One of the biggest issues people face with running live instances of Linux is insufficient RAM, which can cause the system to run slowly. Remember, this will be running completely from memory, so chances are it won’t run as smoothly as if it were installed on the hard drive. However, if your system contains 2 GB or more of RAM, you’ll find the live instance runs fairly well.

Another caveat you must understand is that the second you reboot, all is lost. Just because the system is running from memory, doesn’t mean you cannot install applications or save files. But, unless you’ve saved files to an external drive, as soon as the system is rebooted, everything you’ve saved (installed or configured) will be gone.

You now have all the power necessary to test and run Linux without making a single change to your machine’s hard drive. Linux is an incredibly powerful and flexible platform… live booting is just one way to experience and even share the flagship open source operating system.

Canonical Closes Numerous OpenSSH Vulnerabilities in Ubuntu

UbuntuCanonical has published details in a security notice about a few of OpenSSH vulnerabilities that have been found and fixed in Ubuntu 15.04, Ubuntu 14.04 LTS, and Ubuntu 12.04 LTS operating systems.

The Ubuntu maintainers have been quick to integrate a new version of the OpenSSH library into the repositories. This version covers a number of security issues and it’s not a major upgrade. It’s still a good idea to upgrade the OS as soon as possible.

Read more at Softpedia Linux Blog

Fork Release Intensifies Bitcoin Community Bitterness

A full release of Bitcoin XT became available on Saturday, heaping fuel on the fire spreading throughout the community. 

The Bitcoin subreddit went so far as to ban XT-related posts, resulting in allegations that a small cabal had taken control of the community and was suppressing discussion and dissent. The cause of all the furor is a difference of opinion…

Read more at LinuxInsider

First Beta for GNOME 3.18 Is Out and Ready for Testing

GnomeThe GNOME development team has announced that the first Beta update GNOME 3.18 is now out and ready for testing. There is still a long way to go until the stable version is released, but the project is now in software freeze.

The GNOME 3.18 development is progressing according to schedule, and it looks like no major problems have been encountered until now. The GNOME devs have spent a lot of quality time at the latest conference, GUADEC, and they have made some serious improvements…

Graphic Cards Driver Configuration

Graphic cards driver on linux xorg.conf and org.conf.d configuration:

(for legacy driver) etc/X11/xorg.conf  (file)  
(xserver driver) etc/X11/xorg.conf.d/  (folder)

etc/X11/xorg.conf file and etc/X11/xorg.conf.d/ folder content number orders:
    Files                 File pathnames
    ServerFlags     Server flags
    Module             Dynamic module loading
    Extensions       Extension enabling
    InputDevice      Input device description
    InputClass        Input class description
    Device             Graphics device description
    VideoAdaptor  Xv video adaptor description
    Monitor             Monitor description
    Modes              Video modes descriptions
    Screen             Screen configuration
    ServerLayout   Overall layout
    DRI                    DRI-specific configuration
    Vendor             Vendor-specific configuration

    Keyboard         Keyboard configuration
    Pointer             Pointer/mouse configuration

After the right graphic card (nvidia,ati, amd, intel, or internal) driver installation to your current linux kernel version.

File number order given by yours. Above shall be determined according to the order in case of need for file plug-ins extension numbers, according to the above ranking /etc/X11/xorg.conf file /etc/X11/xorg.conf.d/ and content number orders.

1. xx-nvidia.conf: Create driver configuration file for device first. This file only contain your specific driver information BusID,  option for registery information. Only properties that are needed for the opening of the graphics card. Add to this feature, the feature graphics will happen only when initiated by the graphics card. These features will not be reinstalled when the next graphics card request. For example “/etc/init.d/gdm3 restart
 
$ cat /etc/x11/xorg.conf.d/20-nvidia.conf
Section “Device”
    Identifier     “Nvidia GF G72M”
    Driver         “nvidia”
    BusID         “PCI:1:0:0”
    #    Option        “RegistryDwords” “PowerMizerEnable=0x1; PerfLevelSrc=0x3322; PowerMizerDefaultAC=0x1”
    Option         “RegistryDwords” “PowerMizerEnable=0x1; PerfLevelSrc=0x2222; PowerMizerLevel=0x3; PowerMizerDefault=0x3; PowerMizerDefaultAC=0x3”
    Option         “AddARGBVisuals” “TRUE”
    Option         “AddARGBGLXVisuals” “TRUE”
    Option         “TripleBuffer” “TRUE”
    Option         “BackingStore” “TRUE”
    Option         “NvAGP”   “1”
    Option         “Coolbits” “1”
    Option         “RenderAccel” “TRUE”
    Option         “CustomEDID” “DFP-0:/etc/X11/edid.bin”
EndSection

2. xx-module.conf: File number order given by yours. This module your hardware capability for installed modules. Different device module can be used, if it usable.

$cat /etc/X11/xorg.conf.d/15-module.conf
Section “Module”
    Load           “glx”        # OpenGL X protocol interface
    Load           “extmod”
    Load           “dbe”
    Load           “dri2”
    Load           “fb”
    Load           “wfb”
    Load           “ramdac”
    Load           “evdev”
    Load           “synaptics”
EndSection

3. xx-monitor.conf: In monitor section use your first added configuration. For example from “xx-device.conf”

$ cat /etc/X11/xorg.conf.d/40-monitor.conf
Section “Monitor”
    Identifier          “LG01”
    ModelName     “WSXGA+”
    HorizSync       31.5 – 65.5
    VertRefresh    56.0 – 65.0
    DisplaySize     331.1 207.3
    Option             “DPMS”
    #    Option       “ExactModeTimingsDVI” “TRUE”
    #    Option       “PreferredMode” “1680×1050@60”
EndSection

Section “Device”
    Identifier     “d00”
    Driver         “Nvidia GF G72M”
    Option        “NoLogo” “TRUE”
    Option        “ModeValidation” “NoDFPNativeResolutionCheck”
    Option         “ConnectedMonitor” “DFP-0”
    #    Option   “MonitorLayout” “TDMS”
EndSection

Section “Screen”
    Identifier           “TFT Screen0”  
    Device              “dd0”
    Monitor             “LG01”
    DefaultDepth    24
    Option              “Stereo” “0”
    Option              “nvidiaXineramaInfoOrder” “DFP-0”
    #    Option        “ModeValidation” “NoMaxPClkCheck”
    Option              “metamodes” “1680x1050_60 +0+0”
    SubSection      “Display”
        Depth           24
    EndSubSection
EndSection

4. If needed you add legacy xorg.conf file to /etc/X11/xorg.conf

5. Test your configuration order right or not right.

$ reboot # you see logo first

$ /etc/init.d/gdm3 restart # you can not see first logo but startx works.

$ shutdown # what see and configure your options.

Tthis configuration not need  now xorg.conf file. When  graphic card first load [Option “NoLogo” “TRUE”] not activate, then load monitor and screen [Option “NoLogo” “TRUE”] activate.