
Huawei Watch and TalkBand B2 fitness band unveiled by Huawei at MWC.
Read more at ZDNet News

Released in February, the Raspberry Pi Model 2 B is an update to the original board that brings quad cores for six times the performance of the original, 1 gigabyte of RAM for twice the memory, and still maintains backwards compatibility. The many CPU cores are brought about by moving from the BCM2835 SoC to the BCM2836 SoC in the Raspberry Pi 2.
It retails for $35, but you will also need a microSD card in order to use the Raspberry Pi 2 which brings the overall cost up a little bit. It does retain the physical form of the Raspberry Pi 1 Model B+, so you should be able to select from the many snazzy cases that already exist for your new Pi version 2.
But how does this beefed up board compare to the other substantial ARM machines? Let’s boot it up in Raspbian, run it through some standard graphics and performance tests, and gain access to those 40 GPIO pins.
The Raspberry Pi downloads page includes disk images for Raspbian (which is Debian Wheezy), Snappy Ubuntu, Fedora 20, and two XBMC/Kodi targeted distributions. The latter should be of interest to folks wanting to play back media files on the Raspberry Pi 2.
I tried installing Debian Wheezy and although mplayer, xine-ui, and xbmc could easily be installed using apt-get, performance was very slow on Big Buck Bunny, perhaps in the range of one frame per second. Clearly there is some tinkering to be done in order to unlock the video decoding features on the Raspberry Pi 2 if you are using the Debian image.
The Raspberry Pi must use a microSD card in order to boot. If you are planning to use the Pi frequently you might like to use a faster (more expensive) microSD card. The Raspbian image can be copied to a microSD card on a desktop Linux machine using the ‘dd’ command. Instead of writing directly to a /dev/sdX file, I highly recommend using the links in /dev/disk/by-id to avoid accidentally writing over the wrong disk. I have found that using a large block size as in the below command can speed up writing the image.
# dd if=raspbmc-2014-11-24.img
 of=/dev/disk/by-id/the-right-disk bs=1048576
Then move that microSD card into the Raspberry Pi 2 and you are ready to fire it up. On first boot up a text menu appears on the HDMI output of the Raspberry Pi 2 with nine options. The first allows you to resize the installation to take up all the space on the microSD card. So you don’t have to worry about how to expand the filesystem to allow you to use all the space on your microSD card. You can also set the password for the user ‘pi’ from the menu and ensure that SSH is enabled.
Once you login to the Raspbian installation, you can get root access by running ‘sudo su -l’. A very useful option is to set where audio goes by default; to the HDMI connector or to the audio jack.
In the advanced menu you have options to enable the SPI and TWI interfaces for the board and overclock the hardware should you feel the desire. The finish button in the menu offers to reboot the machine for you which will be useful the first time so that the resized filesystem will let you access all the space on your microSD card.
Once you reboot the Raspberry Pi 2 you should see a desktop at 1080 resolution. Feeling lucky I installed kde-full on the machine and tried out a full KDE desktop. I think the use of a cheaper microSD card made that experience more painful than it might have been. The option to run KDE/Openbox was more usable but did still have some graphical artifacts on scrollbars. Though having kde-full installed did give access to all the KDE applications.
All benchmarking was done from Raspbian.
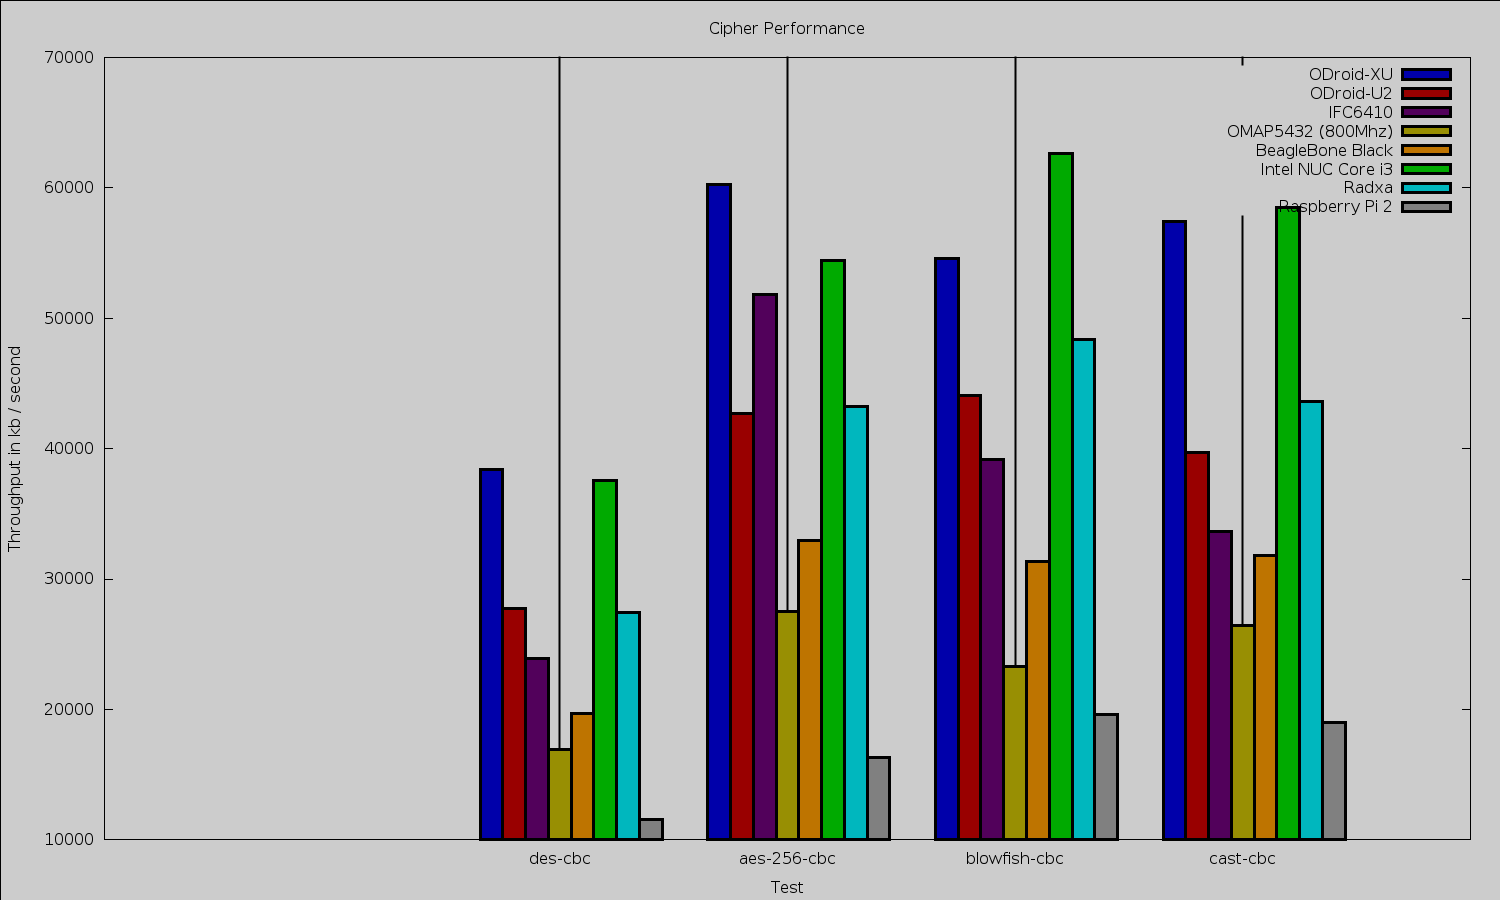
Comping openSSL 1.0.1e using -j 4 took about 9 minutes on the RPi 2. The Radxa took about 8 minutes to do the same, around 4 minutes on the ODroid-U2, and just under a minute on an Intel 2600K desktop machine. Storage speed might also be coming into play during compilation as the ODroid-U2 used faster eMMC storage. Keep in mind that the openssl speed test shown below is single threaded and will only take advantage of a single core. For openssl speed the RPi 2 is slightly below other ARM machines. For RSA signatures the performance was close to the BeagleBone Black.
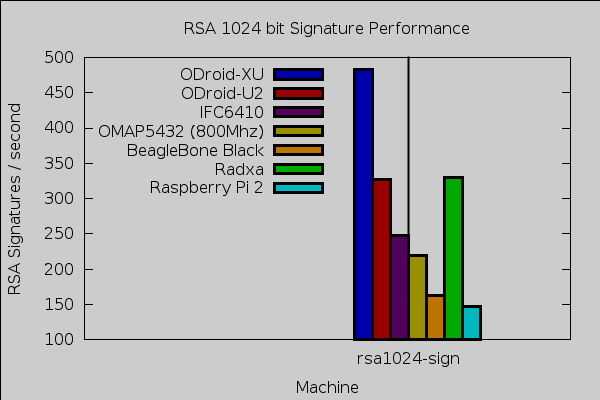
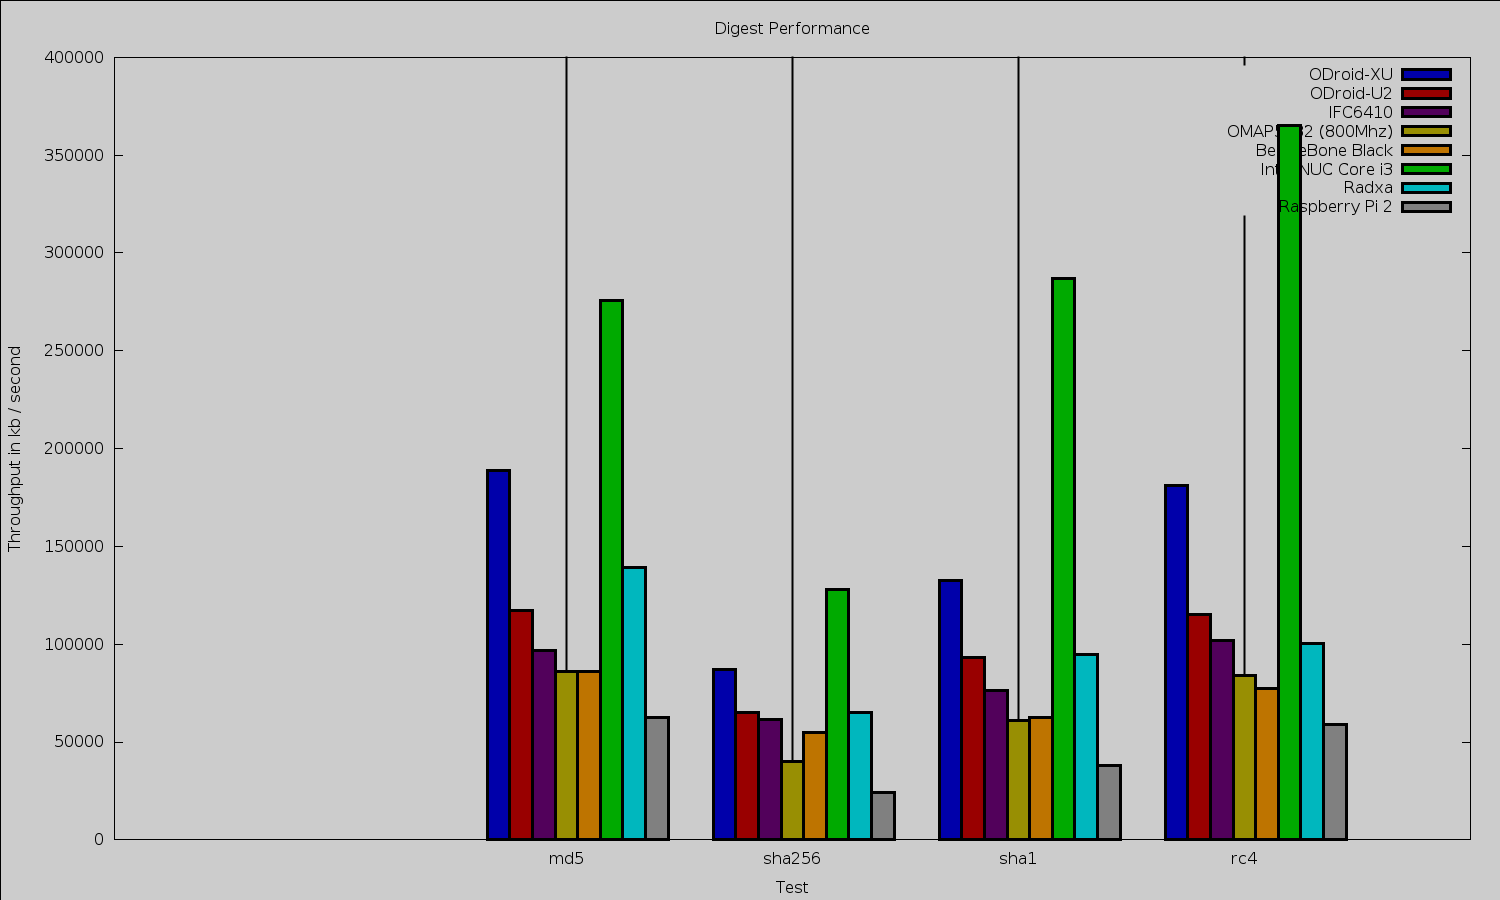
DES and AES cbc mode ciphering was substantially slower on the Raspberry Pi 2 than one might expect. For the Blowfish cipher the Raspberry Pi 2 was much closer to the performance of the BeagleBone Black. The same situation is evident for digests, the Raspberry Pi 2 being 1/5 to 1/3 slower than the BeagleBone Black. Remember though that the Raspberry Pi 2 is a cheaper machine than the BeagleBone Black and the Raspberry Pi 2 also sports four CPU cores relative to the single core of the BeagleBone Black.
To test 2d graphics performance I used version 1.0.1 of the Cairo Performance Demos. The gears test runs three turning gears; the chart runs four line graphs; the fish is a simulated fish tank with many fish swimming around; gradient is a filled curved edged path that moves around the screen; and flowers renders rotating flowers that move up and down the screen. For comparison I used a desktop machine running an Intel 2600K CPU with an NVidia GTX 570 card which drives two screens, one at 2560×1440 and the other at 1080p.
| Test | Radxa at 1080 |
Beable Bone Black at 720 |
Mars LVDS at 768 |
desktop 2600k/nv570 two screens |
Raspberry Pi 2 at 1080 |
|---|---|---|---|---|---|
| gears | 29 | 26 | 18 | 140 | 21.5 |
| chart | 3 | 2 | 2 | 16 | 1.7 |
| fish | 3 | 4 | 0.3 | 188 | 1.6 |
| gradient | 12 | 10 | 17 | 117 | 9.6 |
For testing Web browsing performance, I used the Octane Javascript benchmark. For reference, using The 64-bit version 32.0.3 of Firefox an Intel 2600K gives an overall figure of around 21,300 while the Intel J1900 chip comes in at around 5,500 overall. Using Iceweasel version 31.4.0esr-1 the Raspberry Pi 2 got 1,316 on Octane.
Power usage was around 2.3 Watts idle. When compiling openSSL using four cores power reached up towards 4 W. During the cairo benchmarks power got up to around 3 W.
Getting at those 40 pins
The GPIO interface is exposed at /sys/class/gpio by the Linux kernel. Once you export a GPIO pin, the filesystem lets you set it as an output and then change the voltage on the pin. In the following code, you need a little circuit with the anode of an LED at one end, the cathode of the LED connected to a resistor and the other end of the resistor connected to pin 6 (ground) on the Raspberry Pi 2 header. Then connect pin 8 (GPIO 14) to the anode of an LED circuit. You will then be able to turn on and off the LED by writing 1 or 0 to the gpio14/value file.
root@radxa:/sys/class/gpio# ls -l
total 0
--w------- 1 root root 4096 Jan 1 12:00 export
lrwxrwxrwx 1 root root 0 Jan 1 12:00 gpiochip160 -> ../../devices/virtual/gpio/gpiochip160
lrwxrwxrwx 1 root root 0 Jan 1 12:00 gpiochip192 -> ../../devices/virtual/gpio/gpiochip192
lrwxrwxrwx 1 root root 0 Jan 1 12:00 gpiochip224 -> ../../devices/virtual/gpio/gpiochip224
lrwxrwxrwx 1 root root 0 Jan 1 12:00 gpiochip256 -> ../../devices/virtual/gpio/gpiochip256
--w------- 1 root root 4096 Jan 1 12:00 unexportroot@pi:/sys/class/gpio# echo 14 > export
root@pi:/sys/class/gpio# cd ./gpio14
root@pi:/sys/class/gpio/gpio14# echo out > direction
root@pi:/sys/class/gpio/gpio14# cat value
0
root@pi:/sys/class/gpio/gpio14# echo 1 > value
root@pi:/sys/class/gpio/gpio14# cat value
1
While I had told the raspi-config tool in the advanced section to load and setup both TWI and SPI I could only see the SPI files. Running ‘modprobe i2c-dev’ gave the device files though. I hope to cover digging in and using these interfaces in a future article.
root@pi:/dev# ls -l /dev/i2* /dev/spi*
crw------- 1 root root 89, 1 Feb 6 10:45 /dev/i2c-1
crw-rw---T 1 root spi 153, 0 Jan 1 1970 /dev/spidev0.0
crw-rw---T 1 root spi 153, 1 Jan 1 1970 /dev/spidev0.1
The Raspberry Pi has wide community support, and a fully compatible but much faster Pi 2 with more RAM is a great thing to see. At the lower end of the price range shipping costs can account for a significant part of the total purchase price. I was able to find local distributors of the Pi 2, some of which offer free shipping.
I hope to take a look at video decode performance on the Raspberry Pi 2 in a future article, including the Kodi distributions.

Embedded World, which was held this week in Nuremberg, Germany, lacks the glamor and headlines of next week’s Mobile World Congress in Barcelona. Yet, along with showing off the usual circuit boards, the show coincided with the debut of two interesting new system-on-chips that combine Linux-friendly ARM Cortex-A cores with microcontroller units (MCUs).
On the low end, angling for the Internet of Things market, is Freescale’s i.MX6 SoloX, which combines a version of the single-core Cortex-A9-based i.MX6 Solo SoC with a Cortex-M4 MCU.
On the high end is a next-generation Xilinx Zynq SoC called the Zynq UltraScale+ MPSoC. The already hybrid ARM/FPGA Zynq SoC moves to a cutting edge 16nm 3D FinFet process, switches its dual Cortex-A9 cores to four Cortex-A53s, boosts the power of its FPGA, and adds a pair of Cortex-R5 MCUs for better real-time processing.
MCUs are a large and growing business for ARM, showing up in industrial equipment, robots, sensor systems, and all manner of low-end embedded gizmos. Yet, these real-time oriented chips exist mostly beyond the reach of advanced operating systems like Linux. Many of the hugely popular Cortex-M MCUs and the less commonly seen Cortex-R chips can run the stripped-down uClinux, with some tradeoffs, but even lightweight brands of full-fledged Linux distros, such as OpenWRT, cannot tap these devices.
Instead, MCUs typically run real-time operating systems (RTOSes) such as ARM’s new Mbed OS, which is designed for IoT applications on the Cortex-M. ARM is also working on an automotive-focused ARMv8-R version of the Cortex-R that will be able to run lightweight Linux distros.
Meanwhile, Linux itself continues to gain real-time chops thanks to continuing PREEMPT_RT patches, but the minimum processor requirements for Linux mean that many real-time tasks are beyond its purview.
Freescale previously experimented with a hybrid Cortex-A/Cortex-M SoC in its Vybrid-F, which combined a Cortex-A5 core running Linux with a Cortex-M4 microcontroller running Freescale’s MQX RTOS.
Now, it’s adding a similar MQX-running Cortex-M4 to its popular Cortex-A9-based i.MX6 processor family with the Freescale i.MX6 SoloX.
The i.MX6 has been popular among embedded SBC and computer-on-module vendors, in part due to its low power consumption, multimedia accelerators, and customizable core configurations. You can choose between single, dual, and quad-core versions, and the Solo and Dual versions each come with different flavors of Vivante graphics processing units (GPUs). The Linux- and Android-ready i.MX6 has appeared in numerous community-backed hacker SBCs, including the HummingBoard, LinkSprite Acadia, RIoTboard, Udoo Quad, WandBoard, and Warpboard.
The SoloX takes a 1GHz Cortex-A9 Solo core and combines it with a Cortex-M4 in order to offer “deterministic, real-time responsiveness,” says Freescale. But unlike the Vybrid, it also features a configurable resource domain controller to better coordinate the different cores. The technology allows peripherals to be locked or shared by the CPU cores.
The SoC’s discrete CPU core power domains also enable independent power state control and low current draw, including the ability to turn off the Cortex-A9 core, even while the Cortex-M4 performs low-level system monitoring tasks. Other new features include cryptography and dual-port gigabit Ethernet audio video bridging (AVB) for improved quality-of-service, thereby overcoming the SoCs earlier GbE throughput limitations.
The new features are particularly targeted at automotive gear. However, combining a single Cortex-A9 core with an MCU lends itself to a wide variety of low-power IoT applications ranging from home automation to robotics.

This week’s UltraScale+ announcements were big news in the FPGA (field programmable gate array) world where Xilinx and Altera leapfrog each other for bragging rights. Xilinx is now back on top with the UltraScale+, which advances from the previous 28nm and 20nm fabrication process used by the company’s flagship FPGAs and Linux-ready “Zynq” ARM/FPGA hybrid SoCs, to a cutting-edge 16nm FinFet process. This is essentially the same process that will be used by upcoming, 2.5GHz Cortex-A72 processors. The UltraScale+ process is touted for adding 3D packaging technology in addition to the 3D FinFet transistors, resulting in so called “3D-on-3D” technology.
In addition to the claimed two to five times greater system-level performance/watt gained from the new fab process, UltraScale+ processors are notable for “UltraRAM,” a new type of memory block that provides much more on-chip capacity with improved performance and reduced latency. New SmartConnect interconnects, meanwhile, let hardware designers optimize each interconnection between processing blocks rather than apply a one-size-fits-all approach, says Xilinx. Other enhancements include DDR4 support, high-speed memory cascading, enhanced DSP slices with 27×18-bit multipliers and dual adders, and more.
The UltraScale+ treatment is being given to Xilinx’ Kintex and Virtex FPGAs, as well as the Linux-ready Zynq, which EEJournal called out as the most improved of the UltraScale+ SoCs. The original Zynq was just as groundbreaking, in that it combined Cortex-A9 and FPGA subsystems on a single die, linking them via a high-speed AXI4 interconnect. This helped integrate processing in ways that were impossible with earlier combo chipsets, and opened up much of the FPGA fabric to Linux developers and C programmers, who are far more numerous than FPGA specialists.
The Zynq UltraScale+ MPSoC combines the above listed UltraScale+ enhancements with a boost from two Cortex-A9 to four 64-bit Cortex-A53 cores. As before, it also integrates FPGA circuitry of various levels, depending on the model. In this case, however, the higher-end versions offer up to 914 logic cells, over twice the maximum of the previous versions.
The Zynq UltraScale+ also adds dual Cortex-R5 microcontrollers clocked at up to 600MHz for greater real-time processing, making this a triple hybrid SoC. If you count the new Mali-400MP GPU and optional, hardened H.265/264 video processing unit, up to five unique species of processors are involved. Power management and security chips are also available. All these cores are tied together with the new SmartConnect, as well as new “heterogeneous multi-processing” features, “basically expanding the ARM-based processing system with a lot of optimized hard IP,” according to EEJournal.
The new Zynq SoC are supported with the Xilinx PetaLinux distribution, SDK, and board support package. It appears that Linux, rather than a separate RTOS, can be used to tap the capabilities of the dual Cortex-R5 MCUs. The BSP includes device drivers for the SoC’s embedded processing IP cores, kernel, and boot loader configurations, enabling “software engineers to focus on their value-added applications rather than low level development tasks,” says Xilinx.
Early access to the UltraScale+ processors starts in the second quarter, with samples coming later this year, and volume production slated for 2016. The Freescale i.MX6 SoloX, meanwhile, is available now.
 Docker, which continues to take the tech world by storm, launched a robust set of orchestration tools for its container platform yesterday, and developers can get the tools now. You can learn more about each of the tools here.
Docker Machine, very notably, lets developers rapidly deploy Docker on popular cloud platforms including Amazon EC2, Digital Ocean, Microsoft Azure, Google Cloud Platform, OpenStack, RackSpace Cloud and many VMware platforms. A single command can enable Docker for them.
Then there is Docker Swarm.