
When my brother and I set out to create The Hello World Program, a series of videos and tutorials teaching computer science, programming, Linux, and web development, we gave ourselves the seemingly impossible challenge of producing the show with free and open-source software. Our goal is to help remove the economic barrier associated with digital media production by sharing the lessons we learn while making the show. For Daisy’s Web Development Diary, our HTML-centric video series, we wanted to incorporate stop-motion papercraft animations, but there was a problem. There is no free, open-source, professional-grade, stop-motion animation software for Linux. Having grown up creating our own animations with nothing but a camcorder, we were no strangers to hacking together animation solutions. At the most basic level, we needed some way of connecting a camera to our computer for remote shooting, and a way to compile those images into a movie. Entangle and avconv were just the tools for the job.
Entangle uses the gPhoto library for remote shooting, so it is necessary to have a gPhoto compatible camera. If your camera is not compatible with gPhoto, don’t fret. You can still make animations by shooting blindly with you camera, copying the files to your computer, then compiling with avconv. That process isn’t as fancy, but that’s how this art form started, so you’d be animating just like the old pros! Depending on your operating system, you can probably install Entangle from the software repository, however I would advise against that. Entangle is constantly being updated, and I found that the version in the software repository had major problems that had been addressed in the newest release. This means you are probably going to have to build from source.
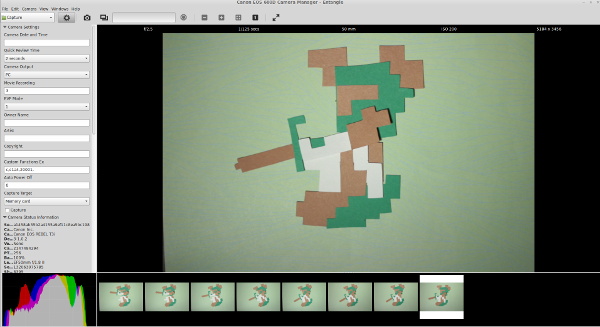
When you have Entangle installed, open the application and connect your camera. Right away, you will get hit with a couple of warnings. The first one asks if you want to unmount your camera, because your operating system most likely already mounted it, preventing Entangle from accessing it. The next one is a warning that claims your camera is still in use. It’s not. Entangle just got ahead of itself. Click the affirmative for both of these and you should be up and running.
The default settings for Entangle are not optimal for doing animation. The first thing you will need to change is the continuous preview handling. Open the application preferences and check the “Continue preview mode after capture” checkbox on the “Capture” tab. Now when you capture an image, the program will return to the live view. At least it should return to the live view. If you get an “Unable to capture preview” error, you will need to change the capture target to “Memory card” instead of “Internal RAM”. This setting is found in the camera settings menu on the left hand side of the program. If you don’t see this menu, click the “view full list of camera settings” button at the top of the program.
Entangle gives you access to most of your camera’s settings. Because it is critical that our lighting stay consistent from frame to frame, you should look through your available camera settings and manually set everything (aperture, shutter speed, ISO). Also make sure any picture styles or in-camera enhancements are turned off.
Finally, you may begin animating. The animations in Daisy’s Web Dev Diary are made entirely out of scraps of paper, but you could animate just about anything. A lump of clay, old toys, or some colored sand. The possibilities are endless!
I found that positioning the camera upside down was the ideal setup for shooting on a tabletop. This freed up a lot of space and helped minimize the possibility of bumping the tripod. It’s a little confusing while shooting, but it’s trivial to rotate the video when we compile it.
Making small adjustments to your model, capture each frame of the video one after the other. Ideally you would be shooting your animations at 24 frames per second, because this is the standard for film, but I’ve found that stop motion still looks good at only 10 or 12 frames. Just keep in mind that your animation will look crisper and more fluid with higher frame rates. The trade off is that you will need to shoot many more frames. For slow movements, you will want to make tiny adjustments between frames. Quick movements would require bigger adjustments, of course. While you can shoot several of the same frame to create a pause, it looks much more natural if there is a bit of movement in the frame. Lightly touching the model in between every frame will bring a static shot to life.
If you make a mistake, you can right click on the thumbnail in Entangle and select delete. This will cause problems when we compile our video, because Entangle doesn’t adjust the names of your other files to accommodate the missing frame, but don’t worry about it for now. Continue on as though everything is perfectly okay.
When you are satisfied with your animation (or tired of working on it), you may move on to compiling your animation with avconv. You should have a folder located at ~Pictures/capture that is chock full of images labeled “capturexxxxxx.jpg”. This is perfectly formatted for feeding an image sequence into avconv, but if you deleted any frames as you were animating, there will be gaps in your image sequence. A bulk rename utility such as pyRenamer can easily correct them.
In pyRenamer, navigate to the folder containing your captured images. Select all of the images, change the “renamed file name pattern” to “frame{num6}.jpg” (without the quotes), preview your changes, then commit them with the “Rename” button.
Before you can compile your video, you will need to decide how to crop your video. Unless you set your camera to shoot in a standard video frame size, you’ll need to adjust the crop manually. These next few steps require some command line magic, so it may look scary, but it’s pretty straightforward. The easiest way I’ve found to determine the crop parameters is with Gimp, so open any one of your frames in Gimp. With the crop tool selected, check the “Fixed” option and set it to “Aspect ratio”. For the sake of demonstration, I’m assuming we are going to output a 1080p video, so in the field just below the “Fixed” checkbox, enter “16:9″.
Drag out a selection on the image for the crop you intend to use for your video, but don’t execute the crop. Take a look at the juicy information in the crop tool options panel. You’ll need the values of the position and size parameters in a moment, but for now you can put Gimp aside.
Now it’s time to compile the video. Here’s the command I used to create my animation:
avconv -f image2 -r 12 -i frame%06d.jpg -vf crop=4663:2623:289:448,scale=1920:1080,vflip,hflip -r:v 30000/1001 -c:v libx264 -qp 0 -preset medium -an “animation.mkv”
Generally when converting input with avconv, you would only need to specify the path to the video file with the -i parameter. With image sequences, we need to supply a little more information.
-f Indicates that the input is an image sequence.
-r is the input framerate. So if you were shooting for 24 frames per second, you would put 24 here. You may want to try compiling several times at different input frame rates to find the one that suits your animation best.
-i is the naming scheme for your image sequence. “frame%06d.jpg” tells avconv that your files all begin with the word “frame” followed by a sequential number that is six digits long, contains leading zeros, and ends with “.jpg”.
The -vf parameter is a comma separated list of video filters. This is where the real magic happens. First you need to crop the image using the data gathered with Gimp’s crop tool. The format of the crop filter is “crop=output width:output height:x:y”. The output width and height are the “size” parameters from Gimp’s crop tool, and the x and y are the “position” parameters.
Surely you noticed that the output width and height are rather large. Normally I would set the video size with the -s:v parameter, but it doesn’t play nice with the crop filter, so you’ll need to use a scale filter to properly size the output. This one is pretty straightforward, it’s formated as “scale=output width:output height”. To output a 1080p video, the scale filter would be “scale=1920:1080″.
If your camera was oriented upside down, you’ll also need to tack on the “vflip” and “hflip” parameters. These flip your output video vertically and horizontally, essentially rotating it 180 degrees.
The remaining parameters are for your video codec. You could set these to anything you want, but in my example, I chose to export a lossless, x264 encoded mkv file at 30 frames per second.
Now for the best part… watching your animation!
 Just before summer began,