
Pivotal’s move is to package up Cloud Foundry and its ecosystem in one distribution for use inside an enterprise.
Read more at Enterprise Open Source Toolkit
Greetings from SUSEcon 2013! SUSE is hosting a bash in lovely Lake Buena Vista, Florida, and it is my duty to endure the great food and gorgeous weather to report on it. It’s brutal, but it has to be done.
SUSECon officially kicked off this morning with keynotes from Nils Brauckmann, President of SUSE, Chris Hallenbeck, Global Vice President, SAP Americas, and Jim Wasko, Director, Linux Technology Center at IBM. I’ll tell you all about them later, because right now you need to watch the dancing chameleon videos. They are brilliantly produced and funny. Who says computer nerds aren’t funny?
Chameleon Dance, the opening video for SUSECon.
SUSE is one of the oldest surviving Linux distributions, born in 1992 when Linux itself was a mere year old. It was created from Slackware (the oldest surviving Linux distribution, and still maintained by its creator) by Roland Dyroff, Burchard Steinbild, Hubert Mantel and Thomas Fehr in Fürth, Germany. SUSE stands for Software- und System-Entwicklung (Software and Systems Development). Novell bought SUSE in in 2003, and then Attachmate bought Novell in 2011. SUSE operates as an independent business unit, and is now based in Nuremburg. Red Hat, the other big enterprise Linux, is #1 in revenues, but SUSE is #1 in a number of other areas: mainframe, autotive, aerospace, supercomputing, and certified hardware support.

A few more SUSE nuggets:
That’s all for now, because I must go prepare to endure more fun and feasting. Stay tuned for coverage of a whole lot of great technical sessions.
Editor’s Note: Carla Schroder is attending SUSECon, which is taking place Nov. 12 – 15 in Lake Buena Vista, Florida. She will be reporting from the conference throughout the week for Linux.com, courtesy of SUSE.
What did I learn at SUSECon yesterday? I learned about indoor skydiving. This isn’t the greatest photo, so visit iFlyWorld to see some better pics.
 It looks way fun. You enter a vertical wind tunnel with an instructor, and swoop and soar just like jumping out of an airplane. And maybe bang around a bit, but what are a few knocks to mighty Linux nerds?
SUSE has offices all over the world, and they also have a lot of distributed workers. Why be limited by physical location? Remote workers interact the same way as people in offices, with email, texting, and instant messaging. Except without the commute and sharing germs. So where does SUSE find talent? The same places a lot of good FOSS companies do: via community projects, referrals, and banging on their door until they notice you.
“Your work is your curriculum vitae” said Ralf Flaxa, SUSE’s Vice President of Engineering. Or in other words, the best way to show what you can do is to do it.
So what skills does SUSE want? Not yesterday’s old mold. Linux and FOSS move fast. Flaxa recalled attending the first Linux Kongress in 1994 in Heidelberg, Germany. Linus Torvalds, Alan Cox, Jon “Maddog” Hall, and other Linux luminaries congregated from all over the world to talk Linux. That first meetup had two tracks: one track covered Linux, and the other was about the World Wide Web and how to use a Web browser. There aren’t many Web-surfing jobs these days. But all Linux distros build on existing FOSS projects, so you can make your mark in bleeding-edge technologies like OpenStack, Btrfs, Ceph Storage, and systemd, develop marketable skills, and accumulate a portfolio of work you can continue to build on.
You also need a customer-centered perspective because it’s no good developing a piece of software and then abandoning it, or scratching a unique itch that no one else cares about. Nothing ever really goes away, and enterprise customers keep old software in service for a long time.
Editor’s Note: Carla Schroder is attending SUSECon, which is taking place Nov. 12 – 15 in Lake Buena Vista, Florida. She will be reporting from the conference throughout the week for Linux.com, courtesy of SUSE.
 In previous layout tutorials, we’ve looked at LinearLayout and RelativeLayout. A common use case in Android, though, is that you have a list of items to display, which you wish the user to be able to click on. One option for this is a ListView (as discussed in this tutorial). Another, which is great if your list is best represented by images, is GridView. This, as you might expect, lays out your list as a scrollable grid of images. Read on for an example of how to set up a GridView with a list of images, which when you click on an image, launches a webpage associated with it.
One of the advantages of a GridView is that, like a ListView, it only needs to keep in memory the images that are visible at any one time. As you scroll, the memory and resources used for the images scrolling off the page can be reused for the ones scrolling on. However, you still need to make sure that your image files are an appropriate size. (A 1024×768 image still takes up the same amount of memory when it is displayed in a 200×150 box.) Create small thumbnails if your image files are large, to avoid the Android VM running out of memory.
A GridLayout is also available from API 14. This is a layout whose children are placed into a rectangular grid. The children are defined as occupying a particular cell or cells in the layout, which makes particular layouts easier to manage and to arrange attractively. If you’re using other layouts and find yourself trying to nest them to multiple levels, it may be worth looking into using a GridLayout instead; and it’s arguably easier to learn if you’re starting from scratch than some of the other layouts. There’s a handy online tutorial available for GridLayout.
First, create a new Android project, GridViewTest. For your images to be available, you need to store them in res/drawable (bearing in mind the note above concerning file sizes). Now create your layout file, in res/layout/activity_grid_view_test.xml:
<GridView xmlns:android="http://schemas.android.com/apk/res/android"
    android:id="@+id/gridview"
    android:layout_width="match_parent"
    android:layout_height="match_parent"
    android:gravity="center"
    android:stretchMode="columnWidth"
    android:numColumns="auto_fit"
    android:paddingBottom="@dimen/activity_vertical_margin"
    android:paddingLeft="@dimen/activity_horizontal_margin"
    android:paddingRight="@dimen/activity_horizontal_margin"
    android:paddingTop="@dimen/activity_vertical_margin"
/>
You’ll see that the GridView is a layout all by itself; it doesn’t need to be wrapped in a RelativeLayout or LinearLayout, unless you wish to add other elements (such as buttons) around the grid. Most of the attributes should be fairly self-explanatory. There are two that it’s worth paying particular attention to:
android:stretchMode="columnWidth" — defines how columns should stretch to fill the empty space. columnWidth means that each column is stretched equally.android:numColumns="auto_fit" — this fits as many columns as possible into the space. You can specify a number instead but this may not work correctly on all devices.
Next, we need to write an adapter to handle the interface between the image list and the view:
public class GridAdapter extends BaseAdapter {
	private Context context;
	private Integer[] imageIds = {
            R.drawable.file1, R.drawable.file2,
            R.drawable.file3, R.drawable.file4
	};

	public GridAdapter(Context c) {
		context = c;
	}

	public int getCount() {
		return imageIds.length;
	}

	public Object getItem(int position) {
		return imageIds[position];
	}

	public long getItemId(int position) {
		return 0;
	}

	public View getView(int position, View view, ViewGroup parent) {
		ImageView iview;
		if (view == null) {
			iview = new ImageView(context);
			iview.setLayoutParams(new GridView.LayoutParams(150,200));
			iview.setScaleType(ImageView.ScaleType.CENTER_CROP);
			iview.setPadding(5, 5, 5, 5);
		} else {
			iview = (ImageView) view;
		}
		iview.setImageResource(imageIds[position]);
		return iview;
	}
}
The images (or, references to their resource IDs) are kept in imageIds. Most of the methods are fairly self-explanatory. Here, we don’t properly implement getItemId() because that’s primarily useful if your adapter is talking to an SQL database and you want to be able to directly access an item ID.
getView() does most of the work — it sets up a View for each individual item. __iview.setLayoutParams()__ sets the width and height of the view (fairly small, as we want several of them to a screen), and __setScaleType()__ gives you an option of various ways to center and scale the image. Note that you only set all of these if the ImageView is currently null. Because GridView reuses its resources where possible, sometimes the ‘new’ view will actually be an ‘old’ view, with all of these values already set. Once the ImageView is set up, we associate a specific image with it and return it.
Finally, set up the main Activity, GridViewTestActivity:
package com.example.gridviewtest;
public class GridViewTestActivity extends Activity {
  protected void onCreate(Bundle savedInstanceState) {
    super.onCreate(savedInstanceState);
    setContentView(R.layout.activity_grid_view_test);

    GridView gridview = (GridView) findViewById(R.id.gridview);
    final GridAdapter gridadapter = new GridAdapter(this);
    gridview.setAdapter(gridadapter));

    gridView.setOnItemClickListener(new onItemClickListener() {
      public void onItemClick(AdapterView<?> parent, View v,
                              int position, long id) {
  		// do something here (see next section)
      }
    });
  }
}
This code sets the content file that we first created, and then connects the activity and the view together using our new GridAdapter class. This will automatically handle pulling the images into the grid, using __getView()__. The __setOnItemClickListener()__ is set up here, but we’ll write the body of it in the next section.
If you now run your code, it should work and show you the images in a neat grid.
A grid is nice to show images, but in most cases you want to be able to click on them. In this case, we’ll associate our images with a URL, and launch a browser to look at the URL when a user clicks on the image. There are many ways you could do this, but here’s one option. First, create an ImageWithUrl class in GridAdapter, and adapt GridAdapter accordingly:
private ImageWithUrl[] imageIds = {
  new ImageWithUrl(R.drawable.file1, "http://example.com/link1.html"),
  new ImageWithUrl(R.drawable.file2, "http://example.com/link2.html"),
  // and all the rest
	};
public ImageWithUrl getItem(int position) {
  return imageIds[position];
}
public View getView(int position, View view, ViewGroup parent) {
  // most of this is just as before
  iview.setImageResource(imageIds[position].getImageId());
  return iview;
}
protected class ImageWithUrl extends Object {
  private int imageId;
  private String imageUrlString;

  ImageWithUrl(int id, String url) {
	imageId = id;
	imageUrlString = url;
  }
  public int getImageId() {
    return imageId;
  }
  public String getImageUrlString() {
    return imageUrlString;
  }
}
Our array of resources is now an array of ImageWithUrl objects. That means we need to change getItem() so it returns an ImageWithUrl, and edit __getView()__ so we get a reference to the image part of the ImageWithUrl. The ImageWithUrl class itself is straightforward.
Finally, we need to write the OnItemClickListener() method in GridViewTestActivity:
gridview.setOnItemClickListener(new OnItemClickListener() {
  public void onItemClick(AdapterView parent, View v,
                          int position, long id) {
     Intent i = new Intent(Intent.ACTION_VIEW);
     i.setData(Uri.parse(gridadapter.getItem(position).getImageUrlString()));
     startActivity(i);
  }
});
This creates a new Intent, with the URL attached from the specific grid item clicked on. The Intent is then used to start an Activity — so it will look for the preferred browser app on your phone and launch the URL in that. (For more on Activities and Intents, see the previous tutorial on Android basics.) You have your clickable grid in action!
The delayed beta release of Fedora 20 is out and ready for testing: “The Fedora Project is excited to announce the beta release of Fedora 20, code-named ‘Heisenbug’. A community-produced, free, Linux-based operating system, Fedora 20 features some of the latest and best of what the open source….
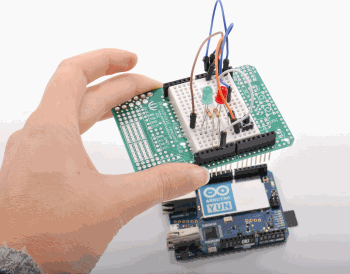
This post introduces in details one of the latest boards from the Arduino Team: a board that we still didn’t cover that much on the blog. YÚN’s DNA is that of the Arduino family lately open to new requirements and perspectives: Embedded Linux, Ethernet and WiFi with a board that is easy to use and just ready out of the box.
Once we put our hands on the Arduino Yun months ago, we could not resist the temptation to test it immediately to verify the innovative features. In the official presentation releases YÚN was announced as a product which that incorporates the features of a standard Arduino Leonardo, a section with additional hardware, with a separate processor can accommodate a full GNU / Linux release (OpenWRT) that is specifically intended for internet connectivity (OpenWRT is the open source distribution mostly used in routers and WiFi access point).