Home Blog Page 267

How to Authenticate a Linux Desktop to Your OpenLDAP Server

In this final part of our three-part series, we reach the conclusion everyone has been waiting for. The ultimate goal of using LDAP (in many cases) is enabling desktop authentication. With this setup, admins are better able to manage and control user accounts and logins. After all, Active Directory admins shouldn’t have all the fun, right?

WIth OpenLDAP, you can manage your users on a centralized directory server and connect the authentication of every Linux desktop on your network to that server. And since you already have OpenLDAP and the LDAP Authentication Manager setup and running, the hard work is out of the way. At this point, there is just a few quick steps to enabling those Linux desktops to authentication with that server.

I’m going to walk you through this process, using the Ubuntu Desktop 18.04 to demonstrate. If your desktop distribution is different, you’ll only have to modify the installation steps, as the configurations should be similar.

What You’ll Need

Obviously you’ll need the OpenLDAP server up and running. You’ll also need user accounts created on the LDAP directory tree, and a user account on the client machines with sudo privileges. With those pieces out of the way, let’s get those desktops authenticating.

Installation

The first thing we must do is install the necessary client software. This will be done on all the desktop machines that require authentication with the LDAP server. Open a terminal window on one of the desktop machines and issue the following command:

sudo apt-get install libnss-ldap libpam-ldap ldap-utils nscd -y

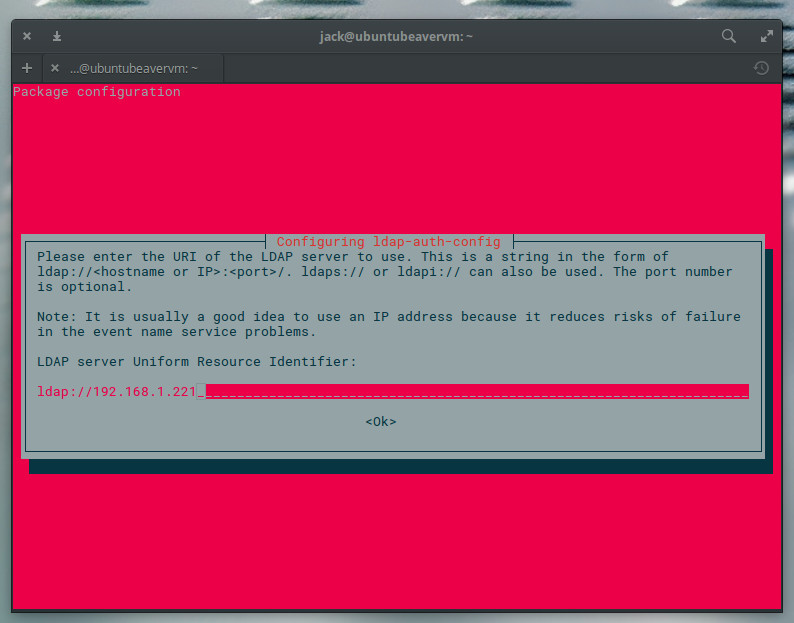
During the installation, you will be asked to enter the LDAP server URI (Figure 1).

The LDAP URI is the address of the OpenLDAP server, in the form ldap://SERVER_IP (Where SERVER_IP is the IP address of the OpenLDAP server). Type that address, tab to OK, and press Enter on your keyboard.

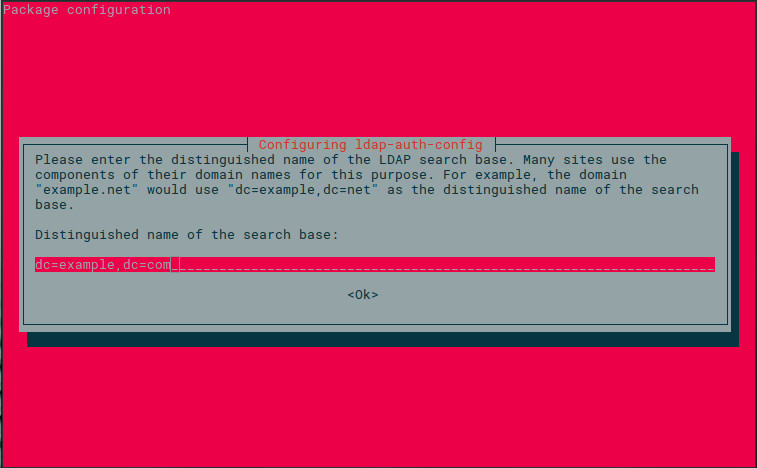
In the next window (Figure 2), you are required to enter the Distinguished Name of the OpenLDAP server. This will be in the form dc=example,dc=com.

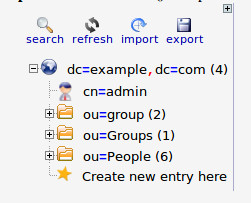
If you’re unsure of what your OpenLDAP DN is, log into the LDAP Account Manager, click Tree View, and you’ll see the DN listed in the left pane (Figure 3).

The next few configuration windows, will require the following information:

  • Specify LDAP version (select 3)

  • Make local root Database admin (select Yes)

  • Does the LDAP database require login (select No)

  • Specify LDAP admin account suffice (this will be in the form cn=admin,dc=example,dc=com)

  • Specify password for LDAP admin account (this will be the password for the LDAP admin user)

Once you’ve answered the above questions, the installation of the necessary bits is complete.

Configuring the LDAP Client

Now it’s time to configure the client to authenticate against the OpenLDAP server. This is not nearly as hard as you might think.

First, we must configure nsswitch. Open the configuration file with the command:

sudo nano /etc/nsswitch.conf

In that file, add ldap at the end of the following line:

passwd: compat systemd

group: compat systemd

shadow: files
These configuration entries should now look like:
 
passwd: compat systemd ldap
group: compat systemd ldap
shadow: files ldap
At the end of this section, add the following line:
 
 gshadow files

The entire section should now look like:

passwd: compat systemd ldap

group: compat systemd ldap

shadow: files ldap

gshadow files
Save and close that file.
 

Now we need to configure PAM for LDAP authentication. Issue the command:

sudo nano /etc/pam.d/common-password

Remove use_authtok from the following line:

password [success=1 user_unknown=ignore default=die] pam_ldap.so use_authtok try_first_pass

Save and close that file.

There’s one more PAM configuration to take care of. Issue the command:

sudo nano /etc/pam.d/common-session

At the end of that file, add the following:

session optional pam_mkhomedir.so skel=/etc/skel umask=077

The above line will create the default home directory (upon first login), on the Linux desktop, for any LDAP user that doesn’t have a local account on the machine. Save and close that file.

Logging In

Reboot the client machine. When the login is presented, attempt to log in with a user on your OpenLDAP server. The user account should authenticate and present you with a desktop. You are good to go.

Make sure to configure every single Linux desktop on your network in the same fashion, so they too can authenticate against the OpenLDAP directory tree. By doing this, any user in the tree will be able to log into any configured Linux desktop machine on your network.

You now have an OpenLDAP server running, with the LDAP Account Manager installed for easy account management, and your Linux clients authenticating against that LDAP server.

And that, my friends, is all there is to it.

We’re done.

Keep using Linux.

It’s been an honor.


Using Square Brackets in Bash: Part 2

Welcome back to our mini-series on square brackets. In the previous article, we looked at various ways square brackets are used at the command line, including globbing. If you’ve not read that article, you might want to start there.

Square brackets can also be used as a command. Yep, for example, in:

[ "a" = "a" ]

which is, by the way, a valid command that you can execute, [ ... ] is a command. Notice that there are spaces between the opening bracket [ and the parameters "a" = "a", and then between the parameters and the closing bracket ]. That is precisely because the brackets here act as a command, and you are separating the command from its parameters.

You would read the above line as “test whether the string “a” is the same as string “a”“. If the premise is true, the [ ... ] command finishes with an exit status of 0. If not, the exit status is 1. We talked about exit statuses in a previous article, and there you saw that you could access the value by checking the $? variable.

Try it out:

[ "a" = "a" ]
echo $?

And now try:

[ "a" = "b" ]
echo $?

In the first case, you will get a 0 (the premise is true), and running the second will give you a 1 (the premise is false). Remember that, in Bash, an exit status from a command that is 0 means it exited normally with no errors, and that makes it true. If there were any errors, the exit value would be a non-zero value (false). The [ ... ] command follows the same rules so that it is consistent with the rest of the other commands.

The [ ... ] command comes in handy in if ... then constructs and also in loops that require a certain condition to be met (or not) before exiting, like the while and until loops.

The logical operators for testing stuff are pretty straightforward:

[ STRING1 = STRING2 ] => checks to see if the strings are equal
[ STRING1 != STRING2 ] => checks to see if the strings are not equal 
[ INTEGER1 -eq INTEGER2 ] => checks to see if INTEGER1 is equal to INTEGER2 
[ INTEGER1 -ge INTEGER2 ] => checks to see if INTEGER1 is greater than or equal to INTEGER2
[ INTEGER1 -gt INTEGER2 ] => checks to see if INTEGER1 is greater than INTEGER2
[ INTEGER1 -le INTEGER2 ] => checks to see if INTEGER1 is less than or equal to INTEGER2
[ INTEGER1 -lt INTEGER2 ] => checks to see if INTEGER1 is less than INTEGER2
[ INTEGER1 -ne INTEGER2 ] => checks to see if INTEGER1 is not equal to INTEGER2
etc...

You can also test for some very shell-specific things. The -f option, for example, tests whether a file exists or not:

for i in {000..099}; 
 do 
  if [ -f file$i ]; 
  then 
   echo file$i exists; 
  else 
   touch file$i; 
   echo I made file$i; 
  fi; 
done

If you run this in your test directory, line 3 will test to whether a file is in your long list of files. If it does exist, it will just print a message; but if it doesn’t exist, it will create it, to make sure the whole set is complete.

You could write the loop more compactly like this:

for i in {000..099};
do
 if [ ! -f file$i ];
 then
  touch file$i;
  echo I made file$i;
 fi;
done

The ! modifier in the condition inverts the premise, thus line 3 would translate to “if the file file$i does not exist“.

Try it: delete some random files from the bunch you have in your test directory. Then run the loop shown above and watch how it rebuilds the list.

There are plenty of other tests you can try, including -d tests to see if the name belongs to a directory and -h tests to see if it is a symbolic link. You can also test whether a files belongs to a certain group of users (-G), whether one file is older than another (-ot), or even whether a file contains something or is, on the other hand, empty.

Try the following for example. Add some content to some of your files:

echo "Hello World" >> file023
echo "This is a message" >> file065
echo "To humanity" >> file010

and then run this:

for i in {000..099};
do
 if [ ! -s file$i ];
 then
  rm file$i;
  echo I removed file$i;
 fi;
done

And you’ll remove all the files that are empty, leaving only the ones you added content to.

To find out more, check the manual page for the test command (a synonym for [ ... ]) with man test.

You may also see double brackets ([[ ... ]]) sometimes used in a similar way to single brackets. The reason for this is because double brackets give you a wider range of comparison operators. You can use ==, for example, to compare a string to a pattern instead of just another string; or < and > to test whether a string would come before or after another in a dictionary.

To find out more about extended operators check out this full list of Bash expressions.

Next Time

In an upcoming article, we’ll continue our tour and take a look at the role of parentheses () in Linux command lines. See you then!

Read more:

  1. The Meaning of Dot (.)
  2. Understanding Angle Brackets in Bash (<...>)
  3. More About Angle Brackets in Bash(< and >)
  4. And, Ampersand, and & in Linux (&)
  5. Ampersands and File Descriptors in Bash (&)
  6. Logical & in Bash (&)
  7. All about {Curly Braces} in Bash ({})
  8. Using Square Brackets in Bash: Part 1

How to Install LDAP Account Manager on Ubuntu Server 18.04

Welcome back to this three-party journey to getting OpenLDAP up and running so that you can authenticate your Linux desktop machines to the LDAP server. In part one, we installed OpenLDAP on Ubuntu Server 18.04 and added our first LDAP entries to the directory tree via the Command Line Interface (CLI).

The process of manually adding data can be cumbersome and isn’t for everyone. If you have staff members that work better with a handy GUI tool, you’re in luck, as there is a very solid web-based tool that makes entering new users a snap. That tool is the LDAP Account Manager (LAM).

LAM features:

  • Support for 2-factor authentication

  • Schema and LDAP browser

  • Support for multiple LDAP servers

  • Support for account creation profiles

  • File system quotas

  • CSV file upload

  • Automatic creation/deletion of home directories

  • PDF output for all accounts

  • And much more

We’ll be installing LAM on the same server we installed OpenLDAP, so make sure you’ve walked through the process from the previous article. With that taken care of, let’s get LAM up and running, so you can more easily add users to your LDAP directory tree.

Installation

Fortunately, LAM is found in the standard Ubuntu repository, so installation is as simple as opening a terminal window and issuing the command:

sudo apt-get install ldap-account-manager -y

When the installation finishes, you can then limit connections to LAM to local IP addresses only (if needed), by opening a specific .conf file with the command:

sudo nano /etc/apache2/conf-enabled/ldap-account-manager.conf

In that file, look for the line:

Require all granted

Comment that line out (add a # character at the beginning of the line) and add the following entry below it:

Require ip 192.168.1.0/24

Make sure to substitute your network IP address scheme in place of the one above (should yours differ). Save and close that file, and restart the Apache web server with the command:

sudo systemctl restart apache2

You are now ready to access the LAM web interface.

Opening LAM

Point your web browser to http://SERVER_IP/lam (where SERVER_IP is the IP address of the server hosting LAM). In the resulting screen (Figure 1), click LAM configuration in the upper right corner of the window.

Figure 1: The LAM login window.

In the resulting window, click Edit server profiles (Figure 2).

Figure 2: The LAM edit options.

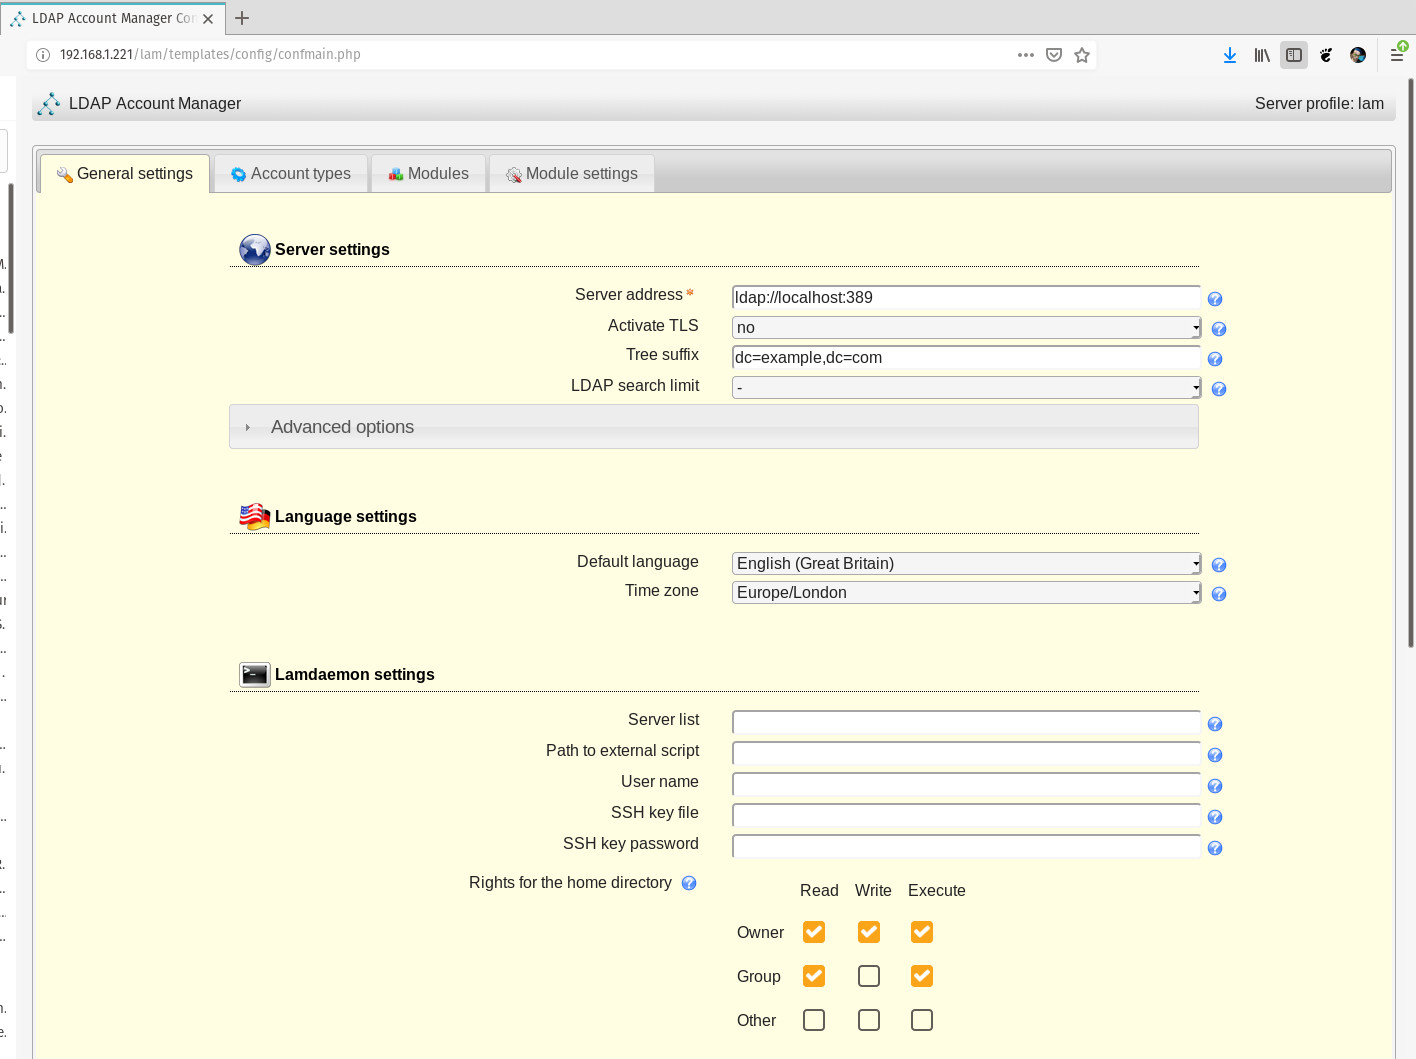
You will be prompted for the default profile password, so type lam and click OK. You will then be presented with the Server settings page (Figure 3).

Figure 3: The LAM Server settings page.

In the Server Settings section, enter the IP address of your LDAP server. Since we’re installing LAM on the same server as OpenLDAP, we’ll leave the default. If your OpenLDAP and LAM servers are not on the same machine, make sure to enter the correct IP address for the OpenLDAP server here. In the Tree suffix entry, add the domain components of your OpenLDAP server in the form dc=example,dc=com.

Next, take care of the following configurations:

In the Security settings section (Figure 4), configure the list of valid users in the form cn=admin,dc=example,dc=com (make sure to use your LDAP admin user and domain components).

Figure 4: The Security settings section.

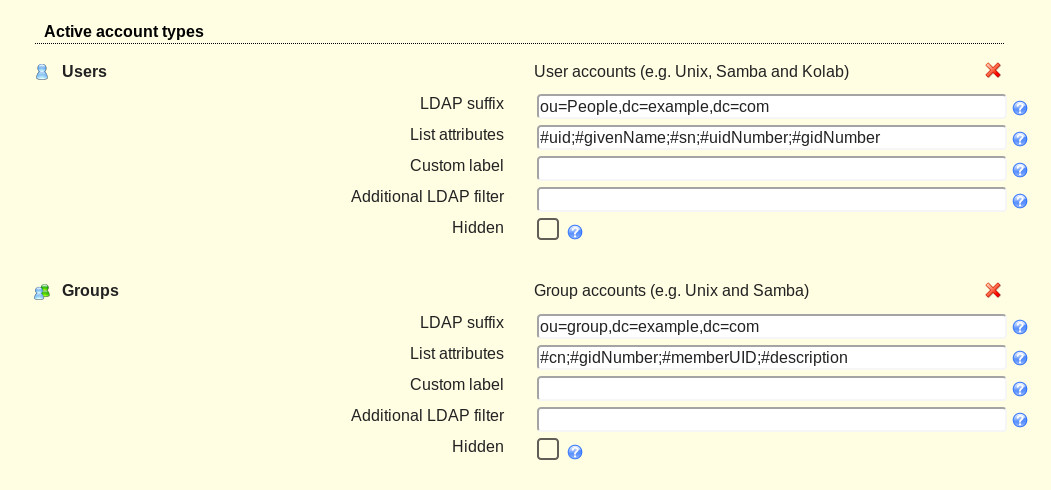
In the Account Types tab (Figure 5), configure the Active account types LDAP options. First, configure the LDAP suffix, which will be in the form ou=group,dc=example,dc=com. This is the suffix of the LDAP tree from where you will search for entries. Only entries in this subtree will be displayed in the account list. In other words, use the group attribute if you have created a group on your OpenLDAP server that all of your users (who will be authenticating against the LDAP directory tree) will be a member of. For example, if all of your users who will be allowed to log in on desktops machines are part of the group login, use that.

Figure 5: The Groups configuration for LAM.

Next, configure the List attributes. These are the attributes that will be displayed in the account list, and are predefined values, such as #uid, #givenName, #sn, #uidNumber, etc. Fill out both the LDAP suffix and List attributes for both Users and groups.

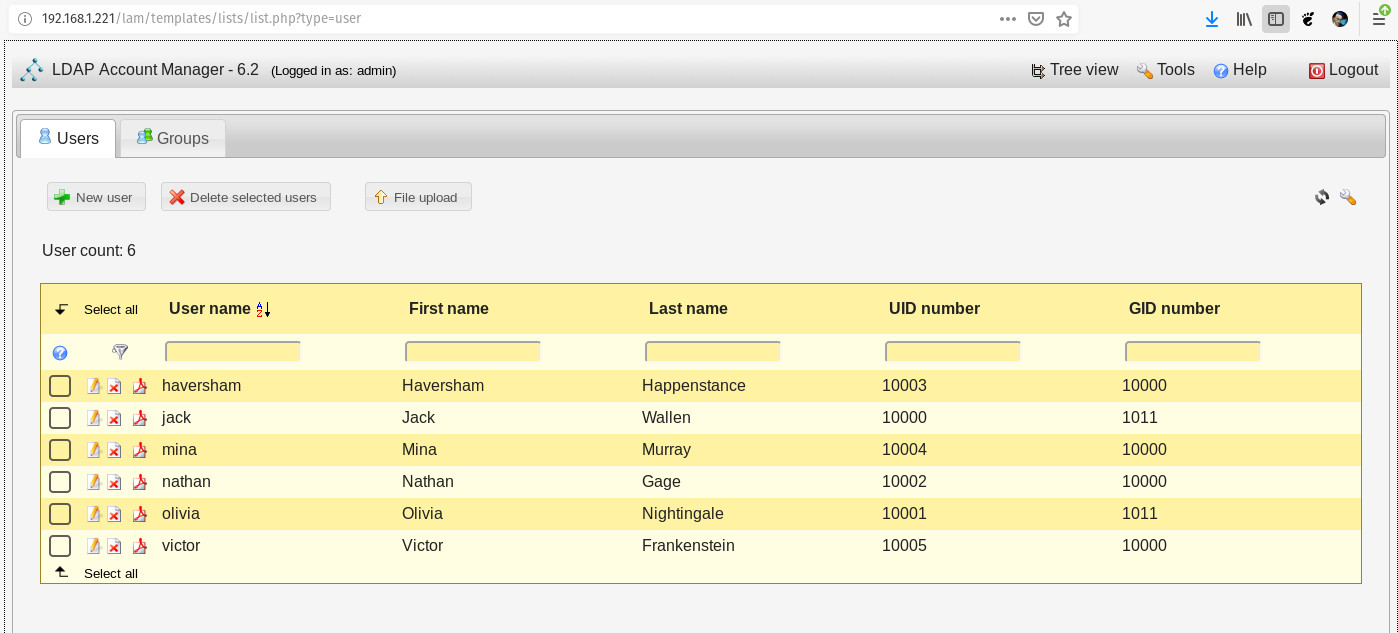
After configuring both users and groups, click Save. This will also log you out of the Server profile manager and take you back to the login screen. You can now log into LAM using your LDAP server admin credentials. Select the user from the User name drop-down, type your LDAP admin password, and click Login. This will take you to the LAM Users tab (Figure 6), where you can start adding new users to the LDAP directory tree.

Figure 6: Our user listing in LAM.

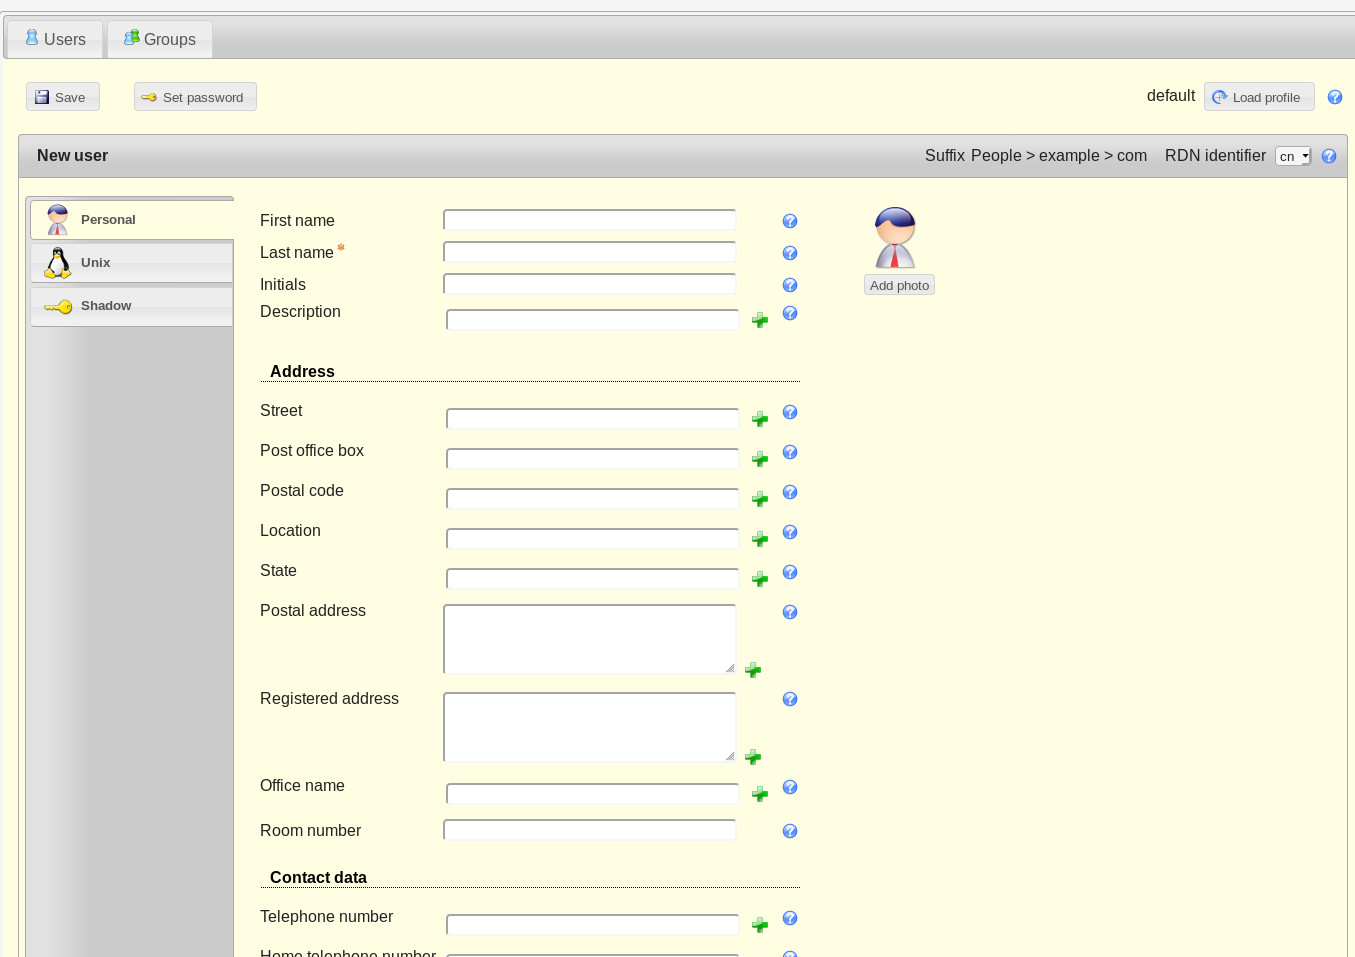
Click New User and the New User window will open (Figure 7), where you can fill in the necessary blanks.

Figure 7: Adding a new user with LAM.

Make sure to click Set password, so you can create a password for the new user (otherwise the user won’t be able to log into their account). Also make sure to click on the Unix tab, where you can set the username, home directory, primary group, login shell, and more. Once you’ve entered the necessary information for the user, click Save and the user account can then be found in the LDAP directory tree.

Welcome to Simpler User Creation

The LDAP Account Manager makes working with OpenLDAP exponentially easier. Without using this tool, you’ll spend more time entering users to the LDAP tree than you probably would like. The last thing you need is to take more time than necessary out of your busy admin day to create and manage users in your LDAP tree via command line.

In the next (and final entry) in this three-part series, I will walk you through the process of configuring a Linux desktop machine, such that it can authenticate against the OpenLDAP server.

Linux Kernel 4.20 Reached End of Life, Users Urged to Upgrade to Linux 5.0

Renowned Linux kernel developer and maintainer Greg Kroah-Hartman announced the end of life of the Linux 4.20 kernel series, urging users to upgrade to a newer kernel series as soon as possible.

“I’m announcing the release of the 4.20.17 kernel. Note, this is the LAST release of the 4.20.y kernel. It is now end-of-life, please move to the 5.0.y kernel tree at this point in time. All users of the 4.20 kernel series must upgrade,” Greg Kroah-Hartman said in a mailing list announcement.

Read more at Softpedia

SREs Wish Automation Solved All Their Problems

Although the SRE job role is often defined as being about automation, the reality is that 59 percent of SREs agree there is too much toil (defined as manual, repetitive, tactical work that scales linearly) in their organization. Based on 188 survey responses from people holding SRE job roles, Catchpoint’s second annual SRE Report surprisingly found that almost half (49 percent) of the SREs believe their organization has not used automation to reduce toil.

Often being inspired by DevOps, SREs have high expectations for automation. Yet, there are key differences between the two and SRE responsibilities are much closer to those associated with systems administrators. SREs have the capability to automation and innovate but are often burdened by IT operations historical focus on incident management and reliability.

Read more at The New Stack

Handling Complex Memory Situations

Jérôme Glisse felt that the time had come for the Linux kernel to address seriously the issue of having many different types of memory installed on a single running system. There was main system memory and device-specific memory, and associated hierarchies regarding which memory to use at which time and under which circumstances. This complicated new situation, Jérôme said, was actually now the norm, and it should be treated as such.

The physical connections between the various CPUs and devices and RAM chips—that is, the bus topology—also was relevant, because it could influence the various speeds of each of those components.

Jérôme wanted to be clear that his proposal went beyond existing efforts to handle heterogeneous RAM. He wanted to take account of the wide range of hardware and its topological relationships to eek out the absolute highest performance from a given system.

Read more at Linux Journal

Solus 4 Linux Gaming Report: A Great Nvidia, Radeon And Steam User Experience

This article is the third in a series on Linux-powered gaming that aims to capture the various nuances in setup, as well as uncover potential performance variations between nine different desktop Linux operating systems. 

Solus is a fascinating Linux distribution. It’s built from scratch, falls under the category of rolling release and by default ships with the Budgie desktop environment — which was also developed by the Solus Project. Other desktop environment ISOs like Gnome and MATE are available. … Read more at Forbes

Kubernetes 1.14: Production-level support for Windows Nodes, Kubectl Updates, Persistent Local Volumes GA

We’re pleased to announce the delivery of Kubernetes 1.14, our first release of 2019!

Kubernetes 1.14 consists of 31 enhancements: 10 moving to stable, 12 in beta, and 7 net new. The main themes of this release are extensibility and supporting more workloads on Kubernetes with three major features moving to general availability, and an important security feature moving to beta.

More enhancements graduated to stable in this release than any prior Kubernetes release. This represents an important milestone for users and operators in terms of setting support expectations. In addition, there are notable Pod and RBAC enhancements in this release, which are discussed in the “additional notable features” section below.

Let’s dive into the key features of this release:

Production-level Support for Windows Nodes

Up until now Windows Node support in Kubernetes has been in beta, allowing many users to experiment and see the value of Kubernetes for Windows containers. Kubernetes now officially supports adding Windows nodes as worker nodes and scheduling Windows containers, enabling a vast ecosystem of Windows applications to leverage the power of our platform. Enterprises with investments in Windows-based applications and Linux-based applications don’t have to look for separate orchestrators to manage their workloads, leading to increased operational efficiencies across their deployments, regardless of operating system.

Read more at Kubernetes.io

Can Better Task Stealing Make Linux Faster?

Oracle Linux kernel developer Steve Sistare contributes this discussion on kernel scheduler improvements.

Load balancing via scalable task stealing

The Linux task scheduler balances load across a system by pushing waking tasks to idle CPUs, and by pulling tasks from busy CPUs when a CPU becomes idle. Efficient scaling is a challenge on both the push and pull sides on large systems. For pulls, the scheduler searches all CPUs in successively larger domains until an overloaded CPU is found, and pulls a task from the busiest group. This is very expensive, costing 10’s to 100’s of microseconds on large systems, so search time is limited by the average idle time, and some domains are not searched. Balance is not always achieved, and idle CPUs go unused.

I have implemented an alternate mechanism that is invoked after the existing search in idle_balance() limits itself and finds nothing. I maintain a bitmap of overloaded CPUs, where a CPU sets its bit when its runnable CFS task count exceeds 1. The bitmap is sparse, with a limited number of significant bits per cacheline. This reduces cache contention when many threads concurrently set, clear, and visit elements. There is a bitmap per last-level cache. When a CPU becomes idle, it searches the bitmap to find the first overloaded CPU with a migratable task, and steals it. This simple stealing yields a higher CPU utilization than idle_balance() alone, because the search is cheap, costing 1 to 2 microseconds, so it may be called every time the CPU is about to go idle. Stealing does not offload the globally busiest queue, but it is much better than running nothing at all.

Results

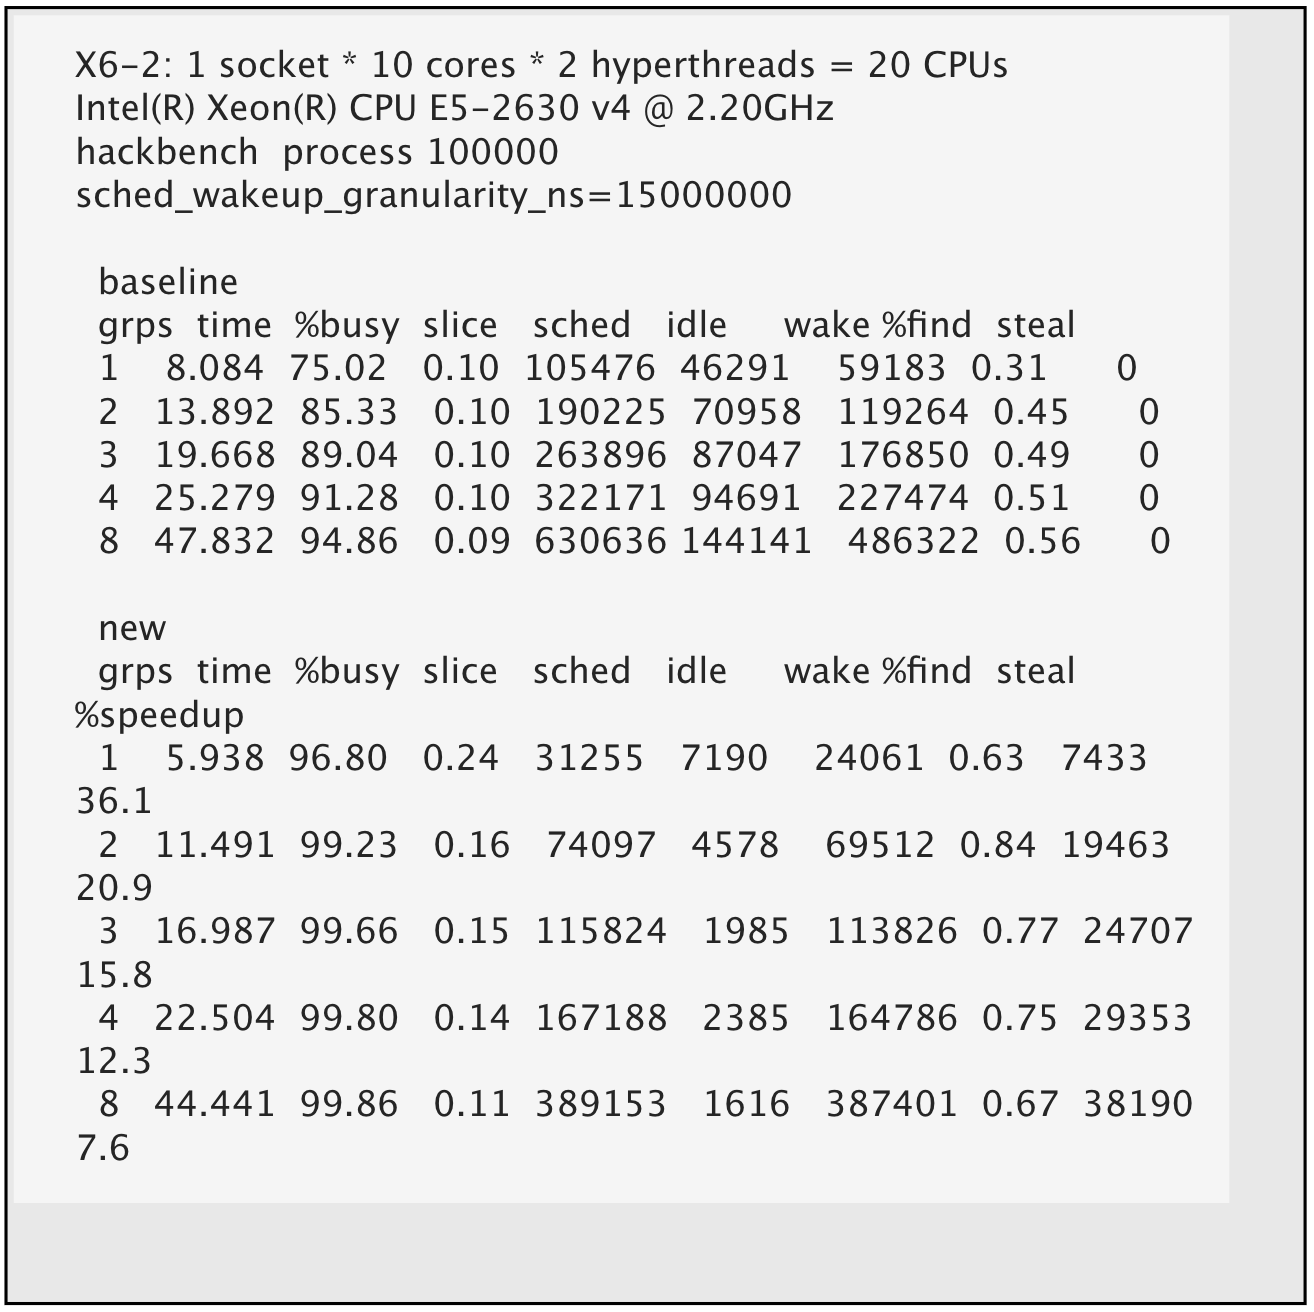
Stealing improves utilization with only a modest CPU overhead in scheduler code. In the following experiment, hackbench is run with varying numbers of groups (40 tasks per group), and the delta in /proc/schedstat is shown for each run, averaged per CPU, augmented with these non-standard stats:

  • %find – percent of time spent in old and new functions that search for idle CPUs and tasks to steal and set the overloaded CPUs bitmap.
  • steal – number of times a task is stolen from another CPU. Elapsed time improves by 8 to 36%, costing at most 0.4% more find time.

​​CPU busy utilization is close to 100% for the new kernel, as shown by the green curve in the following graph, versus the orange curve for the baseline kernel:

Stealing improves Oracle database OLTP performance by up to 9% depending on load, and we have seen some nice improvements for mysql, pgsql, gcc, java, and networking. In general, stealing is most helpful for workloads with a high context switch rate.

The code

As of this writing, this work is not yet upstream, but the latest patch series is at https://lkml.org/lkml/2018/12/6/1253. If your kernel is built with CONFIG_SCHED_DEBUG=y, you can verify that it contains the stealing optimization using


  # grep -q STEAL /sys/kernel/debug/sched_features && echo Yes
  Yes

If you try it, note that stealing is disabled for systems with more than 2 NUMA nodes, because hackbench regresses on such systems, as I explain in https://lkml.org/lkml/2018/12/6/1250 .However, I suspect this effect is specific to hackbench and that stealing will help other workloads on many-node systems. To try it, reboot with kernel parameter sched_steal_node_limit = 8 (or larger).

Future work

After the basic stealing algorithm is pushed upstream, I am considering the following enhancements:

  • If stealing within the last-level cache does not find a candidate, steal across LLC’s and NUMA nodes.
  • Maintain a sparse bitmap to identify stealing candidates in the RT scheduling class. Currently pull_rt_task() searches all run queues.
  • Remove the core and socket levels from idle_balance(), as stealing handles those levels. Remove idle_balance() entirely when stealing across LLC is supported.
  • Maintain a bitmap to identify idle cores and idle CPUs, for push balancing.

This article originally appeared at Oracle Developers Blog.

Linux Release Roundup: Applications and Distros Released This Week

This is a continually updated article that lists various Linux distribution and Linux-related application releases of the week.

At It’s FOSS, we try to provide you with all the major happenings of the Linux and Open Source world. But it’s not always possible to cover all the news, specially the minor releases of a popular application or a distribution.

Hence, I have created this page, which I’ll be continually updating with the links and short snippets of the new releases of the current week. Eventually, I’ll remove releases older than 2 weeks from the page.

Read more at It’s FOSS