
Get your wetsuit on, we’re going data diving. Throughput benchmarks using IOzone on a common SATA disk, an Intel X25-E SSD, and Bcache, using the SSD to cache a single drive.
Read more at Linux Magazine
The next best thing to being there is being able to log into your systems remotely. One of the great things about Linux is the variety of tools you can use to remotely administer your Linux desktop and server systems. From the command line to GUI tools, you can take control of it all right from the comfort of your very own desktop anywhere you happen to be.
I’m going to introduce you to three ways you can remotely administer your desktops and servers: Secure Shell (SSH), Remote Desktop Viewer, and TeamViewer. Once you’ve completed this article, it will be up to you to decide which method best suits your needs and when.
This is, by far, the fastest and easiest method of remotely administering your desktop. Gaining remote access from one machine to another is simple and secure with SSH. You issue the ssh command from your local machine to connect to your remote machine and you can begin to run commands to remotely administer that machine. Typically, the command to connect to a remote machine will look like this:
ssh -v -l usernameremote-host
Where username is the username you want to connect with and remote-host is the IP address or fully qualified domain name (FQDN) of the remote machine you want to access. Once you have successfully connected you will find yourself at the bash prompt of the remote machine. Start firing away commands.
But what if you want (or need) to use GUI tools this way? You can. SSH has the capability of tunneling X protocols built in. This means you can run the GUI tools on the remote machine on your local machine. Why would you want to do this over remotely connecting to the desktop via VNC or Team Viewer? By only using the GUI tools you need you are not slowing down the administrative process by having to process an entire desktop via the network. It’s one tool at a time.
To do this the ssh command looks like:
ssh -v -l usernameremote-host -X
That’s it. Just add the -X switch and SSH will now tunnel X Windows. You can start up the GUI tools you need by simply executing the commands to start them up. This will, of course, require you to know the commands for the tools.
One word of warning. It may be tempting to allow root user connections to the SSH daemon. Do not allow this. Secure shell in as a normal user and then su to root if you need to work as root on a system remotely. Allowing root connections via SSH is inviting trouble. To make sure you do not allow SSH root connections look at the /etc/ssh/sshd_config file and make sure the line PermitRootLogin yesis commented out (it is preceded by a # symbol), or simply change it to no instead. If you have to make this change then restart the ssh daemon after you save the file.
Remote Desktop Viewer is a different beast. With this tool you are going to be administering using the remote machines complete desktop. For these types of connections to work the remote machine must have a server running allowing connections to be made. Fortunately this is very simple. And fortunately the necessary tools are installed by default in the more recent GNOME desktops. Let’s first take a look at how this is set up.
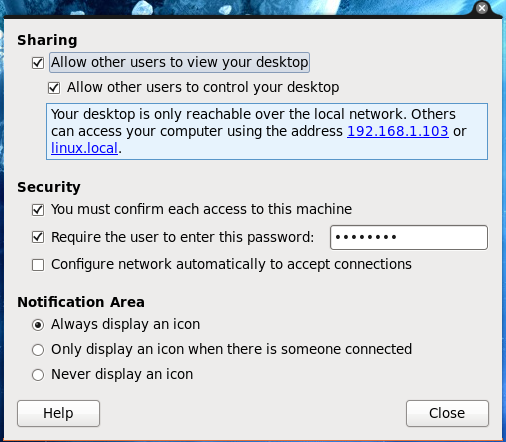 The first step is to allow connections to be made on the remote machine. To do this click System > Preferences > Remote Desktop. This will bring up a small window (see Figure 1) where you configure allowed connections. You want to take care of this set up as a poorly configured server could allow anyone onto your desktop.
Take note of the address you are given for remote connections. Also make sure you select either (or both) options “You must confirm each access to this machine” and/or “Require the user to enter this password”. If you are going to be doing the remote administration you will not want to enable the former as you will not be there to confirm.
Once you have this configured click close and you are ready to connect.
To connect to this machine click Applications > Internet > Remote Desktop Viewer. This will bring up a small window that allows you to manage your remote connections.
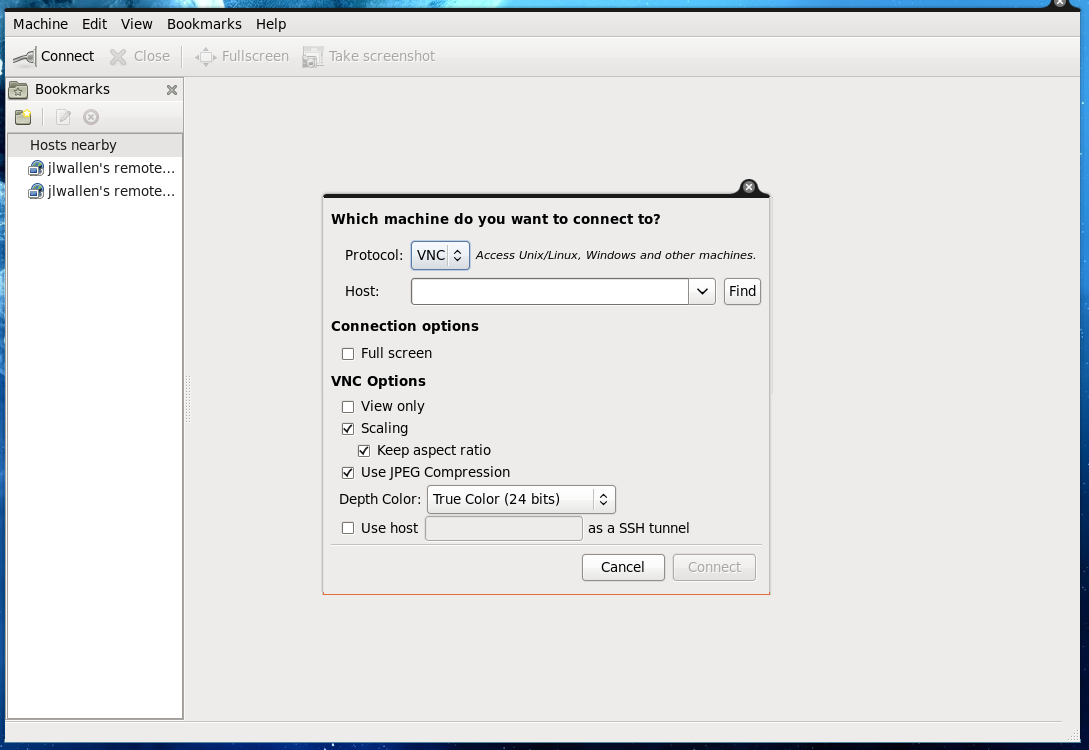 The first thing you need to do is click the Connect button. This will bring up a small window (see Figure 2) that allows you to enter the connection properties for the remote connection. This is fairly straight-forward: Just fill in all the pieces and click Connect. Once you are connected you will have complete control over the remote desktop. If you do not set this connection up to do Full Screen your remote session will remain in the Remote Desktop Viewer window (right pane). You can maximize that window to see the remote desktop better if you like.
Once you are done with your administration, click Close and the connection will be broken.
This is yet another approach to the remote administration. This does work somewhat similarly to Remote Desktop Viewer in that it allows you full control over the remote desktop. However, where this differs is it allows you to connect to a machine that does not have to have a server installed. What I use this tool for is allowing me to do remote help sessions for other users. All they have to do is either install Team Viewer or just run the tool (from the download), give me their ID Number and Password (which I then enter it into my Team Viewer window) and we are connected.
To be the administrator you do have to install Team Viewer. To do this go to the Team Viewer home page and then click the Start Full Version It’s Free button. You will then be taken to the download page. Click the Linux button and then download the file that suits your distribution. Once done you can double click that file and your Package Installer should open for installation. Or, if you are using Firefox, as soon as you click on that file to download it should open up your package installer immediately.
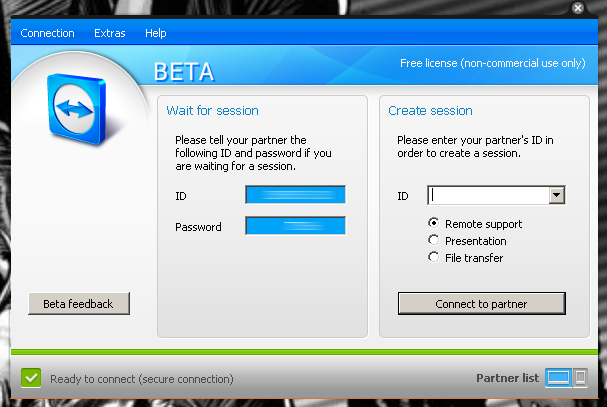 To start up Team Viewer click Applications > Internet > Team Viewer. When the application starts up you will see one simple window (see Figure 3). In this window you will see your ID and Password. When you get the ID from the remote user enter it in ID text area under the Create Session section. Once you hit enter you will then be prompted for that users’ password. Enter that and you will be connected. Time for you to do your administrative thing.
You’ll find many ways to perform remote administration on Linux. This article doesn’t cover them all, but it gives you three very different means to tackle the same task. Which version is best for you? Or do you have a completely different way to handle remote admin? Share with your fellow Linux.com users.