Home Blog Page 2891

A little help please.

With out dragging this out and keeping it simple. My main box has 10 different distro’s on it at any given time. Being as silly as I am, a lot of the time when I go to get rid of an install and replace it with something “New and Exciting” I cant remember whats where and the dame GRUB.cfg and Menu.lst have been written over so many time each entry is pretty generic. So I was wondering if anyone could direct me in the right direction to be able look into the file system of a non-booted (at the moment) installation and tell what distro it is ???


Thanks

Regards,

Google Chrome Now Comes With Flash Built In

Flash come integrated with Chrome in the lattes version of the Google’s Browser. In this vote of confidence to Adobe from Google the message is clear, both has a common enemy, Apple.

Not only is Google giving Adobe’s Flash technology another vote of confidence (Flash Player 10.1 for Mobile, which was announced  earlier this week, will be rolled out on Android 2.2 phones first), but the integration also means any updates to Flash Player will be delivered directly via Google Chrome’s updating system, ultimately minimizing security risks that tend to surface when one uses outdated software and components.

Is this a safe step for Google after all the security problems flash is currently having? Well, in my opinion this is the first step to something bigger between this 2 companies, stay tuned!!!

Source: TechCrunch

Easy Linux backups with Lucky Backup


We would all like to think that, since we are using Linux, we will never really need a backup of our data. Now, let’s look at this realistically. Even if your OS is 100% rock solid, with nary a nanosecond of downtime, that hardware running that OS can not possibly give 100% forever. Add to that the irresistible urge to upgrade hardware and you have the serious makings for the need to back up.

When you need to back up where do you turn? Of course you could slap together a good ol’ fashion Bash script using rsync, ssh, tar, and a few other Linux tools. But for those who haven’t the slightest idea how to cobble together their own Bash scripts, what is there to use to back up all of that precious data? Those of you who don’t want to “roll your own” or those just looking for something easy to use, you’re in luck… thanks to Lucky Backup! Lucky Backup is a very user-friendly backup tool that will have you backing up remotely or locally in no time. Once you’ve seen Lucky Backup in action you will never think Linux backups are difficult again.

Features

Of all the backup utilities I have used I have to say Lucky Backup is the easiest. It has a user-friendly interface that will make any user happy, and has the following features:

  • Create full backups.

  • Create snapshot backups.

  • Sync data directories.

  • Data checks to ensure nothing is erased.

  • Simple and advanced options.

  • Include/Exclude files.

  • Local or remote backups.

  • Scheduled backups.

  • Backup simulation.

  • Logging.

  • Command line option.

  • Profiles.

Installation

Installing Lucky Backup is simple. All you need to do is open up your Add/Remove Software utility, search for “luckybackup” (no quotes), select Lucky Backup for installation, and click Apply to install. Once installed you will find the tool in Applications > Accessories on GNOME. It might vary on other desktops.

Using Lucky Backup

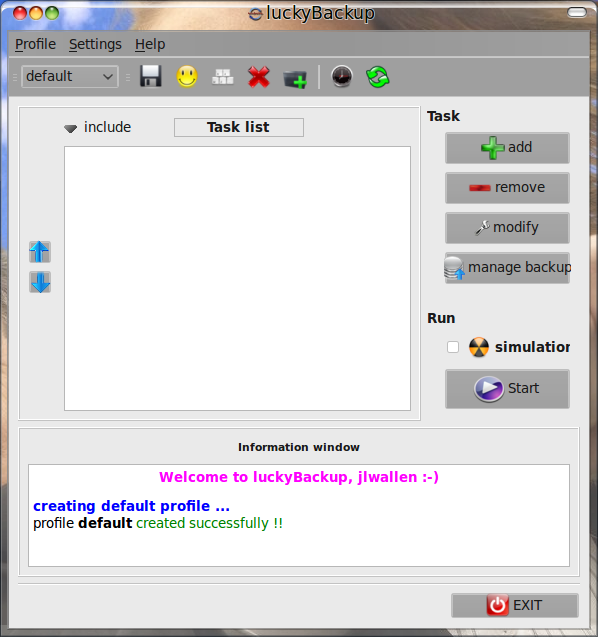
Lucky Backup main window

When you open Lucky Backup the main window (see Figure 1) has pretty much everything you need to create and run a backup. Let’s take a look at the process for creating a scheduled local backup.

Let’s assume you are only going to need one profile for backup. You could, of course, create multiple profiles which would allow you to have multiple backup sets that could be run at different times (making Lucky Backup fairly flexible). But for the sake of simplicity, let’s stick with a single profile.

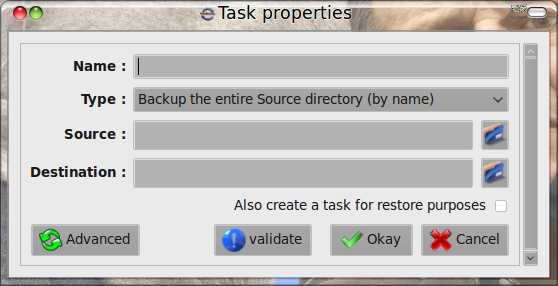
Task propertiesThe first step is to click the Add button which will open up the Task Properties window (see Figure 2). In this window you will need fill out a few pieces of information.

As you can see you can only add one directory per task. If you need multiple sources for this profile you simply create a task for each source.

Obviously you will not want your Source and Destination to be located on the same drive. For a local backup you will want to have either a second drive or an external drive attached. This drive will be your Destination for your tasks. You will also want to pay close attention to the Type of backup you are creating. You can do a full backup (copy all files/sub-folders from the source to the destination) or a synchronized backup (make sure source and destination are the same).

If you want to do any file/folder exclusion make sure you click on the Advanced button. In the Advanced section you can setup excludes, remote options, command options, and extra executables. Before you click the OK button it is always wise to click the Validate button to ensure your backup settings are good to go.

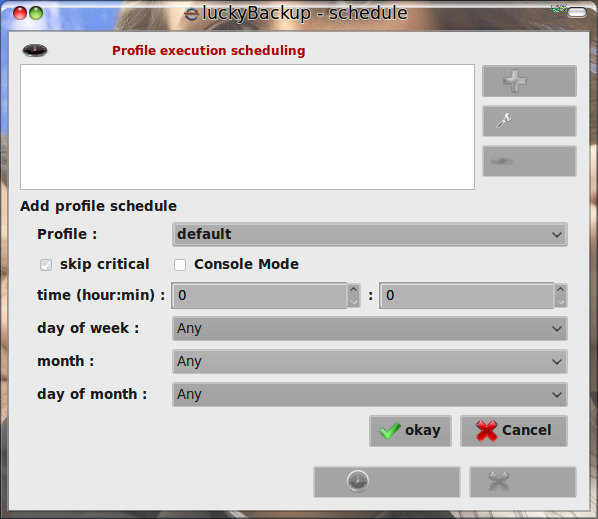
Backup SchedulerOnce you have all of your tasks created you will want to set up the scheduled aspect of the backup. To do this click Profile > Schedule and then click the Add button in the new window (see Figure 3).

When the Schedule window opens click the Add button which will open up the scheduler. From here you can choose a Profile to schedule and then set the interval in which to back up. After you set the time for the backup click OK and the schedule is set…but not complete. After you set the schedule up you then need to click the crontIT! button which will then automatically create a cron job for the backup job.

Multiple backups

Let’s say you have multiple directories you want to back up. You might even want different directories to back up in different way, to different locations, or to be run at different times or intervals. For this you will want to create multiple tasks. You could easily create a task for such backups as:

  • Documents

  • Music

  • Pictures

  • Videos

You get the idea. You can have as many tasks as you want. You can even create specific profiles and then create different tasks for each profile. Very flexible.

Remote backups

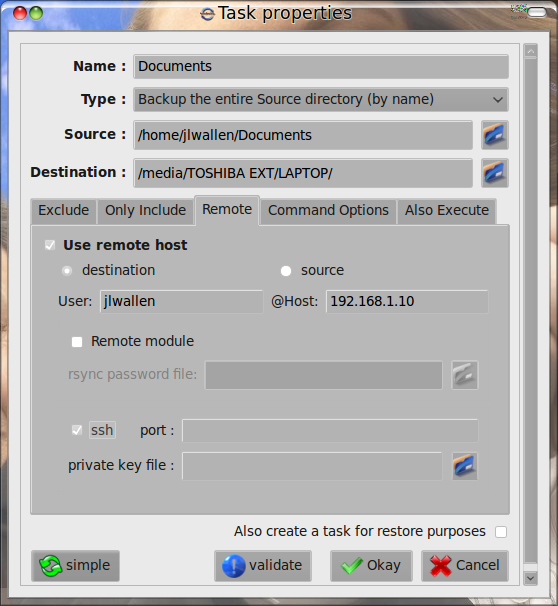
Remote settingsYou can do remote backups with Lucky Backup as well. Attended remote backups are actually quite easy to do. It is only when you want to do scheduled remote backups that you run into any difficulty. Let’s take a look at how to do a single instance of a remote backup first. To do this you would create your backup as you normally would, but you must click on the Advanced button. From the Advanced properties click the Remote tab and begin to fill out the information necessary (see Figure 4).

To do an attended remote backup you will only need to fill out the following:

  • Destination (you need to make sure this directory exists on the remote machine).

  • User (this user must exist on the remote machine).

  • Host (this IP address or host name of the remote machine).

You will also need to select the ssh checkbox. After you complete that information click the Validate button to make sure everything is correct. If it checks out click Okay and you are then ready to run the backup.

There is one thing you will find when running a Lucky Backup remote backup. You will want to start Lucky Backup from the command line so you will be able to enter your ssh password (for the remote host). To start Lucky Backup from the command line open up a terminal window and issue the command luckybackup. Now when you hit the start button on Lucky Backup you will see your console window prompting for your ssh password. Enter the password and hit the Enter key to continue on with your backup.

If you want to schedule a remote backup you will have to set secure shell up to do password-less authentication. This is not necessarily the most secure process. If, however, you want to set this up just follow these steps:

On the local machine issue the command:

ssh-keygen -t dsa

This command will generate public keys that you can then copy to your remote machine. During the key generation do not enter a password, just hit enter when prompted. After the keys are generated copy them to the server with the command:

ssh-copy-id -i .ssh/id_dsa.pub username@destination

Where username is the user you will log into the remote server with and destination is the IP address of the server. To test this go back to the local machine and attempt to ssh into the server. You should automatically be logged into the remote machine. You can now set up scheduled, remote backups.

Running a backup

In order to manually run a backup (such as a remote backup) select the task you want to run and then click the Start button. You can optionally check the “simulator” check box to simulate the backup to make sure it will run properly. That’s all you need to do! Let your backup run to completion and you’re finished.

Final thoughts

Thanks to tools like Lucky Backup, backing up data on Linux is a task nearly any user can accomplish. If you find Lucky Backup challenging, don’t worry… there’s even easier tools available for Linux, and I’ll cover those in upcoming tutorials.

Learn Linux, 101: Find and place system files

Learn the correct location for files under the Filesystem Hierarchy Standard (FHS) on a Linux system and learn how to find important files and commands. You can use the material to explore file organization and management.

Nvidia Releases a Much Improved Video Driver for Linux

Nvidia display driver 256.35 for Linux, FreeBSD and Solaris. After many months of hard work, finally Nvidia lunch this June 22nd the final and stable version of the 256.x proprietary driver for Nvidia graphics cards.Unofficial GLX support was also added for a few OpenGL extensions, as well as Thermal Settings reporting improvements, Compiz fixes, many VDPAU improvements, and many more.


This a good news for the Linux user who had a Nvidia graphic card on their machines. If you want to download follow this link. Here are some of the release highlights:


  • Fixed a regression in 256.29 where Performance Level clock frequencies were reported incorrectly in nvidia-settings.
  • Fixed a 3D Vision Stereo bug that caused the stereo glasses to not toggle when the flat panel was not running at its native mode timings.
  • Fixed a bug that caused nvidia-settings to crash when rendering its thermal gauge widget if the range of valid values for the thermal sensor was empty.
  • Fixed a bug which prevented use of high performance PowerMizer levels on systems with certain ACPI configurations.

To know all the release highlights follow this link to the Nvidia home page

Source: Softpedia News

HTML5 Speed Test: Firefox 3.7 Faster Than Internet Explorer 9

[video:http://www.youtube.com/watch?v=OIZUdZdFzOo&feature=player_embedded 480×300]

The boys from Download Squad made a test between Firefox 3.7, Internet Explorer 9, Chrome and Opera to see who’s the faster browser for Windows. The results are:

Chrome is the slowest (even with hardware acceleration turned on via command line switches), Opera competes very well up to a point, but at the end just Firefox and Internet Explorer are the winners with 1000 fish swimming around.

Both Firefox and IE9 use Direct2D to utilize the GPU’s rendering power — so it’s probably no surprise that they both show very similar results. It’s most apparent when comparing CPU use; IE9 and FF3.7 are both miles ahead in performance, but both show the lowest CPU utilization!

This is just an experiment from the Download squad, but this can give us the idea on what to wait on the near future with the release of FF, IE, Chrome and Opera and of course the main attraction HTML5.

Source: Download Squad

Weekend Project: Replacing Google Reader with Tiny Tiny RSS


If you are like a lot of Linux users, you get more and more of your information through RSS and Atom feeds: news sites, friends’ blogs, projects’ Planet feeds, automatic content delivered from search engines, and so on. Although there are desktop feed aggregators to help you keep up-to-date, Web services like Google Reader or Bloglines are often more convenient. But what if you don’t feel comfortable putting that much personal information in the hands of a commercial third party, or you simply prefer to use free software? Simple: just fire up a LAMP server, roll up your sleeves, and migrate to a feed reader entirely under your control.

There are plenty of free software feed readers to choose from, even if you look just at the Web-based options that allow you to access your reading list from anywhere. Gregarius, GobbleRSS, Newsbeuter all have loyal followings.

Probably the most active, however, is Tiny Tiny RSS (TT-RSS), which makes it a good candidate for installation if you are not already familiar with one of the alternatives. You are more likely to find troubleshooting help if something goes wrong, and bug fixes and new features come down the pipe more quickly.

To install TT-RSS, you will need a Web server running PHP (preferably PHP 5, due to some dependency issues) and either a MySQL or Postgresql database server. Your PHP installation must have the appropriate package for your database of choice, obviously, and you will also need the PHP-XMLRPC module.

TT-RSS can retrieve feed updates in one of two ways, by running a daemon or by running a periodic cron job. If you plan to install the package on a shared hosting plan, you may not have the option of running a daemon, depending on your hosting provider’s policies. Finally, the system can send email updates to alert you of new registrations (if you enable the optional multi-user mode) or to send a daily digest; here again you may need to check with your hosting provider to make sure that you can use the system mail transfer agent (MTA).

Installation

Once you have the prerequisites, download the latest source package from the project’s Web site, and unpack it into the target directory on your server. The most recent release at this time is version 1.4.2 from May 31, 2010, which tips the scales at about 1.2 MB. There is no Web-based installer as yet, but fortunately the process is straightforward. First you will create the database and database user, then edit the TT-RSS configuration file to work with your setup.

Begin by creating a database for TT-RSS, either with a management tool or at the command line, for example with mysql -u root -p -h yourmysqlhost.example.com CREATE DATABASE ttrssdb. Because it is a very bad idea to run everything as root, you should also create a database user with adequate permissions, such as: mysql -u root -p -h yourmysqlhost.example.com GRANT alter,create,delete,drop,insert,update,select ON ttrssdb.* TO ttrssuser IDENTIFIED BY SomePassword.

That lays the groundwork. The schema directory inside the source code release includes SQL files to perform all of the actual table creation and other setup required; there is one file for MySQL and one for Postgresql. Here again, you can import it through a database management tool, or from the command line, using mysql -u ttrssuser -D ttrssdb -p .

Next comes the configuration file. Inside the newly-unpacked TT-RSS folder you will find a file named config.php-dist. Make a copy of config.php-dist named config.php, and open it in your favorite editor. Right at the beginning are the most critical settings: DB_TYPE, DB_HOST, DB_USER, DB_NAME, and DB_PASS. By default, postgresql is selected as the DB_TYPE because it is the developers’ preference; change this to mysql if you are using MySQL as in the examples above. In our example thus far, the DB_NAME is ttrssdb, the DB_USER is ttrssuser, and the DB_PASS is SomePassword. DB_HOST could remain localhost, but if your database server has a fully qualified domain name, it is a safer bet to enter it — particularly if you are installing on a shared hosting plan.

Most of the other settings can remain at their defaults, although it is always wise to read through the entire file. In particular, those using shared Web hosts should make sure that they can access the TMP_DIRECTORY and MAGPIE_CACHE_DIR directories.

Feed Me

Once you save the configuration file, bring up http://www.example.com/tt-rss in your browser, and you should see the TT-RSS interface. You will no doubt notice that it is empty. You can subscribe to individual feeds through the “Subscribe to feed” option in the Actions menu on the right.

If you are already using Google Reader or another feed reader, you can save tremendous amounts of time by exporting your existing subscriptions as an Outline Processor Markup Language (OPML) file. This is a standard format, supported by most feed readers for both import and export. TT-RSS’s OPML importer is accessible through the Preferences link in the upper right-hand corner, under the “Feeds” tab.

While you are in the Preferences, it might help to take a look at the general Preferences tab for a couple of time-saving settings. First, if you subscribe to a lot of Planet feeds, change the first setting (“Allow duplicate posts”) to “No.” This will recognize posts that are aggregated in more than one feed source, and only display them once. Next, “Enable feed categories” to “Yes.” This allows you to group your feeds into categories with a collapsible tree-view list on the left hand pane, and it preserves any categories you already had defined in your OPML import. Finally, double check the “Do not show images in articles” setting ¬ó the wording is confusing; choose “No” to enable images inline in posts.

Back in the feed reader interface, you can click on any feed or category’s name in the left-hand pane to bring up the list of posts, and force an update through the toolbar at the top. The rest of the feed reading feature set is pretty self-explanatory, including starred articles, marking an entire feed as read, and archiving individual posts to keep them past their default expiration date.

With a feed selected, choose “Edit this feed” from the toolbox on the right. From the pop-up window, you can change the name of the feed, its categorization, or set various options. Most importantly, if the feed requires authentication, you can enter your username and password to be saved on the server for future use. No need to hand over your login credentials to the bigwigs in Silicon Valley ever again!

Last but certainly not least, although your individual TT-RSS installation cannot access the reading habits of others or any aggregated “likes” and “dislikes” as the proprietary social networking companies are pushing for, you can share articles that you enjoy with your friends. Clicking on the orange “feed” button in the article list adds the selected post to your Published Articles. You can view your own Published Articles list from the left-hand pane, but more importantly, you can share it with the world. Under the Feeds tab in the application preferences is a button labeled Display URL that creates a public RSS feed of your published articles. You can share that link directly with the world if you like, or integrate it directly into your WordPress blog, syndicate it with Sudosocial, or anything else.

Advanced reading

The basic installation instructions given so far set up TT-RSS into manual-update mode; you must click the Update button to refresh the subscribed feeds. But one of the advantages to a Web-based application is that it can do the refreshing while you are away from the screen. If you are managing your own server and can run background daemons on it, you can turn on this feature by setting ENABLE_UPDATE_DAEMON to true in config.php.

There are several methods to manage the daemon, depending on whether you use init.d or other factors ¬ó the instructions and an explanation of the differences are found on the UpdatingFeeds page of the project wiki. This can be more complicated than some of the other available methods, because init.d scripts are not always portable across Linux distributions.

The same page also explains how to run the feed updating script as a periodic cron job for those that are not able to run background daemons. All you need to do is call the update_feeds.php script from within your TT-RSS directory.

The default installation is also single-user-mode. For security reasons, you may wish to protect access to your TT-RSS site by other means, such as an .htaccess file, but you can also reconfigure the system for multi-user operation, where each user has a login name and password. In config.php, you can adjust the settings to permit any number of accounts (including one), so this can also serve as a security measure.

Finally, you can experiment with a different feed retrieval and parsing library if you want; setting ENABLE_SIMPLEPIE to true tells TT-RSS to use the SimplePie library instead of the default, Magpie. This may eliminate some parsing errors, but it comes at the cost of additional complexity: SimplePie relies on cURL to perform some of the feed retrieval, including any feeds that require authentication. It is still an experimental addition to the codebase, but what fun is life if you stay away from the bleeding edge?

TT-RSS is considerably more configurable than Google Reader, Bloglines, or any other proprietary feed reader. For some people, that alone is reason enough to switch. For others, keeping your subscription data and personal logins private is the key feature. But either way, you are in the driver’s seat ¬ó and that’s the only way to read….


Sprint: EVO 4G users getting Android 2.2 ‘in the near future’

 
It looks like EVO 4G users will soon have one more thing to smile about, as Sprint has just announced that an Android 2.2 (aka Froyo) upgrade will indeed be coming to the “superphone.”
With the Android 2.2 upgrade, customers can expect improvements to include the following benefits: updates to user interface, improved EAS Support, improved browser performance, including Flash 10x Support, voice dialing over Bluetooth and application storage on external memory.

No word on a timeframe yet, but you’ll know as soon as we do — promise.

Sprint: EVO 4G users getting Android 2.2 ‘in the near future’ originally appeared on Engadget on Fri, 25 Jun 2010 11:36:00 EST. Please see our terms for use of feeds.


Permalink | Email this | Comments

Read more at Engadget Mobile

Fedora 11 reaches end of life

Fedora 11, code named “Leonidas”, has reached its end of life. From today no new updates, including security updates and critical fixes, will be available

Read more at The H

Ubuntu Nearing X Server Not Running As Root

Based upon a recent email to the X.Org developers’ mailing list, Canonical is nearing the point of one of their goals for Ubuntu 10.10 of a rootless X Server, or being able to run the X.Org Server without root privileges…


Read more at Phoronix