While bringing them to the Linux side of the computing world, I learned a few things about helping non-techies move to Linux. If someone asks you to help them make the jump to Linux, these eight tips can help you.
1. Be honest about Linux.
Linux is great. It’s not perfect, though. It can be perplexing and sometimes frustrating for new users. It’s best to prepare the person you’re helping with a short pep talk.
What should you talk about? Briefly explain what Linux is and how it differs from other operating systems. Explain what you can and can’t do with it. Let them know some of the pain points they might encounter when using Linux daily.
If you take a bit of time to ease them into Linux and open source, the switch won’t be as jarring.
2. It’s not about you.
It’s easy to fall into what I call the power user fallacy: the idea that everyone uses technology the same way you do. That’s rarely, if ever, the case.
elementary OS began life over a decade ago as a set of icons. (Yes, seriously.) If ever there was a group of developers who started at the bottom and worked their way up to the top, it’s Daniel Foré and the rest of today’s elementary OS team. From a set of icons designed to improve the look of Ubuntu’s then GNOME 2 desktop, the elementary project expanded to include some custom apps, including a fork of the default GNOME files app, Nautilus, called nautilus-elementary. As with most open source projects, the borrowing went both ways: Ubuntu’s Humanity theme was a fork of elementary OS’s icon set.
Over the years, the elementary project continued to grow and encompassed ever more apps and ever more customizations for the desktop. Eventually, things got to the point where it became more and more cumbersome for users to install everything. But there was enough momentum behind the project that Foré decided the logical thing to do was for the group to create their own distribution. The project took Ubuntu as a base and began layering in their custom apps, and the highly refined look and feel of elementary OS was born.
elementary OS 5 Juno
For a bit of logistics, elementary OS Juno should be version .5, following the previous release, .4 or Loki. However, since .5 implies incomplete and elementary OS is more or less complete (in terms of stability certainly) ,the project is calling this release elementary OS 5.
Whatever the version number may be, one thing is for sure: there’s ton of new stuff in Juno. Enough features, in fact, that the release notes, written by elementary OS’s Cassidy James Blaede, are an impressive John Sircusa-style essay of some 8,000 words. If you want to know everything that’s new, Blaede’s notes are worth a read. If you want to know what it’s like to actually use all that stuff, read on.
As of this New Year’s Eve afternoon, the Linux kernel saw 74,974 commits this year that added 3,385,121 lines of code and removed 2,512,040 lines.
For as impressive as seeing almost 75k commits in a single year to an open-source project, it’s not actually a record high. Last year in fact saw 80,725 commits that added 3.9 million lines and removed 1.3 million lines…
Besides Linus Torvalds himself, those with the most commits this year to the Linux kernel included David S. Miller, Arnd Bergmann, Christoph Hellwig, Colin Ian King, and Chris Wilson. There were 4,208 different detected authors this year compared to 4,400 in 2017 but higher than the 4,043 recorded for 2016.
Linus Torvalds unleashed kernel 4.20, dubbed Shy Crocodile, on the world this past Sunday. There was speculation whether Torvalds would make the jump from 4.19 to 5.0, as he did when he skipped 3.20 and went with 4.0 instead. In the end, he stuck with 4.20, and 5.0 will probably be the number of the next kernel after this one.
Apart from all that, probably the largest will-he-won’t-he debate revolved around STIBP. STIBP stands for Single Thread Indirect Branch Predictors, and that mouthful is a preventive measure against the Spectre/Meltdown bugs. When STIBP was tried out during the 4.19 cycle, developers ended up removing it because it was found to have a negative impact on system performance, slowing down execution of some processes up to 50%. The matter was the subject of a long discussion on the Linux Kernel mailing list, with some developers like Andi Kleen arguing that the patch should be reverted entirely. Torvalds, however, pointed out there was a mid-way solution: “[W]e default to something that doesn’t kill performance. Warn once about it, and let the crazy people say «I’d rather take a 50% performance hit than worry about a theoretical issue»“.
After much work, STIBP is back in 4.20, but with performance improvements and allowing processes to choose whether they need to use it or not, because, as it turns out, many don’t.
What the hug?
On what should be a lighter note, but will probably spark outrage anyway (because reasons), Jarkko Sakkinen has taken on himself the thankless job of writing a patch that will cleanse the source code comments of swear words. Instead of just nuking them, the patch changes f-bombs for “hugs”. Hence, expressions become “Get the hug out!”, which implies you have your own personal cache of hugs and you are required to extract and spend one; and “Hug off!”, which must be some kind of endurance event.
Before anybody gets all hot under the collar, it is worth noting that, (a) Sakkinen’s solution is hilarious; and (b) no more reasons should be necessary, but here’s one anyway: such colorful language probably shouldn’t be in code that is easily readable by everyone and that is deployed all over the world to millions of people and businesses. Better reserve cussing for audiences which are more appreciative of the genre, namely Twitter followers and such.
More things to look forward to in Linux 4.20
The open-source NVIDIA Nouveau driver has now got initial HDMI 2.0 support. HDMI 2.0 is what you are going to need to watch movies or play games on 4K displays at 60FPS, since it affords a much larger bandwidth than the currently more common HDMI 1.4 protocol.
Chinese sysadmins will be happy to know that Linux 4.20 supports Hygon Dhyana CPUs. These CPU’s are based on AMD’s Zen microarchitecture and are the result of an AMD-Chinese joint venture that aims to bring domestic x86 chips to data centers.
In more playful news, Linux 4.20 supports the Xbox’s S Controller’s rumbling (meaning it vibrates for added excitement (?) during game play), and there is a working driver for Apple’s Magic Trackpad.
The new year will see more than 200 engineers from all over the world gather at our Paris-Saclay site for a Nokia hosted open source event – the jointly held OPNFV Gambia release Plugfest and ONAP Dublin release Developer Forum.
As a founder and active participant in both projects, Nokia is committed to their success and I’m looking forward to an event where the focus is on openness and collaboration. Based on the experience of hosting the ONAP Developer event little more than a year ago at the same site, I’m confident the event will be a success!
For ONAP, the Dublin release Developer Forum is a critical step in defining and agreeing the contents of the Dublin release, to be ready in mid-2019. Nokia has been a major contributor to ONAP, being especially active in expanding ONAP’s ability to manage and orchestrate not only virtualized but also physical network functions. Together with colleagues, we plan to continue this journey for the ONAP Dublin release and beyond.
DevOps is a framework that allows development, quality assurance, and operations to meet the needs of the business to align with customer demand. It contains capabilities related to:
Integrating development and operations teams to facilitate communication, collaboration, and integration to manage today’s rapidly changing business landscape
Enabling developers to provision, change and manage their development environments without operations involvement
Allowing developers to promote to production cloud-native applications without the need for operations involvement
Facilitating both conventional application development acceleration and cloud-native application development techniques
Benefits of DevOps
To align with the speed of business
To increase the speed of release of new applications
Higher quality applications released to production
Having a cloud architecture that both Operations and Development collaboratively define. Provides and alignment with business requirements and objectives as a catalyst to realizing greater opportunities to leverage cloud-native capabilities that are inherent in cloud technologies
As an enabler to operations to review features, provide feedback into the development process, and reduce production issues
Enables the ability to deliver infrastructure as code
Because purpose plays such an important role in open organizations, I want to share what I’ve learned about how organizations can clarify a purpose, who they serve, how they serve their core customer and what they celebrate externally.
Say it in four sentences
Bloom’s most significant point is that you must be able to state your organization’s purpose in short sentences. A short sentence will simplify complexity and make vagueness turn crystal clear. Bloom looks at a collection of four targeted sentences he calls “the growth discover process,” which he says produces the necessary clarity.
A “who” sentence is about the core customer that most likely will buy your product or service in the quantity required for optimal profit (not a statistic or demographic category, but an imagined person with a personality you can get to know personally).
A “what” sentence is about the uncommon offering that your business has and leverages (your special benefit to the customer you identified in the previous sentence).
A “how” sentence is about the persuasive strategy and actions you employ to convince your core customer (from the first sentence) to believe in your uncommon offering (from the second sentence) versus all competitive offerings (the interaction customers experience with you that differentiates you from all others that is difficult to copy).
An “own it” sentence, as the author calls it, is about a series of imaginative acts and impressions that celebrate your uncommon offering and make it well known to your core customer (your way of showing what you mean to that customer).
The American dream has driven millions upon millions of people to come to a country filled with possibility and opportunity. Sometimes, you get caught up in the gears of enterprise and learn that the machinations of big business tend to run counter to that dream. But, sometimes, you start a company on an ideal and cling to that initial spark no matter what.
That’s what Carl Richell did when he created System76. That was more than a decade ago, when the company’s goal was to sell computer hardware running open source operating systems. System76 has been a bastion of hope for Linux and open source fans, as they’ve proved, year after year, that the dream can be fulfilled, that Linux can be sold on the desktop and laptop space.
The launch of the game-changing System76 Thelio only solidifies this open source dream. CEO Carl Richell oozes the open source ethos, and that ideology comes through, to perfection, in their latest offering, theThelio desktop, a machine as beautiful in design as it is in execution. The Thelio was created, from the ground up, to offer as much open hardware as possible, while delivering a beast of a computer, housed in a chassis that is equal parts form and function. Every detail (from the planetary alignment, marking the date System76 was formed, to the design of the fan output grill, and the ease with which the machine can be upgraded) has been executed to perfection. The Thelio is a hand-crafted computer that any user would be thrilled to own.
What Makes the Thelio So Special?
The easy answer to that question is “everything,” but that serves no purpose, especially for those considering dropping the coin for this desktop beauty. So wherein lies the answer? There are so many ways this new machine exceeds all other desktop computers I’ve seen (which is impressive, considering my daily driver for the last five years has been the—no longer available—System76 Leopard Extreme, which has been truly amazing).
While getting the grand tour of the new System76 headquarters, I was privy to the official Thelio “dog and pony show,” which solidified my assumptions about the company and what they have been and are doing. I was able to watch engineer Ian Santopietro demonstrate how they’ve designed the Thelio in such a way as to optimize air flow through the chassis, so the CPU is capable of running at its listed speed (see video).
Video 1: Air flow has been optimized for the Thelio.
With so many other desktop computers, the listed speed of a CPU is often negated by poorly designed cooling systems and airflows, rendering them incapable of running to spec. The Thelio blows this issue out of the water (or, better yet, out of the back cooling vent). Watching smoke flow through the device was impressive, especially considering how hush-quiet the machine was (with all cores being pushed to the max).
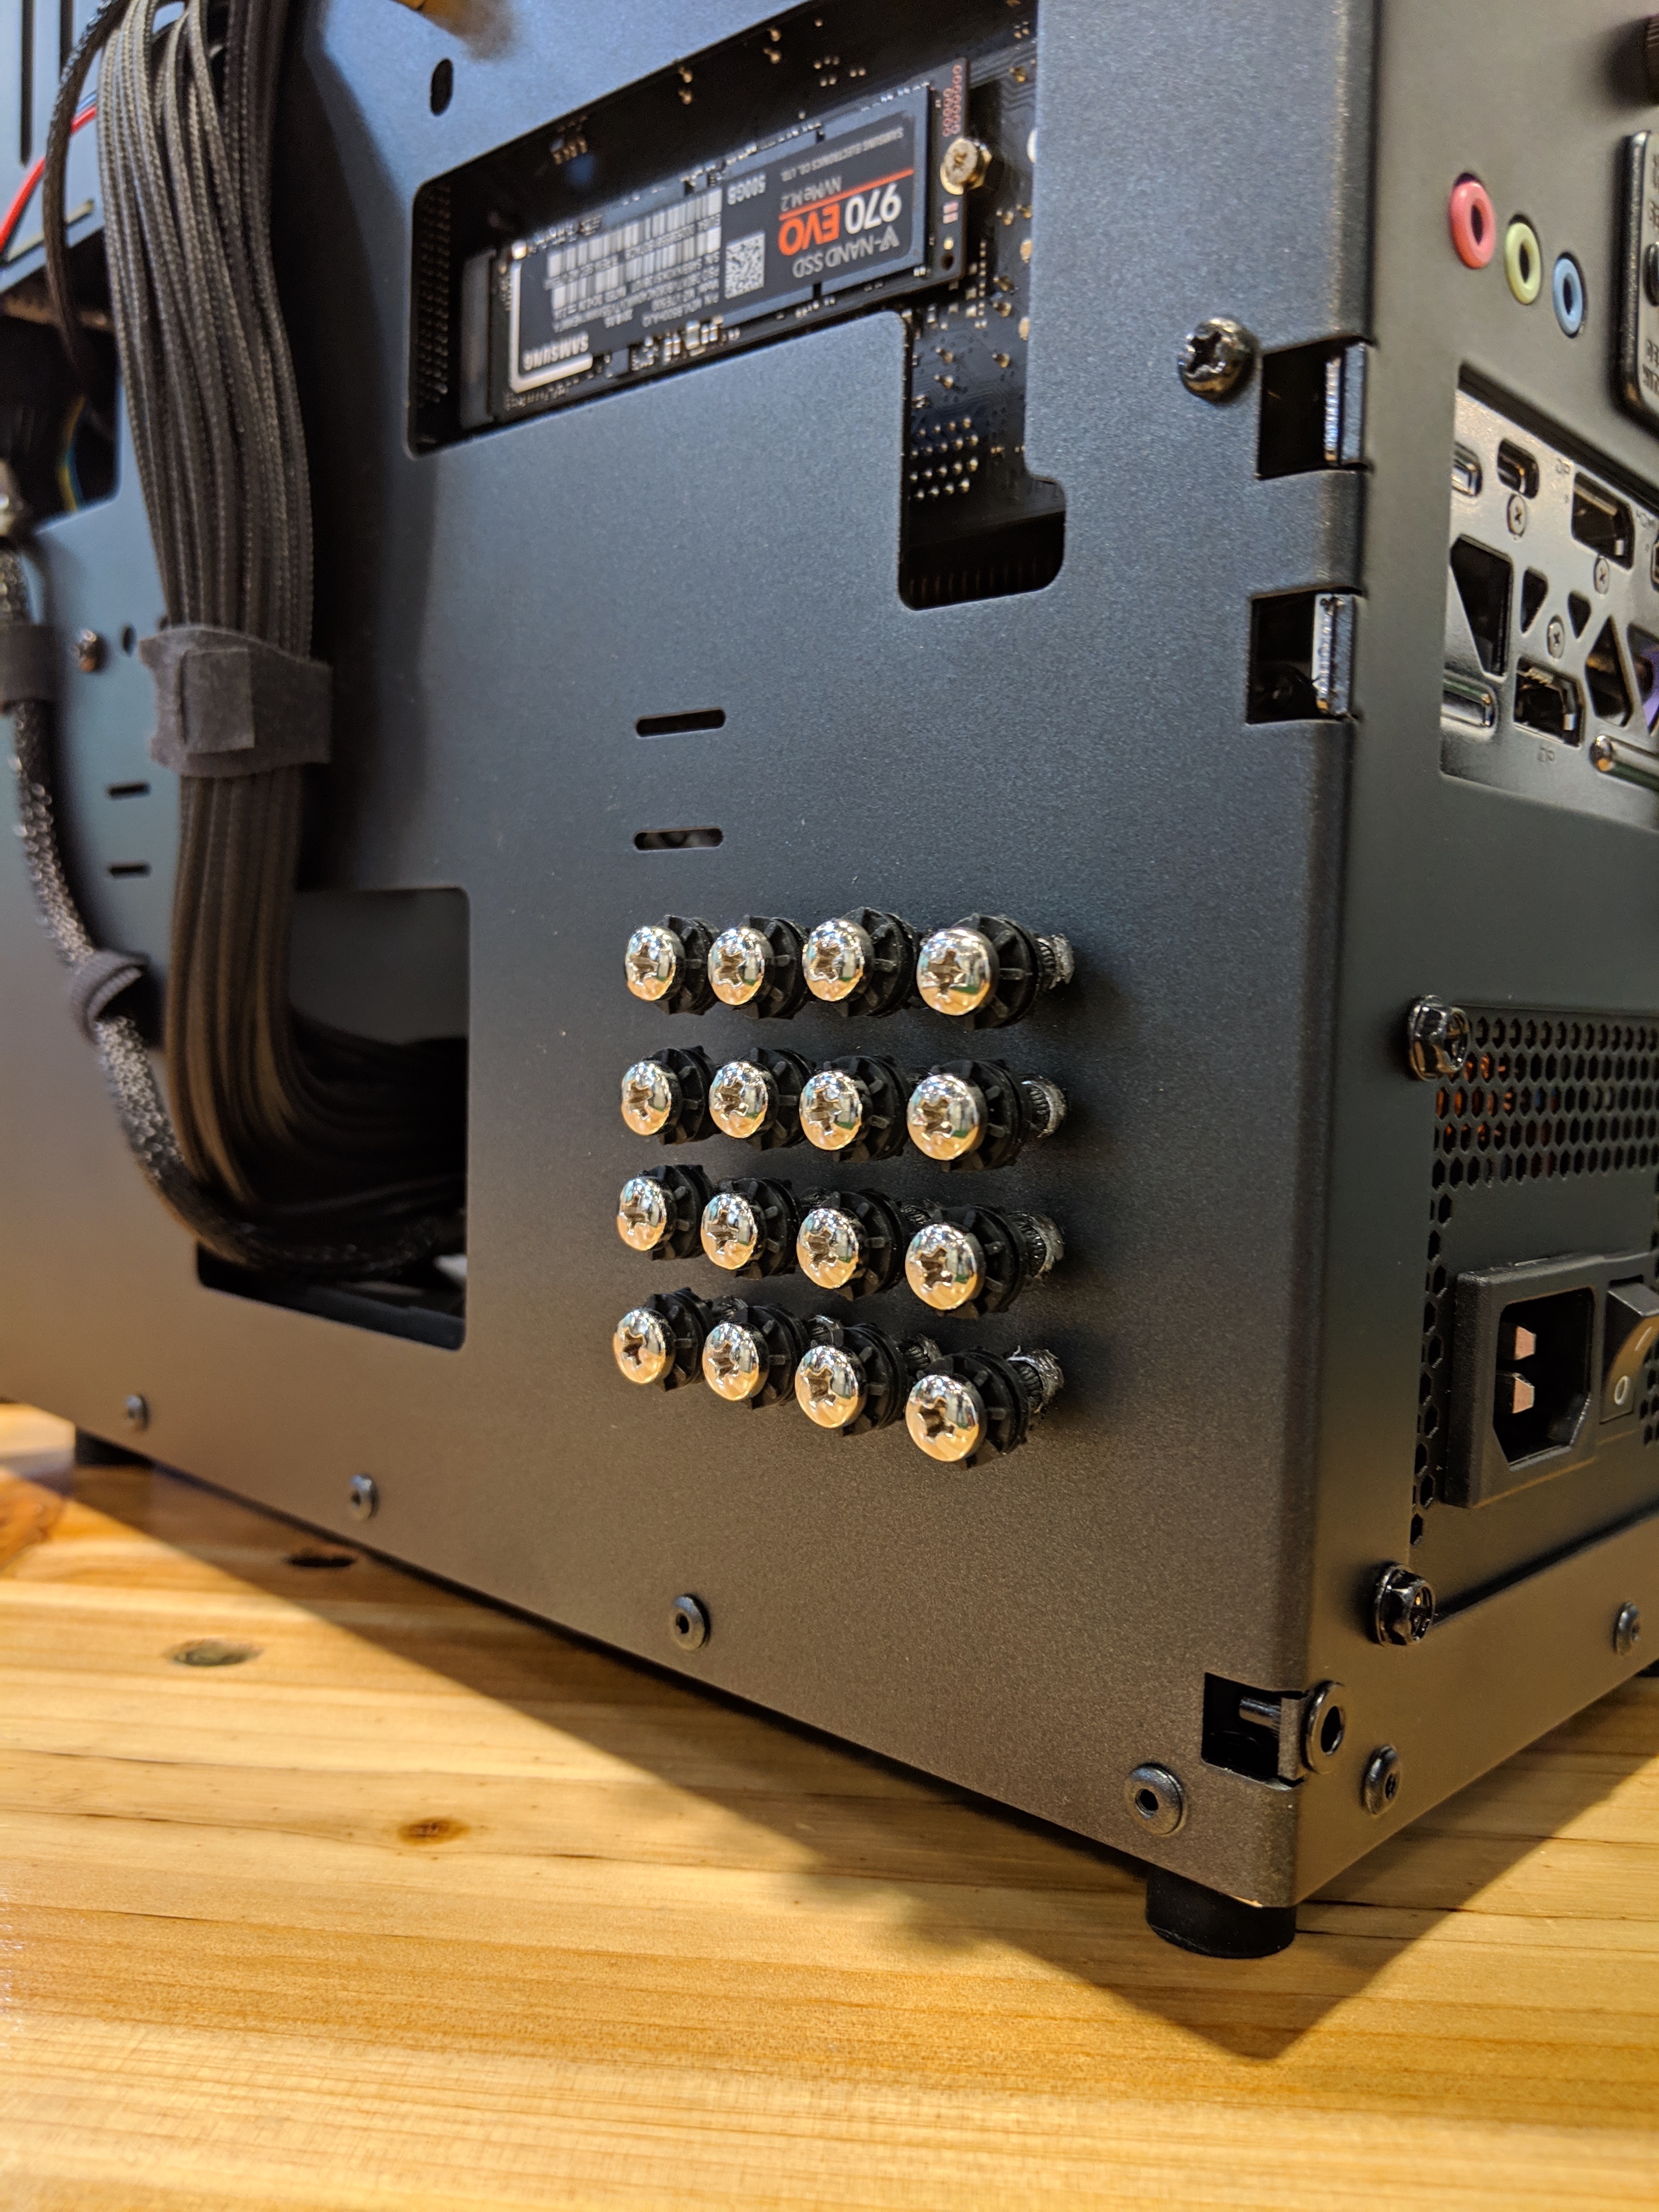
Figure 1: Extra screws are always at the ready.
The ease at which the machine can be upgraded is equally impressive. With a hot-swappable drive-bay that is easily accessible, the Thelio is an upgraders dream come true. And with highly refined tolerances, you can trust that chassis will come apart and slip back together with ease. System76 has added a number of touches most other companies wouldn’t even consider. Take, for instance, the spare drive bolts housed conveniently inside the case (Figure 1). No more will you have to scramble to find that small bag of screws you tossed aside when you unboxed the computer. When you go to add a new drive, you have plenty of screws waiting to be used. A nice touch, for sure.
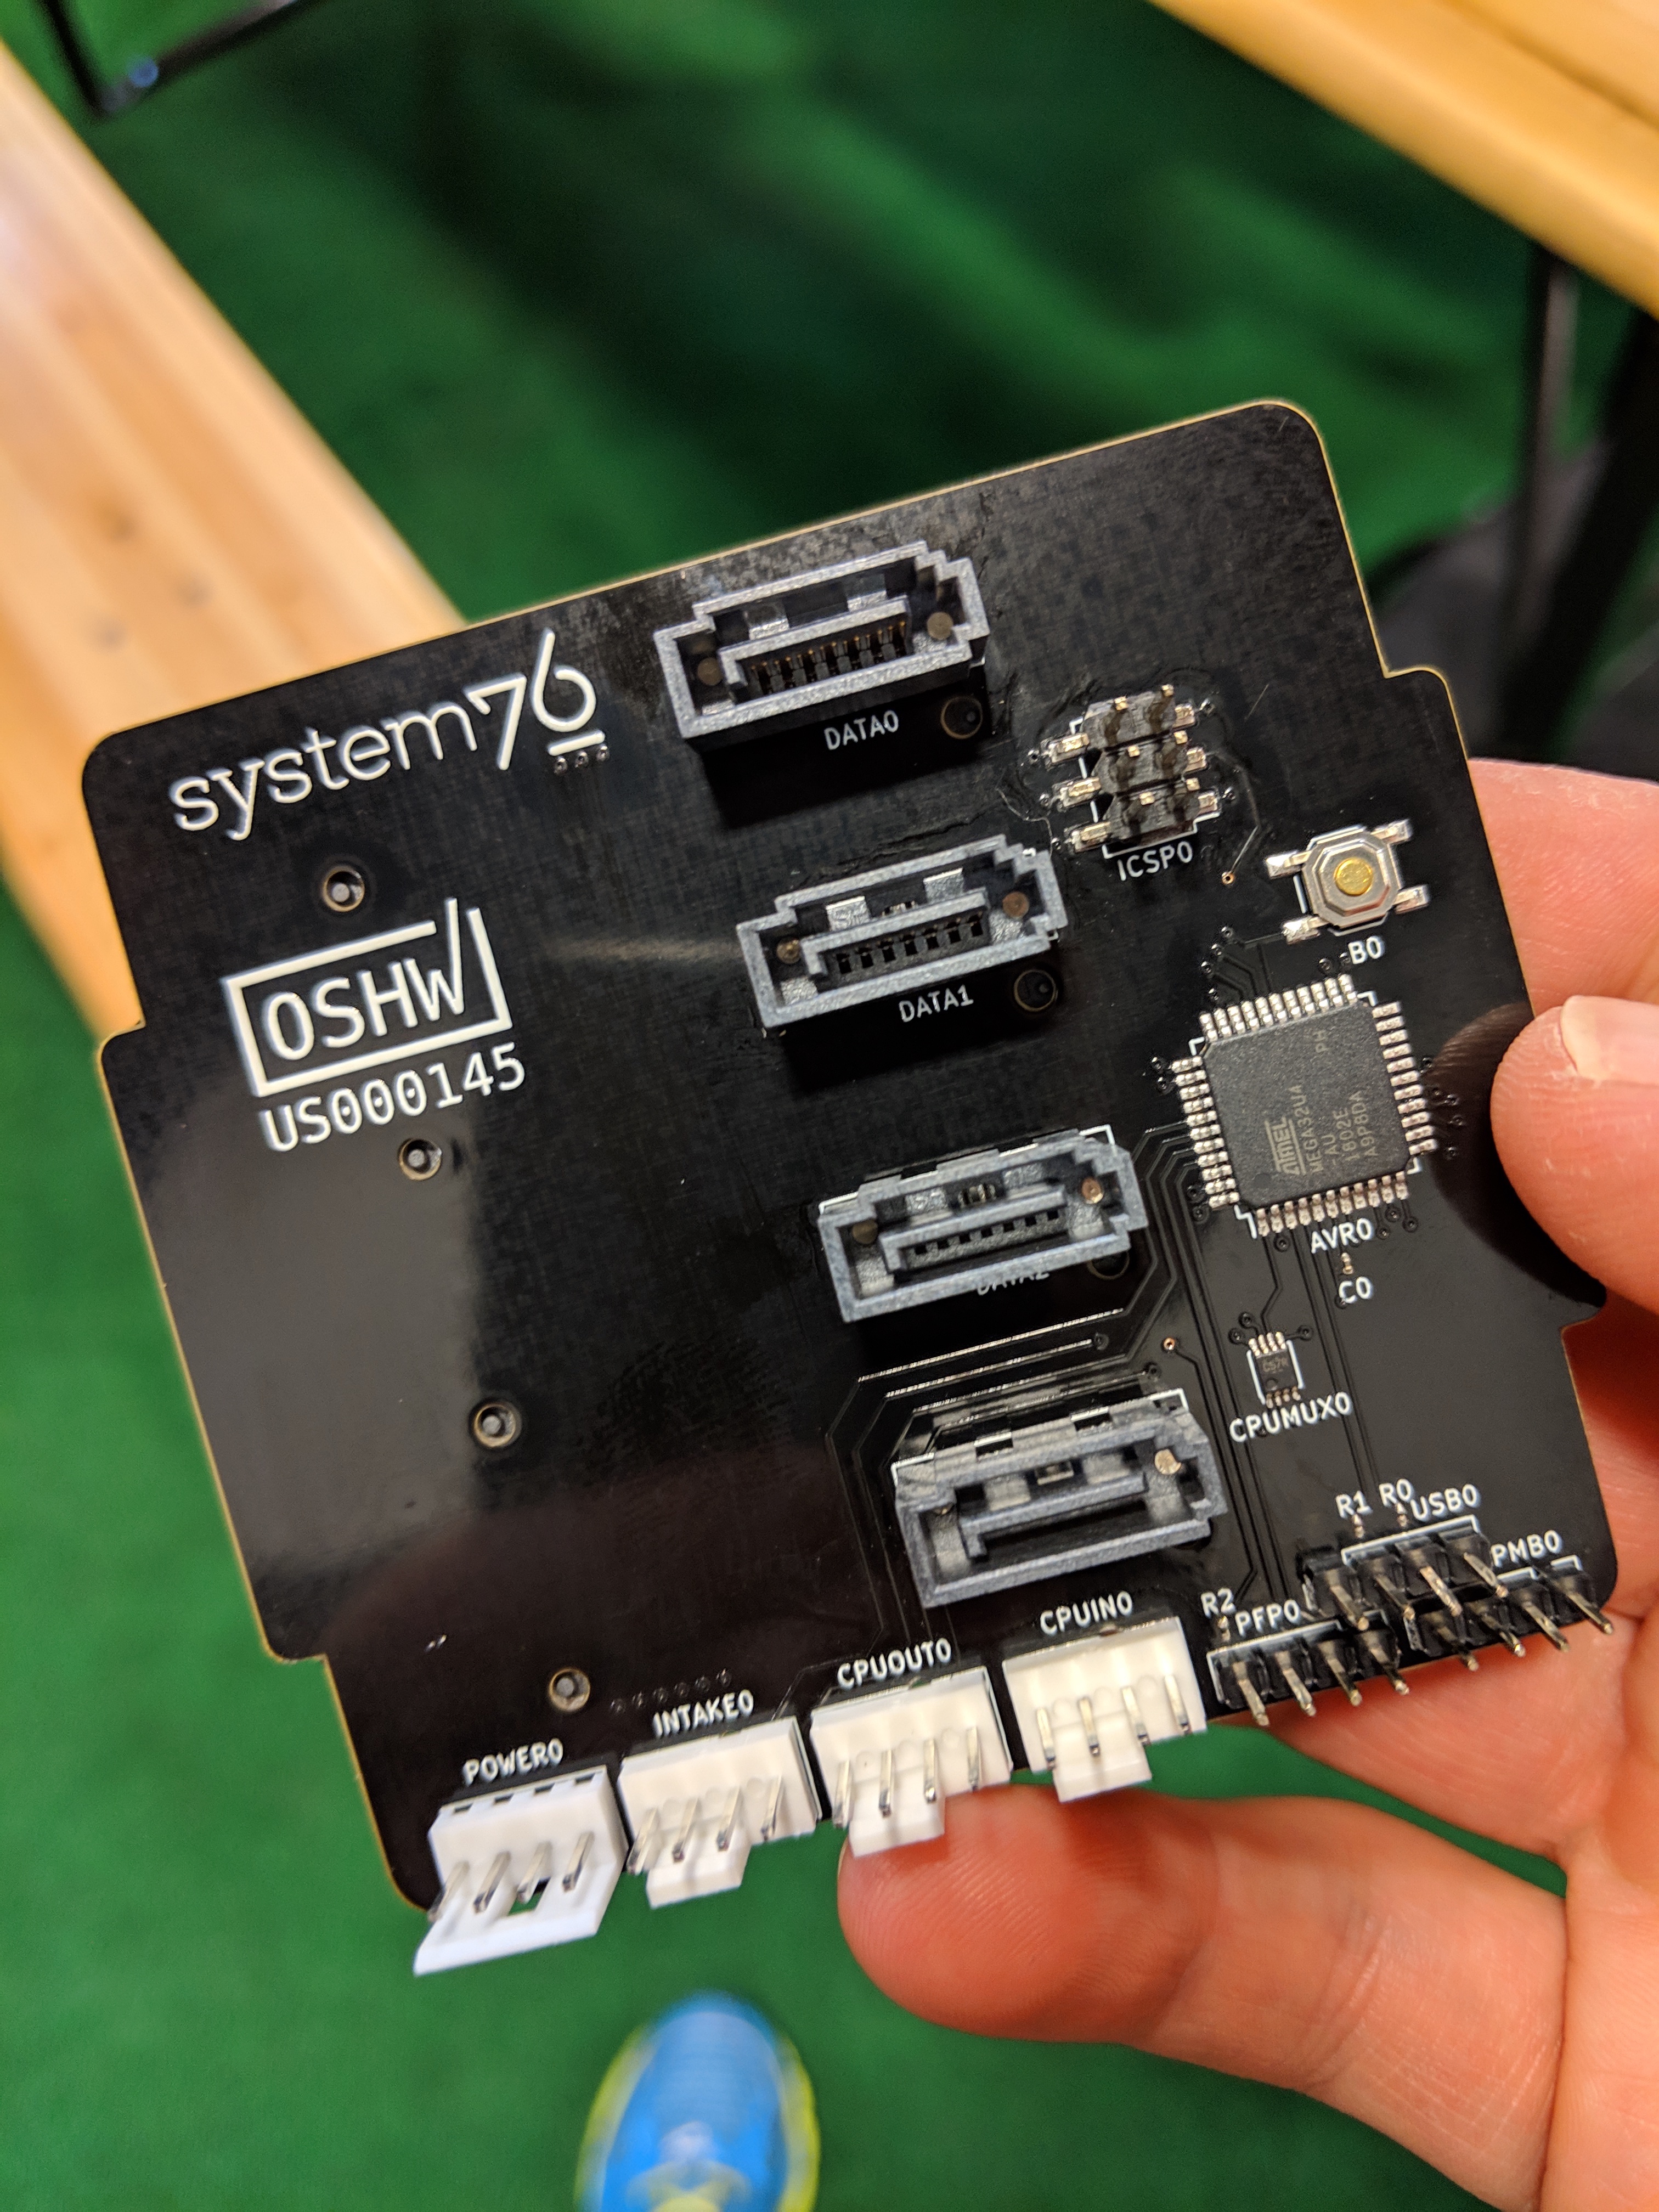
Those curious about the System76 open source claims for the Thelio can download the files for the chassis, as well as the Thelio Io Daughterboard (Figure 2, from GitHub).
Figure 2: The Thelio Io daughterboard.
The Io daughterboard offloads control of the cooling, the passing of data from the motherboard to the storage drives, the power switch, the USB system, and more. This means System76 is able to better control how these systems function (it also means users can benefit from the open source nature of that particular piece of hardware).
The Operating System
As with all of the System76 machines, you can purchase the Thelio with one of the following options:
Pop!_OS 18.04 LTS
POP!_OS 18.10
Ubuntu 18.04 LTS
I would suggest, however, purchasing the hardware with System76’s own POP!_OS, as it offers more control over, and has been optimized for, the Thelio. Although POP!_OS is designed with creators in mind (i.e. developers), one does not have to be a developer to use the OS. In fact, System76’s version of Linux is a general-purpose operating system, only with a few tweaks and inclusions for creators. No matter which operating system you choose, you can be sure to enjoy an unrivaled experience with the Thelio.
Conclusion
To say the Thelio is impressive is an understatement. This is a machine that could easily be mistaken for something produced by a much, much larger company. But make no mistake about it, few large companies put this level of care and heart into the design and execution of a computer desktop. If you’re looking to purchase one of the most impressive pieces of desktop hardware to date, look no further than System76’s new Thelio.
Web development trends have changed drastically over the last few years and as a web developer, to be at the top of your game, it’s important to stay updated with latest technologies.
JavaScript is the current trending programming language out there; it is without doubt the most popular technology used by full stack developers.
JavaScript web frameworks have become a magical solution to faster web development with absolute efficiency, safety and minimized costs. I am quite sure you have heard about Node JavaScript (commonly referred to as Node.js or simply Node), there is a buzz about it on the Internet.
In this article, I will show you how to get started with developing applications in JavaScript using Node.js in Linux. But first, lets get a brief introduction to Node.js.
The Data Plane Development Kit (DPDK) Summit 2018 was held at the Club Auto Sport in San Jose, California, last week, a unique and appropriate location given that DPDK is the engine that powers many NFV platforms today, including auto-focused platforms. As presenters shared the latest research and developments with DPDK in an automobile-themed environment, it was clear that the DPDK initiative’s scope is expanding beyond its original Intel roots. While Intel still has an outsized role within the project, DPDK’s home at the Linux Foundation lends more credibility to its outreach efforts.
For those readers who might still be unfamiliar, DPDK is a set of software libraries designed to accelerate packet-processing workloads running on a wide variety of CPU architectures.