The Data Plane Development Kit (DPDK) Summit 2018 was held at the Club Auto Sport in San Jose, California, last week, a unique and appropriate location given that DPDK is the engine that powers many NFV platforms today, including auto-focused platforms. As presenters shared the latest research and developments with DPDK in an automobile-themed environment, it was clear that the DPDK initiative’s scope is expanding beyond its original Intel roots. While Intel still has an outsized role within the project, DPDK’s home at the Linux Foundation lends more credibility to its outreach efforts.
For those readers who might still be unfamiliar, DPDK is a set of software libraries designed to accelerate packet-processing workloads running on a wide variety of CPU architectures.
Let’s face it, if you’re a Linux administrator, you’re going to work with the command line. To do that, you’ll be using a terminal emulator. Most likely, your distribution of choice came pre-installed with a default terminal emulator that gets the job done. But this is Linux, so you have a wealth of choices to pick from, and that ideology holds true for terminal emulators as well. In fact, if you open up your distribution’s GUI package manager (or search from the command line), you’ll find a trove of possible options. Of those, many are pretty straightforward tools; however, some are truly unique.
In this article, I’ll highlight four such terminal emulators, that will not only get the job done, but do so while making the job a bit more interesting or fun. So, let’s take a look at these terminals.
Tilda
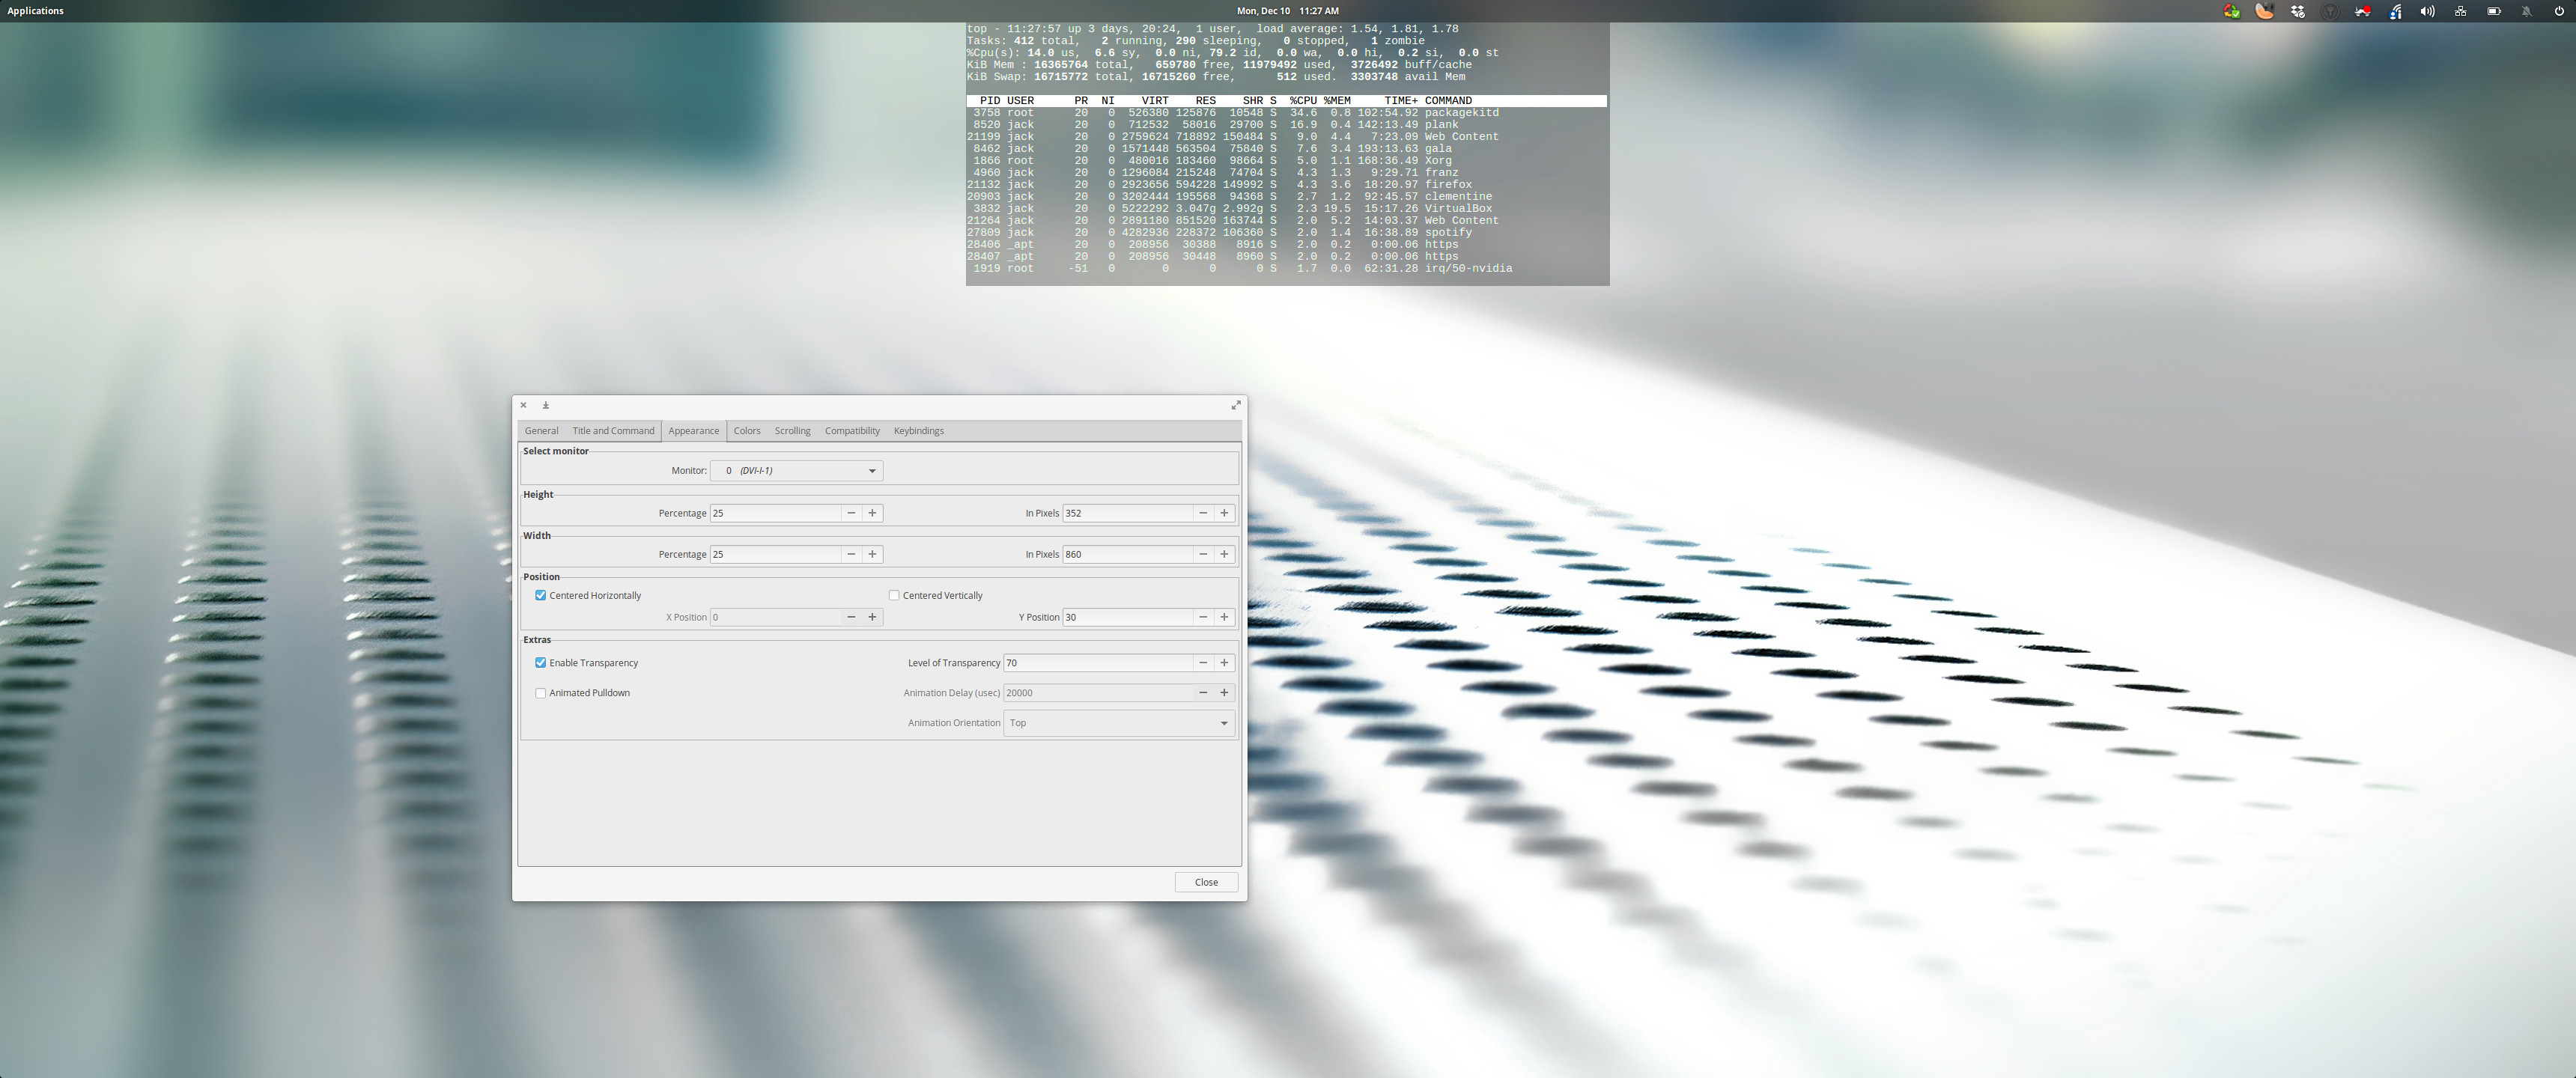
Tilda is designed for Gtk and is a member of the cool drop-down family of terminals. That means the terminal is always running in the background, ready to drop down from the top of your monitor (such as Guake and Yakuake). What makes Tilda rise above many of the others is the number of configuration options available for the terminal (Figure 1).
Figure 1: The Tilda configuration window.
Tilda can be installed from the standard repositories. On a Ubuntu- (or Debian-) based distribution, the installation is as simple as:
sudo apt-get install tilda -y
Once installed, open Tilda from your desktop menu, which will also open the configuration window. Configure the app to suit your taste and then close the configuration window. You can then open and close Tilda by hitting the F1 hotkey. One caveat to using Tilda is that, after the first run, you won’t find any indication as to how to reach the configuration wizard. No worries. If you run the command tilda -C it will open the configuration window, while still retaining the options you’ve previously set.
Available options include:
Terminal size and location
Font and color configurations
Auto Hide
Title
Custom commands
URL Handling
Transparency
Animation
Scrolling
And more
What I like about these types of terminals is that they easily get out of the way when you don’t need them and are just a button click away when you do. For those that hop in and out of the terminal, a tool like Tilda is ideal.
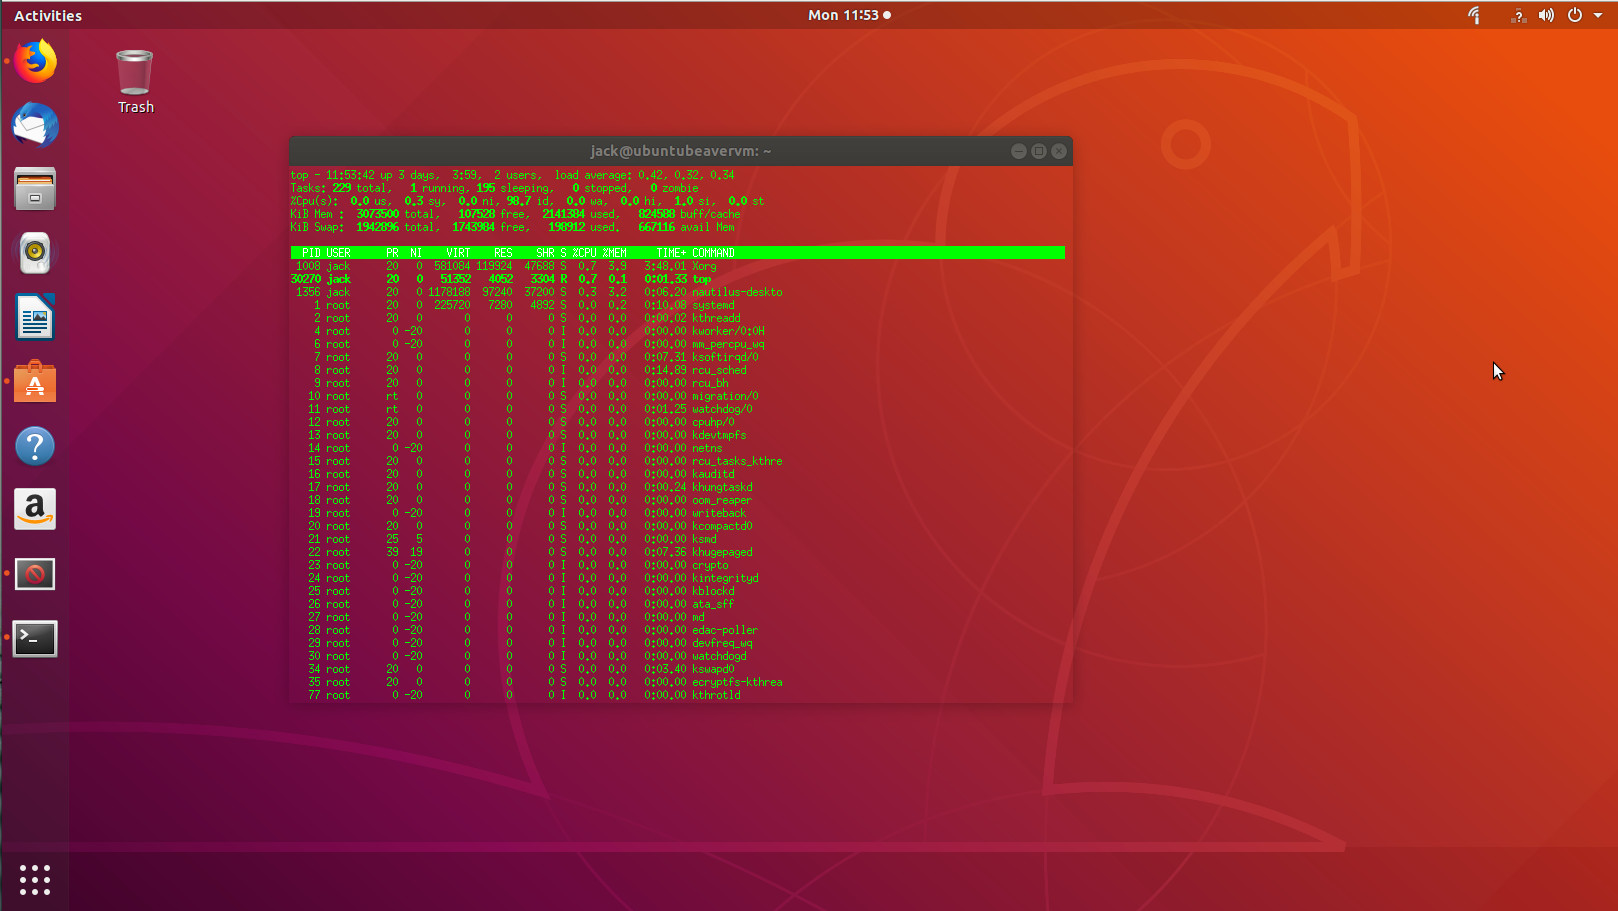
Aterm
Aterm holds a special place in my heart, as it was one of the first terminals I used that made me realize how flexible Linux was. This was back when AfterStep was my window manager of choice (which dates me a bit) and I was new to the command line. What Aterm offered was a terminal emulator that was highly customizable, while helping me learn the ins and outs of using the terminal (how to add options and switches to a command). “How?” you ask. Because Aterm never had a GUI for customization. To run Aterm with any special options, it had to run as a command. For example, say you want to open Aterm with transparency enabled, green text, white highlights, and no scroll bar. To do this, issue the command:
aterm -tr -fg green -bg white +xb
The end result (with the topcommand running for illustration) would look like that shown in Figure 2.
Figure 2: Aterm with a few custom options.
Of course, you must first install Aterm. Fortunately, the application is still found in the standard repositories, so installing on the likes of Ubuntu is as simple as:
sudo apt-get install aterm -y
If you want to always open Aterm with those options, your best bet is to create an alias in your ~/.bashrc file like so:
alias=”aterm -tr -fg green -bg white +sb”
Save that file and, when you issue the command aterm, it will always open with those options. For more about creating aliases, check out this tutorial.
Eterm
Eterm is the second terminal that really showed me how much fun the Linux command line could be. Eterm is the default terminal emulator for the Enlightenment desktop. When I eventually migrated from AfterStep to Enlightenment (back in the early 2000s), I was afraid I’d lose out on all those cool aesthetic options. That turned out to not be the case. In fact, Eterm offered plenty of unique options, while making the task easier with a terminal toolbar. With Eterm, you can easily select from a large number of background images (should you want one – Figure 3) by selecting from the Background > Pixmap menu entry.
Figure 3: Selecting from one of the many background images for Eterm.
There are a number of other options to configure (such as font size, map alerts, toggle scrollbar, brightness, contrast, and gamma of background images, and more). The one thing you want to make sure is, after you’ve configured Eterm to suit your tastes, to click Eterm > Save User Settings (otherwise, all settings will be lost when you close the app).
Eterm can be installed from the standard repositories, with a command such as:
sudo apt-get install eterm
Extraterm
Extraterm should probably win a few awards for coolest feature set of any terminal window project available today. The most unique feature of Extraterm is the ability to wrap commands in color-coded frames (blue for successful commands and red for failed commands – Figure 4).
Figure 4: Extraterm showing two failed command frames.
When you run a command, Extraterm will wrap the command in an isolated frame. If the command succeeds, the frame will be outlined in blue. Should the command fail, the frame will be outlined in red.
Extraterm cannot be installed via the standard repositories. In fact, the only way to run Extraterm on Linux (at the moment) is to download the precompiled binary from the project’s GitHub page, extract the file, change into the newly created directory, and issue the command ./extraterm.
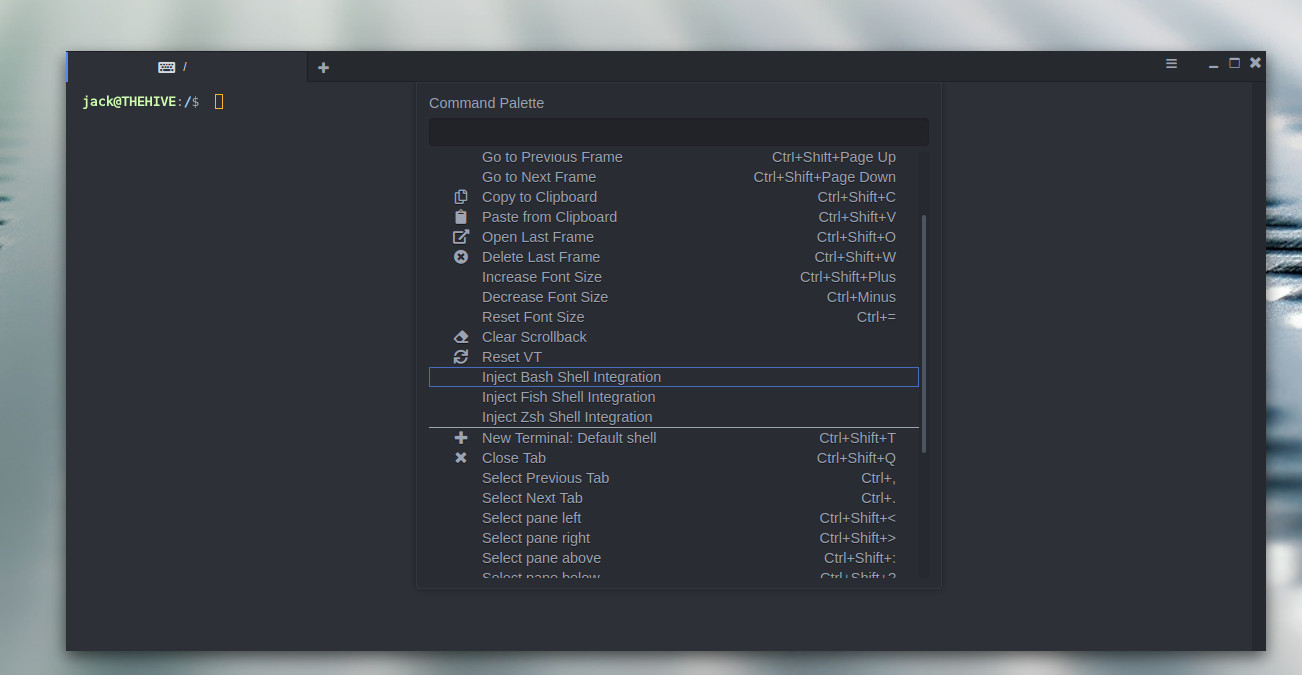
Once the app is running, to enable frames you must first enable bash integration. To do that, open Extraterm and then right-click anywhere in the window to reveal the popup menu. Scroll until you see the entry for Inject Bash shell Integration (Figure 5). Select that entry and you can then begin using the frames option.
Figure 5: Injecting Bash integration for Extraterm.
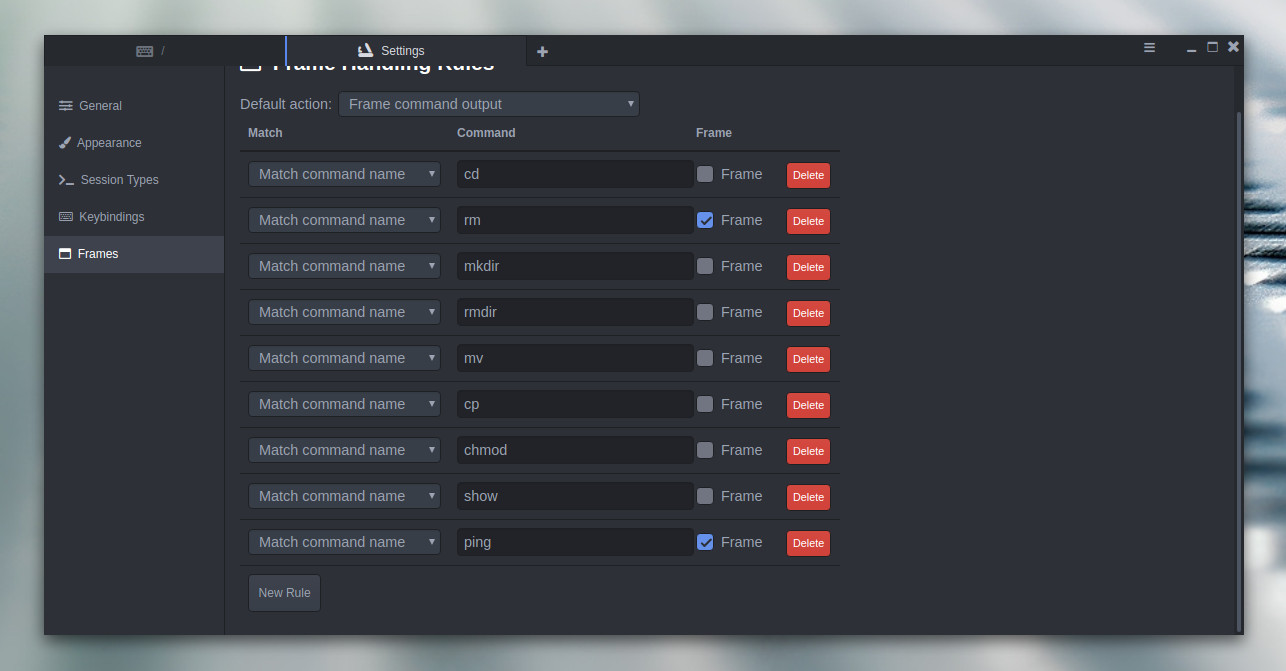
If you run a command, and don’t see a frame appear, you probably have to create a new frame for the command (as Extraterm only ships with a few default frames). To do that, click on the Extraterm menu button (three horizontal lines in the top right corner of the window), select Settings, and then click the Frames tab. In this window, scroll down and click the New Rule button. You can then add a command you want to work with the frames option (Figure 6).
Figure 6: Adding a new rule for frames.
If, after this, you still don’t see frames appearing, download the extraterm-commands file from the Download page, extract the file, change into the newly created directory, and issue the command sh setup_extraterm_bash.sh. That should enable frames for Extraterm. There’s plenty more options available for Extraterm. I’m convinced, once you start playing around with this new take on the terminal window, you won’t want to go back to the standard terminal. Hopefully the developer will make this app available to the standard repositories soon (as it could easily become one of the most popular terminal windows in use).
And Many More
As you probably expected, there are quite a lot of terminals available for Linux. These four represent (at least for me) four unique takes on the task, each of which do a great job of helping you run the commands every Linux admin needs to run. If you aren’t satisfied with one of these, give your package manager a look to see what’s available. You are sure to find something that works perfectly for you.
The Linux Foundation’s Open Network Automation Platform (ONAP) is well into its third 6-month release (Casablanca came out in Dec ’18), and while the project has evolved since its first release, there is still some confusion about what it is and how it’s architected. This blogs takes a closer look at ONAP, under-the-hood, to clarify how it works.
To start, it is important to consider what functionality ONAP includes. I call ONAP a MANO++, where ONAP includes the NFVO and VNFM layers as described by ETSI, but goes beyond by including service assurance/automation and a unified design tool. ONAP does not include the NFVI/VIM or the NFV cloud layer. In other words, ONAP doesn’t really care whether the NFV cloud is OpenStack, Kubernetes or Microsoft Azure. Nor does ONAP include VNFs. VNFs come from third-party companies or open source projects but have VNF guidelines and onboarding SDKs that ease the deployment. In other words, ONAP is a modular platform for complete Network Automation.
OK, end of background. On to four themes:
MODEL DRIVEN
Model-driven is a central tenet of ONAP. If anything, one might complain about there being too much model-driven thinking but not too little! There are models for:
VNF descriptor
Network service descriptor
VNF configuration
Closed-loop automation template descriptor
Policy
APP-C/SDN-C directed graphs
Orchestration workflow
The big bang (just kidding)
So on and so forth
The key idea of a model driven approach is to enable non-programmers to change the behavior of the platform with ease. And ONAP embraces this paradigm fully.
DEVICE ORIENTATION
ONAP goes through great pains of creating a hierarchy and providing the highest level of abstraction to the OSS/BSS layers to support both a cloud-based and device-based networking approach. The below show a couple of examples.
Service Orchestration & LCM (the left-hand side item feeds into the right-hand side item):
VF ⇛ Module ⇛ VNF ⇛ Network/SDN service ⇛ E2E network service ⇛ Product (future) ⇛ Offer (future)
With upcoming MEC applications, the million dollar question is, will ONAP orchestrate MEC applications as well? This is to be determined, but if this happens, ONAP will be even further from device-orientation than it already is.
CLOUD NATIVE
ONAP Casablanca is moving towards an emphasis on cloud native; so what does that mean for virtual network functions (VNFs), or ONAP’s ability to provide an operational layer for NFV? To break it down more specifically:
Can VNFs be cloud native? Yes! In fact they can be, and ONAP highly encourages, I daresay, insists upon it (see ONAP VNF Development requirements here). Cloud-native or containerized network functions (CNFs) are just around the corner and they will be fully supported by ONAP (when we say VNF, we include CNFs in that discussion).
ONAP documentation includes references to VNFs and PNFs – does that mean there is no room for CNFs?ONAP refers to VNFs and PNFs since they constitute higher level services. This would be tantamount to saying that if AWS uses the words VM or container, they need to be written off as outmoded. Moreover, new services such as 5G are expected to be built out of physical network functions (PNFs) — for performance reasons — and VNFs. Therefore, ONAP anticipates orchestrating and managing the lifecycle of PNFs.
Is the fact that VNFs are not always written in a cloud-native manner mean that ONAP has been mis-architected? It is true that a large number of VNFs are VNFs-in-name-only (i.e. PNFs that have been virtualized, but not much else); however, this is orthogonal to ONAP. As mentioned above, ONAP does not include VNFs.
LACK OF INNOVATION
We’ve also heard suggestions that ONAP lacks innovation. For example, there have been questions around the types of clouds supported by ONAP in addition to OpenStack and different NFVI compute instances in addition to virtual machines. In fact, ONAP provides tremendous flexibility in these areas:
Different clouds —There are two levels at which we can discuss clouds. First, clouds that ONAP can run on, and second clouds that ONAP can orchestrate VNFs onto. Since ONAP is already containerized and managed using Kubernetes, the first topic is moot. ONAP can already run on any cloud that supports k8s (which is every cloud out there). For the second use case, the ONAP Casablanca release has experimental support for Kubernetes and Microsoft Azure. There is no reason so believe that this new cloud types like AWS Outpost etc. can’t be supported.
Different compute types — Currently, ONAP instantiates VNFs that are packaged as VMs. With this, ONAP already supports unikernels (i.e. ridiculously small VMs) should a VNF vendor choose to package their VNF as a unikernel. Moreover, ONAP is working on full K8s support that will allow container and Kata Container based VNFs. The only compute type that I think is not on the roadmap is function-as-a-service (aka serverless). But with an NFV use case I don’t see the need to support this compute type. Maybe if/when ONAP supports MEC application orchestration, it will need to do so. I don’t view this as a showstopper. When the time comes, I’m sure the ONAP community will figure out how to support function-as-a-service — it’s not that hard of a problem.
Different controllers — Through the use of message bus approach, ONAP has a set of controllers optimized for layers of SDN/NFV (physical, virtual, application).
In summary, it is always important to make sure you are aware of ONAP’s ability to support a model driven, service oriented, cloud native, transformative future. Hopefully this blog clarifies some of those points.
This article was written by Amar Kapadia and was previously published at Aarna Networks.
This week’s KubeCon + CloudNativeCon North America 2018 in Seattle was the biggest ever! This sold-out event featured four days of information on Kubernetes, Prometheus, Envoy, OpenTracing, Fluentd, gRPC, containerd, and rkt, along with many other exciting projects and topics.
More than 100 lightning talks, keynotes, and technical sessions from the event have already been posted.
The 8,000 attendees attending the Cloud Native Computing Foundation’s(CNCF) KubeCon + CloudNativeCon Kubernetes conference this week in Seattle demonstrated the exponential growth in interest in this complex, technical combination of open source technologies.
I attend many technology conferences, most recently a blockchain, artificial intelligence (AI), and Internet of things conference (see my article from that event). Compared to blockchain in particular as well as AI, my first KubeCon takeaway is that Kubernetes actually works. …
For my seventh takeaway, I saved the most remarkable for last: women are leading the Kubernetes charge. Yes, you read that right. While the audience at KubeCon was perhaps 90% male, the keynote speakers were more than half female.
The state of open source in 2018, and especially, the IBM’s Red Hat purchase, were discussed in this podcast with Rachel Stephens, an analyst with of RedMonk, and Michael Coté, director, marketing, at Pivotal Software, hosted by Libby Clark, editorial director, and Alex Williams, founder and editor-in-chief, of The New Stack.
Indeed, 2018 is even being touted at the “year of open source” in many circles, Stephens said. “The mega acquisitions and just tends to really validate open-source as the method of building in the future and as a viable approach for building your stack. And I think, at the same time, we contrast that with some kind of clouds on the horizon in terms of the growing tension between an ability to run an open source business in the face of cloud providers.”
While many Embedded Linux Conference talks cover emerging technologies, some of the most useful are those that survey the embedded development tools and techniques that are already available. These summaries are not only useful for newcomers but can be a helpful reality check and a source for best practices for more experienced developers.
In “Strategies for Developing and Deploying your Embedded Applications and Images,” Mirza Krak, an embedded developer at Mender.io, surveys the many options for prepping and deploying software on devices. These range from cross-device development strategies between the desktop and embedded platforms to using IDEs to working with Yocto/OE-Core with package managers. Krak, who spoke at this October’s ELC Europe conference in Edinburgh, also covered configuration management tools, network boot utilities, and update solutions such as swupdate and Mender.
Basic desktop/embedded cross development
It’s easier to do your development on a desktop PC rather than directly on an embedded device, said Krak. Even if your device can run the required development software and distributions, you cannot easily integrate all the tools that are available on the desktop. In addition, compile times tend to be very slow.
On the desktop, “everything is available to you via apt-get install, and there is high availability of trace and debug tools,” said Krak. “You have a lot more control when doing things like running a binary, and you can build, debug, and test on the same machine so there are usually very short development cycles.”
Eventually, however, you’ll probably need to do some cross-device development. “You can use some mock hardware to do some basic sanity testing on the desktop, but you are not testing on the hardware where the software will run, which may have some constraints.”
A typical approach for cross-device development is to run Yocto Project or Buildroot on your PC and then cross compile and transfer the binaries to the embedded device. This adds to the complexity because you are compiling the code on one device and you may need to transfer it to multiple devices for testing.
You can use the secure copy (scp) command or transfer data by USB stick. However, “It’s a lot of manual work and prone to error, and it’s hard to replicate across many devices,” said Krak. “I’m surprised at how many people don’t go beyond this entry point.”
IDEs and Package Managers
An easier and more reliable approach is to use an IDE such as Eclipse or Qt Creator, which have plug-ins to cross compile. “IDEs usually have post-build hooks that transfer the binary to the device and run it,” said Krak. “With Qt Creator, you can launch the debug server on the device and do remote debugging remotely.”
IDEs are great for simpler projects, especially for beginning or casual developers, but they may lack the flexibility required for more complex jobs. Krak generally prefers package managers — collections of tools for automating the processing of installing, upgrading, configuring, and removing software — which are much the same as those you’d find on a desktop Linux PC.
“Package managers give you more sanity checks and controls, and the ability to state dependencies,” said Krak. Package managers for embedded targets include deb, rpm, and opkg, and you can also turn to package utilities like apt, yum, dnf, pacman, zipper, and smart.
“If you’re compiling your Debian application in a build system you could say ‘make dpkg’, which will package your binary and any configuration files you might have,” said Krak. “You can then transfer the binary to your device and install. This is less error prone since you have dependency tracking and upstream and custom package feeds.”
Package managers are useful during prototyping and early development, but you typically won’t make them available to the embedded end user, said Krak. In addition, not all embedded devices support platforms such as Ubuntu or Raspbian that include package managers.
Krak typically works with a Yocto Project/Open Embedded environment and uses the OE-core Angstrom distribution, which maintains opkg package feeds. “You can include meta-angstrom in your Yocto build and set DISTRO = ‘angstrom’ to you get package feeds,” said Krak. “But there’s a lot more to Angstrom that you may not want, so you may want to create a more customized setup based on Poky or something.”
Yocto generates package feeds when you do an image build, giving you a choice of rpm, deb, or ipk. Yet, “these are only packages, not a complete package feed,” said Krak. To enable a feed, “there’s a bitbake package-index command that generates the files. You expose the deploy server where all your packages are to make it available on your device.”
While this process handles the “service side” package feed, you still need tools on your embedded device. Within Yocto, “there’s an EXTRA_IMAGE_FEATURES setting you can set to package-management,” said Krak. “There’s also a recipe in meta-openembedded/meta-oe called distro-feed-configs.bb. If you include it in your build it will generate the config files needed for your package manager.”
Config management, network boot, and update solutions
Krak went on to discuss configuration management tools such as CFEngine, Puppet, Chef, and Ansible. “These are very common in the enterprise server world if you need to manage a fleet of servers,” said Krak. “some apply workflows to embedded devices. You install a golden image on all your devices, and then set up connectivity and trust between the CM server and device. You can then script the configuration.”
Krak also surveyed solutions for more complex projects in which the application extends beyond a single binary. “You may be developing a specialized piece of hardware for a very specific use case or perhaps you depend on some custom kernel options,” said Krak.
Network booting is useful here because you can “deploy all the resources necessary to boot your device,” said Krak. “On boot, the system fetches the Linux kernel device tree and file system, so you just need to reboot the device to update the software. The setup can be complex, but it has the advantage of being easily extended to boot multiple devices.”
Typical network booting schemes such as PXELINUX and PXE boot use a tftp server setup on a laptop where you put the build artifacts you want to deploy. Alternatively, you can script it using the NFS root file-system.
A final alternative for complex systems is to use an update solution such as Mender, rauc, or swupdate. “You can use these early in the development process to deploy your builds,” said Krak. “If you build the same device in production, you can use the same software to test it throughout the development process, which builds confidence. Some use image-based updates, which is nice because your devices are stateless, which simplifies testing. Updaters fit well into development workflow and make it easier to integrate build artifacts. They often have features to avoid bricking devices.”
As a developer for Mender.io, Krak is most familiar with Mender, which provides an A/B image update strategy. “You have two copies of the OS and you do image-based updates so you always update the whole system,” explained Krak. You can watch the complete presentation below.
A highly available microservice requires that the system gracefully handle the failures of its components. If one part of the system fails in any way, the system can recover without significant downtime.
So how exactly can you achieve a highly available, highly reliable, and multi-master Kubernetes cluster? One way is to run a regional Kubernetes cluster on the Google Kubernetes Engine, a managed version of Kubernetes hosted on the Google Cloud Platform.
To help you achieve highly available Kubernetes clusters, here are some best practices based on what we learned while operating Google Kubernetes Engine at scale at Google.
A more flexible alternative called Graph Query Language, developed by Facebook, is spreading fast and has won over companies ranging from GitHub to Audi.
GraphQL is heavily inspired by another language called Facebook Query Language, which in turn was based on Structured Query Language, the well-established lingua franca of database software supported by Oracle, Microsoft, and other database makers. That makes the structure and syntax of GraphQL familiar to many developers.
GraphQL saw explosive growth among JavaScript developers over the past two years, according to data compiled by NPM, which offers tools for managing JavaScript code. The annual State of JavaScript survey conducted by a separate group of developers, which polled 20,000 JavaScript developers about the tools they use, found more than 20 percent already use GraphQL and another 62.5 percent want to learn it, up from 5 percent who had used it in 2016.
Aliases, in the context of the Linux shell, are commands you build yourself by packing them with combinations of other instructions that are too long or too hard to remember.
You create an alias by using the word alias, then the name of the command you want to create, an equal sign (=), and then the Bash command(s) you want your alias to run. For example, ls in its base form does not colorize its output, making it difficult to distinguish between directories, files, and links. You can build a new command that shows colors by making an alias like this:
alias lc='ls --color=auto'
where lc is the name you have picked for your new command. When creating aliases, be sure to check that the name you picked isn’t already in use, or you may override an existing command. In this case, lc stands for “list (with) color”. Notice there is no space in front of or behind the =. Finally, you have the regular Bash command(s) you want to run when lc is executed. In this case, the ls command with the --color option.
After defining your alias, every time you type lc, the contents of the current directory will be shown in color.
But, you may think, “my ls command already lists files in different colors!” That is because most Linux distros come with some aliases already set up for you.
Aliases you (probably) already have
Indeed, you can use the alias instruction without any options to see what aliases you already have. These will vary by distro, but some typical preset aliases are:
alias ls='ls --color=auto': You already saw this one above. The auto modifier of the --color option tells ls to use color when standard output is connected to a terminal. That is, the output of ls is going to show up in a terminal window or a text screen, instead of, say, being piped to a file. Other alternatives for --color are always and never.
alias cp='cp -i': The -i option stands for interactive. Sometimes, when you use cp you may inadvertently overwrite an existing file. By using the -i, cp will ask you before clobbering anything.
alias free='free -m': Using -m with freeyou can see how much free memory you have and how much your applications are using in megabytes instead of the default bytes. This makes the output of free easier to read for a human.
There may be more (or less, or even none), but regardless of what your distribution comes with, you can always use the base form (vs. the aliased form) of a command with the modifier. For example:
free
will execute free without the -m option, and
ls
will execute ls without the --color=auto option.
If you want to get rid or modify the preset aliases forever, note that they live in the global .bashrc file which hangs out in our old haunt, the /etc/skel directory.
Aliases for muscle memory
Distro designers try their best to predict which aliases are going to be useful for you. But every user is different and comes from a different background. If you are new to GNU+Linux, it may be because you are coming from another system, and the basic commands vary from shell to shell. If you come from a Windows/MS-DOS background, you may want to define an alias like
alias dir='ls'
to list files or directories.
Likewise,
alias copy='cp'
alias move='mv'
may also come in handy, at least until you get used to Linux’s new lexicon.
The other problem occurs when mistakes become ingrained in your muscle memory, so you always mistype some words the same way. I, for instance, have great difficulty typing admnis-… adminsi-… A-D-M-I-N-I-S-T-R-A-T-I-ON (phew!) at speed. That is why some users create aliases like
alias sl='ls'
and
alias gerp='echo "You did it *again*!"; grep'
Although we haven’t formally introduced grep yet, in its most basic form, it looks for a string of characters in a file or a set of files. It’s one of those commands that you will tend to use A LOT once you get to grips with it, as those ingrained mistyping habits that force you to type the instruction twice every time get annoying really quickly.
Another thing to note in the gerp example is that it is not a single instruction, but two. The first one (echo "You did it *again*!") prints out a message reminding you that you misspelled the grep command, then there is a semicolon (;) that separates one instruction from the other. Finally, you’ve got the second command (grep) that does the actual grepping.
Using gerp on my system to search for the lines containing the word “alias” in /etc/skel/.bashrc, the output looks like this:
$ gerp -R alias /etc/skel/.bashrc
You did it *again*!
       alias ls='ls --color=auto'
       alias grep='grep --colour=auto'
       alias egrep='egrep --colour=auto'
       alias fgrep='fgrep --colour=auto'
alias cp="cp -i"
alias df='df -h'
alias free='free -m'
alias np='nano -w PKGBUILD'
alias more=less
shopt -s expand_aliases
Running commands sequentially as part of an alias, or, even better, chaining commands so that one command can use the results coughed up by another, is getting us perilously close to Bash scripting. This has been in the making of this series for quite some time, and we’ll start covering it in the very next article.
For the time being, if you want to get rid of an alias you temporarily set up in a running terminal, use the unalias command:
unalias gerp
If you want to make your aliases permanent, you can drop them into the .bashrc file you have in your home directory. This is the same thing we did with custom environment variables in last week’s article.