Home Blog Page 302

The Growing Significance Of DevOps For Data Science

DevOps involves infrastructure provisioning, configuration management, continuous integration and deployment, testing and monitoring.  DevOps teams have been closely working with the development teams to manage the lifecycle of applications effectively.

Data science brings additional responsibilities to DevOps. Data engineering, a niche domain that deals with complex pipelines that transform the data, demands close collaboration of data science teams with DevOps. Operators are expected to provision highly available clusters of Apache Hadoop, Apache Kafka, Apache Spark and Apache Airflow that tackle data extraction and transformation. Data engineers acquire data from a variety of sources before leveraging Big Data clusters and complex pipelines for transforming it.

Read more at Forbes

6 Best Practices for High-Performance Serverless Engineering

When you write your first few lambdas, performance is the last thing on your mind. Permissions, security, identity and access management (IAM) roles and triggers all conspire to make the first couple of lambdas, even after a “hello world” trial just to get your first serverless deployments up and working. But once your users begin to rely on services your lambdas provide, it’s time to focus on high-performance serverless.

Here are some key things to remember when you’re trying to produce high-performance serverless applications.

1. Observability
Serverless handles scaling really well. But as scale interacts with complexity, slowdowns and bugs are inevitable. I’ll be frank: these can be a bear if you don’t plan for observability from the start.

Read more at The New Stack

Beyond Finding Stuff with the Linux find Command

Continuing the quest to become a command-line power user, in this installment, we will be taking on the find command.

Jack Wallen already covered the basics of find in an article published recently here on Linux.com. If you are completely unfamiliar with find, please read that article first to come to grips with the essentials.

Done? Good. Now, you need to know that find can be used to do much more than just for search for something, in fact you can use it to search for two or three things. For example:


find path/to/some/directory/ -type f -iname '*.svg' -o -iname '*.pdf'

This will cough up all the files with the extensions svg (or SVG) and pdf (or PDF) in the path/to/directory directory. You can add more things to search for using the -o over and over.

You can also search in more than one directory simultaneously just be adding them to the route bit of the command. Say you want to see what is eating up all the space on your hard drive:


find $HOME /var /etc -size +500M

This will return all the files bigger than 500 Megabytes (-size +500M) in your home directory, /var and /etc.

Additionally, find also lets you do stuff with the files it… er… finds. For example, you can use the -delete action to remove everything that comes up in a search. Now, be careful with this one. If you run


# WARNING: DO NOT TRY THIS AT $HOME

find . -iname "*" -delete

find will erase everything in the current directory (. is shorthand for “the current directory“) and everything in the subdirectories under it, and then the subdirectories themselves, and then there will be nothing but emptiness and an unbearable feeling that something has gone terribly wrong.

Please do not put it to the test.

Instead, let’s look at some more constructive examples…

Moving Stuff Around

Let’s say you have bunch of pictures of Tux the penguin in several formats and spread out over dozens of directories, all under your Documents/ folder. You want to bring them all together into one directory (Tux/) to create a gallery you can revel in:


find $HOME/Documents/ ( -iname "*tux*png" -o -iname "*tux*jpg" -o -iname "*tux*svg" ) 
  -exec cp -v '{}' $HOME/Tux/ ;

Let’s break this down:

  • $HOME/Documents is the directory (and its subdirectories) find is going to search in.
  • You enclose what you want to search for between parentheses (( ... )) because, otherwise -exec, the option that introduces the command you want to run on the results, will only receive the result of the last search (-iname "*tux*svg"). There are two things you have to bear in mind when you do this: (1) you have to escape the parentheses using backslashes like this: ( ... ). You do that so the shell interpreter (Bash) doesn’t get confused (parentheses have a special meanings for Bash); and (2) there is one space between the opening bracket ( and -iname ... and another space between "*tux*svg" and the closing bracket ). If you don’t include those spaces, find will exit with an error.
  • -exec is the option you use to introduce the command you want to run on the found files. In this case it is a simple cp (copy) command. You use cp‘s -v option to see what is going on.
  • '{}' is the shorthand find uses to say “the file or directory I have found that matches the criteria you gave me“. '{}' gets swapped for each file or directory as it is found and, in this case, then gets copied to the Tux/ directory.
  • ; tells find to execute the command for each result sequentially, that is, one after another. There is another option, + which runs the command adding each result from find to the end of the command, making a long sausage of a string. But (1) this is not helpful for you here, and (2) you need the '{}' to be at the end of the command for this to work. You could use + to make executable all the files with the .sh extension tucked away under your Documents/ folder like this:
    
    find $HOME/Documents/ -name "*.sh" -exec chmod a+x {} +


Once you have the basics of modifying files using find under your belt, you will discover all sorts of situations where it comes in handy. For example…

A Terrible Mish-Mash

Client X has sent you a zip file with important documents and images for the new website you are working on for them. You copy the zip into your ClientX folder (which already contains dozens of files and directories) and uncompress it with unzip newwebmedia.zip and, gosh darn it, the person who made the zip file didn’t compress the directory itself, but the contents in the directory. Now all the images, text files and subdirectories from the zip are all mixed up with the original contents of you folder, that contains more images, text files, and subdirectories.

You could try and remember what the original files were and then move or delete the ones that came from the zip archive. But with dozens of entries of all kinds, you are bound to get mixed up at some point and forget to move a file, or, worse, delete one of your original files.

Looking at the files’ dates (ls -la *) won’t help either: the Zip program keeps the dates the files were originally created, not when they were zipped or unzipped. This means a “new” file from the zip could very well have a date prior to some of the files that were already in the folder when you did the unzipping.

You probably can guess what comes next: find to the rescue! Move into the directory (cd path/to/ClientX), make a new directory where you want the new stuff to go (mkdir NewStuff), and then try this:


find . -cnewer newwebmedia.zip -exec mv '{}' NewStuff ;

Breaking that down:

  • The period (.) tells find to do its thing in the current directory.
  • -cnewer tells find to look for files that have been changed at the same time or after a certain file you give as reference. In this case the reference file is newwebmedia.zip. If you copied the file over at 12:00 and then unpacked it at 12:01, all the files that you unpacked will be tagged as changed at 12:01, that is, after newwebmedia.zip and will match that criteria! And, as long as you didn’t change anything else, they will be the only files meeting that criteria.
  • The -exec part of the instruction simply tells find to move the files and directories to the NewStuff/ directory, thus cleaning up the mess.

If you are unsure of anything find may do, you can swap -exec for -ok. The -ok option forces find to check with you before it runs the command you have given it. Accept an action by typing y or reject it with n.

Next Time

We’ll be looking at environmental variables and a way to search even more deeply into files with the grep command.

OPNFV Gambia — Doing What We Do Best While Advancing Cloud Native

Today, the OPNFV community is pleased to announce the availability of Gambia, our seventh platform release! I am extremely proud of the way the community rallied together to make this happen and provide the industry with another integrated reference platform for accelerating their NFV deployments.

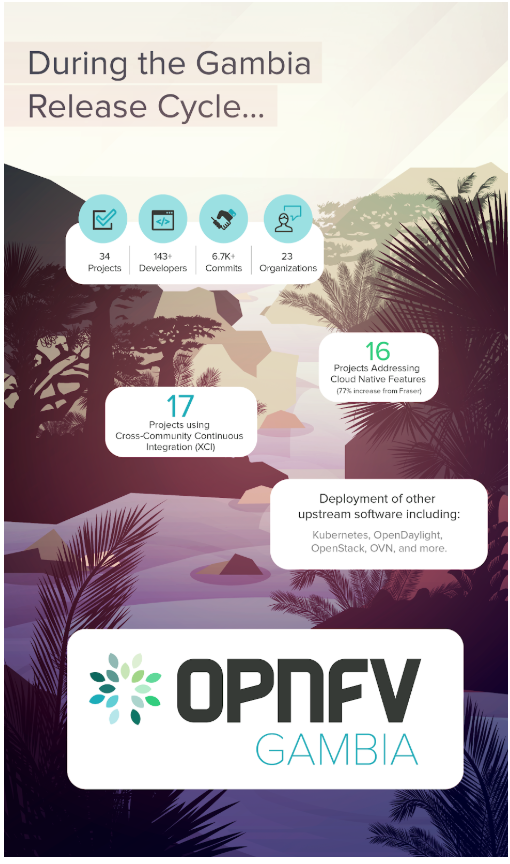
At a high level, Gambia represents our first step towards continuous delivery (CD) and deepens our work in cloud native, while also advancing our core capabilities in testing and integration, and the development of carrier-grade features by working upstream. As an open source pioneer in NFV, it’s amazing to see the evolution of the project to meet the needs of a quickly changing technology landscape.

Here are a few Gambia highlights I’d like to share:

Cloud Native & Continuous Deployment (CD)

A key topic at the recent ONS Europe, cloud native is quickly becoming increasingly relevant for the networking industry. The Gambia release builds up the cloud native progress made in Fraser, with seven more projects supporting containers (a 77% increase), and new scenarios integrating cloud native features…

Read more at OPNFV

The Ceph Storage Project Gets a Dedicated Open-Source Foundation

Ceph is an open source technology for distributed storage that gets very little public attention but that provides the underlying storage services for many of the world’s largest container and OpenStack deployments. It’s used by financial institutions like Bloomberg and Fidelity, cloud service providers like Rackspace and Linode, telcos like Deutsche Telekom, car manufacturers like BMW and software firms like SAP and Salesforce.

These days, you can’t have a successful open source project without setting up a foundation that manages the many diverging interests of the community and so it’s maybe no surprise that Ceph is now getting its own foundation. Like so many other projects, the Ceph Foundation will be hosted by the Linux Foundation.

“Today’s launch of the Ceph Foundation is a testament to the strength of a diverse open source community coming together to address the explosive growth in data storage and services.” said Sage Weil, Ceph co-creator, project leader, and chief architect at Red Hat for Ceph.

Read more at TechCrunch

Systems Engineer Salary Rises Even Higher with Linux Experience

System administration is a very reactive role, with sysadmins constantly monitoring networks for issues. Systems engineers, on the other hand, can build a system that anticipates users’ needs (and potential problems). In certain cases, they must integrate existing technology stacks (e.g., following the merger of two companies), and prototype different aspects of the network before it goes “live.”

In other words, it’s a complex job, with a salary to match.  …If you want a truly impressive salary, though, consider specializing in Linux systems—that will translate into a $20,000 pay bump. 

Read more at Dice

Learn more about Linux through the free “Introduction to Linux” course from The Linux Foundation and edX.

LDAP Authentication In Linux

This howto will show you how to store your users in LDAP and authenticate some of the services against it. I will not show how to install particular packages, as it is distribution/system dependent. I will focus on “pure” configuration of all components needed to have LDAP authentication/storage of users. The howto assumes somehow, that you are migrating from a regular passwd/shadow authentication, but it is also suitable for people who do it from scratch.

The thing we want to achieve is to have our users stored in LDAP, authenticated against LDAP ( direct or pam ) and have some tool to manage this in a human understandable way. This way we can use all software, which has LDAP support or fallback to PAM LDAP module, which will act as a PAM->LDAP gateway.

Configuring OpenLDAP

OpenLDAP consists of slapd and slurpd daemon. This howto covers one LDAP server without a replication, so we will focus only on slapd. I also assume you installed and initialized your OpenLDAP installation (depends on system/distribution). If so, let’s go to the configuration part.

Read more at HowToForge

A Free Guide for Setting Your Open Source Strategy

The majority of companies using open source understand its business value, but they may lack the tools to strategically implement an open source program and reap the full rewards. According to a recent survey from The New Stack, “the top three benefits of open source programs are 1) increased awareness of open source, 2) more speed and agility in the development cycle, and 3) better license compliance.”

Running an open source program office involves creating a strategy to help you define and implement your approach as well as measure your progress. The Open Source Guides to the Enterprise, developed by The Linux Foundation in partnership with the TODO Group, offer open source expertise based on years of experience and practice.

The most recent guide, Setting an Open Source Strategy, details the essential steps in creating a strategy and setting you on the path to success. According to the guide, “your open source strategy connects the plans for managing, participating in, and creating open source software with the business objectives that the plans serve. This can open up many opportunities and catalyze innovation.” The guide covers the following topics:

  1. Why create a strategy?
  2. Your strategy document
  3. Approaches to strategy
  4. Key considerations
  5. Other components
  6. Determine ROI
  7. Where to invest

The critical first step here is creating and documenting your open source strategy, which will “help you maximize the benefits your organization gets from open source.” At the same time, your detailed strategy can help you avoid difficulties that may arise from mistakes such as choosing the wrong license or improperly maintaining code. According to the guide, this document can also:

  • Get leaders excited and involved
  • Help obtain buy-in within the company
  • Facilitate decision-making in diffuse, multi-departmental organizations
  • Help build a healthy community
  • Explain your company’s approach to open source and support of its use
  • Clarify where your company invests in community-driven, external R&D and where your company will focus on its value added differentiation

“At Salesforce, we have internal documents that we circulate to our engineering team, providing strategic guidance and encouragement around open source. These encourage the creation and use of open source, letting them know in no uncertain terms that the strategic leaders at the company are fully behind it. Additionally, if there are certain kinds of licenses we don’t want engineers using, or other open source guidelines for them, our internal documents need to be explicit,” said Ian Varley, Software Architect at Salesforce and contributor to the guide.

Open source programs help promote an enterprise culture that can make companies more productive, and, according to the guide, a strong strategy document can “help your team understand the business objectives behind your open source program, ensure better decision-making, and minimize risks.”  

Learn how to align your goals for managing and creating open source software with your organization’s business objectives using the tips and proven practices in the new guide to Setting an Open Source Strategy. And, check out all 12 Open Source Guides for the Enterprise for more information on achieving success with open source.

This article originally appeared on The Linux Foundation

New TOP500 List Led by DOE Supercomputers

The latest TOP500 list of the world’s fastest supercomputers is out, a remarkable ranking that shows five Department of Energy supercomputers in the top 10, with the first two captured by Summit at Oak Ridge and Sierra at Livermore. With the number one and number two systems on the planet, the “Rebel Alliance” vendors of IBM, Mellanox, and NVIDIA stand far and tall above the others.

“Summit widened its lead as the number one system, improving its High Performance Linpack (HPL) performance from 122.3 to 143.5 petaflops since its debut on the previous list in June 2018.”

Sierra’s ascendance pushed China’s Sunway TaihuLight supercomputer, installed at the National Supercomputing Center in Wuxi, into third place. Prior to last June, it had held the top position on the TOP500 list for two years with its HPL performance of 93.0 petaflops. TaihuLight was developed by China’s National Research Center of Parallel Computer Engineering & Technology (NRCPC).

Read more at insideHPC

Import your Files from Closed or Obsolete Applications

One of the biggest risks with using proprietary applications is losing access to your digital content if the software disappears or ends support for old file formats. Moving your content to an open format is the best way to protect yourself from being locked out due to vendor lock-in and for that, the Document Liberation Project (DLP) has your back.

According to the DLP’s homepage, “The Document Liberation Project was created to empower individuals, organizations, and governments to recover their data from proprietary formats and provide a mechanism to transition that data into open and standardized file formats, returning effective control over the content from computer companies to the actual authors.”

Read more at OpenSource.com