In the 1990s, Xen was a part of a research project to build a public computing infrastructure on the Internet led by Ian Pratt and Keir Fraser at The University of Cambridge Computer Laboratory. The Xen Project is now one of the most popular open source hypervisors and amasses more than 10 million users, and this October marks our 15th anniversary.
From its beginnings, Xen technology focused on building a modular and flexible architecture, a high degree of customizability, and security. This security mindset from the outset led to inclusion of non-core security technologies, which eventually allowed the Xen Project to excel outside of the data center and be a trusted source for security and embedded vendors (ex. Qubes, Bromium, Bitdefender, Star Labs, Zentific, Dornerworks, Bosch, BAE systems), and alsoa leading hypervisor contenderfor the automotive space.
Pivotal Cloud Foundry (PCF) is a multi-cloud platform for the deployment, management, and continuous delivery of applications, containers, and functions. PCF is a distribution of the open source Cloud Foundry developed and maintained by Pivotal Software, Inc. PCF is aimed at enterprise users and offers additional features and services—from Pivotal and from other third parties—for installing and operating Cloud Foundry as well as to expand its capabilities and make it easier to use.
Pivotal Cloud Foundry abstracts away the process of setting up and managing an application runtime environment so that developers can focus solely on their applications and associated data. Running a single command—cf push—will create a scalable environment for your application in seconds, which might otherwise take hours to spin up manually. PCF allows developers to deploy and deliver software quickly, without needing to manage the underlying infrastructure.
In this post, we’ll explore each of the technologies that make up a typical Pivotal Cloud Foundry cluster and how they work together. If you’re already familiar with PCF architecture, feel free to continue on to part two to dive right into PCF’s key performance metrics.
For the better part of a decade, I have been leading guilds in massively multiplayer role-playing games (MMORPGs). Currently, I lead a guild in Guild Wars 2, and before that, I led progression raid teams in World of Warcraft, while also maintaining a career as a software engineer. As I made the transition into software development, it became clear that the skills I gained in building successful raid groups translated well to building successful tech teams.
In this article, I’ll share how you can build, improve, and maintain your own progression software and/or systems teams. I’ll cover assembling our team, leading the team, optimizing for success, continuously improving, and keeping morale high.
Diversify your team
While values are important to share, the same skills, experience, and roles are not. Ten tanks might be able to get a boss down, eventually, but it is certainly more effective to have diversity. You need people who are skilled and trained in their specific roles to work together, with everyone focusing on what they do best.
As technology infrastructure shifts ever more in the direction of open source, there is rapidly growing need for open source skills. Use of open source software leads to better and faster development, and wider collaboration, and open source skills are a very valuable form of currency in the job market. That’s why it’s worth checking out the Introduction to Open Source Software Development, Git and Linux, an online training course from The Linux Foundation.
The course presents a comprehensive learning path focused on development, Linux systems and Git, the revision control system. It is self-paced and comes with extensive and easily referenced learning materials. Can this course arm you with Linux, development and Git skills that translate directly into value in the workplace and the job market? It absolutely can.
Laying the groundwork
This article is the second in a four-part article series that highlights the major aspects of the training course. The initial article covered the course’s general introduction to working with open source software, with a focus on such essentials as project collaboration, licensing, legal issues and getting help. With that groundwork laid, the course next delves into working with Bash, the standard shell for most Linux distributions.
In addition to comprehensive coverage of how to write effective Bash scripts, the course covers configuring bash, setting aliases, Bash tips and tricks and much more. There is also discussion of shell initialization and customizing the command prompt.
With these topics mastered, students will be able to not only perform basic tasks, but also perform basic customizations. One recommendation: the online course includes many summary slides, useful bullet lists that can be referenced later, graphics and more. It’s definitely worth setting up a desktop folder and regularly saving screenshots of especially useful topics to the folder, with simple names for the screenshots such as “CommandLine.jpg.”
Hands-on learning
The “Labs” modules prompt students to perform specific actions. For example, a Labs module might ask you to set the prompt to a current directory and encourage you follow up by changing the prompt to any other desired configuration. In addition to being self-paced, the course is very focused on getting students to perform meaningful tasks rather than simply reading or watching.
In the course’s discussion of aliases, students learn that they permit custom definitions, and they learn that they can type alias with no arguments to view predefined aliases. Working with redirection and pipes are also covered thoroughly, as is working with special characters and using them to perform specific actions (such as redirecting an input descriptor).
Before proceeding to more advanced topics, the course lays more basic groundwork, much of it focused on Linux. It comprehensively covers filesystem layout, partitions, paths and links, as well as the basics of working with text editors. The layout of the Linux filesystem is covered clearly, showing the main directories and their purposes.
Working with commands and command-line tools are, of course, essential Linux skills, and the course proceeds by delving into task-based instruction on these topics. We will cover these important lessons in the next installment in this series.
Securing your Kubernetes cluster is one thing, keeping it secure is a continuous uphill struggle. However, with the introduction of new features to Kubernetes it is becoming much easier to do both.
Kubernetes (as of version 1.6) has introduced the concept of Role-Based Access Control (RBAC), allows administrators to define policies to restrict the actions of users of your cluster. This means it is possible to create a user with limited access, allowing you to restrict access to resources such as Secrets, or by limiting access of that user to a specific Namespace.
This blog post will not look at how to implement RBAC, as there are many decent sources of information that cover it in vast detail:
Instead, this post will focus on how to ensure your business’s compliance and requirements are actually being adhered to and to ensure that we need to test our applied RBAC objects, to ensure they do what we intend them to do.
Some organizations might not include their Code of Conductin the software source code tree, but the Linux developers aren’t your ordinary group. In the Linux 4.19 announcement, Greg Kroah-Hartman, Linux’s leader for this release and maintainer of the stable branch, added in the Code of Conduct and some minor changes.
Kroah-Hartman explained why the Linux developers felt they needed to add a Code of Conduct:
We all need to remember that, every year new people enter our community with the goal, or requirement, to get stuff done for their job, their hobby, or just because they want to help contribute to the tool that has taken over the world and enabled everyone to have a solid operating system base on which to build their dreams.
.. That goal has been, is now, and will continue to be to produce the best possible code. Some in the community have feared that a Code of Conduct would force Linux to accept poor-quality code just to fulfill some kind of quota. In his keynote speech at the Open Source Europe Summit in Scotland, Jon Corbet, Linux kernel developer and editor of LWN, replied to this: “These fears will prove to be unfounded.”
Today was a gorgeous day in San Francisco. The temperature was in the mid-60’s, the sun was shining, and there was a light breeze. The forecast is for similar weather all week – just in time for Oracle OpenWorld 2018. I flew in to cloud cover, but it burned off between baggage, finding my ride, and the drive from SFO to the city. I…
Click to Read More at Oracle Linux Kernel Development
Back in 2001, a new operating system arrived that promised to change the way users worked with their computers. That platform was BeOS and I remember it well. What I remember most about it was the desktop, and how much it looked and felt like my favorite window manager (at the time) AfterStep. I also remember how awkward and overly complicated BeOS was to install and use. In fact, upon installation, it was never all too clear how to make the platform function well enough to use on a daily basis. That was fine, however, because BeOS seemed to live in a perpetual state of “alpha release.”
That was then. This is very much now.
Now we have haiku
Bringing BeOS to life
An AfterStep joy.
No, Haiku has nothing to do with AfterStep, but it fit perfectly with the haiku meter, so work with me.
The Haiku project released it’s R1 Alpha 4 six years ago. Back in September of 2018, it finally released it’s R1 Beta 1 and although it took them eons (in computer time), seeing Haiku installed (on a virtual machine) was worth the wait … even if only for the nostalgia aspect. The big difference between R1 Beta 1 and R1 Alpha 4 (and BeOS, for that matter), is that Haiku now works like a real operating system. It’s lighting fast (and I do mean fast), it finally enjoys a modicum of stability, and has a handful of useful apps. Before you get too excited, you’re not going to install Haiku and immediately become productive. In fact, the list of available apps is quite limiting (more on this later). Even so, Haiku is definitely worth installing, even if only to see how far the project has come.
Speaking of which, let’s do just that.
Installing Haiku
The installation isn’t quite as point and click as the standard Linux distribution. That doesn’t mean it’s a challenge. It’s not; in fact, the installation is handled completely through a GUI, so you won’t have to even touch the command line.
To install Haiku, you must first download an image. Download this file into your ~/Downloads directory. This image will be in a compressed format, so once it’s downloaded you’ll need to decompress it. Open a terminal window and issue the command unzip ~/Downloads/haiku*.zip. A new directory will be created, called haiku-r1beta1XXX-anyboot (Where XXX is the architecture for your hardware). Inside that directory you’ll find the ISO image to be used for installation.
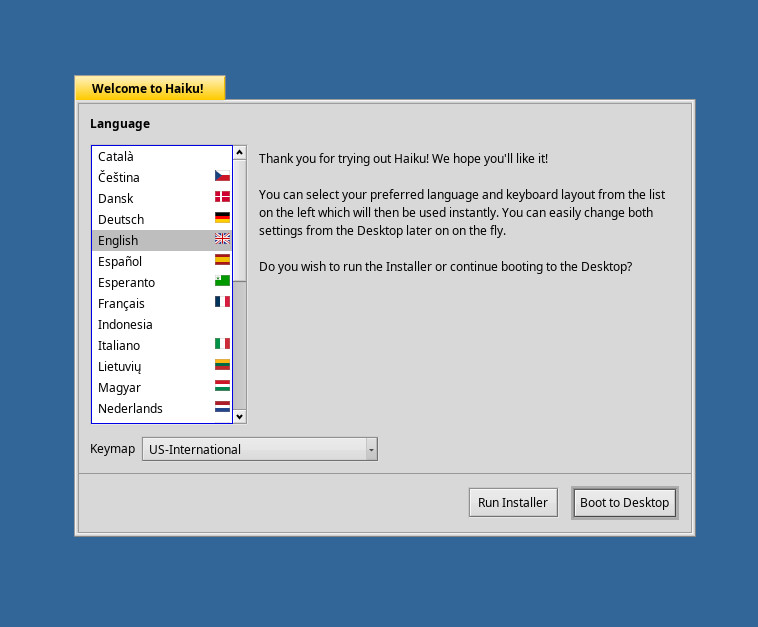
For my purposes, I installed Haiku as a VirtualBox virtual machine. I highly recommend going the same route, as you don’t want to have to worry about hardware detection. Creating Haiku as a virtual machine doesn’t require any special setup (beyond the standard). Once the live image has booted, you’ll be asked if you want to run the installer or boot directly to the desktop (Figure 1). Click Run Installer to begin the process.
Figure 1: Selecting to run the Haiku installer.
The next window is nothing more than a warning that Haiku is beta software and informing you that the installer will make the Haiku partition bootable, but doesn’t integrate with your existing boot menu (in other words, it will not set up dual booting). In this window, click the Continue button.
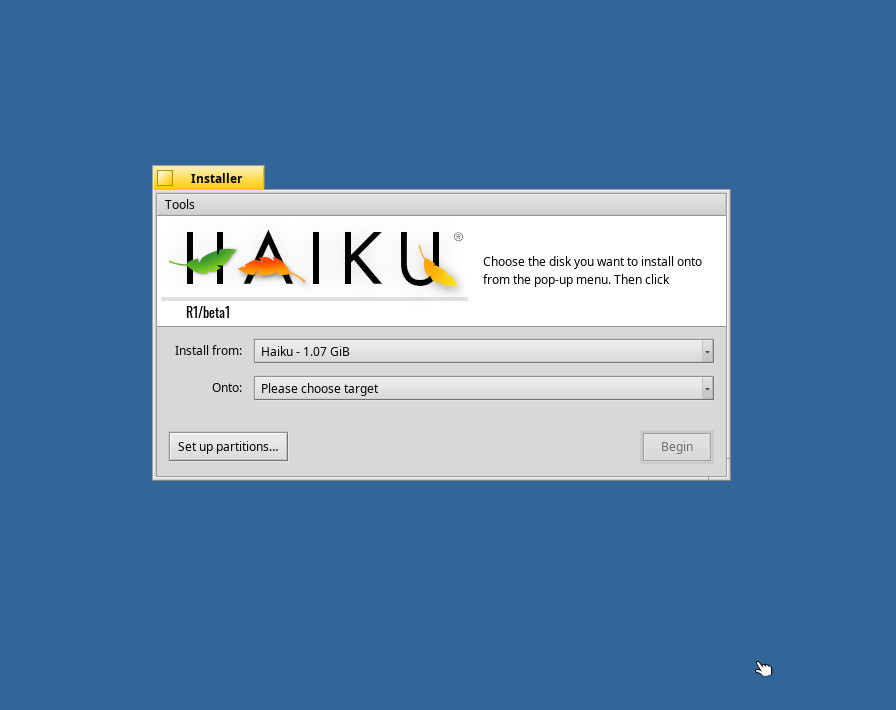
You will then be warned that no partitions have been found. Click the OK button, so you can create a partition table. In the remaining window (Figure 2), click the Set up partitions button.
Figure 2: The Haiku Installer in action.
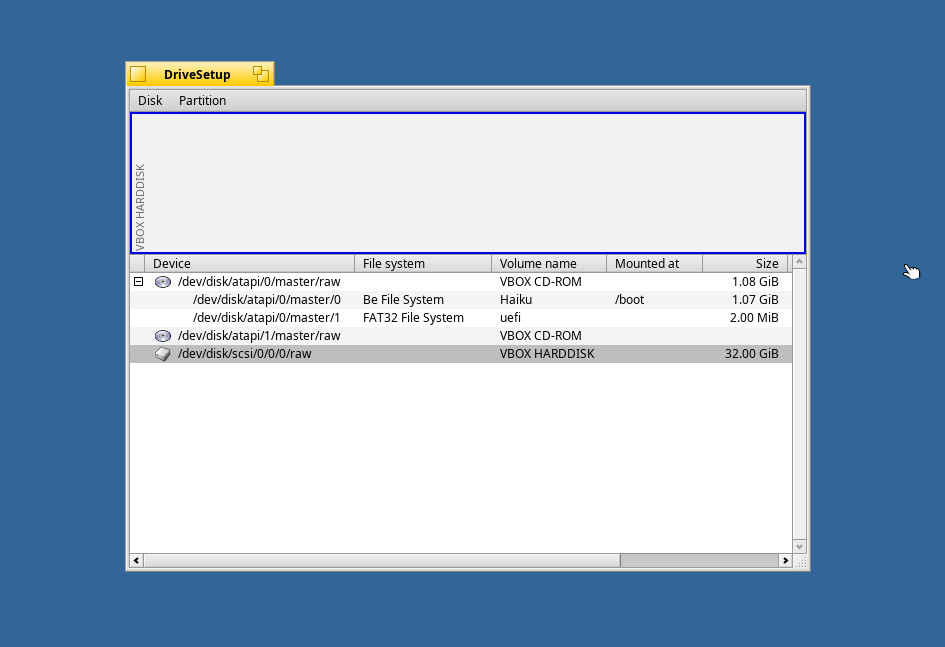
In the resulting window (Figure 3), select the partition to be used and then click Disk > Initialize > GUID Partition Map. You will be prompted to click Continue and then Write Changes.
Figure 3: Our target partition ready to be initialized.
Select the newly initialized partition and then click Partition > Format > Be File System. When prompted, click Continue. In the resulting window, leave everything default and click Initialize and then click Write changes.
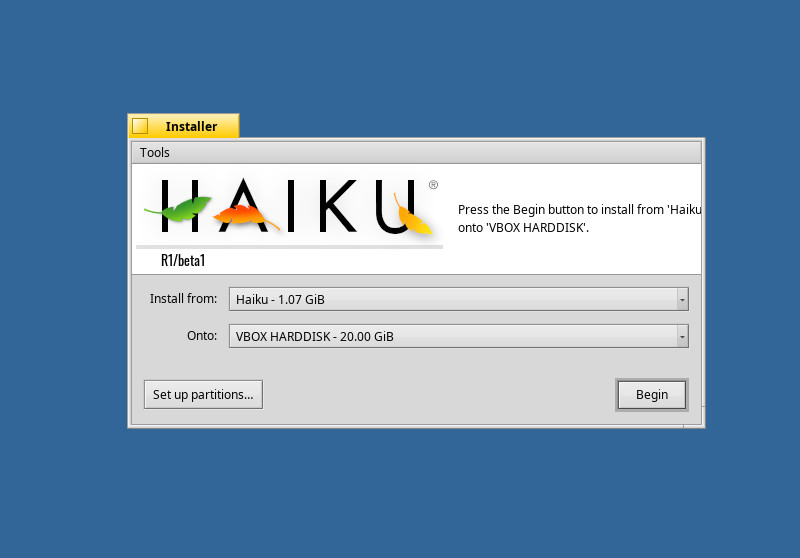
Close the DriveSetup window (click the square in the titlebar) to return to the Haiku Installer. You should now be able to select the newly formatted partition in the Onto drop-down (Figure 4).
Figure 4: Selecting our partition for installation.
After selecting the partition, click Begin and the installation will start. Don’t blink, as the entire installation takes less than 30 seconds. You read that correctly—the installation of Haiku takes less than 30 seconds. When it finishes, click Restart to boot your newly installed Haiku OS.
Usage
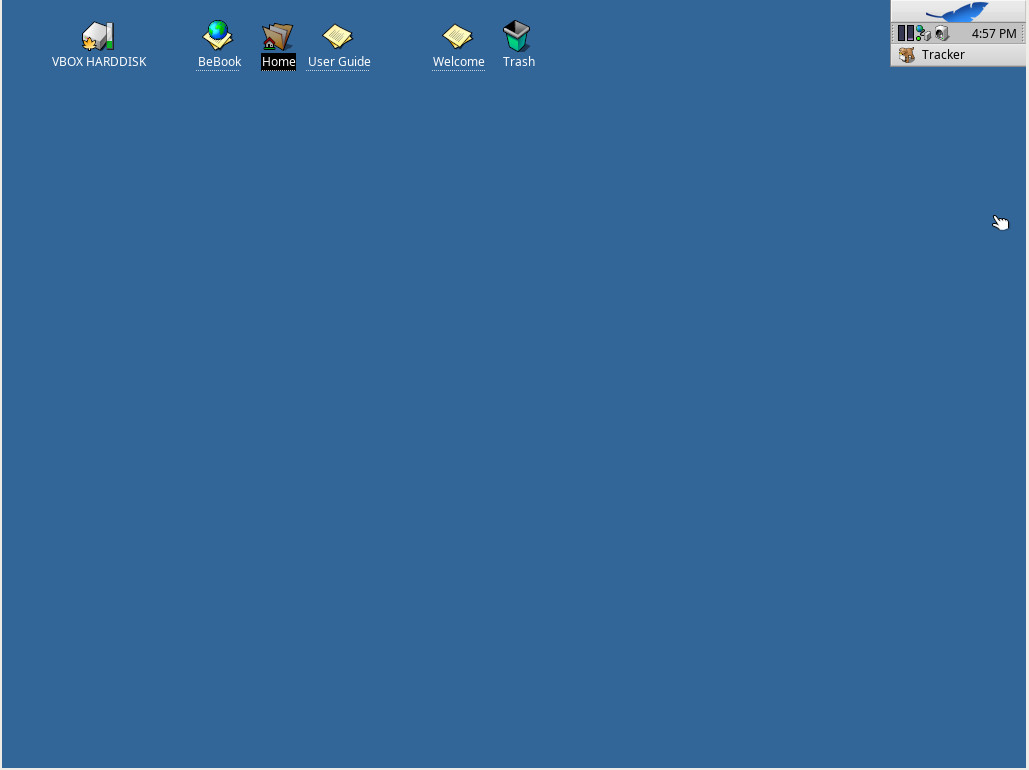
When Haiku boots, it’ll go directly to the desktop. There is no login screen (or even the means to log in). You’ll be greeted with a very simple desktop that includes a few clickable icons and what is called the Tracker(Figure 5).
Figure 5: The Haiku desktop.
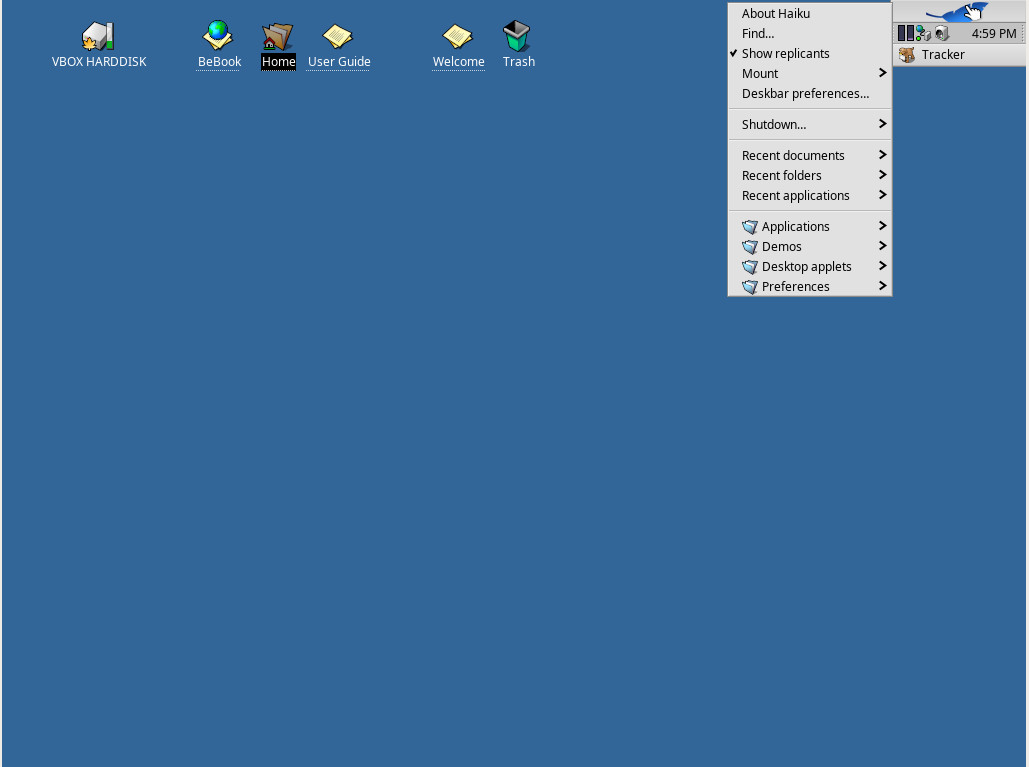
The Tracker includes any minimized application and a desktop menu that gives you access to all of the installed applications. Left click on the leaf icon in the Tracker to reveal the desktop menu (Figure 6).
Figure 6: The Haiku desktop menu.
From within the menu, click Applications and you’ll see all the available tools. In that menu you’ll find the likes of:
ActivityMonitor (Track system resources)
BePDF (PDF reader)
CodyCam (allows you to take pictures from a webcam)
DeskCalc (calculator)
Expander (unpack common archives)
HaikuDepot (app store)
Mail (email client)
MediaPlay (play audio files)
People (contact database)
PoorMan (simple web server)
SoftwareUpdater (update Haiku software)
StyledEdit (text editor)
Terminal (terminal emulator)
WebPositive (web browser)
You might find, in the HaikuDepot, a limited number of available applications. At first blush, what you won’t find are many productivity tools. Missing are office suites, image editors, and more. However, if you uncheck the “Show only featured packages”, you will find a large number of applications can be found. It would be my advice, that this feature be unchecked by default, otherwise users not in the know might seem to think Haiku has a very limited scope of applications available and that this beta version of Haiku is not a true desktop replacement, but a view into the work the developers have put into giving the now-defunct BoOS new life. Even with this tiny hiccup, this blast from the past is certainly worth checking out.
A positive step forward
Based on my experience with BeOS and the alpha of Haiku (all those years ago), the developers have taken a big, positive step forward. Hopefully, the next beta release won’t take as long and we might even see a final release in the coming years. Although Haiku won’t challenge the likes of Ubuntu, Mint, Arch, or Elementary OS, it could develop its own niche following. No matter its future, it’s good to see something new from the developers. Bravo to Haiku.