This week, the latest State of DevOps report by the team at DORA was released. There is a lot of conversations in various social media platforms on what makes an engineering team ‘successful’ and how to increase feature velocity in tech companies and the DORA report does not just rely on anecdotes but surveys the field using rigorous scientific methods and statistical constructs to back or debunk common practices with real data. Because of the strong scientific backbone of their findings, I have been following the report for the last few years. If you have not, the book Accelerate is a great way to learn the findings of the previous four years.
Database management as a part of team performance
One of the new things in this year’s report is expanding behaviors by high performing teams to more than just ‘development’ practices. This year expands the view on high performing engineering organizations to how these organizations handle database management.
We discovered that good communication and comprehensive configuration management that includes the database matter. Teams that do well at continuous delivery store database changes as scripts in version control and manage these changes in the same way as production application changes.
Is that service still running? What application is using that TCP port? These questions and more can be answered easily by sysadmins who know simple Linux commands.
If you’re a system administrator responsible for Linux servers, it’s essential that you master the Bash shell, especially the commands that show what software is running. That’s necessary for troubleshooting, obviously, but it is always a good idea to know what’s happening on a server for other reasons—not the least of which is security awareness.
A project to build the $50 phone has been launched on Crowd Supply, promising to deliver “an open-source, Linux-powered” handset with “no carrier locks, bloated apps, or data mining” and that “doesn’t depend on big companies”.
The ZeroPhone will be based around the tiny Raspberry Pi Zero, an Arduino microcontroller, and the ESP8266 Wi-Fi module.
To get the most of the phone, users will need to be technically proficient. While the splash page for the project says the likes of IR receivers and the Pi’s 5 and eight-megapixel cameras can be wired up the phone’s electronic interfaces, this will require users to hook up the electronics themselves.
Open source software programs play an important role in how DevOps and open source best practices are adopted by organizations, according to a survey conducted by The New Stack and The Linux Foundation (via the TODO Group). By implementing open source best practices, organizations are helping developers become both more productive and more structured in how they manage the often abundant open source software their businesses rely on.
Thousands of open source projects have participants from organizations with open source offices that consume — and in turn contribute back to — any number of projects. The interest is showing enough results to merit companies considering deeper and more focused approaches to the development of the open source offices they manage.
Open source programs generally have three core characteristics: they 1) execute and communicate the organization’s open source software strategy, 2) maintain license compliance, and, most of all, 3) foster open source culture.
At The Linux Foundation‘s Open Source Summit North America in Vancouver, Linus Torvalds, Linux’s creator, and Dirk Hohndel, VMware VP and chief open source officer, had a wide-ranging conversation about Linux security, open-source developer, and quantum computing.
Torvalds would really like his work to get back to being boring. It hasn’t been lately because of Intel’s CPU Meltdown and Spectre security bugs. The root cause behind these security holes was speculative execution.
In speculative execution, when a program does a calculation, which might go several ways, the processor assumes several results and works on them. If it’s wrong, it goes back to the beginning and restarts with the correct data. Because CPUs are so fast these days, it’s much quicker to do this than to have the hardware sit idle waiting for data.
Torvalds “loves speculative execution. CPUs must do this.” But, Torvalds is annoyed that “people didn’t think about the problems of taking shortcuts with speculative execution. We knew speculative work that wasn’t used had to be thrown away.” It wasn’t. That problem is now baked in most modern processors. The long-term fix is a new generation of Intel CPUs.
If you have any experience with programming or just altering config files, I’m sure you’ve been dumbstruck by how one change you’ve made along the line affects the whole project. Identifying and isolating the problem without a version control system is often time- and energy-intensive, involving retracing your steps and checking all changes made before the unwanted behavior first occurred. A version control system is designed explicitly to make that process easier and provide readable comparisons between versions of text.
Another great feature that distributed version control systems such as git provide is the power of lateral movement. Traditionally, a team of programmers would implement features linearly. This meant pulling the code from the trusted source (server) and developing a section before pushing the altered version back upstream to the server. With distributed systems, every computer maintains a full repository, which means each programmer has a full history of additions, deletions and contributors as well as the ability to roll back to a previous version or break away from the trusted repository and fork the development tree (which I discuss later).
Quick Start Guide
The great thing about git is there’s so little you need to know! Without further ado, let’s begin with the most important commands.
On August 10, the Academy of Motion Picture Arts & Sciences—the same organization responsible for the Academy Awards (also known as the Oscars), not exactly an industry that’s renowned for its openness—teamed up with the Linux Foundation to form the Academy Software Foundation(ASWF). The purpose of this organization is “to increase the quality and quantity of contributions to the content creation industry’s open source software base.” That’s right; the film industry has put together an organization in support of open source software.
According to a presentation shared during this year’s SIGGRAPH conference, code repositories will be hosted on GitHub, use Jenkins and Nexus Repository Manager for automation and continuous integration, and have much clearer processes for people to submit bug reports and pull requests. Even more important, any project that’s accepted for inclusion in the ASWF will still maintain its autonomy when it comes to development. Core developers still decide what patches to include and even what license to release under, so long as it’s OSI-approved.
The foundation hasn’t yet announced any official projects under its management, but it’s still early days. Prime candidates to start, though, look to be the libraries that were born from the industry. I would expect projects like OpenEXR, OpenVDB, and OpenColorIO to be first in line.
Every so often I run into a Linux distribution that reminds me of the power of open source software. SharkLinux is one such distribution. With a single developer creating this project, it attempts to change things up a bit. Some of those changes will be gladly welcomed by new users, while scoffed at by the Linux faithful. In the end, however, thanks to open source software, the developer of SharkLinux has created a distribution exactly how he would want it to be. And thatmy friends, is one amazing aspect of open source. We get to do it our way.
But what is SharkLinux and what makes it stand out? I could make one statement about SharkLinux and end this now. The developer of SharkLinux reportedly developed the entire distribution using only an Android phone. That, alone, should have you wanting to give SharkLinux a go.
Let’s take a look at this little-known distribution and see it’s all about.
What Exactly is SharkLinux?
First off, SharkLinux is based on Ubuntu and makes use of a custom Mate/Xfce desktop. Outside of the package manager, the similarities between SharkLinux and Ubuntu are pretty much non-existent. Instead of aiming for the new or average user, the creator has his eyes set on developers and other users who need to lean heavily on virtualization. The primary feature set for SharkLinux includes:
KVM hypervisor
Full QEMU Utilities
Libvirt and Virtual Machine Manager
Vagrant (mutate and libvirt support)
LXD/LXC/QLc/LXDock
Docker/Kubernetes
VMDebootstrap
Virt-Install/Convert
Launch Local Cloud Images
Full System Containers GUI Included
Kimchi – WebVirtCloud – Guacamole
Vagrant Box Conversion
Many Dashboards, Admin Panels
LibGuestFS and other disk/filesystem tools
Nested Virtualization (hardware depending)
Alien (rpm) LinuxBrew (Mac) Nix Package Manager
Powershell, Upstream WINE (Win)
Cloud Optimized Desktop
Dozens of wrappers, automated install scripts, and expansion packs
Guake terminal
Kernel Options v4.4** -> v4.12*
Clearly, SharkLinux isn’t built for those who simply need a desktop, browser, and office suite. This includes tools for a specific cross section of users. Let’s dive in a bit deeper.
Post Install
As per usual, I don’t want to waste time on the installation of another Linux distribution, simply because that process has become so easy. It’s point and click, fill out a few items, and wait for 5-10 minutes for the call to reboot.
Once you’ve logged into your newly installed instance of SharkLinux, you’ll immediately notice something different. The “Welcome to SharkLinux” window is clearly geared toward users with a certain level of knowledge. Tasks such as Automatic Maintenance, the creation of swap space, sudo policy, and more are all available (Figure 1).
Figure 1: The SharkLinux Welcome to window.
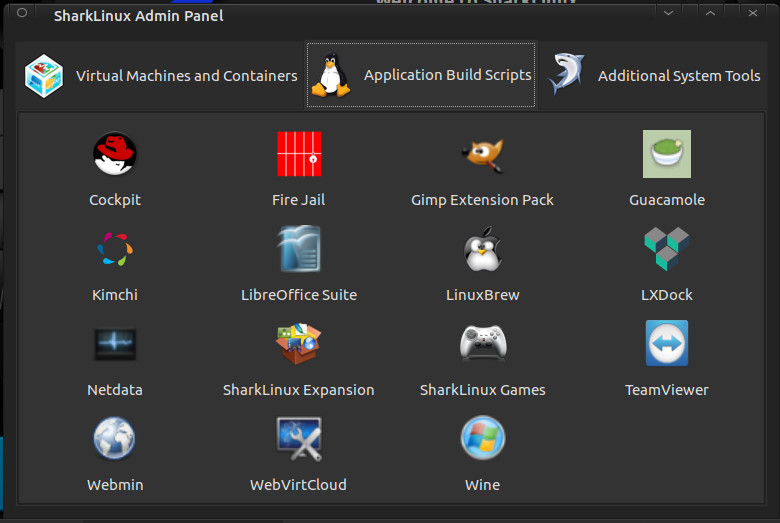
The first thing you should do is click the SharkLinux Expansion button. When prompted, click Yes to install this package. Without this package installed, absolutely no upstream packages are enabled for the system. Until you install the expansion, you’ll be missing out on a lot of available software. So install the SharkLinux Expansion out of the gate.
Next you’ll want to install the SharkExtras. This makes it easy to install other packages (such as Bionic, MiniKube, Portainer, Cockpit, Kimchi, Webmin, Gimp Extension Pack, Guacamole, LXDock, Mainline Kernel, Wine, and much more (Figure 2).
Figure 2: Click on a package and OK its installation.
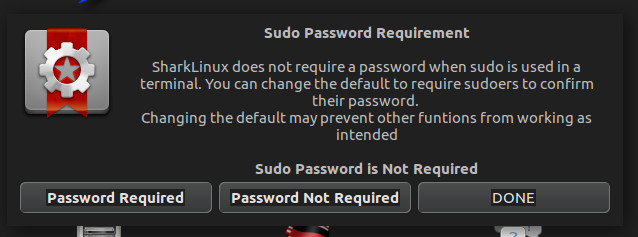
Sudo Policy
This is where things get a bit dicey for the Linux faithful. I will say this: I get why the developer has included this. Out of the box, SharkLinux does require a sudo password, but with the Sudo Policy editor, you can easily set up the desktop such that sudo doesn’t require a password (Figure 3).
Figure 3: Changing the sudo password policy in SharkLinux.
Click on the Sudo Policy button in the Welcome to SharkLinux window and then either click Password Required or Password Not Required. Use this option with great caution, as you’d reduce the security of the desktop by disabling the need for a sudo password.
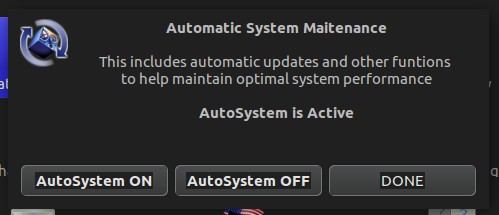
Automatic Maintenance
Another interesting feature, found in the Welcome to SharkLinux window is Automatic Maintenance. If you turn this feature on (Figure 4), functions like system updates will occur automatically (without user interaction). For those that often forget to regularly update their system, this might be a good idea. If you’re like me, and prefer to run updates on a daily basis manually, you’ll probably opt to skip this feature.
Figure 4: Enabling Automatic System Maintenance.
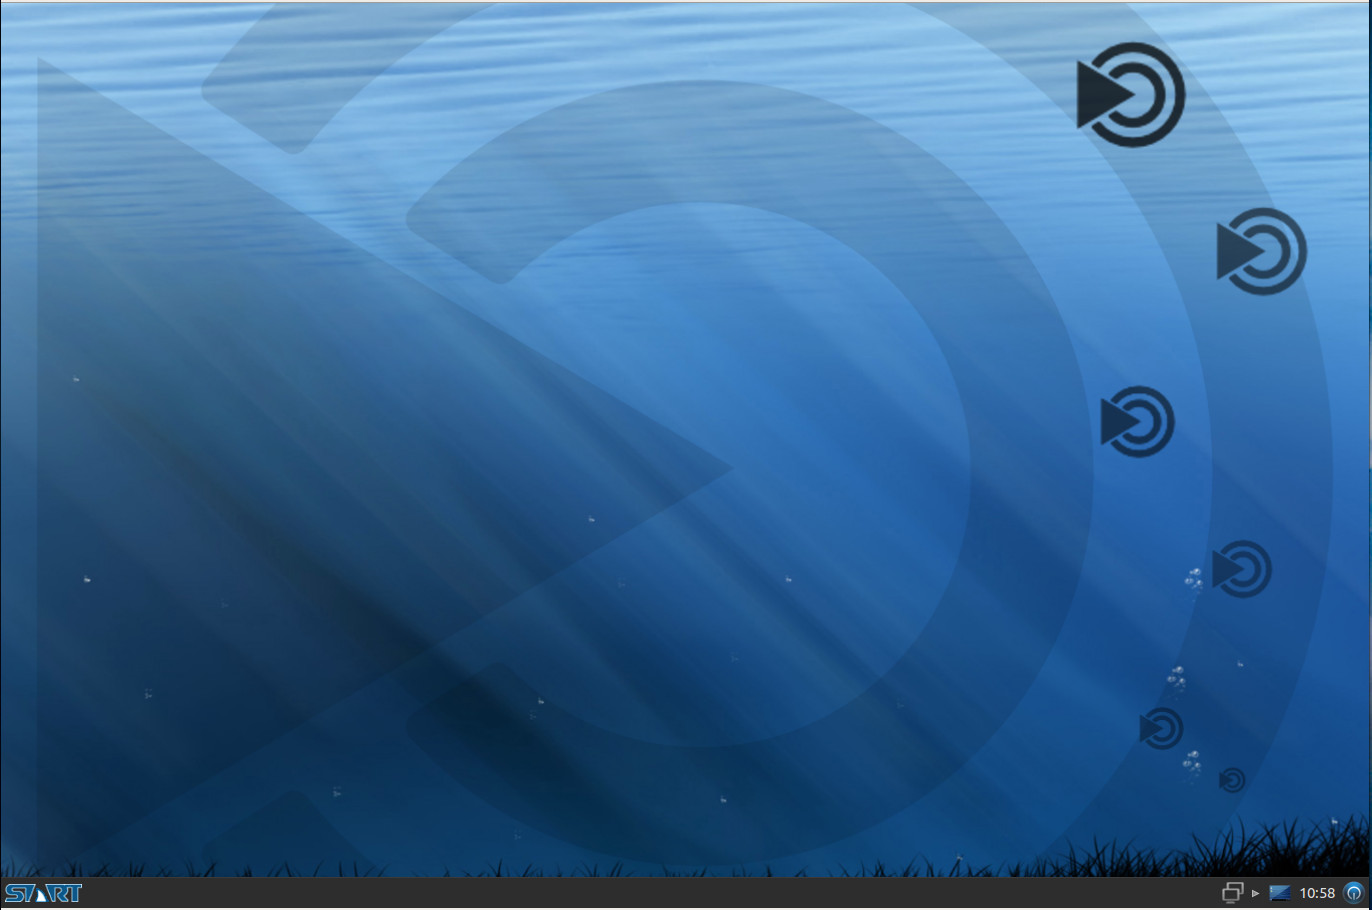
After taking care of everything you need in the Welcome to SharkLinux window, close it out and you’ll find yourself on the desktop (Figure 5).
Figure 5: The default SharkLinux desktop.
At this point, you can start using SharkLinux as you would any desktop distribution, the difference being you’ll have quite a bit more tools for virtualization and development at your disposal. One tiny word of warning: You will notice, by default, the desktop wallpaper is set to randomly change. In that mix of wallpapers, the developer has added one particular wallpaper that may not be quite suitable for a work environment (it’s nothing too drastic, just a woman posing seductively). You can remove that photo from the Appearance Preferences window (should you choose to do so). Beyond that, SharkLinux works as well as any desktop Linux distribution you can find.
One Quirky Distribution
Of all the Linux distributions I have used over the years (and I have used PLENTY), SharkLinux might well be one of the more quirky releases. That doesn’t mean it’s one to avoid. Quite the opposite. I highly recommend everyone interested in seeing what a single developer can do with the Linux platform give SharkLinux a try. I promise you, you’ll be glad you gave it a go. SharkLinux is fun, of that there is no doubt. It’s also a flavor of desktop Linux that shows you what is possible, thanks to open source.
Learn more about Linux through the free “Introduction to Linux” course from The Linux Foundation and edX.
Accurately identifying the license for open source software is important for license compliance. However, determining the license can sometimes be difficult due to a lack of information or ambiguous information. Even when there is some licensing information present, a lack of consistent ways of expressing the license can make automating the task of license detection very difficult, thus requiring significant amounts of manual human effort. There are some commercial tools applying machine learning to this problem to reduce the false positives, and train the license scanners, but a better solution is to fix the problem at the upstream source.
In 2013, the U-boot project decided to use the SPDX license identifiers in each source file instead of the GPL v2.0 or later header boilerplate that had been used up to that point. The initial commit message had an eloquent explanation of reasons behind this transition.
Dandified yum, better known as DNF, is a software package manager for RPM-based Linux distributions that installs, updates, and removes packages. It was first introduced in Fedora 18 in a testable state (i.e., tech preview), but it’s been Fedora’s default package manager since Fedora 22.
Since it is the next-generation version of the traditional yum package manager, it has more advanced and robust features than you’ll find in yum. Some of the features that distinguish DNF from yum are:
Dependency calculation based on modern dependency-solving technology